Moist & Healthy Banana Zucchini Bread

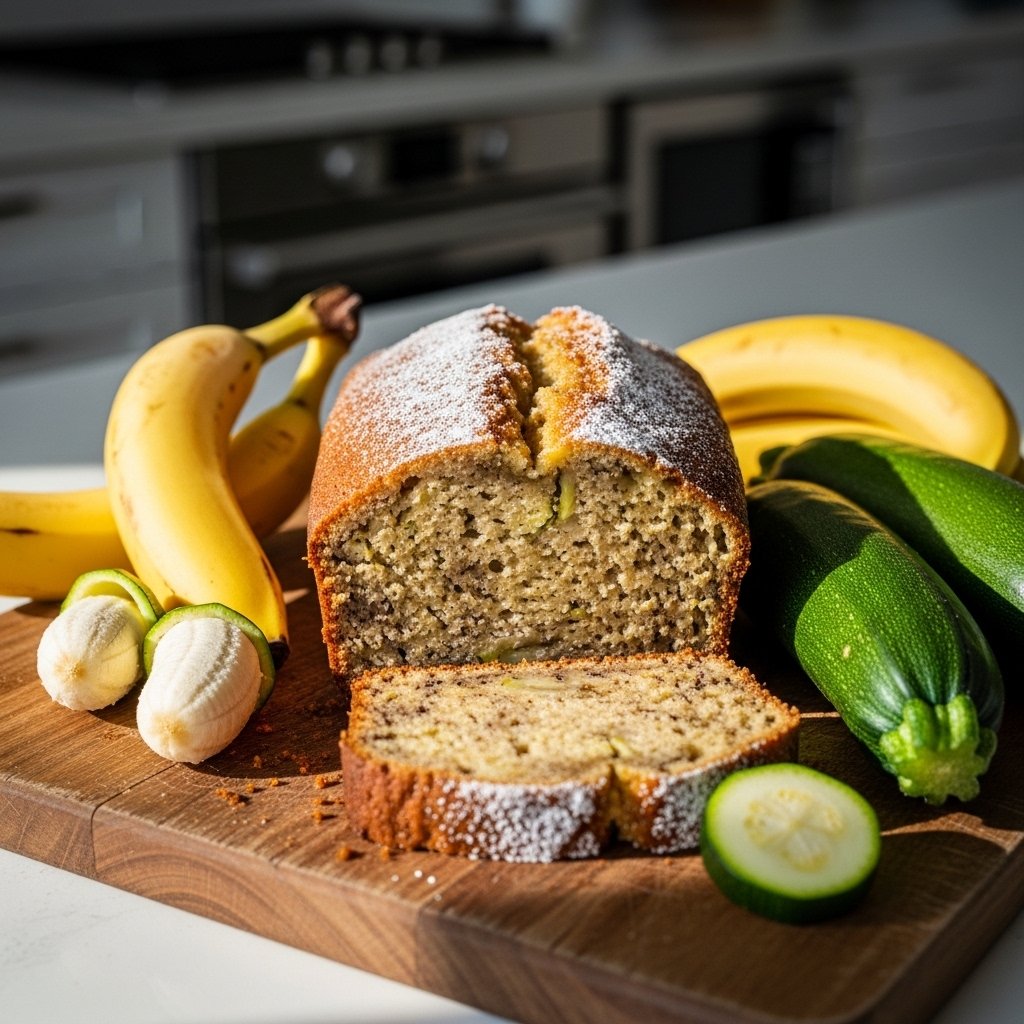
If you’re searching for a baked good that strikes the perfect balance between indulgent and nourishing, this moist & healthy banana zucchini bread is exactly what you need. It’s soft, tender, naturally sweetened, and packed with wholesome ingredients that make every slice feel like a treat you can feel good about. Whether you’re trying to use up overripe bananas or sneak more veggies into your diet, this recipe checks all the boxes.

What makes this bread truly special is how seamlessly the zucchini blends into the batter. You won’t taste it, but it adds incredible moisture and a subtle freshness that takes traditional banana bread to the next level. This is the kind of recipe you’ll find yourself making again and again—simple, reliable, and absolutely delicious.

Moist & Healthy Banana

Why You’ll Love This Moist & Healthy Banana Zucchini Bread

There are plenty of reasons this moist & healthy banana zucchini bread deserves a spot in your weekly baking rotation. First, it’s incredibly easy to make—no fancy equipment required. Second, it uses simple pantry staples, making it accessible anytime a craving hits.

Even better, it’s a healthier twist on classic quick bread. Thanks to ripe bananas and shredded zucchini, you get natural sweetness and moisture without needing excessive sugar or oil. It’s perfect for breakfast, an afternoon snack, or even a light dessert.

  • Naturally sweetened with bananas
  • Packed with hidden veggies
  • Soft, moist, and tender texture
  • Freezer-friendly and meal prep approved
  • Kid-friendly and picky-eater approved
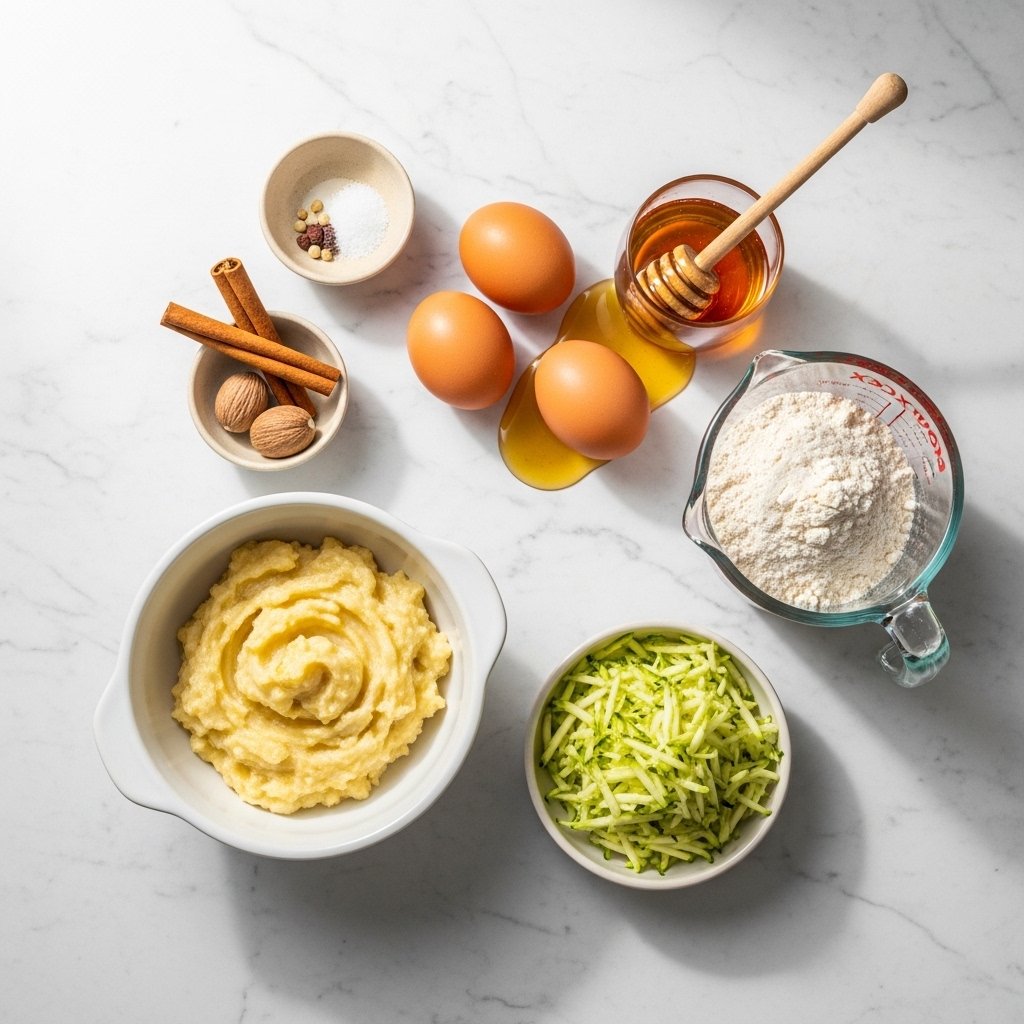
Ingredients

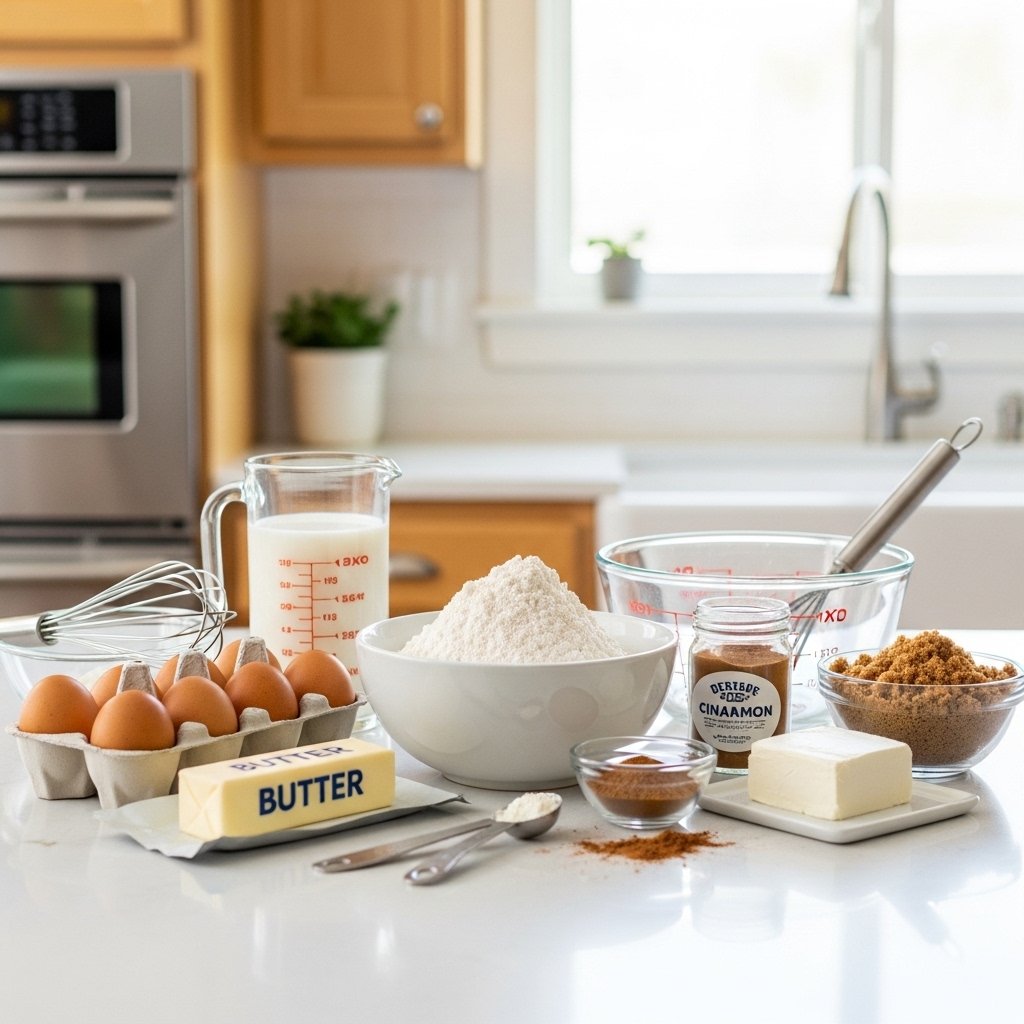
To make this delicious moist & healthy banana zucchini bread, you’ll need the following ingredients:

  • 2 ripe bananas (mashed)
  • 1 cup grated zucchini (excess moisture squeezed out)
  • 1 ½ cups whole wheat or all-purpose flour
  • ½ cup honey or maple syrup
  • 2 large eggs
  • ⅓ cup coconut oil or olive oil
  • 1 teaspoon baking soda
  • 1 teaspoon cinnamon
  • ½ teaspoon salt
  • 1 teaspoon vanilla extract
  • Optional: ½ cup chopped walnuts or chocolate chips

Ingredient Notes

Understanding your ingredients is key to achieving the best moist & healthy banana zucchini bread possible. Use very ripe bananas—the browner, the better—as they provide natural sweetness and a deeper flavor. When it comes to zucchini, be sure to squeeze out excess water using a clean kitchen towel. This step prevents the bread from becoming too dense or soggy.

If you’re looking to make the recipe even healthier, opt for whole wheat flour. Prefer a lighter texture? A mix of whole wheat and all-purpose flour works beautifully. And don’t skip the cinnamon—it enhances the natural sweetness and adds warmth to every bite.

Step-by-Step Instructions

Making this moist & healthy banana zucchini bread is straightforward and beginner-friendly:

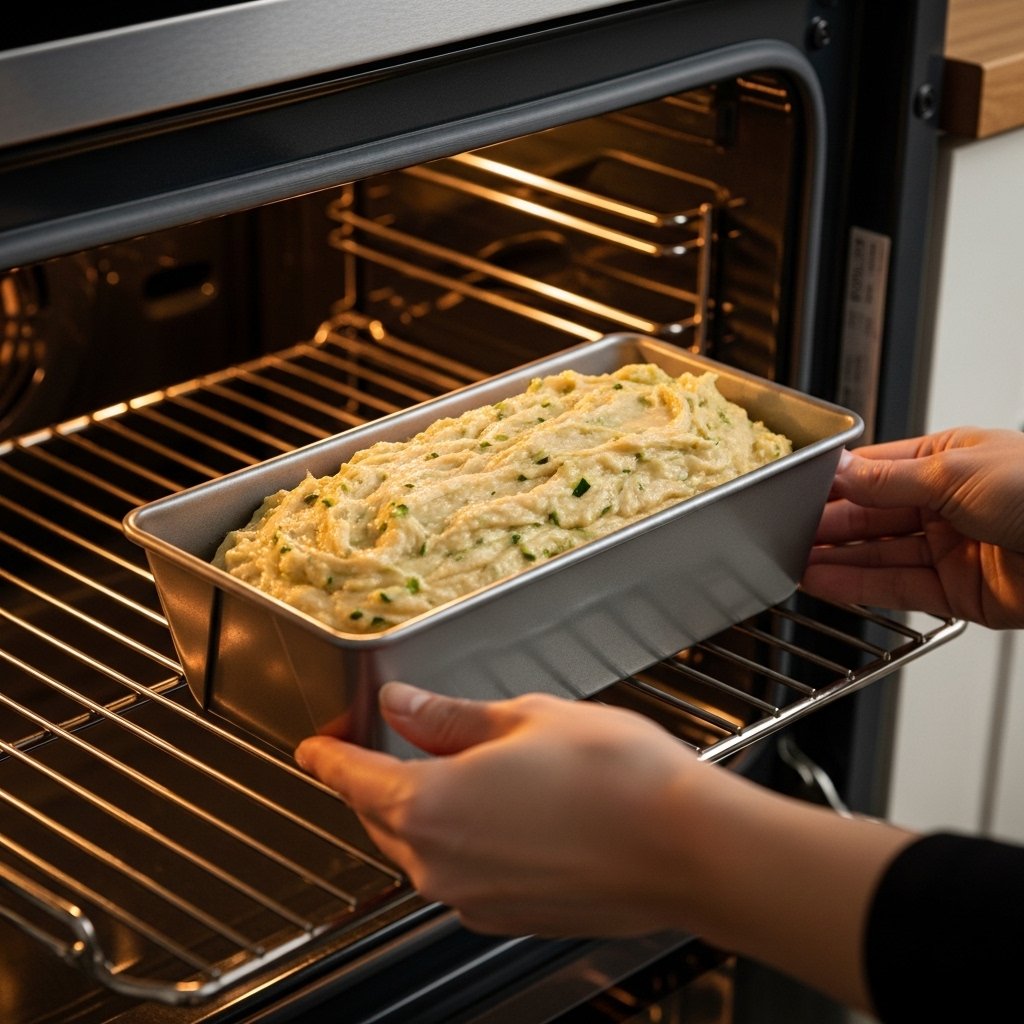
1. Prepare Your Oven and Pan

Preheat your oven to 350°F (175°C). Grease a standard loaf pan or line it with parchment paper.

2. Mix Wet Ingredients

In a large bowl, mash the bananas thoroughly. Add eggs, oil, honey (or maple syrup), and vanilla extract. Whisk until smooth.

3. Add Zucchini

Stir in the grated zucchini, ensuring it’s evenly distributed.

4. Combine Dry Ingredients

In a separate bowl, whisk together flour, baking soda, cinnamon, and salt.

5. Bring It All Together

Gradually fold the dry ingredients into the wet mixture. Do not overmix—this keeps the bread tender.

6. Bake

Pour the batter into your prepared pan and bake for 50–60 minutes, or until a toothpick inserted in the center comes out clean.

7. Cool and Serve

Let the bread cool in the pan for 10 minutes, then transfer to a wire rack.

Tips for Perfect Results

Getting the perfect moist & healthy banana zucchini bread is all about technique. Avoid overmixing the batter, as it can lead to a dense loaf. Always measure your flour correctly—spoon it into the measuring cup and level it off for accuracy.

Another key tip is to monitor baking time closely. Every oven is different, so start checking your bread at the 50-minute mark. If the top browns too quickly, loosely cover it with foil.

Variations to Try

This recipe is incredibly versatile, making it easy to customize your moist & healthy banana zucchini bread:

  • Add chocolate chips for a sweeter twist
  • Mix in chopped walnuts or pecans for crunch
  • Swap cinnamon for pumpkin spice for a seasonal flavor
  • Use gluten-free flour for a gluten-free version
  • Add shredded coconut for extra texture

Each variation brings a new dimension to the bread while keeping it wholesome and delicious.

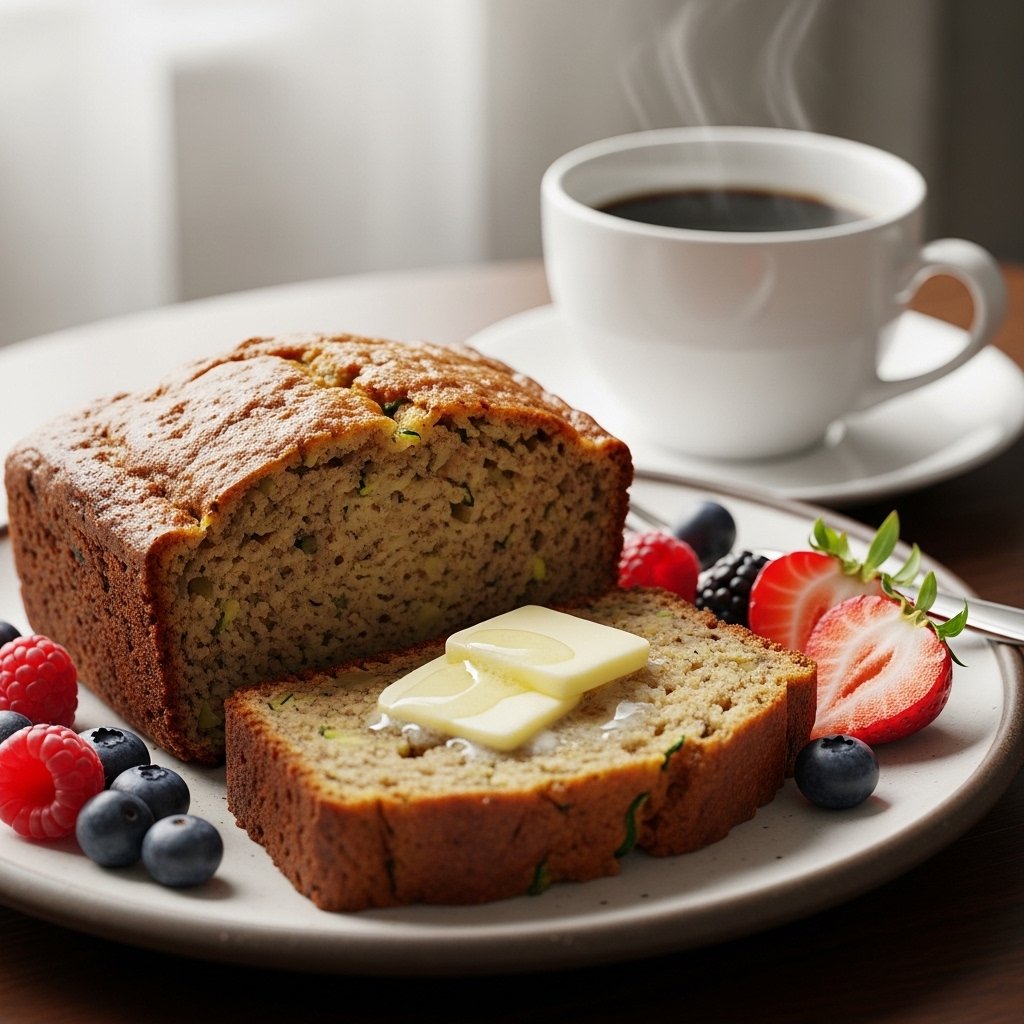
What to Serve With Banana Zucchini Bread

This moist & healthy banana zucchini bread pairs wonderfully with a variety of accompaniments. Enjoy it warm with a pat of butter, a drizzle of honey, or even a spread of cream cheese for added richness.

For a complete breakfast, serve it alongside Greek yogurt and fresh fruit. It also pairs beautifully with coffee or tea, making it an ideal mid-morning or afternoon snack.

Storage & Reheating Tips

One of the best things about this moist & healthy banana zucchini bread is how well it stores. Keep it in an airtight container at room temperature for up to 3 days, or refrigerate for up to a week.

For longer storage, wrap slices individually and freeze for up to 3 months. To reheat, simply microwave for 20–30 seconds or warm in the oven for a freshly baked feel.

Common Mistakes to Avoid

Even a simple recipe like moist & healthy banana zucchini bread can go wrong if you’re not careful. One common mistake is not draining the zucchini properly, which can lead to excess moisture. Another is overbaking, which dries out the bread.

Also, avoid using underripe bananas—they lack sweetness and flavor. And remember, gentle mixing is key to maintaining that soft, moist texture.

FAQs

Can I make banana zucchini bread vegan?

Yes! Replace the eggs with flax eggs (1 tablespoon flaxseed + 2.5 tablespoons water per egg) for a vegan-friendly version.

Do I need to peel the zucchini?

No, the skin is tender and blends seamlessly into the bread while adding nutrients.

Can I reduce the sweetener?

Absolutely. The bananas already add sweetness, so you can slightly reduce honey or maple syrup if preferred.

Why is my bread too dense?

This usually happens from overmixing the batter or using too much flour. Be gentle when combining ingredients.

Final Thoughts

This moist & healthy banana zucchini bread is more than just a recipe—it’s a dependable go-to that brings comfort, nutrition, and flavor together in one loaf. Whether you’re baking for your family, meal prepping for the week, or simply craving something wholesome and delicious, this bread delivers every time.

Once you try it, don’t be surprised if it becomes a staple in your kitchen. It’s easy, adaptable, and irresistibly moist—everything a great quick bread should be.

Luscious Creamy Chicken Salad Wraps: A Delightful Portable Meal!

If you’re looking for a satisfying, easy-to-make meal that you can take anywhere, these Luscious Creamy Chicken Salad Wraps: A Delightful Portable Meal! are exactly what you need. They’re packed with tender chicken, a creamy, flavorful dressing, and crisp vegetables—all wrapped in a soft tortilla for ultimate convenience.

This recipe is perfect for lunchboxes, picnics, road trips, or busy workdays. It delivers comfort, freshness, and protein in every bite, making it one of those go-to recipes you’ll find yourself making again and again.

Luscious Creamy Chicken Salad

Why You’ll Love This Recipe

These Luscious Creamy Chicken Salad Wraps: A Delightful Portable Meal! are loved for their balance of flavor, texture, and convenience.

Here’s why they stand out:

  • Creamy, rich, and satisfying
  • Quick and easy to prepare
  • Perfect for meal prep
  • Portable and mess-free
  • Customizable with your favorite ingredients

They’re ideal when you want something hearty without spending too much time in the kitchen.

Ingredients

To make these Luscious Creamy Chicken Salad Wraps: A Delightful Portable Meal!, you’ll need:

  • 2 cups cooked chicken (shredded or diced)
  • 4 large tortillas (flour or whole wheat)
  • 1 cup lettuce (chopped)
  • ½ cup celery (finely chopped)
  • ¼ cup red onion (finely diced)

For the creamy dressing:

  • ½ cup mayonnaise
  • 2 tablespoons Greek yogurt
  • 1 teaspoon Dijon mustard
  • 1 tablespoon lemon juice
  • Salt and pepper to taste

Optional add-ins:

  • Grapes or dried cranberries
  • Chopped nuts (walnuts or pecans)

Ingredient Notes

The creamy base is what makes these Luscious Creamy Chicken Salad Wraps: A Delightful Portable Meal! truly shine. Combining mayonnaise with Greek yogurt gives you a rich yet slightly lighter texture, while Dijon mustard and lemon juice add brightness and depth.

Crunchy celery and onion provide contrast, and the optional sweet add-ins like grapes or cranberries bring a subtle sweetness that pairs beautifully with the savory chicken.

Step-by-Step Instructions

Making these Luscious Creamy Chicken Salad Wraps: A Delightful Portable Meal! is simple and quick:

1. Prepare the Dressing

In a bowl, mix mayonnaise, Greek yogurt, mustard, lemon juice, salt, and pepper.

2. Make the Chicken Salad

Add chicken, celery, and onion to the bowl and mix until well coated.

3. Taste & Adjust

Adjust seasoning as needed for balance.

4. Assemble the Wraps

Lay out tortillas and add lettuce, then spoon the chicken salad on top.

5. Wrap & Roll

Fold in the sides and roll tightly into a wrap.

6. Slice & Serve

Cut in half and enjoy immediately.

Tips for Perfect Results

To make your Luscious Creamy Chicken Salad Wraps: A Delightful Portable Meal! even better:

  • Use chilled chicken for best texture
  • Don’t overdress the salad
  • Let the mixture chill before assembling for enhanced flavor
  • Use fresh, crisp lettuce

These tips ensure a balanced and delicious wrap every time.

Variations

These Luscious Creamy Chicken Salad Wraps: A Delightful Portable Meal! are highly versatile.

Flavor Variations

  • Add curry powder for a unique twist
  • Mix in fresh herbs like dill or parsley

Healthier Options

  • Use all Greek yogurt instead of mayo
  • Choose whole wheat or low-carb wraps

Add More Texture

  • Include apples for crunch
  • Add sunflower seeds

You can easily customize this recipe to match your taste preferences.

What to Serve With It

These Luscious Creamy Chicken Salad Wraps: A Delightful Portable Meal! pair well with:

  • Fresh fruit
  • Chips or crackers
  • Side salad
  • Iced tea or lemonade

They’re perfect for a light, balanced meal.

Storage & Reheating

To store your Luscious Creamy Chicken Salad Wraps: A Delightful Portable Meal!:

  • Store chicken salad separately in an airtight container for up to 3 days
  • Assemble wraps fresh for best texture
  • Keep refrigerated at all times

No reheating is needed—these wraps are best served cold.

Common Mistakes to Avoid

Avoid these common mistakes:

  • Using warm chicken (affects texture)
  • Adding too much dressing
  • Not seasoning properly
  • Overfilling the wraps

Keeping everything balanced is key to success.

FAQs

Can I make the chicken salad ahead of time?

Yes! It actually tastes better after chilling for a few hours.

Can I use rotisserie chicken?

Absolutely—it’s a great time-saving option.

Are these wraps healthy?

They can be! Use more yogurt and less mayo for a lighter version.

How do I keep wraps from getting soggy?

Add lettuce as a barrier and assemble just before serving.

Final Thoughts

These Luscious Creamy Chicken Salad Wraps: A Delightful Portable Meal! are the perfect combination of convenience, flavor, and comfort. They’re easy to make, endlessly customizable, and ideal for busy lifestyles.

Once you try them, they’ll quickly become one of your favorite go-to recipes for a quick and satisfying meal.

Sizzling BLT Wraps: A Grilled Delight for Your Taste Buds!

If you love the classic BLT sandwich, you’re going to fall head over heels for these Sizzling BLT Wraps: A Grilled Delight for Your Taste Buds! This recipe takes everything you already love—crispy bacon, fresh lettuce, juicy tomatoes—and wraps it all in a warm tortilla, then grills it to golden perfection.

The result? A crispy, melty, flavor-packed wrap that’s perfect for lunch, dinner, or even a quick snack. It’s simple, satisfying, and just a little bit indulgent in the best possible way.

Sizzling BLT Wraps

Why You’ll Love This Recipe

These Sizzling BLT Wraps: A Grilled Delight for Your Taste Buds! are everything you want in a comfort meal with a modern twist.

Here’s why they’re a must-try:

  • Crispy on the outside, fresh and juicy inside
  • Quick and easy to prepare
  • Perfect for lunch or dinner
  • Packed with classic BLT flavor
  • Easily customizable

Once you try them grilled, you may never go back to a regular BLT sandwich.

Ingredients

To make these Sizzling BLT Wraps: A Grilled Delight for Your Taste Buds!, you’ll need:

  • 4 large flour tortillas
  • 8 slices bacon (cooked crispy)
  • 1 cup romaine lettuce (chopped)
  • 1–2 tomatoes (sliced)
  • ½ cup shredded cheddar or mozzarella cheese
  • ¼ cup mayonnaise

Optional additions:

  • Avocado slices
  • Cooked chicken for extra protein
  • Garlic aioli instead of mayo

Ingredient Notes

The key to amazing Sizzling BLT Wraps: A Grilled Delight for Your Taste Buds! is using high-quality, fresh ingredients. Crispy bacon is essential—it provides that smoky crunch that defines the dish.

Fresh, crisp lettuce and ripe tomatoes add brightness and balance, while cheese melts inside the wrap to bring everything together. The creamy spread enhances every bite, so don’t skip it.

Step-by-Step Instructions

Making these Sizzling BLT Wraps: A Grilled Delight for Your Taste Buds! is simple:

1. Cook the Bacon

Cook bacon until crispy, then drain on paper towels.

2. Prep the Fillings

Chop lettuce, slice tomatoes, and shred cheese if needed.

3. Assemble the Wraps

Spread mayonnaise on each tortilla, then layer bacon, lettuce, tomatoes, and cheese.

4. Fold the Wrap

Fold in the sides and roll tightly.

5. Grill the Wraps

Place wraps on a skillet or grill pan over medium heat and cook until golden and crispy.

6. Slice & Serve

Cut in half and serve warm.

Tips for Perfect Results

To make your Sizzling BLT Wraps: A Grilled Delight for Your Taste Buds! perfect every time:

  • Use medium heat to avoid burning
  • Don’t overfill the wraps
  • Pat tomatoes dry to prevent sogginess
  • Press gently while grilling for even crispiness

These small details make a big difference in texture and flavor.

Variations

These Sizzling BLT Wraps: A Grilled Delight for Your Taste Buds! are easy to customize.

Add Protein

  • Grilled chicken
  • Turkey slices

Make It Healthier

  • Use whole wheat tortillas
  • Swap mayo for Greek yogurt spread

Boost Flavor

  • Add avocado
  • Use spicy mayo or chipotle sauce

You can easily adapt this recipe to suit your taste.

What to Serve With It

These Sizzling BLT Wraps: A Grilled Delight for Your Taste Buds! pair perfectly with:

  • French fries or sweet potato fries
  • Coleslaw
  • Pickles
  • Iced tea or soda

They’re great for casual meals or entertaining guests.

Storage & Reheating

To store your Sizzling BLT Wraps: A Grilled Delight for Your Taste Buds!:

  • Wrap tightly in foil and refrigerate for up to 2 days
  • Reheat in a skillet or oven to restore crispiness
  • Avoid microwaving to keep texture intact

They’re best enjoyed fresh but can still be tasty as leftovers.

Common Mistakes to Avoid

Avoid these common mistakes:

  • Using soggy lettuce or tomatoes
  • Overstuffing the wrap
  • Cooking on high heat
  • Skipping the grilling step

Getting these right ensures a perfectly crispy wrap.

FAQs

Can I make these wraps ahead of time?

Yes, but grill them just before serving for the best texture.

Can I use turkey bacon?

Absolutely! It’s a great lighter option.

What cheese works best?

Cheddar, mozzarella, or a blend all work well.

How do I keep the wraps crispy?

Cook on medium heat and avoid excess moisture inside.

Final Thoughts

These Sizzling BLT Wraps: A Grilled Delight for Your Taste Buds! are a simple yet delicious twist on a classic favorite. They’re crispy, flavorful, and incredibly satisfying—perfect for any time of day.

Once you try them, they’ll quickly become a go-to recipe for quick, comforting meals.

Summer’s Savory Wrap: The Ultimate Lunch to Boost Your Mood!

When the weather heats up, the last thing anyone wants is a heavy, complicated meal. That’s where Summer’s Savory Wrap: The Ultimate Lunch to Boost Your Mood! comes in. This vibrant, fresh wrap is everything you need for a quick, satisfying, and energizing lunch that actually makes you feel good.

Packed with crisp vegetables, lean protein, and a creamy, zesty spread, this wrap is designed to nourish your body and brighten your day. It’s light yet filling, simple yet bursting with flavor—and perfect for everything from busy workdays to relaxing summer picnics.

Summer's Savory Wrap

Why You’ll Love This Recipe

This Summer’s Savory Wrap: The Ultimate Lunch to Boost Your Mood! is more than just a wrap—it’s a refreshing, feel-good meal that’s both delicious and nutritious.

Here’s why you’ll love it:

  • Light, fresh, and perfect for warm weather
  • Packed with protein and healthy fats
  • Quick and easy to prepare
  • Great for meal prep or on-the-go lunches
  • Customizable with your favorite ingredients

It’s the kind of recipe that fits seamlessly into a healthy, balanced lifestyle.

Ingredients

To make Summer’s Savory Wrap: The Ultimate Lunch to Boost Your Mood!, you’ll need:

  • 4 large tortillas (whole wheat or spinach wraps)
  • 2 cups grilled chicken breast (sliced)
  • 1 cup mixed greens or lettuce
  • 1 cup cucumber (sliced)
  • 1 cup cherry tomatoes (halved)
  • 1 avocado (sliced)
  • ½ cup shredded carrots
  • ¼ cup red onion (thinly sliced)

For the sauce:

  • ½ cup Greek yogurt
  • 1 tablespoon lemon juice
  • 1 teaspoon honey
  • Salt and pepper to taste

Ingredient Notes

The freshness of the ingredients is what makes Summer’s Savory Wrap: The Ultimate Lunch to Boost Your Mood! truly shine. Crisp cucumbers, juicy tomatoes, and creamy avocado create a perfect balance of textures, while grilled chicken adds satisfying protein.

The yogurt-based sauce is light yet flavorful, adding a creamy tang without weighing down the wrap. You can easily swap in your favorite veggies or protein depending on what you have on hand.

Step-by-Step Instructions

Making Summer’s Savory Wrap: The Ultimate Lunch to Boost Your Mood! is simple and quick:

1. Prepare the Sauce

In a bowl, mix Greek yogurt, lemon juice, honey, salt, and pepper.

2. Warm the Tortillas

Heat tortillas briefly to make them flexible.

3. Layer the Ingredients

Place chicken, greens, cucumber, tomatoes, avocado, carrots, and onion on each tortilla.

4. Add the Sauce

Drizzle the sauce evenly over the fillings.

5. Wrap It Up

Fold in the sides and roll tightly into a wrap.

6. Slice & Serve

Cut in half and serve immediately.

Tips for Perfect Results

To make your Summer’s Savory Wrap: The Ultimate Lunch to Boost Your Mood! even better:

  • Use fresh, crisp vegetables for maximum flavor
  • Don’t overfill the wrap
  • Add sauce just before serving
  • Roll tightly to keep everything together

These simple tips help create the perfect wrap every time.

Variations

This Summer’s Savory Wrap: The Ultimate Lunch to Boost Your Mood! is incredibly versatile.

Protein Options

  • Grilled shrimp
  • Turkey slices
  • Chickpeas or tofu for a vegetarian version

Flavor Boosters

  • Add hummus or pesto
  • Sprinkle feta or goat cheese
  • Include spicy sauce for heat

Low-Carb Option

  • Use lettuce leaves instead of tortillas

You can easily customize this wrap to fit your preferences.

What to Serve With It

This Summer’s Savory Wrap: The Ultimate Lunch to Boost Your Mood! pairs perfectly with:

  • Fresh fruit salad
  • Smoothies
  • Chips or veggie sticks
  • Iced tea or lemonade

It’s a complete, refreshing meal that’s perfect for summer days.

Storage & Reheating

To store your Summer’s Savory Wrap: The Ultimate Lunch to Boost Your Mood!:

  • Wrap tightly in foil or plastic wrap
  • Store in the refrigerator for up to 2 days
  • Keep sauce separate if possible

These wraps are best enjoyed fresh and don’t require reheating.

Common Mistakes to Avoid

Avoid these common mistakes:

  • Overfilling the wrap
  • Using soggy vegetables
  • Adding too much sauce
  • Not rolling tightly

Keeping things balanced ensures the best result.

FAQs

Can I make this wrap ahead of time?

Yes, but for best freshness, add the sauce just before eating.

Is this wrap healthy?

Absolutely—it’s packed with fresh veggies, lean protein, and healthy fats.

Can I make it vegetarian?

Yes! Simply replace the chicken with plant-based protein.

What’s the best tortilla to use?

Whole wheat or spinach wraps work great for added flavor and nutrition.

Final Thoughts

This Summer’s Savory Wrap: The Ultimate Lunch to Boost Your Mood! is everything a great meal should be—fresh, flavorful, and easy to make. It’s perfect for busy days, warm weather, and anyone looking for a healthy, satisfying lunch.

Once you try it, it’s sure to become one of your favorite go-to recipes for a quick and delicious meal.

Healthy BBQ Chicken Chopped Salad Recipe (Fresh, Flavorful & Protein-Packed)

If you’re craving something hearty, fresh, and full of bold flavor, this Healthy BBQ Chicken Chopped Salad Recipe is exactly what you need. It combines smoky BBQ chicken with crisp veggies, creamy elements, and a satisfying crunch—all chopped into bite-sized perfection.

This salad is a complete meal on its own, packed with lean protein, fiber, and healthy fats. It’s perfect for busy weekdays, meal prep, or when you want something filling without feeling heavy. Best of all, it delivers that classic BBQ flavor in a lighter, healthier way.

Healthy BBQ Chicken Chopped

Why You’ll Love This Recipe

This Healthy BBQ Chicken Chopped Salad Recipe is a game-changer for anyone who loves bold flavors but wants to keep things nutritious.

Here’s why it’s so popular:

  • Packed with protein and fiber
  • Full of smoky, tangy BBQ flavor
  • Perfect for meal prep
  • Balanced textures—crunchy, creamy, and juicy
  • Easy to customize

It’s the kind of salad that actually feels like a satisfying meal, not just a side.

Ingredients

To make this Healthy BBQ Chicken Chopped Salad Recipe, you’ll need:

  • 2 cups grilled chicken breast (chopped, tossed in BBQ sauce)
  • 6 cups romaine lettuce (chopped)
  • 1 cup corn kernels
  • 1 cup black beans (rinsed and drained)
  • 1 cup cherry tomatoes (halved)
  • 1 avocado (diced)
  • ½ cup red onion (finely chopped)
  • ½ cup shredded cheddar cheese
  • ¼ cup cilantro (chopped)

For the dressing:

  • ½ cup Greek yogurt
  • 2 tablespoons BBQ sauce
  • 1 tablespoon lime juice
  • Salt and pepper to taste

Ingredient Notes

The beauty of this Healthy BBQ Chicken Chopped Salad Recipe lies in the balance of flavors and textures. The BBQ chicken brings a smoky, slightly sweet flavor, while the fresh vegetables add brightness and crunch.

Using Greek yogurt in the dressing keeps it creamy while reducing calories compared to traditional dressings. Fresh lime juice adds a refreshing tang that balances the richness of the BBQ sauce perfectly.

Step-by-Step Instructions

Making this Healthy BBQ Chicken Chopped Salad Recipe is quick and easy:

1. Prepare the Chicken

Grill or cook chicken, then chop and toss with BBQ sauce.

2. Chop the Vegetables

Chop lettuce, tomatoes, onion, and avocado into bite-sized pieces.

3. Make the Dressing

In a bowl, whisk together Greek yogurt, BBQ sauce, lime juice, salt, and pepper.

4. Assemble the Salad

In a large bowl, combine lettuce, corn, beans, tomatoes, onion, and cilantro.

5. Add Chicken & Dressing

Top with BBQ chicken, avocado, and cheese, then drizzle with dressing.

6. Toss & Serve

Mix everything together until evenly coated and serve immediately.

Tips for Perfect Results

To make your Healthy BBQ Chicken Chopped Salad Recipe absolutely perfect:

  • Use freshly grilled chicken for best flavor
  • Chop ingredients evenly for better texture
  • Add avocado just before serving
  • Taste and adjust dressing as needed

These tips help ensure a balanced and delicious salad every time.

Variations

This Healthy BBQ Chicken Chopped Salad Recipe is incredibly versatile.

Change the Protein

  • Grilled shrimp
  • Turkey or steak
  • Tofu for a vegetarian option

Add Extra Crunch

  • Tortilla strips
  • Roasted nuts or seeds

Boost Flavor

  • Add jalapeños for heat
  • Use smoked paprika in the dressing

You can easily adapt this salad to your preferences.

What to Serve With It

This Healthy BBQ Chicken Chopped Salad Recipe is filling on its own but pairs well with:

  • Garlic bread or cornbread
  • Fresh fruit
  • Soup
  • Iced tea or lemonade

It’s perfect for lunch, dinner, or casual gatherings.

Storage & Reheating

To store your Healthy BBQ Chicken Chopped Salad Recipe:

  • Keep dressing separate for best freshness
  • Store in an airtight container in the fridge for up to 3 days
  • Add avocado fresh before serving

No reheating is needed—this salad is best served cold.

Common Mistakes to Avoid

Avoid these common mistakes:

  • Overdressing the salad
  • Using dry or overcooked chicken
  • Not seasoning properly
  • Adding avocado too early

Keeping these in mind ensures great results.

FAQs

Can I make this salad ahead of time?

Yes! Just store the dressing separately and combine before serving.

Is this salad healthy?

Absolutely—it’s packed with protein, fiber, and healthy fats.

What BBQ sauce should I use?

Use your favorite brand or a low-sugar option for a healthier version.

Can I make it dairy-free?

Yes, skip the cheese and use a dairy-free yogurt alternative.

Final Thoughts

This Healthy BBQ Chicken Chopped Salad Recipe is everything you want in a modern meal—fresh, flavorful, and satisfying. It’s easy to make, packed with nutrients, and bursting with bold BBQ flavor in every bite.

Once you try it, you’ll see why it’s a go-to recipe for meal prep, quick lunches, and healthy dinners.

Southwest Chicken Wraps: Easy & Healthy Lunch Recipes You’ll Love

If you’re searching for a quick, nutritious, and flavor-packed meal, these Southwest Chicken Wraps: Easy & Healthy Lunch Recipes are exactly what you need. Loaded with juicy chicken, crisp veggies, and a creamy, zesty sauce, these wraps are the perfect balance of healthy and satisfying.

They’re ideal for busy weekdays, meal prep, or even a light dinner when you want something filling without feeling heavy. Plus, they’re incredibly versatile—you can customize them to suit your taste, making them a staple recipe you’ll come back to again and again.

Southwest Chicken Wraps

Why You’ll Love This Recipe

These Southwest Chicken Wraps: Easy & Healthy Lunch Recipes stand out because they combine bold flavors with wholesome ingredients.

Here’s why you’ll love them:

  • Quick and easy to prepare
  • Packed with protein and fiber
  • Perfect for meal prep
  • Customizable to your preferences
  • Great for on-the-go lunches

They’re a delicious way to keep your meals both exciting and nutritious.

Ingredients

To make these Southwest Chicken Wraps: Easy & Healthy Lunch Recipes, you’ll need:

  • 2 cups cooked chicken breast (grilled or shredded)
  • 4 large whole wheat tortillas
  • 1 cup romaine lettuce (chopped)
  • 1 cup cherry tomatoes (halved)
  • ½ cup black beans (rinsed and drained)
  • ½ cup corn kernels
  • 1 avocado (sliced)
  • ½ cup shredded cheese (cheddar or Mexican blend)

For the sauce:

  • ½ cup Greek yogurt
  • 1 tablespoon lime juice
  • 1 teaspoon chili powder
  • ½ teaspoon cumin
  • Salt and pepper to taste

Ingredient Notes

The key to delicious Southwest Chicken Wraps: Easy & Healthy Lunch Recipes is using fresh, vibrant ingredients. Grilled chicken adds a smoky depth of flavor, while black beans and corn provide texture and heartiness.

Using whole wheat tortillas boosts fiber and makes the wraps more filling. The creamy yogurt-based sauce adds tanginess without the heaviness of traditional dressings, making this recipe both healthy and satisfying.

Step-by-Step Instructions

Making these Southwest Chicken Wraps: Easy & Healthy Lunch Recipes is simple and quick:

1. Prepare the Sauce

In a bowl, mix Greek yogurt, lime juice, chili powder, cumin, salt, and pepper.

2. Warm the Tortillas

Heat tortillas slightly to make them more flexible.

3. Assemble the Wraps

Lay out each tortilla and layer chicken, lettuce, tomatoes, beans, corn, avocado, and cheese.

4. Add Sauce

Drizzle the sauce evenly over the fillings.

5. Wrap & Serve

Fold in the sides, roll tightly, and slice in half if desired.

Tips for Perfect Results

To make your Southwest Chicken Wraps: Easy & Healthy Lunch Recipes even better:

  • Don’t overfill the wraps to prevent tearing
  • Use warm tortillas for easier rolling
  • Season the chicken well for maximum flavor
  • Add sauce just before serving to keep wraps fresh

These simple tips ensure a perfect wrap every time.

Variations

One of the best things about these Southwest Chicken Wraps: Easy & Healthy Lunch Recipes is how customizable they are.

Protein Options

  • Grilled shrimp
  • Ground turkey
  • Tofu for a vegetarian option

Add More Flavor

  • Jalapeños for heat
  • Salsa or pico de gallo
  • Fresh cilantro

Low-Carb Option

  • Use lettuce wraps instead of tortillas

These variations make it easy to adapt the recipe to your needs.

What to Serve With It

These Southwest Chicken Wraps: Easy & Healthy Lunch Recipes pair perfectly with:

  • Sweet potato fries
  • Fresh fruit salad
  • Chips and salsa
  • Iced tea or lemonade

They’re great for casual meals or packed lunches.

Storage & Reheating

To store your Southwest Chicken Wraps: Easy & Healthy Lunch Recipes:

  • Wrap tightly in foil or plastic wrap
  • Store in the refrigerator for up to 3 days
  • Keep sauce separate if possible

These wraps are best enjoyed cold or at room temperature, so reheating isn’t necessary.

Common Mistakes to Avoid

Avoid these common mistakes:

  • Overloading the wrap
  • Using cold, stiff tortillas
  • Skipping seasoning
  • Adding too much sauce

Keeping the balance right makes all the difference.

FAQs

Can I make these wraps ahead of time?

Yes! They’re perfect for meal prep—just store them properly.

Are these wraps healthy?

Absolutely. They’re packed with lean protein, fiber, and healthy fats.

Can I use rotisserie chicken?

Yes, it’s a great time-saving option.

How do I keep wraps from getting soggy?

Add sauce right before eating and avoid overfilling.

Final Thoughts

These Southwest Chicken Wraps: Easy & Healthy Lunch Recipes are everything you want in a quick meal—fresh, flavorful, and satisfying. They’re easy to make, endlessly customizable, and perfect for busy lifestyles.

Once you try them, they’ll quickly become a regular part of your meal rotation.

5-Ingredient Pizza Quesadillas (Quick, Cheesy & Family-Friendly!)

If you’re looking for a quick, satisfying meal that combines two all-time favorites, these 5-Ingredient Pizza Quesadillas are about to become your new go-to recipe. They bring together the cheesy, saucy goodness of pizza with the crispy, golden texture of a quesadilla—all in under 15 minutes.

This recipe is perfect for busy weeknights, after-school snacks, or even a fun weekend lunch. With just a handful of ingredients, you can create something that feels indulgent, comforting, and totally crowd-pleasing without spending hours in the kitchen.

Ingredient Pizza

Why You’ll Love This Recipe

These 5-Ingredient Pizza Quesadillas are everything you want in a quick meal—simple, delicious, and incredibly versatile.

Here’s why you’ll love them:

  • Only 5 basic ingredients required
  • Ready in under 15 minutes
  • Crispy outside, gooey inside
  • Perfect for kids and adults alike
  • Easily customizable

It’s one of those recipes you can make again and again without getting bored.

Ingredients

To make these 5-Ingredient Pizza Quesadillas, you’ll need:

  • 4 large flour tortillas
  • 1 cup shredded mozzarella cheese
  • ½ cup pizza sauce
  • ½ cup sliced pepperoni
  • 1 tablespoon olive oil or butter

Ingredient Notes

The simplicity of 5-Ingredient Pizza Quesadillas is what makes them so great, but choosing the right ingredients still matters.

Mozzarella is the classic choice for that stretchy, melty texture, but you can also mix in a little cheddar or provolone for extra flavor. Use your favorite pizza sauce—whether store-bought or homemade—and don’t be afraid to experiment with different toppings depending on your taste.

Step-by-Step Instructions

Making 5-Ingredient Pizza Quesadillas is as easy as it gets:

1. Heat the Pan

Warm a skillet over medium heat and add a little oil or butter.

2. Assemble the Quesadilla

Place one tortilla in the pan, spread a thin layer of pizza sauce, then add cheese and pepperoni.

3. Top and Cook

Place another tortilla on top and cook until the bottom is golden and crispy.

4. Flip Carefully

Flip the quesadilla and cook the other side until cheese is melted.

5. Slice & Serve

Remove from the pan, let cool slightly, then slice into wedges.

Tips for Perfect Results

To make your 5-Ingredient Pizza Quesadillas absolutely perfect:

  • Use medium heat to avoid burning
  • Don’t overload with sauce (prevents sogginess)
  • Press gently while cooking for even crispiness
  • Let rest briefly before slicing

These simple tips ensure a crispy, cheesy result every time.

Variations

One of the best things about 5-Ingredient Pizza Quesadillas is how easy they are to customize.

Change the Protein

  • Cooked sausage
  • Grilled chicken
  • Ham or bacon

Add Veggies

  • Bell peppers
  • Mushrooms
  • Olives

Make It Gourmet

  • Add fresh basil
  • Drizzle with hot honey
  • Use different cheeses

You can easily adapt this recipe to fit your cravings.

What to Serve With It

These 5-Ingredient Pizza Quesadillas pair perfectly with:

  • Marinara sauce for dipping
  • A fresh green salad
  • Garlic bread
  • Iced tea or soda

They also work great as a party appetizer or game-day snack.

Storage & Reheating

If you have leftovers, here’s how to store your 5-Ingredient Pizza Quesadillas:

  • Refrigerate in an airtight container for up to 3 days
  • Reheat in a skillet or oven for best crispiness
  • Avoid microwaving if possible (can make them soggy)

They’re best enjoyed fresh but still tasty the next day.

Common Mistakes to Avoid

Avoid these common mistakes:

  • Using too much sauce
  • Cooking on high heat
  • Overfilling the quesadilla
  • Not flipping carefully

Keeping it simple is the key to success.

FAQs

Can I make these ahead of time?

Yes, but they’re best fresh. Reheat in a skillet to restore crispiness.

Can I use corn tortillas?

You can, but flour tortillas work better for flexibility and texture.

What cheese works best?

Mozzarella is ideal, but blends work great too.

Can I make them vegetarian?

Absolutely—just skip the pepperoni and add veggies.

Final Thoughts

These 5-Ingredient Pizza Quesadillas prove that simple recipes can still be incredibly delicious. They’re quick, satisfying, and endlessly customizable—perfect for busy days or when you just want something comforting without the effort.

Once you try them, they’ll quickly become a staple in your kitchen rotation.

Caramelized Onion and Gruyere Dip (Rich, Creamy & Perfect for Entertaining)

If you’re looking for a crowd-pleasing appetizer that feels both elegant and comforting, this Caramelized Onion and Gruyere Dip is exactly what you need. It’s rich, creamy, and layered with deep, savory flavors thanks to slow-cooked onions and nutty Gruyere cheese.

This dip strikes the perfect balance between indulgent and sophisticated. Whether you’re hosting a holiday gathering, game day party, or casual get-together, this recipe is guaranteed to impress. Plus, it’s surprisingly simple to make with just a handful of ingredients and a little patience.

Caramelized Onion and Gruyere

Why You’ll Love This Recipe

This Caramelized Onion and Gruyere Dip stands out from typical party dips because of its depth of flavor and luxurious texture.

Here’s why it’s a favorite:

  • Rich, savory, and slightly sweet flavor
  • Creamy with perfectly melted cheese
  • Great for entertaining or holidays
  • Can be made ahead of time
  • Pairs well with a variety of dippers

It’s one of those recipes that feels gourmet but is totally doable at home.

Ingredients

To make this delicious Caramelized Onion and Gruyere Dip, you’ll need:

  • 3 large yellow onions (thinly sliced)
  • 2 tablespoons butter
  • 1 tablespoon olive oil
  • 1 teaspoon sugar (optional, for caramelization)
  • ½ teaspoon salt
  • ½ teaspoon black pepper
  • 1 cup shredded Gruyere cheese
  • ½ cup cream cheese (softened)
  • ½ cup sour cream
  • ¼ cup mayonnaise
  • 1 garlic clove (minced)

Optional garnish:

  • Fresh thyme or parsley

Ingredient Notes

The star of this Caramelized Onion and Gruyere Dip is, of course, the onions. Slowly caramelizing them brings out their natural sweetness and creates that deep golden color and rich flavor.

Gruyere cheese adds a slightly nutty, melty quality that elevates the dip far beyond standard cheese dips. If you can, grate it fresh—it melts better and tastes richer. The combination of cream cheese, sour cream, and mayo creates a smooth, velvety base that ties everything together.

Step-by-Step Instructions

Making this Caramelized Onion and Gruyere Dip is all about building flavor step by step:

1. Caramelize the Onions

Heat butter and olive oil in a skillet over medium-low heat. Add onions, salt, and sugar. Cook slowly for 25–30 minutes, stirring occasionally, until golden and caramelized.

2. Add Garlic

Stir in minced garlic and cook for another minute until fragrant.

3. Prepare the Base

In a bowl, mix cream cheese, sour cream, and mayonnaise until smooth.

4. Combine Ingredients

Fold in the caramelized onions and shredded Gruyere cheese.

5. Bake the Dip

Transfer to a baking dish and bake at 375°F for 20 minutes until bubbly and lightly golden on top.

6. Garnish & Serve

Top with fresh herbs and serve warm.

Tips for Perfect Results

To make your Caramelized Onion and Gruyere Dip absolutely perfect:

  • Cook onions low and slow for best flavor
  • Stir occasionally to prevent burning
  • Use freshly grated Gruyere
  • Serve warm for the best texture

Patience during caramelization is the secret to success here.

Variations

This Caramelized Onion and Gruyere Dip is easy to customize:

Add Protein

  • Crumbled bacon
  • Diced ham

Change the Cheese

  • Swiss or fontina instead of Gruyere
  • Add a little Parmesan for extra depth

Make It Lighter

  • Use Greek yogurt instead of sour cream
  • Reduce the mayo

These variations let you tailor the dip to your preferences.

What to Serve With It

This Caramelized Onion and Gruyere Dip pairs perfectly with a variety of dippers:

  • Crackers and toasted baguette slices
  • Fresh vegetables like carrots and celery
  • Pretzels or chips

It also works beautifully as a spread for sandwiches or burgers.

Storage & Reheating

If you have leftovers, here’s how to store your Caramelized Onion and Gruyere Dip:

  • Refrigerate in an airtight container for up to 4 days
  • Reheat in the oven or microwave until warm
  • Stir before serving to restore creaminess

It reheats beautifully, making it great for prepping ahead.

Common Mistakes to Avoid

Avoid these common pitfalls:

  • Rushing the onion caramelization
  • Using high heat (leads to burning)
  • Not seasoning properly
  • Using pre-shredded cheese

Taking your time ensures the best flavor.

FAQs

Can I make this dip ahead of time?

Yes! Prepare it in advance and bake just before serving.

Can I freeze it?

It’s not recommended, as the texture may change.

What can I use instead of Gruyere?

Swiss or mozzarella can work as substitutes.

How do I know when onions are properly caramelized?

They should be deep golden brown, soft, and slightly sweet.

Final Thoughts

This Caramelized Onion and Gruyere Dip is the kind of recipe that turns simple ingredients into something truly special. It’s rich, flavorful, and perfect for sharing—whether you’re hosting a party or just treating yourself.

Once you make it, it’s guaranteed to become one of your go-to appetizer recipes for any occasion.

Caramel Apple French Toast Bake (Cozy, Make-Ahead Breakfast Favorite)

There’s something incredibly comforting about a warm, oven-baked breakfast—especially when it involves soft bread, spiced apples, and gooey caramel. This Caramel Apple French Toast Bake is the ultimate cozy dish that brings together all those flavors in one irresistible casserole.

Perfect for fall mornings, holiday brunches, or anytime you want a make-ahead breakfast, this recipe is both indulgent and practical. You can prep it the night before, pop it in the oven in the morning, and enjoy a rich, bakery-style dish with minimal effort.

Caramel Apple French

Why You’ll Love This Recipe

This Caramel Apple French Toast Bake is more than just a breakfast—it’s an experience. The combination of soft custard-soaked bread, cinnamon-spiced apples, and sweet caramel creates layers of flavor in every bite.

Here’s why it’s a must-try:

  • Perfect make-ahead breakfast
  • Rich, comforting, and full of fall flavors
  • Great for feeding a crowd
  • Easy to customize
  • Smells amazing while baking

It’s the kind of dish that turns an ordinary morning into something special.

Ingredients

To make this delicious Caramel Apple French Toast Bake, you’ll need:

  • 1 loaf of brioche or French bread (cubed)
  • 2 cups diced apples (Granny Smith or Honeycrisp)
  • 6 large eggs
  • 2 cups milk
  • ½ cup heavy cream
  • ½ cup brown sugar
  • 1 teaspoon cinnamon
  • ½ teaspoon nutmeg
  • 1 teaspoon vanilla extract
  • ¼ teaspoon salt

For the caramel topping:

  • ½ cup caramel sauce (store-bought or homemade)

Optional toppings:

  • Powdered sugar
  • Chopped pecans
  • Whipped cream

Ingredient Notes

The key to a great Caramel Apple French Toast Bake is using the right bread and apples. Brioche or challah works best because of its soft, slightly sweet texture that soaks up the custard beautifully.

For apples, choose a variety that holds its shape when baked. Granny Smith adds a nice tart contrast, while Honeycrisp brings natural sweetness. Using a mix of both gives you the best of both worlds.

Step-by-Step Instructions

Making this Caramel Apple French Toast Bake is simple:

1. Prepare the Bread

Cut bread into cubes and place in a greased baking dish.

2. Add Apples

Scatter diced apples evenly over the bread.

3. Make the Custard

Whisk eggs, milk, cream, sugar, cinnamon, nutmeg, vanilla, and salt.

4. Assemble

Pour custard over the bread and apples, pressing gently to soak.

5. Chill (Optional)

Cover and refrigerate overnight for best results.

6. Bake

Bake at 350°F for 40–45 minutes until golden and set.

7. Add Caramel

Drizzle caramel sauce over the warm bake before serving.

Tips for Perfect Results

To make your Caramel Apple French Toast Bake truly outstanding:

  • Use slightly stale bread for better absorption
  • Let it sit before baking for deeper flavor
  • Cover loosely with foil if browning too quickly
  • Don’t skip the caramel—it’s essential

These tips ensure a perfect balance of texture and flavor.

Variations

This Caramel Apple French Toast Bake is easy to customize:

Add Extra Flavor

  • Add raisins or dried cranberries
  • Mix in chopped nuts for crunch

Make It Healthier

  • Use whole milk instead of cream
  • Reduce sugar slightly

Change the Flavor Profile

  • Add pumpkin spice for a seasonal twist
  • Use maple syrup instead of caramel

You can easily tailor it to your taste or dietary preferences.

What to Serve With It

This Caramel Apple French Toast Bake pairs beautifully with:

  • Crispy bacon or sausage
  • Fresh fruit
  • Yogurt
  • Coffee or hot cider

It’s ideal for brunch spreads or holiday mornings.

Storage & Reheating

Leftovers of this Caramel Apple French Toast Bake store well:

  • Refrigerate in an airtight container for up to 4 days
  • Reheat in the oven or microwave
  • Add extra caramel before serving for freshness

It’s just as delicious the next day!

Common Mistakes to Avoid

Avoid these common issues:

  • Using fresh bread (doesn’t absorb well)
  • Skipping the resting time
  • Overbaking and drying it out
  • Not seasoning enough

Paying attention to these details ensures success.

FAQs

Can I make this ahead of time?

Yes! It’s best when prepared the night before and baked in the morning.

What type of bread works best?

Brioche or challah are ideal for their soft, rich texture.

Can I freeze it?

Yes, bake first, then freeze and reheat when ready.

Can I use store-bought caramel?

Absolutely—it’s a great time-saving option.

Final Thoughts

This Caramel Apple French Toast Bake is everything you want in a cozy breakfast—rich, flavorful, and incredibly satisfying. It’s easy enough for everyday mornings but special enough for holidays and gatherings.

Once you try it, it’ll quickly become a favorite tradition in your kitchen.

Easy & Fluffy Cinnamon Roll Pancakes (Better Than Breakfast at a Café!)

If you’ve ever had to choose between cinnamon rolls and pancakes for breakfast, this recipe solves that delicious dilemma. These Easy & Fluffy Cinnamon Roll Pancakes combine the soft, airy texture of classic pancakes with the sweet, buttery swirl of a cinnamon roll—all finished with a luscious cream cheese glaze.

They’re indulgent, comforting, and surprisingly simple to make at home. Whether you’re planning a weekend brunch or just want to treat yourself to something special, these pancakes bring bakery-level flavor right to your kitchen.

Easy & Fluffy Cinnamon

Why You’ll Love This Recipe

These Easy & Fluffy Cinnamon Roll Pancakes are the ultimate breakfast upgrade. They take everything you love about cinnamon rolls and turn it into a quick, griddle-friendly recipe.

Here’s why they’re a must-try:

  • Soft, fluffy texture with rich cinnamon flavor
  • Beautiful swirls that look bakery-quality
  • Perfect for special breakfasts or brunch
  • Easy to make with simple ingredients
  • Kid-friendly and crowd-pleasing

Once you try them, regular pancakes might feel a little boring.

Ingredients

To make these Easy & Fluffy Cinnamon Roll Pancakes, you’ll need:

Pancake Batter:

  • 1 ½ cups all-purpose flour
  • 2 tablespoons sugar
  • 1 tablespoon baking powder
  • ¼ teaspoon salt
  • 1 ¼ cups milk
  • 1 egg
  • 3 tablespoons melted butter
  • 1 teaspoon vanilla extract

Cinnamon Swirl:

  • ¼ cup melted butter
  • ½ cup brown sugar
  • 1 tablespoon ground cinnamon

Cream Cheese Glaze:

  • 4 oz cream cheese (softened)
  • ½ cup powdered sugar
  • 2–3 tablespoons milk
  • ½ teaspoon vanilla extract

Ingredient Notes

The key to perfect Easy & Fluffy Cinnamon Roll Pancakes is balance. The pancake batter should be light and airy, while the cinnamon swirl adds richness and sweetness.

Make sure your cream cheese is softened before mixing the glaze—this ensures a smooth, pourable consistency. For the swirl, combining melted butter with brown sugar and cinnamon creates that signature gooey cinnamon roll flavor.

Step-by-Step Instructions

Making Easy & Fluffy Cinnamon Roll Pancakes is easier than you think:

1. Make the Pancake Batter

In a bowl, whisk together dry ingredients. In another bowl, mix wet ingredients, then combine until just blended.

2. Prepare the Cinnamon Swirl

Mix melted butter, brown sugar, and cinnamon. Transfer to a piping bag or zip-top bag.

3. Heat the Pan

Preheat a non-stick skillet or griddle over medium heat and lightly grease it.

4. Cook the Pancakes

Pour batter onto the pan, then pipe a swirl of cinnamon mixture on top.

5. Flip Carefully

Cook until bubbles form, then flip gently and cook until golden brown.

6. Make the Glaze

Whisk cream cheese, powdered sugar, milk, and vanilla until smooth.

7. Serve Warm

Drizzle glaze over pancakes and enjoy immediately.

Tips for Perfect Results

To master Easy & Fluffy Cinnamon Roll Pancakes, keep these tips in mind:

  • Don’t overmix the batter—lumps are okay
  • Use medium heat to avoid burning the swirl
  • Wipe the pan between batches if needed
  • Pipe the swirl lightly to prevent spreading

These small adjustments make a big difference in both appearance and flavor.

Variations

This recipe is easy to customize depending on your cravings.

Flavor Twists

  • Add nutmeg or pumpkin spice
  • Mix chocolate chips into the batter

Healthier Options

  • Use whole wheat flour
  • Reduce sugar in the swirl

Toppings

  • Chopped pecans or walnuts
  • Fresh berries
  • Maple syrup for extra sweetness

No matter how you tweak it, Easy & Fluffy Cinnamon Roll Pancakes remain irresistible.

What to Serve With It

These pancakes are rich, so pairing them with lighter sides creates balance.

Try serving with:

  • Fresh fruit or fruit salad
  • Crispy bacon or sausage
  • Scrambled eggs
  • Coffee or a latte

This combination makes for a perfect brunch spread.

Storage & Reheating

If you have leftovers, here’s how to store your Easy & Fluffy Cinnamon Roll Pancakes:

  • Refrigerate in an airtight container for up to 3 days
  • Freeze for up to 2 months
  • Reheat in a toaster or skillet for best texture

Avoid microwaving too long, as it can make them rubbery.

Common Mistakes to Avoid

To get the best results, avoid these common issues:

  • Overcooking the pancakes
  • Using heat that’s too high
  • Adding too much cinnamon swirl
  • Skipping the glaze (it’s essential!)

Getting these right ensures bakery-quality pancakes every time.

FAQs

Can I make these pancakes ahead of time?

Yes! You can make and store them, then reheat before serving.

How do I get perfect cinnamon swirls?

Use a piping bag or zip-top bag and apply light pressure for clean swirls.

Can I make them without cream cheese glaze?

Yes, but the glaze adds that authentic cinnamon roll flavor.

Can I use pancake mix?

Absolutely! Just prepare the mix and follow the swirl and glaze steps.

Final Thoughts

These Easy & Fluffy Cinnamon Roll Pancakes are everything you want in a breakfast—sweet, comforting, and visually stunning. They bring together two classic favorites into one unforgettable dish that’s perfect for weekends, holidays, or whenever you want something special.

Once you make them, they’ll quickly become a family favorite—and maybe even your signature brunch recipe.