South Korean Croffles Recipe (Croissant Waffles That Are Crispy, Buttery & Irresistible)

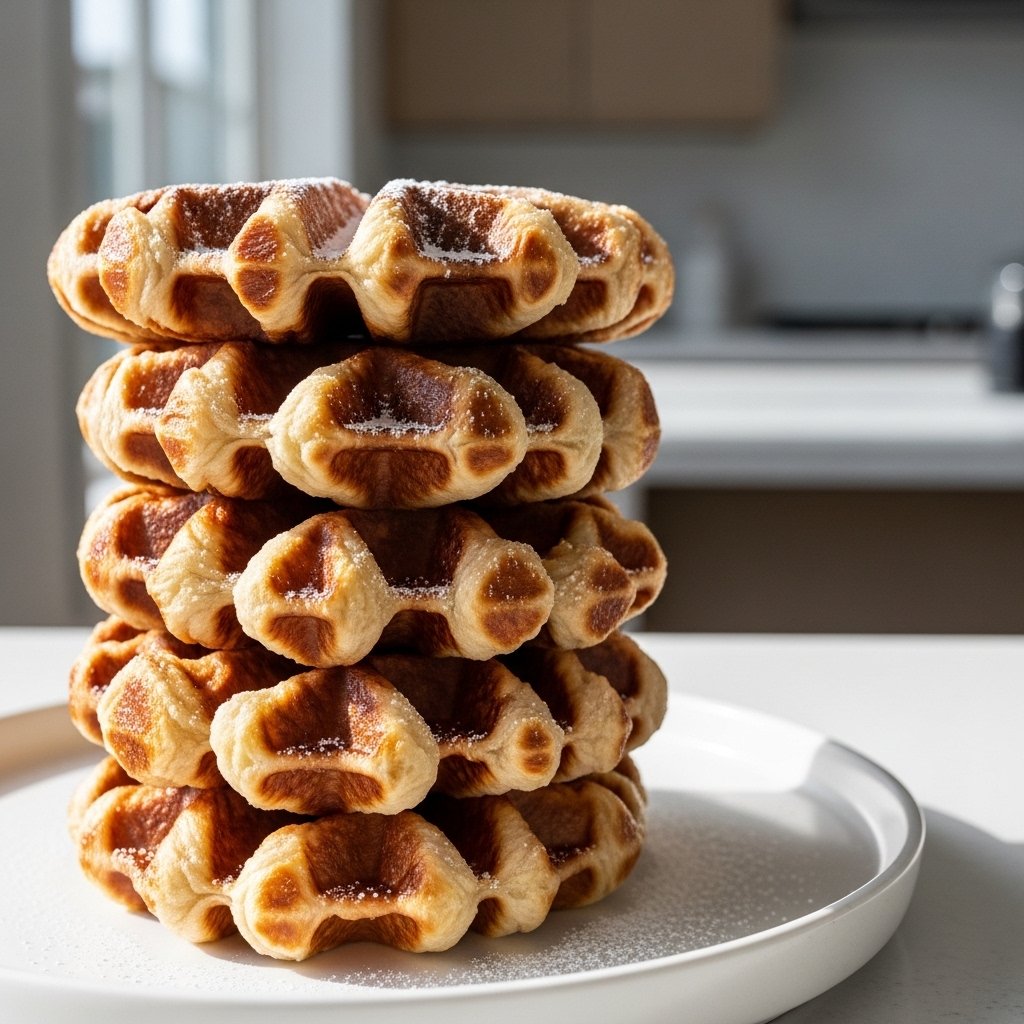
If you’ve been scrolling through food trends lately, you’ve probably seen the viral sensation known as South Korean croffles recipe (croissant waffles). These golden, crispy treats combine the flaky layers of a croissant with the crisp exterior of a waffle—creating something truly magical.

Originating in trendy cafés across South Korea, croffles quickly gained popularity for their unique texture and endless topping possibilities. The best part? You don’t need to be a professional baker to make them at home. With just a few simple ingredients and a waffle maker, you can recreate this café-style favorite right in your own kitchen.

South Korean Croffles Recipe

Why You’ll Love This Recipe

This South Korean croffles recipe (croissant waffles) is the perfect combination of convenience and indulgence. It transforms store-bought croissant dough into something that feels gourmet and bakery-worthy.

Here’s why you’ll fall in love:

  • Crispy on the outside, soft and buttery inside
  • Quick and easy—ready in under 15 minutes
  • Requires minimal ingredients
  • Perfect for breakfast, brunch, or dessert
  • Endless topping possibilities

Once you try croffles, they’ll quickly become a staple in your weekend routine.

Ingredients

To make this delicious South Korean croffles recipe (croissant waffles), you’ll need:

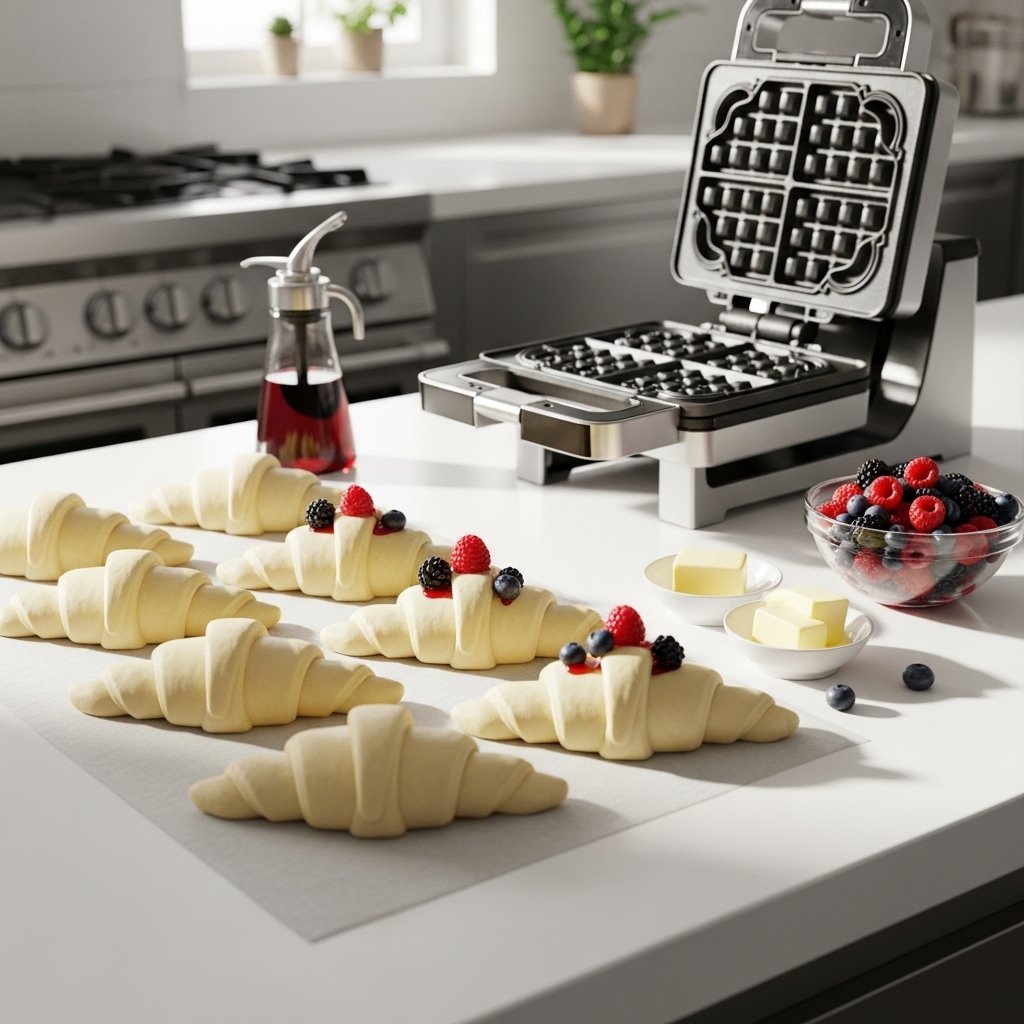
  • 1 can refrigerated croissant dough (or pre-made croissants)
  • Butter or cooking spray (for greasing waffle maker)

Optional toppings:

  • Powdered sugar
  • Maple syrup or honey
  • Fresh berries
  • Whipped cream
  • Nutella or chocolate sauce

Ingredient Notes

The beauty of this South Korean croffles recipe (croissant waffles) lies in its simplicity. Using store-bought croissant dough saves time while still delivering that signature flaky texture. However, if you want to elevate the recipe, you can use bakery-quality croissants for even richer flavor.

Make sure your croissant dough is fresh and properly chilled before cooking. This helps maintain the layers and ensures a crisp, flaky result when pressed in the waffle maker.

Step-by-Step Instructions

Making South Korean croffles recipe (croissant waffles) is incredibly simple:

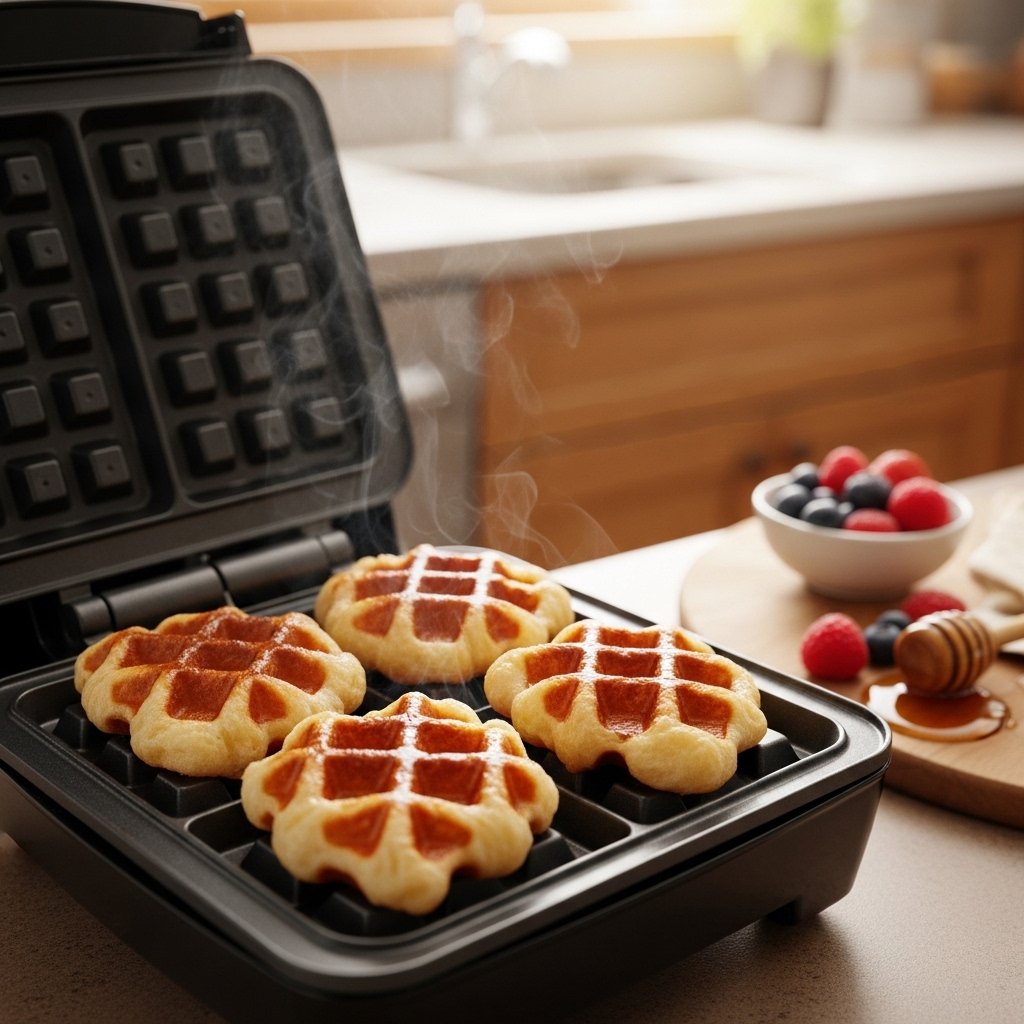
1. Preheat the Waffle Maker

Heat your waffle maker to medium-high and lightly grease it with butter or spray.

2. Prepare the Dough

Open the croissant dough and separate into individual triangles.

3. Shape the Croffles

Roll each triangle into a croissant shape (or leave as is for a rustic look).

4. Cook in Waffle Maker

Place the dough into the waffle maker and press gently. Cook for 3–5 minutes until golden brown and crispy.
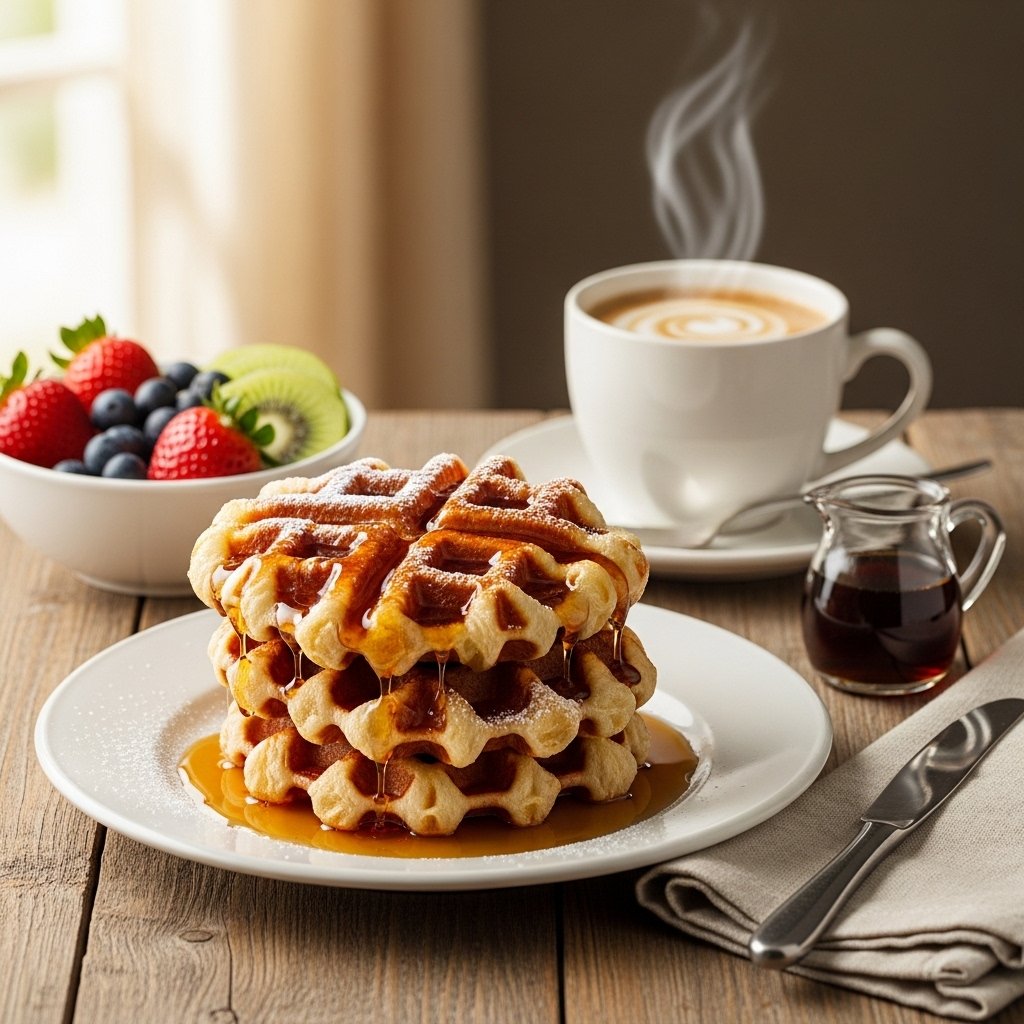
5. Serve Warm

Carefully remove and serve immediately with your favorite toppings.

Tips for Perfect Results

To get the best results from your South Korean croffles recipe (croissant waffles), keep these tips in mind:

  • Don’t overfill the waffle maker—the dough expands
  • Use medium heat to avoid burning the outside
  • Lightly press instead of flattening completely
  • Serve immediately for the best texture

These simple tips ensure your croffles come out perfectly crisp and golden every time.

Variations

One of the most exciting parts of this South Korean croffles recipe (croissant waffles) is how customizable it is.

Sweet Variations

  • Add cinnamon sugar before cooking
  • Top with ice cream and caramel drizzle
  • Fill with chocolate before pressing

Savory Options

  • Add cheese and ham inside the dough
  • Top with fried eggs and avocado
  • Sprinkle with herbs and Parmesan

This versatility makes croffles perfect for any time of day.

What to Serve With It

These South Korean croffles recipe (croissant waffles) pair beautifully with a variety of sides and drinks:

  • Fresh fruit or fruit salad
  • Coffee, latte, or iced matcha
  • Yogurt parfait
  • Freshly squeezed juice

They’re ideal for brunch spreads or cozy weekend breakfasts.

Storage & Reheating

If you have leftovers (which is rare!), here’s how to store your South Korean croffles recipe (croissant waffles):

  • Store in an airtight container at room temperature for 1 day
  • Refrigerate for up to 3 days
  • Reheat in a toaster or oven to restore crispiness

Avoid microwaving, as it can make them soft instead of crispy.

Common Mistakes to Avoid

Even though this recipe is simple, here are a few mistakes to watch out for:

  • Cooking at too high heat (burns outside, undercooks inside)
  • Not greasing the waffle maker properly
  • Overcrowding the waffle maker
  • Removing too early before fully crisp

Paying attention to these details makes all the difference.

FAQs

What are croffles?

Croffles are croissant dough cooked in a waffle maker, creating a crispy, flaky waffle-like pastry.

Can I use homemade croissant dough?

Yes! Homemade dough will give you an even richer and more authentic flavor.

Are croffles sweet or savory?

They can be both—just adjust the toppings or fillings to your preference.

Do I need a special waffle maker?

No, any standard waffle maker works perfectly for this recipe.

Final Thoughts

This South Korean croffles recipe (croissant waffles) is proof that simple ingredients can create something extraordinary. With minimal effort, you get a crispy, buttery, café-style treat that feels both indulgent and fun.

Whether you’re making them for breakfast, brunch, or dessert, croffles are guaranteed to impress. Once you try them, you’ll understand why this trend took the world by storm—and why it’s here to stay.

My 1 SECRET Ingredient Makes This Pasta Salad SO Good (You’ll Want It Every Week!)

The beauty of this recipe is in the balance of textures and flavors. The crisp vegetables contrast beautifully with the creamy dressing, while the Dijon mustard ties everything together with just the right amount of tang.

Use high-quality mayonnaise and fresh vegetables for the best results. If you want to elevate the flavor even more, try freshly grated cheese instead of pre-shredded—it melts slightly into the dressing and enhances the creaminess.

Pasta Salad

Step-by-Step Instructions

Making this dish is quick and easy:

1. Cook the Pasta

Boil pasta in salted water until al dente. Drain and let cool completely.

2. Prepare the Dressing

In a bowl, whisk together mayonnaise, Dijon mustard, vinegar, olive oil, salt, and pepper until smooth.

3. Chop the Vegetables

Dice cucumber, slice onion, and halve tomatoes.

4. Combine Everything

In a large bowl, mix pasta, vegetables, cheese, and parsley.

5. Toss with Dressing

Pour dressing over the salad and toss until evenly coated.

6. Chill Before Serving

Refrigerate for at least 30 minutes to let the flavors develop.

Tips for Perfect Results

To make sure My 1 SECRET ingredient makes this pasta salad SO good every time:

  • Always salt your pasta water generously
  • Let pasta cool completely before mixing
  • Taste and adjust seasoning after chilling
  • Don’t skip the resting time—it enhances flavor

These small steps make a noticeable difference in the final result.

Variations

This pasta salad is incredibly flexible, so feel free to get creative.

Add Protein

  • Grilled chicken
  • Tuna
  • Salami or ham

Make It Healthier

  • Use Greek yogurt instead of some mayo
  • Add more veggies like spinach or bell peppers

Boost Flavor

  • Add olives or sun-dried tomatoes
  • Sprinkle with Parmesan cheese

No matter how you customize it, My 1 SECRET ingredient makes this pasta salad SO good every time.

What to Serve With It

This pasta salad pairs perfectly with a variety of dishes:

  • Grilled burgers or chicken
  • BBQ ribs
  • Sandwiches or wraps
  • Fresh fruit or lemonade

It’s the ideal side dish for summer gatherings and casual dinners.

Storage & Reheating

Here’s how to store your pasta salad properly:

  • Store in an airtight container in the fridge
  • Keeps well for 3–4 days
  • Stir before serving to refresh the texture

No reheating needed—this dish is best served cold or slightly chilled.

Common Mistakes to Avoid

Even simple recipes can go wrong. Avoid these:

  • Overcooking the pasta
  • Adding dressing while pasta is hot
  • Skipping the Dijon mustard (seriously!)
  • Under-seasoning

Getting these right ensures your pasta salad is packed with flavor.

FAQs

What makes this pasta salad different?

The Dijon mustard adds a unique tang and creaminess that elevates the entire dish.

Can I make it ahead of time?

Yes! It actually tastes better after chilling for a few hours.

Can I make it without mayo?

You can substitute part or all of the mayo with Greek yogurt.

What pasta shape works best?

Short pasta like rotini or bowtie holds the dressing best.

Final Thoughts

If you’ve ever felt like pasta salad was a little boring, this recipe will completely change your mind. My 1 SECRET ingredient makes this pasta salad SO good that it transforms a simple dish into something truly memorable.

It’s easy, reliable, and packed with flavor—exactly the kind of recipe every home cook needs. Try it once, and it might just become your signature dish.

Perfect Chicken Pasta Salad With Avocado, Tomato and Basil (Fresh & Flavor-Packed)

If you’re craving something fresh, satisfying, and packed with vibrant flavors, this Perfect Chicken Pasta Salad With Avocado, Tomato and Basil is exactly what your table needs. It combines tender chicken, perfectly cooked pasta, creamy avocado, juicy tomatoes, and fragrant basil into one irresistible dish that feels both comforting and refreshing.

This recipe is especially popular during warmer months, but honestly, it’s delicious year-round. Whether you’re preparing a quick lunch, planning a picnic, or looking for a crowd-pleasing side dish, this pasta salad delivers on all fronts—flavor, texture, and ease.

Chicken Pasta Salad

Why You’ll Love This Recipe

This Perfect Chicken Pasta Salad With Avocado, Tomato and Basil isn’t just another pasta salad—it’s a complete, well-balanced meal that feels both hearty and light at the same time.

Here’s why it stands out:

  • Combines protein, healthy fats, and carbs in one dish
  • Fresh, bright flavors with a creamy texture
  • Easy to customize with what you have on hand
  • Perfect for meal prep and gatherings
  • Ready in under 30 minutes

The creamy avocado paired with juicy tomatoes and aromatic basil creates a flavor combination that’s simple yet incredibly satisfying.

Ingredients

To make this Perfect Chicken Pasta Salad With Avocado, Tomato and Basil, gather the following:

  • 2 cups cooked chicken breast (grilled or roasted, diced)
  • 3 cups cooked pasta (rotini, penne, or bowtie)
  • 1 large avocado (diced)
  • 1 cup cherry tomatoes (halved)
  • ¼ cup fresh basil (chopped)
  • ¼ cup red onion (thinly sliced)
  • 2 tablespoons olive oil
  • 1 tablespoon lemon juice
  • Salt and black pepper to taste

Optional additions:

  • Mozzarella balls
  • Cucumber slices
  • Parmesan cheese

Ingredient Notes

The key to a standout Perfect Chicken Pasta Salad With Avocado, Tomato and Basil lies in using fresh, high-quality ingredients. Choose ripe but firm avocados so they hold their shape when mixed. Cherry tomatoes add natural sweetness and juiciness, while fresh basil provides a fragrant, slightly peppery note that ties everything together beautifully.

For the pasta, opt for shapes like rotini or penne that hold onto the dressing well. And don’t forget to salt your pasta water—it’s your first opportunity to build flavor.

Step-by-Step Instructions

Making this Perfect Chicken Pasta Salad With Avocado, Tomato and Basil is simple and straightforward:

1. Cook the Pasta

Bring a pot of salted water to a boil and cook pasta according to package instructions. Drain and let it cool completely.

2. Prepare the Chicken

If not already cooked, season and grill or bake the chicken, then dice into bite-sized pieces.

3. Chop Fresh Ingredients

Dice the avocado, halve the tomatoes, slice the onion, and chop the basil.

4. Combine Everything

In a large bowl, add pasta, chicken, avocado, tomatoes, onion, and basil.

5. Dress the Salad

Drizzle with olive oil and lemon juice, then season with salt and pepper. Toss gently to combine.

Tips for Perfect Results

To make your Perfect Chicken Pasta Salad With Avocado, Tomato and Basil truly shine, follow these expert tips:

  • Let pasta cool before mixing to avoid mushy avocado
  • Toss gently to keep avocado chunks intact
  • Add avocado last to maintain its texture
  • Use fresh lemon juice for brightness
  • Taste and adjust seasoning before serving

These small details make a big difference in the final dish.

Variations

One of the best things about this Perfect Chicken Pasta Salad With Avocado, Tomato and Basil is how easy it is to customize.

Add More Protein

  • Grilled shrimp
  • Turkey or ham

Make It Vegetarian

  • Skip the chicken and add chickpeas or tofu

Change the Flavor Profile

  • Add pesto for an herby twist
  • Use balsamic glaze for a tangy finish

Add More Crunch

  • Toasted pine nuts
  • Chopped cucumbers

This flexibility makes it a recipe you can enjoy in many different ways.

What to Serve With It

This Perfect Chicken Pasta Salad With Avocado, Tomato and Basil works beautifully as a main dish or side.

Serve it with:

  • Grilled vegetables
  • Garlic bread or crusty baguette
  • A light soup
  • Fresh fruit or lemonade

It’s perfect for picnics, barbecues, or even as a quick weekday dinner.

Storage & Reheating

Proper storage helps maintain the freshness of your Perfect Chicken Pasta Salad With Avocado, Tomato and Basil.

  • Store in an airtight container in the refrigerator
  • Best consumed within 1–2 days
  • Add fresh avocado just before serving if possible

This salad is meant to be enjoyed cold or at room temperature—no reheating needed.

Common Mistakes to Avoid

Avoid these common pitfalls when making your Perfect Chicken Pasta Salad With Avocado, Tomato and Basil:

  • Overcooking the pasta
  • Mixing while pasta is still hot
  • Using underripe avocado
  • Skipping seasoning or acid

Balancing flavors and textures is key to getting it just right.

FAQs

Can I make this pasta salad ahead of time?

Yes, but for best results, add the avocado right before serving to keep it fresh.

What type of pasta works best?

Short pasta like rotini, penne, or bowtie works best because it holds the dressing well.

Can I use store-bought rotisserie chicken?

Absolutely! It’s a great time-saving option and adds plenty of flavor.

How do I keep avocado from browning?

Toss it with lemon juice and store the salad in an airtight container to slow oxidation.

Final Thoughts

This Perfect Chicken Pasta Salad With Avocado, Tomato and Basil is everything you want in a fresh, easy recipe—simple, flavorful, and incredibly satisfying. It’s the kind of dish that looks impressive but requires minimal effort, making it perfect for both everyday meals and special occasions.

Once you try it, you’ll see why it quickly becomes a staple. It’s fresh, wholesome, and packed with ingredients that work beautifully together in every bite.

Healthy Avocado Chicken Salad (Creamy, Light & Protein-Packed)

If you’re searching for a fresh, wholesome twist on a classic, this Healthy Avocado Chicken Salad is about to become your new go-to recipe. It delivers all the creamy satisfaction of traditional chicken salad—but without the heavy mayonnaise. Instead, ripe avocados create a naturally rich, velvety texture that’s both nourishing and delicious.

Perfect for lunch, meal prep, or a light dinner, this salad strikes the ideal balance between flavor and nutrition. It’s loaded with lean protein, healthy fats, and crisp vegetables, making it a smart choice for anyone looking to eat well without sacrificing taste.

Healthy Avocado Chicken Salad

Why You’ll Love This Recipe

This Healthy Avocado Chicken Salad stands out for its simplicity and clean ingredients. It’s the kind of recipe that feels indulgent while still being incredibly good for you.

Here’s why it’s worth making:

  • Naturally creamy with no mayonnaise
  • High in protein and healthy fats
  • Quick and easy to prepare
  • Perfect for meal prep and lunches
  • Gluten-free, low-carb, and keto-friendly

It’s a modern, healthier take on a classic comfort food that doesn’t compromise on flavor.

Ingredients

To make this flavorful Healthy Avocado Chicken Salad, you’ll need:

  • 2 cups cooked chicken breast (shredded or diced)
  • 2 ripe avocados
  • ¼ cup red onion (finely chopped)
  • ¼ cup celery (diced)
  • 2 tablespoons fresh cilantro or parsley
  • 2 tablespoons lime juice
  • 1 tablespoon olive oil
  • Salt and black pepper to taste

Optional add-ins:

  • Cherry tomatoes (halved)
  • Cucumber (diced)
  • Jalapeño (for a spicy kick)

Ingredient Notes

The success of this Healthy Avocado Chicken Salad depends heavily on using fresh, high-quality ingredients. Choose avocados that are perfectly ripe—they should yield slightly when pressed but not feel mushy. This ensures a smooth, creamy texture without any bitterness.

Rotisserie chicken is a fantastic time-saving option, but if you have the time, cooking and seasoning your own chicken breast gives you more control over flavor. Fresh lime juice is key here—it brightens the entire dish and balances the richness of the avocado.

Step-by-Step Instructions

Making this Healthy Avocado Chicken Salad couldn’t be easier:

1. Prepare the Avocado Base

Cut the avocados in half, remove the pit, and scoop into a bowl. Mash with a fork until creamy but slightly chunky.

2. Add Flavor

Stir in lime juice, olive oil, salt, and pepper. Mix until well combined.

3. Combine Ingredients

Add the chicken, red onion, celery, and herbs to the bowl.

4. Mix Gently

Fold everything together until evenly coated and creamy.

5. Taste & Adjust

Adjust seasoning with extra lime juice, salt, or pepper as needed.

Tips for Perfect Results

To make your Healthy Avocado Chicken Salad absolutely perfect, keep these tips in mind:

  • Use ripe avocados for the best texture
  • Don’t overmix—keep some texture for better mouthfeel
  • Add lime juice immediately to prevent browning
  • Chill for 15–20 minutes before serving for enhanced flavor

These small adjustments can take your salad from good to outstanding.

Variations

This Healthy Avocado Chicken Salad is incredibly versatile, making it easy to customize.

Add More Crunch

  • Chopped nuts like almonds or walnuts
  • Diced bell peppers

Boost the Flavor

  • Add garlic or a pinch of cumin
  • Mix in a spoonful of Greek yogurt for tanginess

Make It Spicy

  • Add hot sauce or chili flakes
  • Include diced jalapeños

You can easily tailor the recipe to match your cravings or dietary needs.

What to Serve With It

This Healthy Avocado Chicken Salad can be enjoyed in many ways:

  • Serve it in lettuce wraps for a low-carb option
  • Spread it on whole-grain toast or sandwiches
  • Stuff it into pita bread or wraps
  • Pair it with crackers for a quick snack

It’s a flexible dish that works for everything from casual lunches to elegant light meals.

Storage & Reheating

Because avocado is delicate, storing this Healthy Avocado Chicken Salad requires a bit of care.

  • Store in an airtight container in the refrigerator
  • Best enjoyed within 1–2 days
  • Press plastic wrap directly onto the surface to reduce browning

This salad is not suitable for reheating, but it tastes best when served chilled or at room temperature.

Common Mistakes to Avoid

Even a simple recipe like Healthy Avocado Chicken Salad can go wrong if you’re not careful.

  • Using underripe or overripe avocados
  • Skipping acid (lime/lemon), which prevents browning
  • Overloading with ingredients and losing balance
  • Not seasoning properly

Keeping things simple and balanced is the key to success here.

FAQs

Can I make Healthy Avocado Chicken Salad ahead of time?

Yes, but for best results, enjoy it within 24 hours to keep the avocado fresh and vibrant.

How do I keep the avocado from turning brown?

Adding lime juice and storing it properly with minimal air exposure helps slow oxidation.

Can I freeze this salad?

No, freezing is not recommended as avocado changes texture when thawed.

Is this recipe keto-friendly?

Absolutely! This Healthy Avocado Chicken Salad is low in carbs and high in healthy fats, making it perfect for keto diets.

Final Thoughts

This Healthy Avocado Chicken Salad is proof that eating healthy doesn’t have to be boring. It’s creamy, flavorful, and incredibly satisfying—all while being packed with nutrients your body will thank you for.

Whether you’re prepping meals for the week or throwing together a quick lunch, this recipe is a reliable favorite you’ll come back to again and again. Once you try it, you might never go back to traditional chicken salad!

Southwest Chicken Salad (Easy, Flavor-Packed & Healthy!)

If you’re looking for a meal that’s vibrant, satisfying, and bursting with bold Tex-Mex flavors, this Southwest Chicken Salad is exactly what you need. It’s the perfect balance of juicy grilled chicken, crisp vegetables, hearty beans, and a creamy, tangy dressing that ties everything together beautifully. Whether you’re meal prepping for the week or serving a crowd, this salad delivers both flavor and nutrition in every bite.

What makes this dish stand out is its versatility—you can enjoy it as a light lunch, a hearty dinner, or even as a crowd-pleasing potluck dish. Plus, it’s incredibly customizable, so you can easily adapt it to suit your preferences or what you already have in your kitchen.

Southwest Chicken Salad

Why You’ll Love This Recipe

This Southwest Chicken Salad isn’t just another salad—it’s a full-on flavor experience. Every bite combines smoky, creamy, crunchy, and fresh elements that make it incredibly satisfying.

Here’s why it’s a favorite:

  • Packed with protein and fiber
  • Quick and easy to prepare
  • Perfect for meal prep
  • Naturally gluten-free
  • Customizable to your taste

It’s the kind of recipe you’ll come back to again and again because it never feels boring or repetitive.

Ingredients

To make this delicious Southwest Chicken Salad, you’ll need:

  • 2 cups cooked grilled chicken breast (sliced or diced)
  • 6 cups chopped romaine lettuce
  • 1 cup canned black beans (rinsed and drained)
  • 1 cup corn kernels (fresh, canned, or frozen)
  • 1 cup cherry tomatoes (halved)
  • 1 avocado (diced)
  • ½ cup shredded cheddar or Mexican blend cheese
  • ¼ cup red onion (thinly sliced)
  • ¼ cup chopped cilantro
  • Tortilla strips (optional, for crunch)

For the dressing:

  • ½ cup Greek yogurt or mayonnaise
  • 2 tablespoons lime juice
  • 1 tablespoon olive oil
  • 1 teaspoon chili powder
  • ½ teaspoon cumin
  • 1 garlic clove (minced)
  • Salt and pepper to taste

Ingredient Notes

The beauty of this Southwest Chicken Salad lies in the quality and balance of its ingredients. Using freshly grilled chicken makes a huge difference in flavor, especially if it’s seasoned with chili powder, paprika, and garlic before cooking.

If you’re short on time, rotisserie chicken works wonderfully as a shortcut. For the corn, grilled corn adds a smoky sweetness that elevates the entire dish. And don’t skip the avocado—it adds a creamy texture that complements the tangy dressing perfectly.

Step-by-Step Instructions

Making this Southwest Chicken Salad is simple and straightforward:

1. Prepare the Chicken

If not already cooked, season chicken with salt, pepper, chili powder, and cumin, then grill or pan-sear until fully cooked. Let it rest before slicing.

2. Make the Dressing

In a bowl, whisk together Greek yogurt (or mayo), lime juice, olive oil, spices, garlic, salt, and pepper until smooth and creamy.

3. Assemble the Salad

In a large bowl, combine lettuce, black beans, corn, tomatoes, onion, and cilantro.

4. Add Chicken & Toppings

Top with sliced chicken, avocado, cheese, and tortilla strips.

5. Toss & Serve

Drizzle dressing over the salad and toss gently until evenly coated.

Tips for Perfect Results

To make your Southwest Chicken Salad truly exceptional, keep these tips in mind:

  • Always let your chicken rest before slicing to keep it juicy
  • Use chilled ingredients for a refreshing salad
  • Add dressing just before serving to prevent sogginess
  • Taste and adjust seasoning before serving

A little attention to detail goes a long way in elevating this dish from good to unforgettable.

Variations

One of the best things about Southwest Chicken Salad is how adaptable it is.

Protein Swaps

  • Use shrimp or steak instead of chicken
  • Make it vegetarian with grilled tofu or extra beans

Dressing Options

  • Try a chipotle ranch for extra smokiness
  • Use a vinaigrette for a lighter version

Add-Ins

  • Quinoa or rice for extra heartiness
  • Jalapeños for heat
  • Bell peppers for extra crunch

These variations allow you to reinvent the salad depending on your mood or dietary needs.

What to Serve With It

This Southwest Chicken Salad is a complete meal on its own, but it pairs beautifully with:

  • Warm tortillas or flatbread
  • A side of tortilla soup
  • Fresh fruit salad
  • Iced tea or lime agua fresca

It’s also fantastic as a filling for wraps or tacos if you want to switch things up.

Storage & Reheating

If you’re making this Southwest Chicken Salad ahead of time, proper storage is key.

  • Store salad and dressing separately in airtight containers
  • Keep refrigerated for up to 3 days
  • Add avocado fresh before serving to prevent browning

Avoid reheating the salad, but you can warm the chicken slightly if desired before adding it back in.

Common Mistakes to Avoid

Even simple recipes can go wrong without a little care. Here are common pitfalls:

  • Overdressing the salad (it can become soggy quickly)
  • Using dry or overcooked chicken
  • Skipping seasoning (this salad thrives on bold flavors)
  • Not balancing textures (crunchy + creamy is key)

Avoiding these mistakes ensures your Southwest Chicken Salad turns out perfect every time.

FAQs

Can I make Southwest Chicken Salad ahead of time?

Yes! Just store the dressing separately and combine everything right before serving for best freshness.

Is this salad healthy?

Absolutely. It’s high in protein, fiber, and healthy fats, especially if you use Greek yogurt in the dressing.

Can I use canned chicken?

You can, but fresh or rotisserie chicken will give you much better flavor and texture.

How do I make it dairy-free?

Simply skip the cheese and use a dairy-free dressing alternative.

Final Thoughts

This Southwest Chicken Salad is everything a great recipe should be—flavorful, easy, versatile, and satisfying. It brings together the bold, zesty flavors of the Southwest in a way that feels fresh and nourishing, making it perfect for busy weeknights or relaxed weekend meals.

Once you try it, you’ll see why it’s a staple in so many kitchens. Don’t be surprised if it becomes one of your go-to recipes for both everyday meals and special gatherings.

Healthy Greek Yogurt Chicken Salad (Creamy, High-Protein & Easy Recipe)

If you’re looking for a lighter, healthier twist on classic chicken salad, this Healthy Greek Yogurt Chicken Salad is going to be your new go-to recipe. It’s creamy, flavorful, and packed with protein—without the heaviness of traditional mayo-based chicken salad.

This Greek yogurt chicken salad is perfect for meal prep, quick lunches, sandwiches, wraps, or even served over fresh greens. The combination of tender chicken, tangy Greek yogurt, and crunchy mix-ins creates a balanced dish that feels both satisfying and refreshing.

Healthy Greek Yogurt Chicken Salad

Why You’ll Love This Healthy Greek Yogurt Chicken Salad

This Healthy Greek Yogurt Chicken Salad is more than just a simple lunch—it’s a nutritious, versatile recipe you’ll make again and again.

  • High in protein and naturally low in fat
  • Creamy texture without heavy mayonnaise
  • Perfect for meal prep and busy weekdays
  • Great for sandwiches, wraps, or lettuce cups
  • Customizable with sweet or savory add-ins

It’s the perfect balance of healthy eating and comfort food flavor.

Ingredients

To make the best Greek yogurt chicken salad, you’ll need:

  • 3 cups cooked chicken breast (shredded or diced)
  • 1 cup plain Greek yogurt
  • 1/2 cup celery, finely chopped
  • 1/3 cup red grapes, halved (optional)
  • 2 tbsp red onion, finely diced
  • 1 tbsp Dijon mustard
  • 1 tbsp lemon juice
  • Salt and black pepper to taste
  • 1 tbsp fresh parsley, chopped

Ingredient Notes

The base of this Healthy Greek Yogurt Chicken Salad is plain Greek yogurt, which gives it a creamy texture while adding protein and probiotics. Make sure to use unsweetened yogurt for the best savory flavor.

Cooked chicken breast works best because it’s lean and easy to shred. You can use leftover roasted chicken or rotisserie chicken for convenience.

Step-by-Step Instructions

Step 1: Prepare the Chicken

Shred or dice cooked chicken breast into bite-sized pieces.

Step 2: Mix the Dressing

In a large bowl, combine Greek yogurt, Dijon mustard, lemon juice, salt, and black pepper. Mix until smooth.

Step 3: Combine Ingredients

Add chicken, celery, red onion, grapes, and parsley into the bowl.

Step 4: Mix and Chill

Stir everything together until evenly coated. Chill for 15–30 minutes before serving for best flavor.

Tips for Perfect Results

To make the best Greek yogurt chicken salad, follow these simple tips:

  • Use cold, cooked chicken for best texture
  • Don’t overmix to keep chicken pieces intact
  • Chill before serving to enhance flavor
  • Add dressing gradually to avoid it becoming too watery
  • Season well with salt and lemon for balance

These small details make a big difference in taste and texture.

Variations

You can easily customize this Healthy Greek Yogurt Chicken Salad:

  • Mediterranean Style: Add olives and feta cheese
  • Nutty Crunch: Add almonds or walnuts
  • Spicy Version: Add chili flakes or hot sauce
  • Low-Carb Version: Skip grapes and serve in lettuce cups

Each variation keeps the base healthy while adding new flavors.

What to Serve With It

This Greek yogurt chicken salad pairs perfectly with:

  • Whole grain bread or wraps
  • Lettuce cups for a low-carb option
  • Crackers or pita chips
  • Fresh green salad

It’s versatile enough for lunch, dinner, or snacks.

Storage & Reheating

Store Healthy Greek Yogurt Chicken Salad in an airtight container in the refrigerator for up to 3 days.

Since it contains yogurt, it should be kept cold at all times. Do not freeze, as the texture will change. Stir before serving if it separates slightly.

Common Mistakes

Avoid these mistakes when making Greek yogurt chicken salad:

  • Using flavored yogurt instead of plain
  • Overmixing the salad
  • Adding too much liquid (makes it runny)
  • Not seasoning enough

Proper balance is key for the best flavor.

FAQs

Is Greek yogurt chicken salad healthy?

Yes, it’s high in protein and lower in fat than traditional mayo-based versions.

Can I use rotisserie chicken?

Yes, it’s a great time-saving option.

How long does it last in the fridge?

Up to 3 days when stored properly.

Can I make it dairy-free?

Yes, you can use dairy-free yogurt alternatives.

Final Thoughts

This Healthy Greek Yogurt Chicken Salad is a simple, nutritious, and incredibly versatile recipe that fits perfectly into any healthy eating routine. It’s creamy, flavorful, and satisfying without being heavy.

Whether you enjoy it in a sandwich, wrap, or on its own, this recipe is a reliable go-to for quick meals and meal prep. Once you try it, it will become a staple in your kitchen.

Easy Strawberry Spinach Salad (15-Minutes) – Fresh, Healthy & Flavorful Recipe

If you’re looking for a fresh, vibrant, and incredibly easy dish, this Easy Strawberry Spinach Salad (15-Minutes) is exactly what you need. It’s light, refreshing, and packed with flavor, making it perfect for lunch, dinner, or even as a side dish for gatherings.

This strawberry spinach salad combines sweet strawberries, crisp spinach, crunchy nuts, and a tangy dressing that brings everything together beautifully. The best part? It takes just 15 minutes to prepare, making it ideal for busy weekdays or last-minute meals.

Easy Strawberry Spinach Salad

Why You’ll Love This Easy Strawberry Spinach Salad

This Easy Strawberry Spinach Salad (15-Minutes) is more than just a salad—it’s a perfect balance of sweet, savory, and tangy flavors.

  • Quick and easy 15-minute preparation
  • Naturally sweet and refreshing flavor
  • Packed with vitamins and nutrients
  • Perfect for summer meals and BBQs
  • Light but satisfying

It’s the kind of salad that even non-salad lovers enjoy.

Ingredients

To make this delicious strawberry spinach salad, you’ll need:

  • 6 cups fresh baby spinach
  • 1 1/2 cups fresh strawberries, sliced
  • 1/3 cup crumbled feta cheese
  • 1/4 cup sliced almonds or walnuts
  • 1/4 small red onion, thinly sliced (optional)

For the Dressing:

  • 3 tbsp olive oil
  • 1 tbsp balsamic vinegar
  • 1 tbsp honey
  • 1 tsp Dijon mustard
  • Salt and black pepper to taste

Ingredient Notes

The success of this Easy Strawberry Spinach Salad (15-Minutes) depends on fresh, high-quality ingredients. Baby spinach works best because of its soft texture and mild flavor.

Strawberries should be ripe and sweet, as they are the star of the dish. For added crunch, toasted nuts like almonds or walnuts work beautifully. The balsamic dressing ties everything together with a perfect sweet and tangy balance.

Step-by-Step Instructions

Step 1: Prepare the Base

Wash and dry the spinach thoroughly. Place it in a large salad bowl.

Step 2: Add Fruits and Toppings

Slice strawberries and add them to the spinach. Sprinkle feta cheese, nuts, and red onion if using.

Step 3: Make the Dressing

In a small bowl, whisk together olive oil, balsamic vinegar, honey, Dijon mustard, salt, and pepper.

Step 4: Assemble the Salad

Drizzle dressing over the salad and toss gently before serving.

Tips for Perfect Results

To make the best strawberry spinach salad, keep these tips in mind:

  • Use fresh, dry spinach for best texture
  • Add dressing just before serving
  • Toast nuts for extra flavor and crunch
  • Slice strawberries evenly for consistent bites
  • Balance sweet and tangy dressing carefully

These simple tips help elevate your salad from good to great.

Variations

You can easily customize this Easy Strawberry Spinach Salad (15-Minutes):

  • Protein Boost: Add grilled chicken or shrimp
  • Cheese Swap: Use goat cheese instead of feta
  • Nut-Free Version: Skip nuts or use sunflower seeds
  • Extra Fruit: Add blueberries or apple slices

Each variation adds a unique twist while keeping it fresh and healthy.

What to Serve With It

This strawberry spinach salad pairs perfectly with:

  • Grilled chicken or salmon
  • Pasta dishes
  • Sandwiches or wraps
  • BBQ meals

It’s a versatile side dish that complements many main courses.

Storage & Reheating

Store the salad ingredients separately for best freshness. Keep spinach and toppings in airtight containers in the fridge for up to 2 days.

Do not store the salad once dressed, as it will become soggy. Dressing can be stored separately in the refrigerator for up to 5 days.

Common Mistakes

Avoid these common mistakes when making Easy Strawberry Spinach Salad (15-Minutes):

  • Adding dressing too early
  • Using wet spinach leaves
  • Overpowering with too much cheese
  • Using unripe strawberries

These can affect both texture and flavor.

FAQs

Can I make strawberry spinach salad ahead of time?

Yes, but keep ingredients and dressing separate until serving.

What dressing goes best with spinach strawberry salad?

Balsamic vinaigrette is the most popular choice.

Can I add protein to this salad?

Yes, grilled chicken, shrimp, or tofu work great.

Is strawberry spinach salad healthy?

Yes, it’s rich in vitamins, fiber, and antioxidants.

Final Thoughts

This Easy Strawberry Spinach Salad (15-Minutes) is a perfect combination of fresh, sweet, and savory flavors. It’s quick to prepare, incredibly healthy, and beautiful enough to serve at any gathering.

Whether you’re making it for a light lunch or a dinner side dish, this salad delivers freshness in every bite. Once you try it, it will become a regular in your meal rotation.

Brownie Cookies – In Bloom Bakery (Fudgy, Crinkly & Bakery-Style Recipe)

If you love brownies but also crave the convenience of cookies, these Brownie Cookies – In Bloom Bakery inspired treats are going to be your new favorite dessert. They combine the best of both worlds: the shiny, crackly top of a perfect brownie and the chewy edges of a bakery-style cookie.

These brownie cookies are deeply chocolatey, soft in the center, and slightly crisp on the outside. They’re rich enough to satisfy serious chocolate cravings but still simple enough for beginner bakers to master at home.

Brownie Cookies

Why You’ll Love These Brownie Cookies

These Brownie Cookies – In Bloom Bakery style cookies are a dream for chocolate lovers.

  • Fudgy brownie-like centers with crisp edges
  • Shiny, crackly tops like classic brownies
  • Deep, rich chocolate flavor
  • Easy one-bowl cookie recipe
  • Perfect for holidays, gifting, or everyday baking

They deliver bakery-level results with minimal effort.

Ingredients

To make the best brownie cookies, you’ll need:

  • 1 cup semi-sweet chocolate chips or chopped chocolate
  • 1/2 cup unsalted butter
  • 3/4 cup granulated sugar
  • 1/4 cup brown sugar
  • 2 large eggs
  • 1 tsp vanilla extract
  • 3/4 cup all-purpose flour
  • 1/4 cup unsweetened cocoa powder
  • 1/2 tsp baking powder
  • 1/4 tsp salt
  • Extra chocolate chunks for topping

Ingredient Notes

The key to perfect brownie cookies – In Bloom Bakery style is using good-quality chocolate. Since chocolate is the main flavor, choose a semi-sweet or dark chocolate with at least 60% cocoa.

Melting the chocolate with butter creates that signature fudgy texture. The combination of white and brown sugar helps create the shiny, crackly tops that make these cookies so irresistible.

Step-by-Step Instructions

Step 1: Melt Chocolate and Butter

In a heatproof bowl, melt chocolate and butter together until smooth. Let it cool slightly.

Step 2: Whisk Sugars and Eggs

In a separate bowl, whisk granulated sugar, brown sugar, eggs, and vanilla until light and glossy.

Step 3: Combine Mixtures

Slowly mix the melted chocolate into the egg mixture until fully combined.

Step 4: Add Dry Ingredients

Fold in flour, cocoa powder, baking powder, and salt. Mix until just combined.

Step 5: Chill the Dough

Refrigerate dough for 20–30 minutes to help cookies hold shape.

Step 6: Bake the Cookies

Preheat oven to 350°F. Scoop dough onto baking sheet and bake for 10–12 minutes.

Step 7: Cool and Enjoy

Let cookies cool slightly before eating for the perfect fudgy texture.

Tips for Perfect Results

To master Brownie Cookies – In Bloom Bakery, follow these expert tips:

  • Don’t overbake—cookies should be soft in the center
  • Use high-quality melted chocolate for best flavor
  • Chill dough for thicker cookies
  • Whisk eggs and sugar well for crackly tops
  • Add chocolate chunks on top before baking

These techniques guarantee bakery-quality results.

Variations

You can customize your brownie cookies easily:

  • Sea Salt Version: Sprinkle flaky salt on top
  • Double Chocolate: Add extra chocolate chips inside
  • Nutty Brownie Cookies: Add walnuts or pecans
  • Espresso Boost: Add espresso powder for deeper flavor

Each variation enhances the chocolate experience.

What to Serve With It

These brownie cookies pair perfectly with:

  • Cold milk
  • Hot coffee or espresso
  • Vanilla ice cream
  • Whipped cream

They’re perfect for dessert platters or cozy nights in.

Storage & Reheating

Store brownie cookies – In Bloom Bakery style in an airtight container at room temperature for up to 4 days. For longer storage, freeze for up to 2 months.

To enjoy warm cookies, microwave for 10–15 seconds to restore their fudgy texture.

Common Mistakes

Avoid these common baking mistakes:

  • Overbaking (leads to dry cookies)
  • Skipping dough chilling
  • Using low-quality chocolate
  • Overmixing the batter

Small details make a big difference in texture and flavor.

FAQs

Why are my brownie cookies not fudgy?

They may have been overbaked or not enough chocolate was used.

Can I freeze brownie cookie dough?

Yes, freeze for up to 3 months.

What makes brownie cookies shiny on top?

Whisking eggs and sugar well creates the glossy surface.

Can I use milk chocolate instead of dark chocolate?

Yes, but dark chocolate gives a richer flavor.

Final Thoughts

These Brownie Cookies – In Bloom Bakery inspired cookies are the ultimate treat for chocolate lovers. Fudgy, rich, and perfectly crackly on top, they combine everything you love about brownies and cookies in one bite.

Whether you’re baking for guests or treating yourself, this recipe delivers consistent, bakery-style results every time. Once you try them, they’ll quickly become a favorite in your dessert collection.

Oreo Cheesecake Cookies (Soft, Creamy & Cookies-and-Cream Delight)

If you love cookies and cheesecake, these Oreo Cheesecake Cookies are going to become your new obsession. They combine the rich, tangy flavor of cheesecake with the crunchy, chocolatey goodness of Oreos—all baked into a soft, chewy cookie.

These Oreo Cheesecake Cookies are the perfect dessert for parties, holidays, or anytime you want something indulgent but easy to make. With simple ingredients and a straightforward method, you can achieve bakery-quality cookies right at home.

Oreo Cheesecake Cookies

Why You’ll Love These Oreo Cheesecake Cookies

These cookies are not your ordinary chocolate chip cookies—they’re richer, softer, and more indulgent.

  • Soft and chewy texture with creamy cheesecake flavor
  • Packed with Oreo cookie chunks in every bite
  • Easy, beginner-friendly recipe
  • Perfect for holidays, parties, or gifting
  • Bakery-style taste without complicated steps

Every bite delivers that cookies-and-cream experience everyone loves.

Ingredients

To make the best Oreo Cheesecake Cookies, you’ll need:

  • 1 3/4 cups all-purpose flour
  • 1/2 tsp baking soda
  • 1/2 tsp salt
  • 1/2 cup unsalted butter (softened)
  • 4 oz cream cheese (softened)
  • 3/4 cup brown sugar
  • 1/2 cup white sugar
  • 2 large eggs
  • 2 tsp vanilla extract
  • 1 1/2 cups crushed Oreo cookies (plus extra for topping)

Ingredient Notes

The secret to perfect Oreo Cheesecake Cookies is the combination of butter and cream cheese. The butter gives richness, while the cream cheese adds that signature cheesecake tang and softness.

Use classic Oreo cookies for the best flavor and texture. Don’t crush them too finely—leave some chunks for that cookies-and-cream bite experience.

Step-by-Step Instructions

Step 1: Prepare Dry Ingredients

In a bowl, whisk together flour, baking soda, and salt. Set aside.

Step 2: Cream Butter, Cream Cheese & Sugars

Beat butter, cream cheese, brown sugar, and white sugar until smooth and fluffy.

Step 3: Add Eggs and Vanilla

Mix in eggs one at a time, then add vanilla extract.

Step 4: Combine Dough

Gradually add dry ingredients into wet mixture and stir until just combined.

Step 5: Add Oreos

Fold in crushed Oreo cookies, leaving some larger chunks for texture.

Step 6: Bake the Cookies

Preheat oven to 350°F. Scoop dough onto a baking sheet and bake for 10–12 minutes.

Step 7: Cool and Serve

Let cookies cool before serving to allow the cheesecake texture to set.

Tips for Perfect Results

To get the best Oreo Cheesecake Cookies, follow these tips:

  • Chill dough for thicker cookies
  • Do not overmix after adding flour
  • Slightly underbake for soft centers
  • Use room-temperature cream cheese for smooth blending
  • Add extra Oreo pieces on top before baking

These small adjustments create bakery-style results every time.

Variations

You can easily customize your Oreo Cheesecake Cookies:

  • Double Oreo Version: Add extra crushed Oreos in the dough
  • White Chocolate Oreo Cookies: Add white chocolate chips
  • Stuffed Cookies: Add a cream cheese center
  • Mint Oreo Version: Use mint-flavored Oreos

Each version gives a unique twist on the classic recipe.

What to Serve With It

These cookies pair perfectly with:

  • Cold milk
  • Hot coffee or latte
  • Vanilla ice cream
  • Hot chocolate

They’re great for dessert tables, parties, or cozy nights at home.

Storage & Reheating

Store Oreo Cheesecake Cookies in an airtight container in the refrigerator for up to 5 days due to the cream cheese. For longer storage, freeze for up to 2 months.

To enjoy warm, let them sit at room temperature or microwave for 10–15 seconds.

Common Mistakes

Avoid these common mistakes:

  • Overbaking (makes cookies dry instead of soft)
  • Using cold cream cheese (causes lumps)
  • Overmixing dough
  • Crushing Oreos too finely

Proper technique ensures soft, creamy cookies every time.

FAQs

Why are my Oreo cheesecake cookies not soft?

They may be overbaked or overmixed.

Can I freeze the dough?

Yes, freeze for up to 3 months.

Do I need to refrigerate these cookies?

Yes, because of the cream cheese content.

Can I use flavored Oreos?

Yes, any Oreo variety works well.

Final Thoughts

These Oreo Cheesecake Cookies are the perfect blend of creamy cheesecake richness and classic cookies-and-cream flavor. Soft, chewy, and packed with Oreo chunks, they’re a guaranteed crowd favorite.

Whether you’re baking for family, friends, or just yourself, this recipe is simple, reliable, and incredibly delicious. Once you try them, they’ll become one of your go-to cookie recipes.

Double Chocolate S’mores Cookies – Cambrea Bakes Copycat Recipe (Ultra Chewy & Gooey)

If you’re a fan of rich, gooey, bakery-style cookies, these Double Chocolate S’mores Cookies – Cambrea Bakes inspired treats will absolutely blow your mind. Imagine everything you love about a classic campfire s’more—crispy graham crackers, melted chocolate, and gooey marshmallows—baked into a thick, fudgy double chocolate cookie.

These cookies are indulgent, soft in the center, slightly crisp on the edges, and packed with deep chocolate flavor in every bite. The combination of textures makes them one of the most satisfying desserts you can bake at home.

Double Chocolate S’mores Cookies

Why You’ll Love These Double Chocolate S’mores Cookies

These Double Chocolate S’mores Cookies – Cambrea Bakes style cookies are not your average chocolate chip cookie—they are next-level indulgence.

  • Rich double chocolate cookie base (deep cocoa flavor)
  • Gooey marshmallow centers like a real s’more
  • Crunchy graham cracker pieces for texture
  • Bakery-style thick and chewy consistency
  • Perfect balance of sweet, smoky, and chocolatey flavors

They are the kind of cookies that disappear within minutes at any gathering.

Ingredients

To make these irresistible double chocolate s’mores cookies, you’ll need:

  • 1 3/4 cups all-purpose flour
  • 1/2 cup unsweetened cocoa powder
  • 1 tsp baking soda
  • 1/2 tsp salt
  • 3/4 cup unsalted butter (softened)
  • 1 cup brown sugar
  • 1/2 cup white sugar
  • 2 large eggs
  • 2 tsp vanilla extract
  • 1 cup chocolate chunks or chips
  • 1 cup mini marshmallows
  • 1 cup crushed graham crackers

Ingredient Notes

The secret behind perfect Double Chocolate S’mores Cookies – Cambrea Bakes style cookies is the balance between rich cocoa dough and gooey add-ins. Use high-quality cocoa powder for a deep chocolate flavor.

Mini marshmallows are essential—they melt into soft, caramelized pockets inside the cookie. Graham crackers add crunch and that signature s’mores taste. Chocolate chunks work better than chips because they melt more dramatically.

Step-by-Step Instructions

Step 1: Prepare the Dry Ingredients

In a bowl, whisk together flour, cocoa powder, baking soda, and salt until well combined.

Step 2: Cream Butter and Sugars

In a separate bowl, beat butter, brown sugar, and white sugar until light and fluffy.

Step 3: Add Wet Ingredients

Mix in eggs one at a time, then add vanilla extract.

Step 4: Combine Dough

Slowly add dry ingredients to wet ingredients. Stir until just combined.

Step 5: Add S’mores Mix-Ins

Fold in chocolate chunks, crushed graham crackers, and mini marshmallows.

Step 6: Bake the Cookies

Preheat oven to 350°F. Scoop dough onto a baking sheet and bake for 10–12 minutes.

Step 7: Cool Slightly and Enjoy

Let cookies cool for a few minutes so the marshmallows set slightly before eating.

Tips for Perfect Results

To get bakery-quality double chocolate s’mores cookies, follow these tips:

  • Chill the dough for thicker cookies
  • Add marshmallows halfway through baking for less melting
  • Do not overbake—cookies should be soft in the center
  • Use parchment paper to prevent sticking
  • Add extra chocolate chunks on top before baking

These small details make a big difference in texture and appearance.

Variations

You can customize your Double Chocolate S’mores Cookies – Cambrea Bakes style recipe easily:

  • Peanut Butter S’mores Cookies: Add peanut butter chips
  • Salted Caramel Version: Drizzle caramel after baking
  • Extra Gooey Version: Add more marshmallows inside
  • Dark Chocolate Upgrade: Use 70% dark chocolate chunks

Each variation enhances the rich s’mores experience.

What to Serve With It

These cookies pair perfectly with:

  • Cold milk
  • Hot chocolate
  • Coffee or latte
  • Vanilla ice cream for cookie sandwiches

They’re perfect for cozy nights, parties, or holiday dessert tables.

Storage & Reheating

Store Double Chocolate S’mores Cookies – Cambrea Bakes in an airtight container at room temperature for up to 4 days. For longer storage, freeze baked cookies for up to 2 months.

To reheat, warm in the microwave for 10–15 seconds to restore gooey marshmallow texture.

Common Mistakes

Avoid these mistakes when baking double chocolate s’mores cookies:

  • Overbaking (makes cookies dry)
  • Using too many marshmallows (can cause spreading issues)
  • Skipping dough chilling
  • Not measuring cocoa powder correctly

Precision ensures perfect bakery-style results.

FAQs

Why are my s’mores cookies spreading too much?

The butter may be too warm or dough wasn’t chilled.

Can I use large marshmallows instead of mini?

Mini marshmallows work best for even distribution.

Can I freeze cookie dough?

Yes, freeze for up to 3 months.

What makes these cookies “double chocolate”?

They use cocoa powder in the dough plus chocolate chunks.

Final Thoughts

These Double Chocolate S’mores Cookies – Cambrea Bakes inspired cookies are the ultimate indulgent treat—rich, gooey, and packed with nostalgic campfire flavors. Every bite delivers melted chocolate, soft marshmallow, and crunchy graham cracker in perfect harmony.

Whether you’re baking for family, friends, or just yourself, this recipe guarantees bakery-level results at home. Once you try them, they’ll become one of your favorite cookie recipes ever.