Cajun Crispy Chicken Sandwich with Garlic Aioli (Bold, Crunchy & Flavor-Packed)

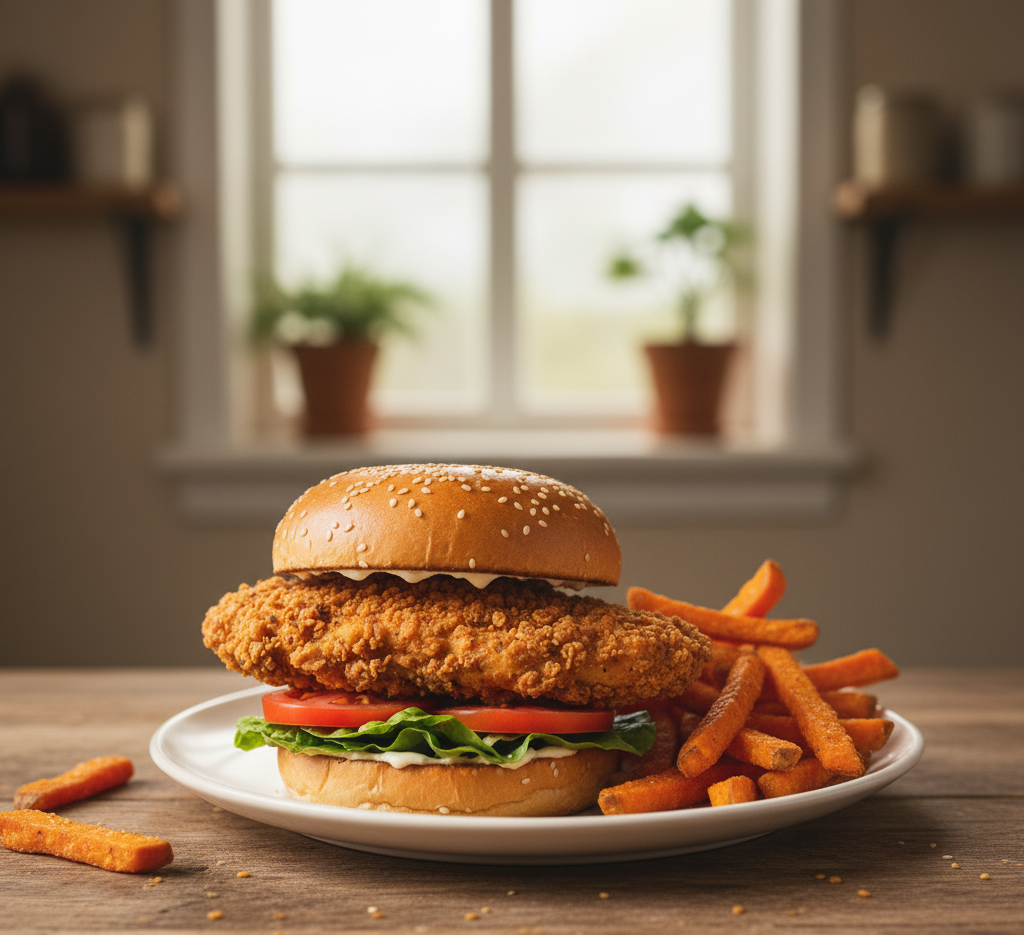
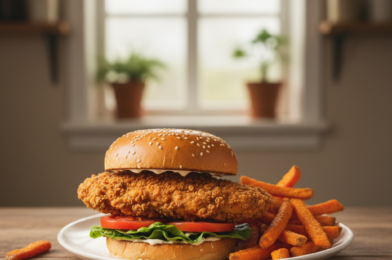
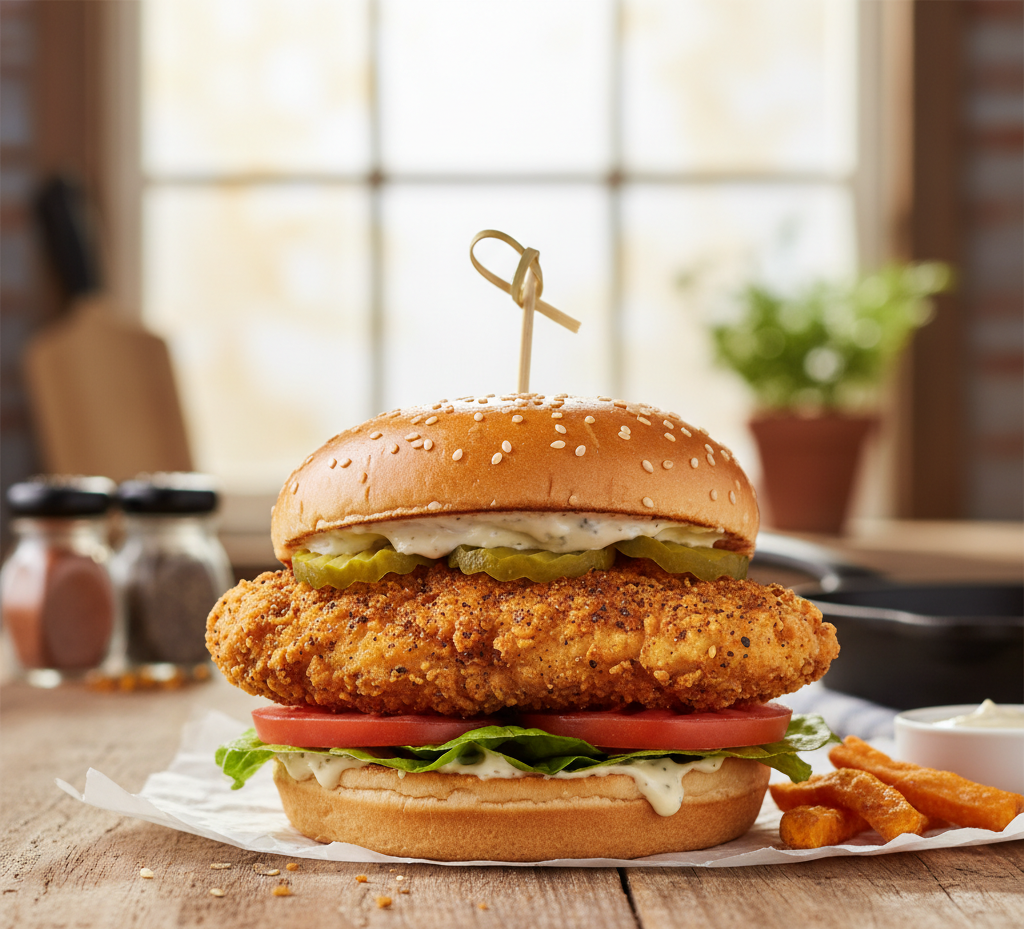
If you’re craving a restaurant-quality sandwich with bold flavor and irresistible crunch, this Cajun Crispy Chicken Sandwich with Garlic Aioli is about to become your go-to recipe. It’s everything you want in a sandwich—crispy fried chicken, juicy interior, toasted bun, and a creamy, garlicky sauce that ties it all together.

This sandwich brings Southern-inspired Cajun seasoning into your kitchen with simple ingredients and easy steps. Whether you’re making it for a weekend treat, game day, or a satisfying weeknight dinner, this recipe delivers big flavor with every bite.

Cajun Crispy Chicken

Why You’ll Love This Cajun Crispy Chicken Sandwich

This Cajun crispy chicken sandwich with garlic aioli stands out for its bold spices and perfect texture combination.

Here’s why you’ll love it:

  • Ultra crispy, golden fried chicken
  • Juicy and flavorful inside
  • Bold Cajun seasoning for a spicy kick
  • Creamy garlic aioli for balance
  • Better than takeout and easy to customize
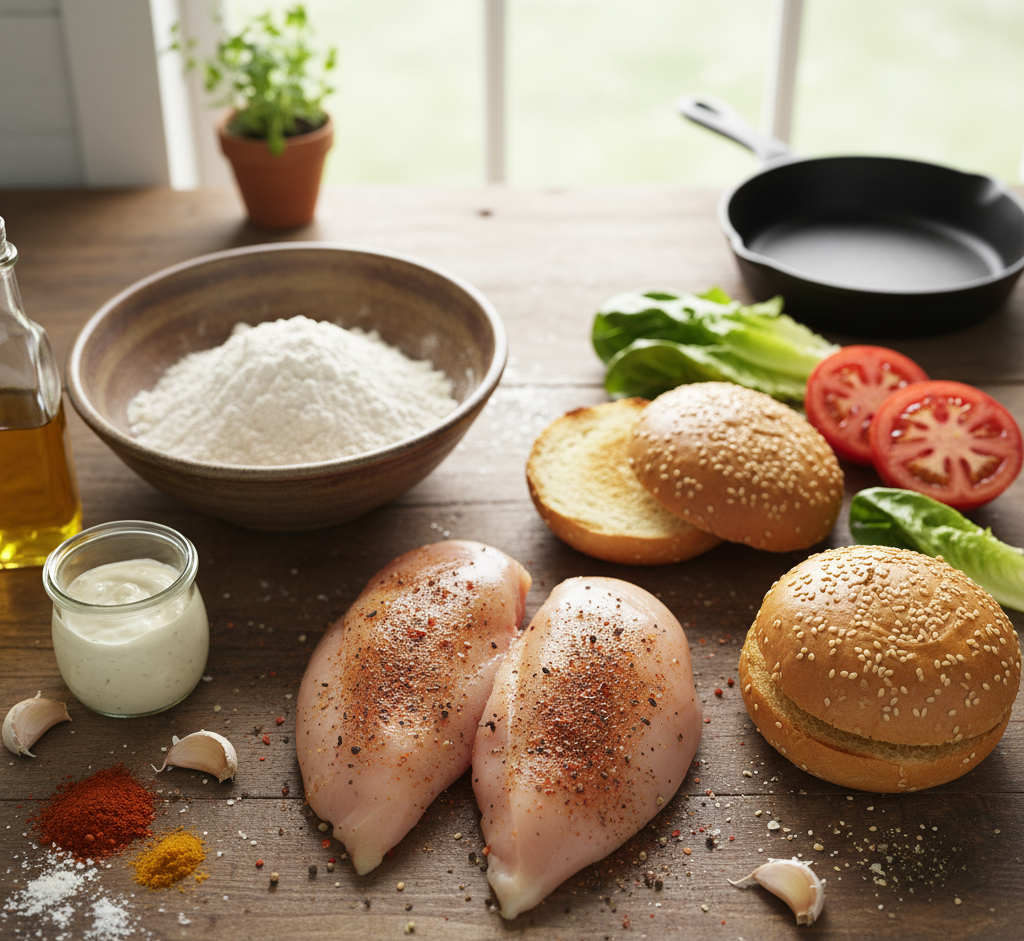
Ingredients

To make this Cajun crispy chicken sandwich with garlic aioli, you’ll need:

For the Chicken:

  • 2 boneless, skinless chicken breasts
  • 1 cup buttermilk
  • 1 cup all-purpose flour
  • 1/2 cup cornstarch
  • 1 tablespoon Cajun seasoning
  • 1 teaspoon paprika
  • 1/2 teaspoon garlic powder
  • Salt and pepper to taste
  • Oil for frying

For the Garlic Aioli:

  • 1/2 cup mayonnaise
  • 2 cloves garlic, minced
  • 1 tablespoon lemon juice
  • Salt to taste

For Assembly:

  • Brioche buns
  • Lettuce
  • Tomato slices
  • Pickles (optional)

Ingredient Notes

The key to a great Cajun crispy chicken sandwich with garlic aioli is layering flavor. Buttermilk tenderizes the chicken while helping the coating stick, creating that signature crunch.

Cornstarch in the breading makes the crust extra crispy, while Cajun seasoning adds a smoky, slightly spicy kick. The garlic aioli balances everything with a creamy, tangy finish.

Step-by-Step Instructions

1. Marinate the Chicken

Slice chicken breasts in half and soak in buttermilk for at least 30 minutes (or overnight for best flavor).

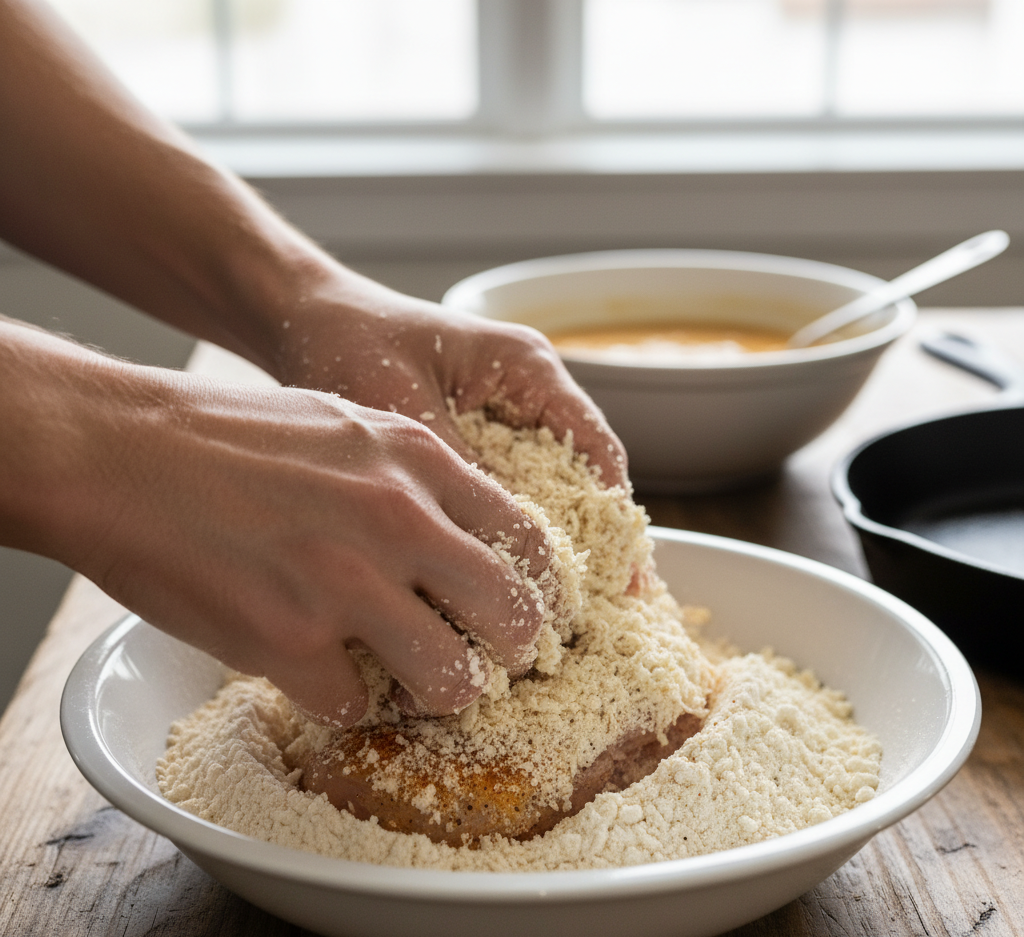
2. Prepare the Coating

In a bowl, mix flour, cornstarch, Cajun seasoning, paprika, garlic powder, salt, and pepper.

3. Bread the Chicken

Remove chicken from buttermilk and dredge in the flour mixture, pressing firmly to coat.
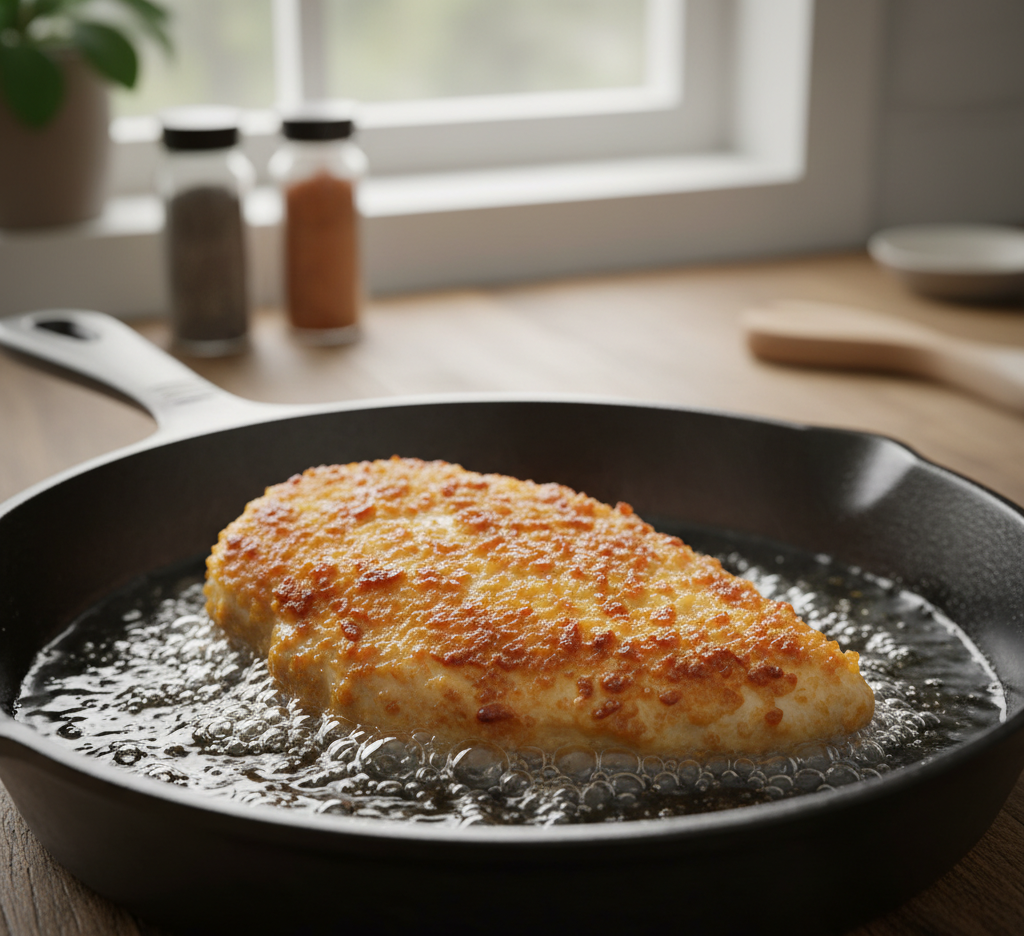
4. Fry Until Crispy

Heat oil to 350°F and fry chicken for 5–7 minutes until golden brown and cooked through.

5. Make Garlic Aioli

Mix mayonnaise, minced garlic, lemon juice, and salt until smooth.

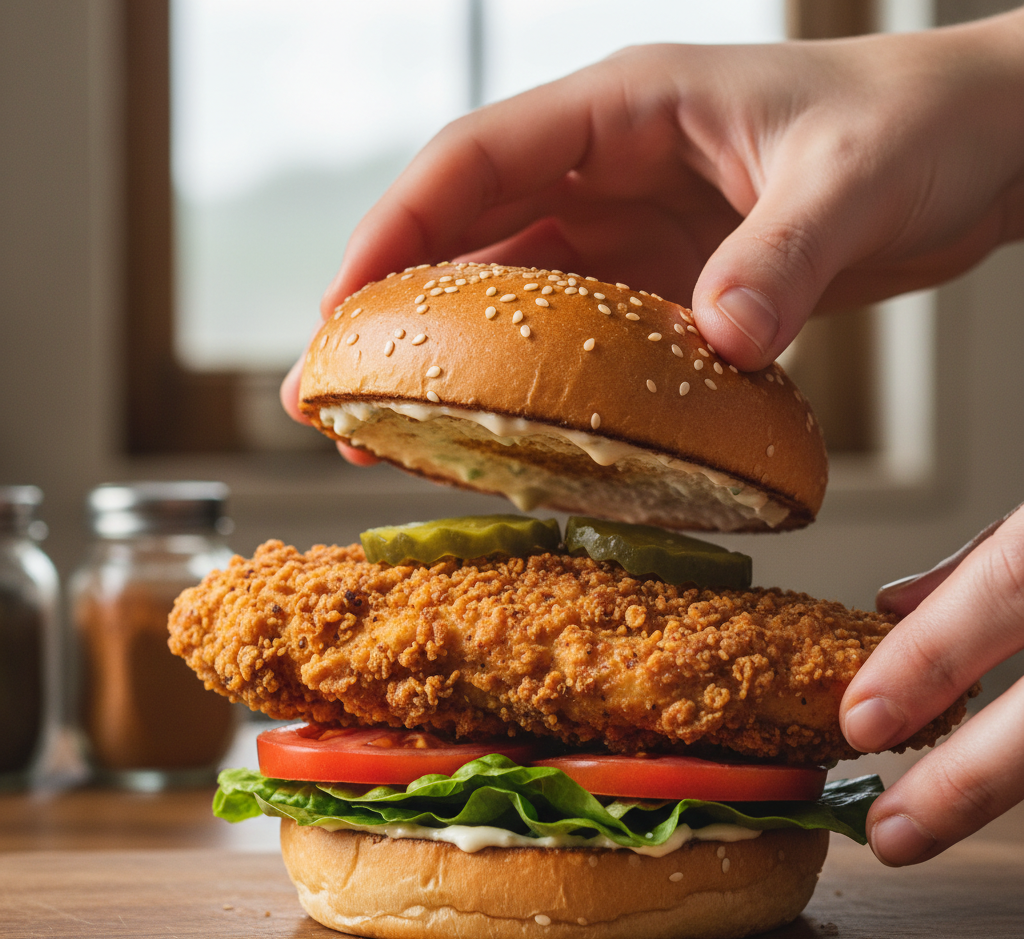
6. Assemble the Sandwich

Toast buns, spread garlic aioli, add crispy chicken, lettuce, tomato, and pickles.

Tips for Perfect Results

To make the best Cajun crispy chicken sandwich with garlic aioli, follow these tips:

  • Marinate chicken longer for deeper flavor
  • Double dredge for extra crunch
  • Maintain oil temperature for even frying
  • Let chicken rest briefly before assembling

These tips ensure maximum crispiness and flavor.

Variations

Customize your Cajun crispy chicken sandwich with these ideas:

  • Spicy Version: Add hot sauce to buttermilk
  • Grilled Option: Grill instead of frying
  • Cheesy Upgrade: Add melted cheddar or pepper jack
  • Low-Carb: Serve in lettuce wraps

What to Serve With It

Pair this sandwich with:

  • French fries or sweet potato fries
  • Coleslaw
  • Potato salad
  • Iced tea or lemonade

These sides complement the bold flavors perfectly.

Storage & Reheating

For storing your Cajun crispy chicken sandwich with garlic aioli:

  • Refrigerate: Store chicken separately for up to 3 days
  • Reheat: Use oven or air fryer to keep it crispy
  • Avoid microwaving to prevent sogginess

Common Mistakes to Avoid

Avoid these common pitfalls:

  • Frying at the wrong temperature
  • Skipping the marinade
  • Overcrowding the pan
  • Not seasoning enough

Attention to detail makes all the difference.

FAQs

Can I bake the chicken instead of frying?

Yes, but it won’t be as crispy. Use high heat and a wire rack for best results.

How spicy is Cajun seasoning?

It has a mild to medium heat, but you can adjust to taste.

Can I make the aioli ahead of time?

Absolutely! It can be stored in the fridge for up to 3 days.

What’s the best bun to use?

Brioche buns are ideal for their soft texture and slight sweetness.

Final Thoughts

This Cajun Crispy Chicken Sandwich with Garlic Aioli is everything you want in a homemade sandwich—crispy, juicy, flavorful, and incredibly satisfying. With bold Cajun spices and creamy garlic aioli, it’s a recipe that easily rivals your favorite restaurant version.

Whether you’re cooking for family, friends, or just yourself, this sandwich delivers comfort and flavor in every bite. Once you try it, it’s sure to become a regular in your meal rotation.

Decadent Nutella Swirl Banana Bread Recipe (Perfectly Fluffy & Easy)

If you’re looking to upgrade your classic banana bread, this Decadent Nutella Swirl Banana Bread Recipe is exactly what you need. It takes everything you love about traditional banana bread—moist texture, sweet banana flavor—and elevates it with rich, creamy swirls of Nutella.

This recipe is perfect for breakfast, brunch, dessert, or even an afternoon snack with coffee. The beautiful chocolate hazelnut ribbons not only add flavor but also create a stunning visual that makes this loaf look bakery-worthy. Best of all, it’s incredibly easy to make, even if you’re not an experienced baker.

 Nutella Swirl Banana

Why You’ll Love This Nutella Swirl Banana Bread Recipe

This decadent Nutella swirl banana bread recipe is a must-try for banana bread lovers and chocolate fans alike.

Here’s why it stands out:

  • Incredibly moist and fluffy texture
  • Rich Nutella swirls in every slice
  • Easy, beginner-friendly recipe
  • Great way to use overripe bananas
  • Perfect for breakfast, snack, or dessert

Ingredients

To make this Nutella swirl banana bread recipe, you’ll need:

  • 3 ripe bananas, mashed
  • 1/2 cup unsalted butter, melted
  • 3/4 cup brown sugar
  • 2 large eggs
  • 1 teaspoon vanilla extract
  • 1 1/2 cups all-purpose flour
  • 1 teaspoon baking soda
  • 1/2 teaspoon salt
  • 1/2 cup Nutella (slightly warmed for easy swirling)

Ingredient Notes

The key to a perfect decadent Nutella swirl banana bread recipe is using very ripe bananas. The darker and softer they are, the sweeter and more flavorful your bread will be.

Warming the Nutella slightly makes it easier to swirl into the batter, creating those signature marbled layers. Brown sugar adds moisture and depth, while butter ensures a rich, tender crumb.

Step-by-Step Instructions

1. Prepare the Batter

Preheat your oven to 350°F and grease a loaf pan. In a bowl, mix mashed bananas, melted butter, and brown sugar until smooth.

2. Add Wet Ingredients

Stir in eggs and vanilla extract until fully combined.

3. Mix Dry Ingredients

In another bowl, whisk together flour, baking soda, and salt.

4. Combine Batter

Gradually add the dry ingredients into the wet mixture, stirring until just combined. Do not overmix.

5. Add Nutella Swirl

Pour half the batter into the pan, add spoonfuls of Nutella, then repeat with remaining batter. Use a knife to gently swirl.

6. Bake

Bake for 50–60 minutes or until a toothpick inserted comes out mostly clean.

7. Cool and Slice

Let the bread cool before slicing to maintain structure and texture.

Tips for Perfect Results

To make the best decadent Nutella swirl banana bread recipe, keep these tips in mind:

  • Use overripe bananas for maximum flavor
  • Don’t overmix the batter to keep it fluffy
  • Warm Nutella slightly for easier swirling
  • Cover loosely with foil if browning too quickly

These simple tricks ensure a moist and beautiful loaf.

Variations

Switch up this Nutella swirl banana bread recipe with these ideas:

  • Chocolate Chip Banana Bread: Add chocolate chips
  • Nutty Version: Add chopped walnuts or pecans
  • Peanut Butter Swirl: Replace Nutella with peanut butter
  • Mini Loaves: Divide into smaller pans for gifting

What to Serve With It

This banana bread pairs perfectly with:

  • Hot coffee or latte
  • Cold milk
  • Fresh fruit
  • A spread of butter or cream cheese

It’s versatile enough for breakfast or dessert.

Storage & Reheating

For storing your decadent Nutella swirl banana bread recipe:

  • Room Temperature: Store in airtight container for up to 3 days
  • Refrigerate: Keeps fresh up to 1 week
  • Freeze: Wrap slices and freeze for up to 2 months
  • Reheat: Warm slices in microwave for 10–15 seconds

Common Mistakes to Avoid

Avoid these common issues:

  • Using underripe bananas
  • Overmixing the batter
  • Adding too much Nutella
  • Not checking for doneness

These mistakes can affect texture and flavor.

FAQs

Can I use frozen bananas?

Yes! Just thaw and drain excess liquid before using.

How do I make it extra moist?

Use very ripe bananas and don’t overbake.

Can I use a different spread?

Absolutely—peanut butter or almond butter works well.

Why is my banana bread dense?

Overmixing the batter is usually the cause.

Final Thoughts

This Decadent Nutella Swirl Banana Bread Recipe is the perfect way to turn a simple classic into something truly special. With its moist texture, rich flavor, and beautiful swirls, it’s a recipe you’ll come back to again and again.

Whether you’re baking for your family, hosting brunch, or just treating yourself, this easy banana bread delivers big flavor with minimal effort. One slice, and you’ll see why it’s a favorite among home bakers everywhere.

Homemade Red Velvet Oreo Cookies (Soft, Chewy & Irresistibly Creamy)

If you love soft, bakery-style cookies with a rich chocolate-vanilla twist, these Homemade Red Velvet Oreo Cookies are about to become your new obsession. They combine the classic flavor of red velvet with crunchy Oreo pieces and a soft, chewy cookie base that melts in your mouth.

These cookies are perfect for holidays, Valentine’s Day, bake sales, or simply when you want a show-stopping dessert that looks as good as it tastes. With their vibrant red color, creamy hints of cocoa, and Oreo crunch in every bite, they deliver bakery-quality results right from your home kitchen.

Homemade Red Velvet

Why You’ll Love These Homemade Red Velvet Oreo Cookies

These homemade red velvet Oreo cookies are more than just pretty—they’re packed with flavor and texture in every bite.

Here’s why they stand out:

  • Soft, chewy bakery-style texture
  • Rich red velvet cocoa flavor
  • Crunchy Oreo cookie pieces inside
  • Beautiful vibrant red color for holidays and gifting
  • Easy one-bowl cookie dough

Ingredients

To make these homemade red velvet Oreo cookies, you’ll need:

  • 1/2 cup unsalted butter, softened
  • 3/4 cup brown sugar
  • 1/4 cup granulated sugar
  • 1 large egg
  • 1 teaspoon vanilla extract
  • 1 tablespoon red food coloring
  • 1 1/4 cups all-purpose flour
  • 2 tablespoons cocoa powder
  • 1/2 teaspoon baking soda
  • 1/4 teaspoon salt
  • 10–12 Oreo cookies, roughly chopped
  • Optional: white chocolate chips

Ingredient Notes

The magic behind homemade red velvet Oreo cookies lies in balancing cocoa powder with just enough red food coloring to create that signature red velvet look. Brown sugar adds chewiness, while granulated sugar helps crisp the edges slightly.

Oreo chunks add texture and contrast, so don’t crush them too finely—you want visible cookie pieces in every bite.

Step-by-Step Instructions

1. Cream Butter and Sugars

In a large bowl, cream together butter, brown sugar, and granulated sugar until light and fluffy.

2. Add Wet Ingredients

Mix in egg, vanilla extract, and red food coloring until smooth and evenly combined.

3. Combine Dry Ingredients

In a separate bowl, whisk together flour, cocoa powder, baking soda, and salt.

4. Form the Cookie Dough

Gradually add dry ingredients into the wet mixture. Stir until just combined, then gently fold in chopped Oreos.

5. Shape and Bake

Scoop dough into balls and place on a lined baking sheet. Bake at 350°F for 10–12 minutes.

6. Cool and Enjoy

Let cookies cool on the tray for 5 minutes before transferring to a wire rack.

Tips for Perfect Results

To make the best homemade red velvet Oreo cookies, follow these tips:

  • Don’t overmix the dough to keep cookies soft
  • Slightly underbake for a chewy center
  • Chill dough for thicker cookies
  • Use gel food coloring for vibrant red color

These small adjustments make a big difference in texture and appearance.

Variations

Try these fun twists on your homemade red velvet Oreo cookies:

  • Cream Cheese Filled: Add a cream cheese center
  • White Chocolate Chip: Mix in white chocolate chips
  • Double Oreo: Add extra Oreo chunks
  • Holiday Version: Use festive colored sprinkles

What to Serve With Them

These cookies pair perfectly with:

  • Cold milk
  • Hot coffee or latte
  • Vanilla ice cream
  • Hot chocolate

The creamy beverages balance the rich cookie flavor beautifully.

Storage & Reheating

For your homemade red velvet Oreo cookies:

  • Room Temperature: Store in airtight container for up to 5 days
  • Refrigerate: Up to 1 week for extended freshness
  • Freeze: Freeze dough or baked cookies for up to 2 months
  • Reheat: Warm in microwave for 10–15 seconds for fresh-baked softness

Common Mistakes to Avoid

Avoid these common baking issues:

  • Overbaking (leads to dry cookies)
  • Using too much flour
  • Skipping chilling step for thicker cookies
  • Crushing Oreos too finely

Attention to detail ensures bakery-quality results.

FAQs

Why are my red velvet cookies not red enough?

Use gel food coloring instead of liquid for a stronger color.

Can I make the dough ahead of time?

Yes, it can be refrigerated for up to 48 hours.

Can I use double-stuffed Oreos?

Absolutely—they add extra creaminess.

How do I keep cookies soft?

Store in an airtight container with a slice of bread to retain moisture.

Final Thoughts

These Homemade Red Velvet Oreo Cookies are the perfect combination of soft, chewy, and crunchy. With their rich cocoa flavor and Oreo-studded texture, they’re guaranteed to impress anyone who tries them.

Whether you’re baking for a holiday, a party, or just a sweet craving at home, this recipe delivers bakery-level results with simple ingredients and easy steps. Once you try them, they’ll quickly become a favorite in your cookie rotation.

Chocolate Lasagna – Easy No-Bake Chocolate Dessert

If you’re craving something rich, creamy, and completely irresistible, this Chocolate Lasagna – Easy No-Bake Chocolate Dessert is exactly what you need. Despite its name, there’s no pasta involved—just layers of chocolatey goodness stacked into a chilled dessert that’s as impressive as it is easy to make.

This no-bake chocolate lasagna is perfect for warm days, holiday gatherings, or anytime you want a crowd-pleasing dessert without turning on the oven. With its Oreo crust, smooth cream cheese layer, velvety chocolate pudding, and fluffy whipped topping, every bite is pure indulgence.Chocolate Lasagna

Why You’ll Love This Chocolate Lasagna

This chocolate lasagna – easy no-bake chocolate dessert is a go-to favorite for both beginner and experienced home bakers.

Here’s why it’s so popular:

  • No oven required—perfect for hot days
  • Layers of creamy, crunchy, and fluffy textures
  • Easy to prepare ahead of time
  • Great for parties and potlucks
  • Kid-friendly and crowd-approved

Ingredients

To make this delicious chocolate lasagna, you’ll need:

For the Crust:

  • 36 Oreo cookies, crushed
  • 6 tablespoons melted butter

For the Cream Layer:

  • 8 oz cream cheese, softened
  • 1 cup powdered sugar
  • 1 1/2 cups whipped topping

For the Chocolate Layer:

  • 2 packages instant chocolate pudding mix
  • 3 cups cold milk

For the Topping:

  • 2 cups whipped topping
  • Chocolate shavings or chips

Ingredient Notes

The secret to a perfect chocolate lasagna – easy no-bake chocolate dessert lies in layering complementary textures. The Oreo crust provides a rich, slightly crunchy base, while the cream cheese layer adds tangy sweetness that balances the chocolate.

Using instant pudding keeps things quick and foolproof. Be sure to use cold milk to help it set properly, and opt for full-fat cream cheese for the creamiest results.

Step-by-Step Instructions

1. Make the Oreo Crust

Mix crushed Oreos with melted butter until combined. Press firmly into the bottom of a 9×13-inch dish. Chill for 15 minutes to set.

2. Prepare the Cream Layer

Beat cream cheese and powdered sugar until smooth. Fold in whipped topping until light and fluffy. Spread evenly over the crust.

3. Make the Chocolate Pudding

Whisk pudding mix with cold milk until thickened. Let it sit for a few minutes to fully set.

4. Add the Chocolate Layer

Spread the pudding evenly over the cream layer, smoothing the top.

5. Add the Final Topping

Spread whipped topping over the pudding layer and garnish with chocolate shavings or chips.

6. Chill

Refrigerate for at least 4 hours (or overnight) before serving.

Tips for Perfect Results

To make the best chocolate lasagna – easy no-bake chocolate dessert, keep these tips in mind:

  • Chill between layers for clean separation
  • Use softened cream cheese for a smooth texture
  • Don’t rush the chilling process
  • Use a sharp knife for neat slices

These tips ensure your dessert looks as good as it tastes.

Variations

This chocolate lasagna is easy to customize:

  • Peanut Butter Version: Add a peanut butter layer
  • Mint Chocolate: Use mint Oreos or extract
  • White Chocolate Twist: Swap chocolate pudding for vanilla
  • Salted Caramel: Add caramel drizzle between layers

What to Serve With It

Pair this rich dessert with:

  • Fresh berries
  • Coffee or espresso
  • Cold milk
  • Light fruit salad

These options help balance the sweetness.

Storage & Reheating

For storing your chocolate lasagna – easy no-bake chocolate dessert:

  • Refrigerate: Store covered for up to 4 days
  • Freeze: Freeze for up to 1 month for a firmer texture
  • Serve chilled: Best enjoyed cold

No reheating is needed for this dessert.

Common Mistakes to Avoid

Avoid these common issues:

  • Not chilling long enough
  • Using warm ingredients
  • Overmixing the cream layer
  • Skipping the crust setting step

Paying attention to these details ensures perfect layers.

FAQs

Can I make chocolate lasagna ahead of time?

Yes! It’s actually better when made a day in advance.

Can I use homemade whipped cream?

Absolutely—it adds a fresher flavor.

How do I get clean slices?

Chill thoroughly and wipe the knife between cuts.

Can I freeze chocolate lasagna?

Yes, it freezes well and can be served slightly frozen for a firmer texture.

Final Thoughts

This Chocolate Lasagna – Easy No-Bake Chocolate Dessert is the ultimate combination of simplicity and indulgence. With its rich layers and creamy texture, it’s guaranteed to be a hit at any gathering.

Whether you’re making it for a special occasion or just treating yourself, this dessert delivers big flavor with minimal effort. Once you try it, it’s sure to become a staple in your dessert rotation.

Decadent Cookie Dough Cake Recipe (Ultimate Layered Dessert)

If you’ve ever snuck a bite of cookie dough while baking, this Decadent Cookie Dough Cake Recipe is about to become your dream dessert. Imagine soft, fluffy cake layers stacked with rich, edible cookie dough and finished with a creamy frosting—it’s indulgence at its finest.

This cake is perfect for birthdays, celebrations, or anytime you want a show-stopping dessert that truly impresses. While it looks like something straight from a bakery, this cookie dough cake recipe is totally achievable at home with a bit of planning and the right techniques.

Decadent Cookie Dough

Why You’ll Love This Cookie Dough Cake Recipe

This decadent cookie dough cake recipe is the perfect combination of nostalgia and indulgence. It brings together everything you love about cookies and cake in one incredible dessert.

Here’s why it’s a must-try:

  • Soft, moist cake layers
  • Safe-to-eat edible cookie dough filling
  • Rich, creamy frosting
  • Perfect for special occasions
  • Customizable flavors and decorations

Ingredients

To make this cookie dough cake recipe, you’ll need:

For the Cake:

  • 2 1/2 cups all-purpose flour
  • 2 teaspoons baking powder
  • 1/2 teaspoon salt
  • 1 cup unsalted butter, softened
  • 1 3/4 cups sugar
  • 4 large eggs
  • 1 tablespoon vanilla extract
  • 1 cup milk

For the Cookie Dough Filling:

  • 1/2 cup unsalted butter, softened
  • 3/4 cup brown sugar
  • 1/4 cup sugar
  • 2 tablespoons milk
  • 1 teaspoon vanilla extract
  • 1 cup heat-treated flour
  • 1/2 cup mini chocolate chips

For the Frosting:

  • 1 cup unsalted butter
  • 3 cups powdered sugar
  • 2–3 tablespoons milk
  • 1 teaspoon vanilla extract

Ingredient Notes

The secret to this decadent cookie dough cake recipe lies in balancing textures. The cake layers should be soft and fluffy, while the cookie dough adds richness and a slightly chewy bite.

Always heat-treat the flour for the cookie dough layer to ensure it’s safe to eat. Using mini chocolate chips helps distribute flavor evenly without overwhelming each bite.

Step-by-Step Instructions

1. Bake the Cake Layers

Preheat your oven to 350°F. Cream butter and sugar until light and fluffy, then add eggs and vanilla. Mix in dry ingredients alternately with milk. Divide batter into pans and bake for 25–30 minutes.

2. Cool Completely

Allow cakes to cool fully before assembling. This prevents melting the filling or frosting.

3. Make the Cookie Dough

Cream butter and sugars, then add milk and vanilla. Mix in heat-treated flour and chocolate chips until a soft dough forms.

4. Prepare the Frosting

Beat butter and powdered sugar until fluffy. Add milk and vanilla until smooth and spreadable.

5. Assemble the Cake

Place one cake layer on a serving plate. Spread a thick layer of cookie dough, then top with the second cake layer. Frost the entire cake evenly.

6. Decorate

Finish with extra chocolate chips, cookie dough pieces, or decorative piping.

Tips for Perfect Results

To master this cookie dough cake recipe, keep these tips in mind:

  • Use room temperature ingredients for smooth mixing
  • Don’t overbake the cake layers
  • Chill the cake slightly before slicing
  • Use a serrated knife for clean cuts

These tips ensure your cake turns out bakery-quality.

Variations

This decadent cookie dough cake recipe is easy to customize:

  • Chocolate Cake Base: Swap vanilla cake for chocolate
  • Peanut Butter Version: Add peanut butter to the dough
  • Cookies & Cream: Add crushed sandwich cookies
  • Layered Drip Cake: Add chocolate ganache drip

What to Serve With It

Pair this rich cake with:

  • Cold milk
  • Coffee or espresso
  • Vanilla ice cream
  • Fresh berries

These pairings balance the sweetness beautifully.

Storage & Reheating

For storing your cookie dough cake recipe:

  • Refrigerate: Store covered for up to 4 days
  • Freeze: Freeze slices individually for up to 2 months
  • Serve: Bring to room temperature before serving

Common Mistakes to Avoid

Avoid these common issues:

  • Skipping flour heat treatment
  • Frosting warm cake layers
  • Overmixing batter
  • Using cold ingredients

Attention to detail ensures the best results.

FAQs

Is the cookie dough safe to eat?

Yes, as long as you use heat-treated flour and no raw eggs.

Can I make this cake ahead of time?

Absolutely! It’s great for preparing a day in advance.

Can I use store-bought frosting?

Yes, but homemade gives the best flavor.

How do I heat-treat flour?

Bake it at 350°F for 5–7 minutes before using.

Final Thoughts

This Decadent Cookie Dough Cake Recipe is the ultimate dessert for cookie dough lovers. With its soft cake layers, rich filling, and creamy frosting, it’s guaranteed to impress anyone who takes a bite.

Whether you’re celebrating a special occasion or simply indulging your sweet tooth, this cake delivers on every level. Once you try it, it’s sure to become a favorite in your baking rotation.

Cookie Dough Oreo Brownies Recipe (Ultra Decadent Layered Dessert)

If you’re looking for the ultimate indulgent dessert, this Cookie Dough Oreo Brownies Recipe is guaranteed to blow you away. Imagine three irresistible layers: a fudgy chocolate brownie base, a crunchy Oreo middle, and a thick, creamy layer of edible cookie dough on top. It’s rich, decadent, and absolutely unforgettable.

This recipe is perfect for special occasions, bake sales, or whenever you want to impress a crowd. While it looks like something straight out of a bakery display case, it’s surprisingly doable at home with simple ingredients and a little layering magic.

Cookie Dough Oreo

Why You’ll Love This Cookie Dough Oreo Brownies Recipe

This cookie dough Oreo brownies recipe takes classic brownies to a whole new level by combining multiple dessert favorites into one show-stopping treat.

Here’s why it’s worth making:

  • Three indulgent layers in one dessert
  • Perfect balance of fudgy, crunchy, and creamy textures
  • Great for parties and celebrations
  • Easy to customize with different flavors
  • Guaranteed crowd-pleaser

Ingredients

To make this cookie dough Oreo brownies recipe, you’ll need:

For the Brownie Layer:

  • 1 cup unsalted butter, melted
  • 1 1/2 cups granulated sugar
  • 3/4 cup cocoa powder
  • 3 large eggs
  • 1 teaspoon vanilla extract
  • 1 cup all-purpose flour
  • 1/2 teaspoon salt

For the Oreo Layer:

  • 20–24 Oreo cookies

For the Cookie Dough Layer:

  • 1/2 cup unsalted butter, softened
  • 1/2 cup brown sugar
  • 1/4 cup granulated sugar
  • 2 tablespoons milk
  • 1 teaspoon vanilla extract
  • 1 cup heat-treated flour
  • 1/2 cup mini chocolate chips

Ingredient Notes

The success of this cookie dough Oreo brownies recipe depends on quality ingredients and proper preparation. Use high-quality cocoa powder for a deep chocolate flavor, and don’t skip heat-treating the flour for the cookie dough layer—it ensures it’s safe to eat raw.

The Oreos act as a delicious barrier between the brownie and cookie dough layers, adding both texture and that iconic cookies-and-cream flavor.

Step-by-Step Instructions

1. Prepare the Brownie Batter

In a large bowl, mix melted butter, sugar, and cocoa powder until smooth. Add eggs and vanilla, then stir in flour and salt until just combined.

2. Layer the Oreos

Pour half of the brownie batter into a lined baking pan. Arrange Oreos evenly on top, then cover with the remaining batter.

3. Bake

Bake at 350°F for 30–35 minutes, or until the brownies are set. Let them cool completely before adding the cookie dough layer.

4. Make the Cookie Dough

Cream butter, brown sugar, and granulated sugar. Add milk and vanilla, then mix in heat-treated flour and chocolate chips.

5. Assemble

Spread the cookie dough evenly over the cooled brownies. Press gently to create a smooth top layer.

6. Chill and Slice

Refrigerate for at least 1 hour before slicing into squares.

Tips for Perfect Results

To make the best cookie dough Oreo brownies recipe, follow these expert tips:

  • Let brownies cool completely before adding cookie dough
  • Use parchment paper for easy removal
  • Don’t overbake—keep brownies fudgy
  • Chill before slicing for clean layers

These tips ensure your dessert looks as amazing as it tastes.

Variations

This cookie dough Oreo brownies recipe is easy to customize:

  • Peanut Butter Twist: Add peanut butter to the cookie dough
  • Double Chocolate: Use chocolate chip cookie dough
  • Mint Oreo Version: Swap regular Oreos for mint
  • Salted Caramel: Drizzle caramel and sprinkle sea salt

What to Serve With It

These rich brownies pair well with:

  • Vanilla ice cream
  • Cold milk
  • Coffee or espresso
  • Fresh berries

The contrast helps balance the richness.

Storage & Reheating

To store your cookie dough Oreo brownies recipe:

  • Refrigerate: Store in an airtight container for up to 5 days
  • Freeze: Freeze for up to 2 months
  • Serve chilled or at room temperature

No reheating needed—just slice and enjoy!

Common Mistakes to Avoid

Avoid these common issues:

  • Adding cookie dough to warm brownies
  • Skipping flour heat treatment
  • Overbaking the brownie layer
  • Not chilling before slicing

These mistakes can affect both texture and safety.

FAQs

Is the cookie dough safe to eat?

Yes, as long as you use heat-treated flour and no raw eggs.

Can I use boxed brownie mix?

Absolutely! It’s a great time-saving option.

How do I heat-treat flour?

Bake flour at 350°F for 5–7 minutes to kill bacteria.

Can I make this ahead of time?

Yes, it’s actually better when chilled and set in advance.

Final Thoughts

This Cookie Dough Oreo Brownies Recipe is the ultimate dessert for anyone who loves rich, layered treats. With its combination of fudgy brownies, crunchy Oreos, and creamy cookie dough, it delivers an unforgettable bite every time.

Whether you’re baking for a party or just treating yourself, this recipe is guaranteed to impress. Once you try it, you’ll understand why it’s a favorite among dessert lovers everywhere.

Baking Made Simple: Dessert Recipes That Are Both Healthy and Delicious

If you’ve ever thought that desserts couldn’t be both indulgent and nutritious, it’s time to rethink your approach. Baking made simple: dessert recipes that are both healthy and delicious is all about striking that perfect balance—creating treats that satisfy your cravings while using better-for-you ingredients.

Today’s home bakers are looking for recipes that are easy, wholesome, and still incredibly satisfying. Whether you’re cutting back on sugar, experimenting with alternative flours, or simply trying to eat a little cleaner, these healthy dessert ideas prove you don’t have to sacrifice flavor for nutrition.

Baking Made Simple

Why You’ll Love Baking Made Simple: Healthy Desserts

The concept of baking made simple: dessert recipes that are both healthy and delicious is perfect for modern lifestyles. These recipes are approachable, flexible, and designed for real kitchens.

Here’s why you’ll love this approach:

  • Uses wholesome, nutrient-rich ingredients
  • Simple techniques anyone can follow
  • Balanced sweetness without being overpowering
  • Perfect for everyday treats or special occasions
  • Family-friendly and customizable

Key Ingredients for Healthy Baking

When it comes to baking made simple: dessert recipes that are both healthy and delicious, choosing the right ingredients makes all the difference.

Here are some staples to keep on hand:

  • Whole wheat flour or almond flour
  • Natural sweeteners like honey or maple syrup
  • Greek yogurt or applesauce for moisture
  • Dark chocolate or cacao
  • Fresh fruits like bananas, berries, and apples

Ingredient Notes

Healthy baking doesn’t mean complicated baking. In fact, baking made simple: dessert recipes that are both healthy and delicious often relies on swapping traditional ingredients for more nutritious alternatives.

For example, replacing butter with applesauce reduces fat while keeping moisture, and using oats or nut flours adds fiber and texture. Natural sweeteners not only enhance flavor but also provide a more balanced sweetness.

Easy Healthy Dessert Ideas

1. Banana Oat Muffins

These muffins are naturally sweetened with ripe bananas and made with oats for a hearty texture. They’re perfect for breakfast or a snack.

2. Dark Chocolate Avocado Brownies

Rich and fudgy, these brownies use avocado for creaminess and healthy fats while maintaining a decadent taste.

3. Greek Yogurt Cheesecake Cups

A lighter twist on classic cheesecake, these individual servings are creamy, tangy, and satisfying.

Step-by-Step Basics for Healthy Baking

1. Choose Your Base

Start with a nutrient-dense base like whole grain flour or oats.

2. Sweeten Naturally

Use ingredients like mashed bananas, dates, or honey instead of refined sugar.

3. Add Moisture

Incorporate yogurt, applesauce, or nut butters to keep desserts soft and tender.

4. Bake Carefully

Healthy baked goods can cook faster, so keep an eye on them to avoid overbaking.

Tips for Perfect Results

To master baking made simple: dessert recipes that are both healthy and delicious, keep these tips in mind:

  • Measure ingredients accurately for best texture
  • Don’t overmix batter—this keeps baked goods tender
  • Taste as you go when possible
  • Use ripe fruits for natural sweetness

These small adjustments help ensure consistent, delicious results.

Variations

Healthy desserts are incredibly flexible. Here are some ideas:

  • Gluten-Free: Use almond or coconut flour
  • Vegan: Replace eggs with flax eggs
  • Low-Sugar: Use stevia or monk fruit sweetener
  • High-Protein: Add protein powder or Greek yogurt

What to Serve With Healthy Desserts

Pair your healthy treats with:

  • Fresh fruit
  • Herbal tea or coffee
  • Smoothies
  • Light yogurt parfaits

These pairings enhance the overall experience without adding heaviness.


Storage & Reheating

For baking made simple: dessert recipes that are both healthy and delicious, proper storage is key:

  • Room Temperature: Store muffins or cookies for 2–3 days
  • Refrigerate: Keeps desserts fresh up to a week
  • Freeze: Great for long-term storage
  • Reheat: Warm slightly for best texture

Common Mistakes to Avoid

Avoid these pitfalls when making healthy desserts:

  • Overbaking (leads to dryness)
  • Using too many substitutions at once
  • Not adjusting liquids for alternative flours
  • Skipping taste testing

Balancing ingredients is essential for success.

FAQs

Are healthy desserts really tasty?

Absolutely! With the right ingredients, they can be just as satisfying as traditional desserts.

Can I replace sugar completely?

Yes, natural sweeteners like honey, maple syrup, or fruit work well.

Are these recipes kid-friendly?

Definitely—many kids love the natural sweetness and soft textures.

Do healthy desserts take longer to make?

Not at all. Many are just as quick, if not quicker, than traditional recipes.

Final Thoughts

Baking made simple: dessert recipes that are both healthy and delicious proves that you don’t have to choose between flavor and nutrition. With a few smart ingredient swaps and simple techniques, you can create desserts that are just as satisfying as the classics—if not more so.

Whether you’re baking for your family, meal prepping for the week, or just treating yourself, these recipes make it easy to enjoy sweets in a more balanced way. Once you start experimenting, you’ll discover that healthy baking is not only simple—it’s incredibly rewarding.

Gooey Butterscotch Brownies (Rich, Chewy & Irresistibly Decadent)

If you’re a fan of rich, buttery desserts with deep caramel-like flavor, these gooey butterscotch brownies are about to become your new obsession. Unlike traditional chocolate brownies, this recipe highlights the warm, sweet notes of butterscotch, creating a dessert that’s both nostalgic and indulgent.

What makes these gooey butterscotch brownies truly special is their texture—perfectly chewy edges with a soft, melt-in-your-mouth center. Whether you’re baking for a party, a family gathering, or just treating yourself, these brownies deliver bakery-quality results right from your kitchen.

Gooey Butterscotch

Why You’ll Love These Gooey Butterscotch Brownies

These gooey butterscotch brownies offer a delicious twist on a classic dessert. They’re easy to make and packed with flavor that stands out from traditional brownies.

Here’s why they’re a must-try:

  • Rich, buttery butterscotch flavor
  • Soft, gooey center with chewy edges
  • Easy, one-bowl recipe
  • Perfect for any occasion
  • Great for make-ahead desserts

Ingredients

To make these irresistible gooey butterscotch brownies, you’ll need:

  • 1 cup unsalted butter, melted
  • 1 1/2 cups brown sugar
  • 2 large eggs
  • 1 tablespoon vanilla extract
  • 2 cups all-purpose flour
  • 1 teaspoon baking powder
  • 1/2 teaspoon salt
  • 1 cup butterscotch chips
  • Optional: 1/2 cup chopped nuts

Ingredient Notes

The key to perfect gooey butterscotch brownies lies in using brown sugar instead of white sugar. Brown sugar provides moisture and that signature caramel-like flavor. Melted butter enhances richness and contributes to the chewy texture.

Butterscotch chips are essential—they melt into the batter and create pockets of sweetness throughout. For added crunch, you can mix in chopped pecans or walnuts.

Step-by-Step Instructions

1. Preheat and Prepare

Preheat your oven to 350°F and line a 9×13-inch baking pan with parchment paper.

2. Mix Wet Ingredients

In a large bowl, whisk together melted butter and brown sugar until smooth. Add eggs and vanilla extract, mixing until fully combined.

3. Combine Dry Ingredients

In a separate bowl, whisk flour, baking powder, and salt.

4. Make the Batter

Gradually add the dry ingredients to the wet mixture, stirring until just combined. Fold in butterscotch chips and nuts if using.

5. Bake

Spread the batter evenly in the prepared pan and bake for 25–30 minutes, or until the edges are set and the center remains slightly soft.

6. Cool and Slice

Allow the brownies to cool before slicing into squares. This helps them set while maintaining a gooey texture.

Tips for Perfect Results

To achieve the best gooey butterscotch brownies, follow these tips:

  • Don’t overbake—slightly underbaked centers stay gooey
  • Use parchment paper for easy removal
  • Let brownies cool before cutting
  • Measure flour correctly to avoid dryness

These simple tips make a big difference in texture and flavor.

Variations

Switch up your gooey butterscotch brownies with these fun variations:

  • Chocolate Swirl: Add melted chocolate for a marbled effect
  • Salted Caramel: Drizzle caramel and sprinkle sea salt
  • Blondie Style: Skip chips for a classic blondie texture
  • Extra Crunch: Add pretzels or toffee bits

What to Serve With It

These gooey butterscotch brownies pair perfectly with:

  • Vanilla ice cream
  • Fresh whipped cream
  • Hot coffee or espresso
  • A drizzle of caramel sauce

The contrast of warm brownies and cold ice cream is especially irresistible.

Storage & Reheating

To store your gooey butterscotch brownies:

  • Room Temperature: Store in an airtight container for up to 3 days
  • Refrigerate: Up to 1 week
  • Freeze: Wrap individually and freeze for up to 2 months
  • Reheat: Warm in the microwave for a few seconds for a gooey texture

Common Mistakes to Avoid

Avoid these common baking mistakes:

  • Overbaking (leads to dry brownies)
  • Using too much flour
  • Not lining the pan
  • Cutting brownies while still hot

Attention to these details ensures perfect results every time.

FAQs

What makes these brownies gooey?

The combination of melted butter, brown sugar, and slightly underbaking creates that gooey texture.

Can I use white sugar instead?

Brown sugar is recommended for flavor and moisture, but you can substitute if needed.

How do I know when they’re done?

The edges should be set, but the center should still look slightly soft.

Can I make these gluten-free?

Yes! Use a 1:1 gluten-free flour blend.

Final Thoughts

These gooey butterscotch brownies are the perfect dessert for anyone who loves rich, buttery sweetness with a chewy, melt-in-your-mouth texture. They’re simple to make, incredibly satisfying, and guaranteed to impress.

Whether you’re baking for a special occasion or just craving something sweet, this recipe delivers every time. Once you try these gooey butterscotch brownies, they’ll quickly earn a permanent spot in your dessert rotation.

S’mores Lasagna (No-Bake, Layered Dessert Everyone Will Love)

If you love classic campfire s’mores, get ready to fall in love with this over-the-top S’mores Lasagna. This no-bake dessert takes everything you adore about s’mores—crunchy graham crackers, gooey marshmallows, and rich chocolate—and transforms it into a layered masterpiece that’s perfect for sharing.

What makes this dessert so special is its combination of textures and flavors. Each bite delivers creamy, crunchy, and fluffy layers all at once. Plus, this s’mores lasagna is incredibly easy to prepare, making it ideal for parties, potlucks, or whenever you want a show-stopping treat without turning on the oven.

S’mores Lasagna

Why You’ll Love This S’mores Lasagna

This s’mores lasagna recipe is the ultimate dessert for anyone who loves indulgent, crowd-pleasing treats. It’s easy, fun, and packed with nostalgic flavor.

Here’s why it’s a must-try:

  • No baking required for most of the recipe
  • Perfect for feeding a crowd
  • Combines classic s’mores flavors in a creative way
  • Layers of creamy, crunchy, and gooey textures
  • Great for make-ahead desserts

Ingredients

To make this irresistible s’mores lasagna, you’ll need:

For the Crust:

  • 2 cups graham cracker crumbs
  • 1/2 cup melted butter

For the Chocolate Layer:

  • 1 package instant chocolate pudding mix
  • 2 cups cold milk

For the Cream Layer:

  • 8 oz cream cheese, softened
  • 1 cup powdered sugar
  • 1 1/2 cups whipped topping

For the Topping:

  • Mini marshmallows
  • Chocolate chips or chocolate bars
  • Additional whipped topping

Ingredient Notes

The key to a perfect s’mores lasagna is layering flavors and textures. Graham cracker crumbs form a buttery, slightly crunchy base that mimics traditional s’mores. The chocolate pudding layer adds richness, while the cream cheese mixture brings a smooth, tangy balance.

Mini marshmallows are essential for that authentic s’mores experience. For an extra touch, lightly toast them before serving to recreate that campfire flavor.

Step-by-Step Instructions

1. Prepare the Crust

In a bowl, mix graham cracker crumbs with melted butter until combined. Press firmly into the bottom of a 9×13-inch dish. Chill in the refrigerator for 15–20 minutes.

2. Make the Cream Layer

Beat cream cheese and powdered sugar until smooth. Fold in whipped topping until light and fluffy.

3. Prepare the Chocolate Layer

Whisk together chocolate pudding mix and cold milk until thickened.

4. Assemble the Layers

Spread the cream layer over the crust, followed by the chocolate pudding layer. Smooth each layer evenly.

5. Add Toppings

Top with whipped topping, mini marshmallows, and chocolate chips. For extra flavor, lightly toast the marshmallows using a kitchen torch or broiler.

Tips for Perfect Results

To make the best s’mores lasagna, follow these tips:

  • Chill between layers for cleaner slices
  • Use full-fat cream cheese for a richer texture
  • Don’t skip the crust chilling step
  • Toast marshmallows just before serving for best flavor

These simple steps will elevate your dessert to bakery-quality.

Variations

This s’mores lasagna is incredibly versatile:

  • Peanut Butter Twist: Add a peanut butter layer
  • Oreo Version: Replace graham crackers with crushed Oreos
  • Salted Caramel: Drizzle caramel sauce between layers
  • Frozen Version: Freeze for an ice cream cake-like texture

What to Serve With It

This rich dessert pairs well with lighter options:

  • Fresh berries
  • Hot coffee or espresso
  • Cold milk
  • Vanilla ice cream

These pairings help balance the sweetness.

Storage & Reheating

Here’s how to store your s’mores lasagna:

  • Refrigerate: Store covered for up to 4 days
  • Freeze: Freeze for up to 1 month for a firmer texture
  • Serve chilled: Best enjoyed cold

Avoid reheating, as it’s meant to be served chilled.

Common Mistakes to Avoid

Avoid these common issues:

  • Not chilling long enough (layers won’t set)
  • Overmixing the cream layer
  • Skipping the crust compression step
  • Adding marshmallows too early before chilling

Attention to detail ensures a perfect dessert.

FAQs

Can I make s’mores lasagna ahead of time?

Yes! It’s actually better when made a day in advance.

Do I have to toast the marshmallows?

No, but it adds that classic s’mores flavor.

Can I use homemade whipped cream?

Absolutely! It works just as well as store-bought.

How do I get clean slices?

Chill thoroughly and use a sharp knife wiped clean between cuts.

Final Thoughts

This S’mores Lasagna is everything you could want in a dessert—rich, creamy, nostalgic, and incredibly easy to make. It takes the classic flavors of s’mores and turns them into a layered treat that’s perfect for any occasion.

Whether you’re hosting a party or just treating yourself, this dessert is guaranteed to impress. Once you try it, you’ll understand why s’mores lasagna is quickly becoming a favorite in kitchens everywhere.

Decadent Chocolate Peanut Butter Ice Cream Cake Recipe

If you’re searching for the ultimate show-stopping dessert, this Decadent Chocolate Peanut Butter Ice Cream Cake Recipe is guaranteed to impress. Combining layers of creamy ice cream, rich chocolate, and smooth peanut butter, this frozen treat delivers indulgence in every bite.

Perfect for birthdays, holidays, or warm-weather gatherings, this cake brings together two classic flavors—chocolate and peanut butter—in a way that feels both nostalgic and elevated. The best part? It’s easier to make than you might think, and you don’t even need to turn on the oven for most of it.

Decadent Chocolate

Why You’ll Love This Chocolate Peanut Butter Ice Cream Cake Recipe

This decadent chocolate peanut butter ice cream cake recipe is everything you want in a dessert—rich, creamy, and incredibly satisfying.

Here’s why it’s a must-make:

  • No complicated baking techniques required
  • Perfect balance of chocolate and peanut butter flavors
  • Ideal for make-ahead desserts
  • Great for parties and celebrations
  • Customizable with your favorite mix-ins

Ingredients

To make this chocolate peanut butter ice cream cake recipe, you’ll need:

For the Base:

  • 24 chocolate sandwich cookies (crushed)
  • 5 tablespoons melted butter

For the Filling:

  • 1 quart chocolate ice cream (softened)
  • 1 quart peanut butter ice cream (softened)

For the Layers:

  • 1 cup hot fudge sauce
  • 1/2 cup creamy peanut butter

For the Topping:

  • Whipped cream or whipped topping
  • Chocolate syrup
  • Crushed peanuts or mini chocolate chips

Ingredient Notes

The magic of this decadent chocolate peanut butter ice cream cake recipe comes from using high-quality ingredients. Choose premium ice cream for the creamiest texture and richest flavor. Let it soften slightly before assembling so it spreads easily.

For the cookie base, chocolate sandwich cookies create a sturdy, flavorful crust. You can also swap in chocolate graham crackers if preferred. The hot fudge and peanut butter layers add richness and help bind everything together.

Step-by-Step Instructions

1. Make the Crust

Combine crushed cookies with melted butter and press firmly into the bottom of a springform pan. Freeze for 15–20 minutes to set.

2. Add Chocolate Ice Cream Layer

Spread softened chocolate ice cream evenly over the crust. Smooth the top and freeze for 30 minutes.

3. Add Fudge and Peanut Butter

Drizzle hot fudge and peanut butter over the chocolate layer, spreading gently.

4. Add Peanut Butter Ice Cream Layer

Spread the peanut butter ice cream on top and smooth evenly. Freeze for at least 4 hours or until fully set.

5. Decorate

Top with whipped cream, drizzle with chocolate syrup, and sprinkle with crushed peanuts or chocolate chips.

Tips for Perfect Results

To get the best results from this chocolate peanut butter ice cream cake recipe, keep these tips in mind:

  • Work quickly when layering to prevent melting
  • Freeze between layers for clean separation
  • Use a warm knife for smooth slicing
  • Line the pan with parchment for easy removal

These tips ensure a professional-looking dessert every time.

Variations

This decadent chocolate peanut butter ice cream cake recipe is easy to customize:

  • Crunchy Version: Add crushed peanut butter cups between layers
  • Salted Twist: Sprinkle flaky sea salt on top
  • Cookie Lovers: Add cookie dough chunks
  • Dairy-Free: Use plant-based ice cream alternatives

What to Serve With It

This rich dessert pairs well with lighter accompaniments:

  • Fresh berries
  • Hot coffee or espresso
  • Cold milk
  • Light fruit salad

These options help balance the richness of the cake.

Storage & Reheating

For storing your chocolate peanut butter ice cream cake recipe:

  • Freeze: Keep covered in the freezer for up to 1 week
  • Serve: Let sit at room temperature for 5–10 minutes before slicing
  • Avoid refreezing repeatedly: This can affect texture

Proper storage keeps your cake tasting fresh and creamy.

Common Mistakes to Avoid

Avoid these common issues:

  • Not freezing layers long enough
  • Using overly melted ice cream
  • Skipping the crust chilling step
  • Overloading with toppings

Attention to detail ensures the perfect final result.

FAQs

Can I make this ice cream cake ahead of time?

Yes! It’s perfect for making a day or two in advance.

What’s the best way to slice it?

Use a sharp knife dipped in warm water for clean slices.

Can I use different ice cream flavors?

Absolutely! Customize with your favorite combinations.

Do I need a springform pan?

It’s recommended for easy removal, but you can use a regular pan lined with parchment.

Final Thoughts

This Decadent Chocolate Peanut Butter Ice Cream Cake Recipe is everything a dessert should be—rich, creamy, and completely irresistible. It’s the kind of treat that turns any occasion into something special.

With its layers of chocolate and peanut butter goodness, this cake is sure to become a go-to favorite in your recipe collection. Once you make it, don’t be surprised if everyone asks for it again and again.