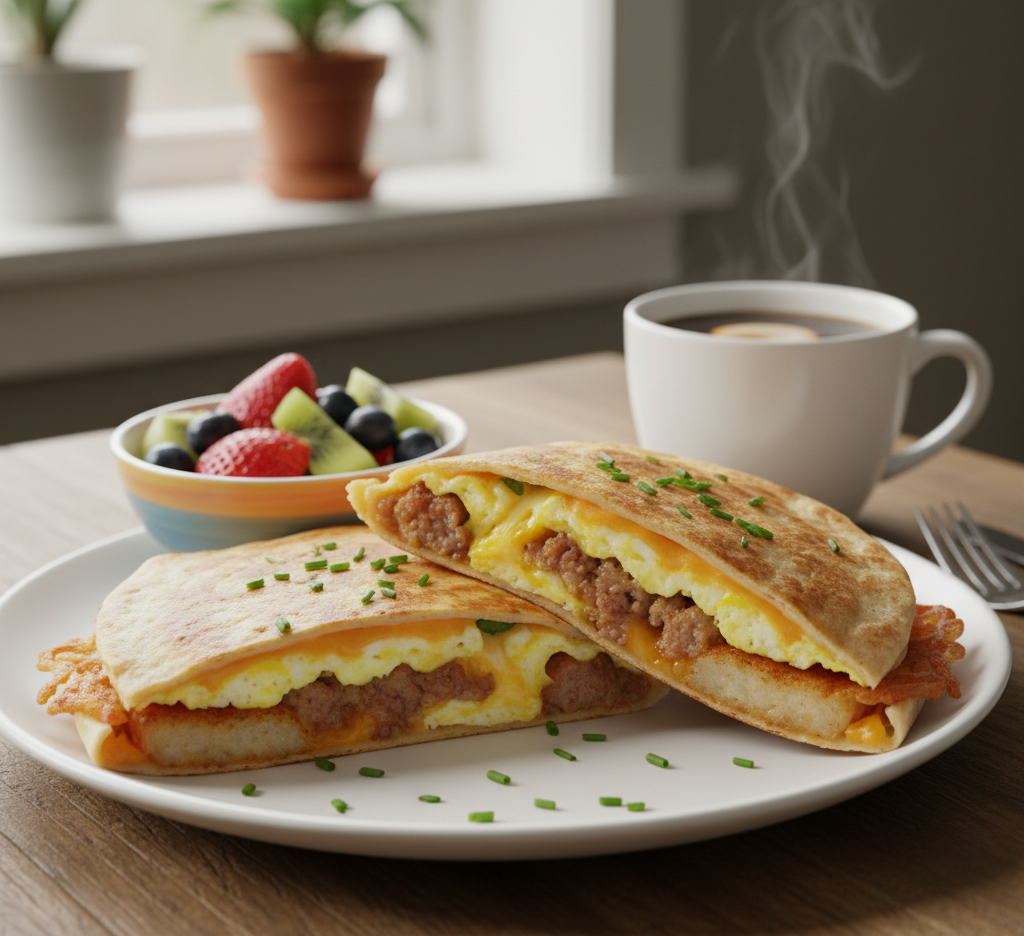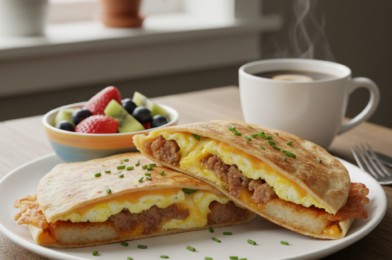
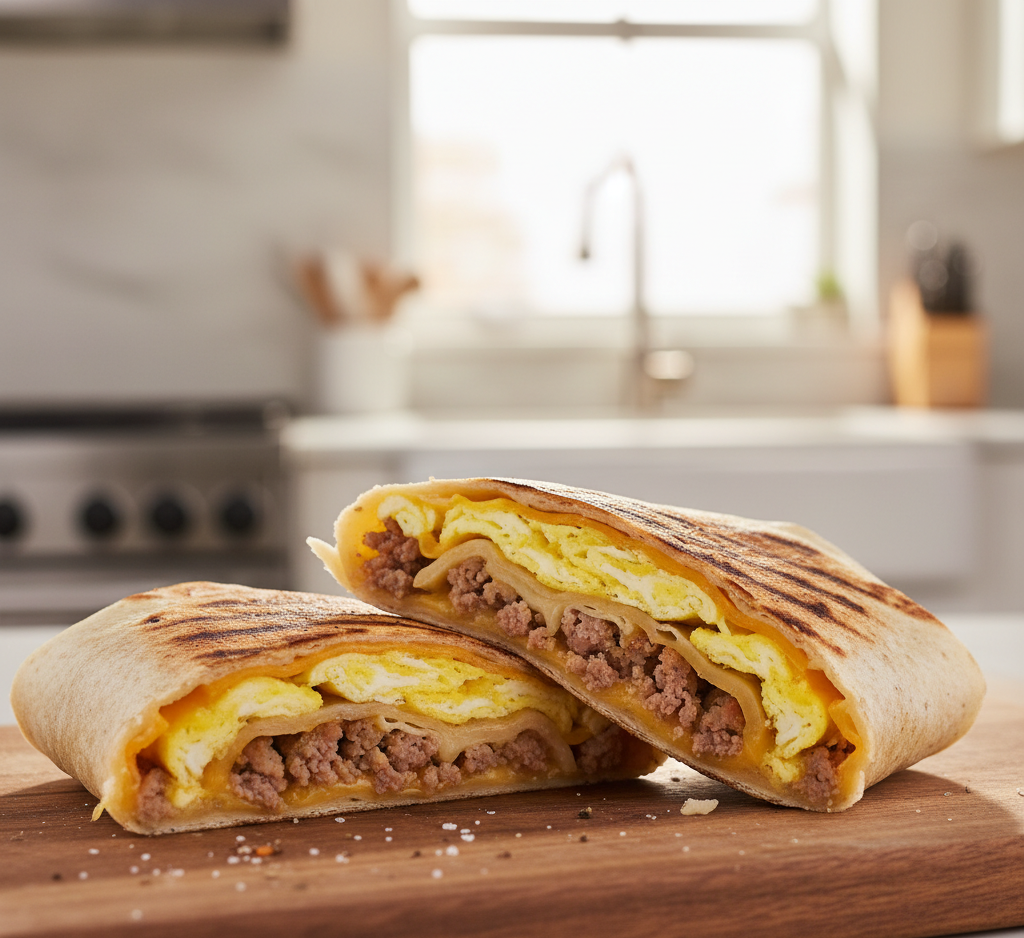
If you’ve ever craved a breakfast that’s crispy on the outside, warm and cheesy on the inside, and packed with bold flavors, this Hearty Cheesy Grilled Breakfast Crunchwrap is exactly what you need. It’s the perfect combination of textures—crunchy tortilla, creamy eggs, melty cheese, and savory fillings—all wrapped into one irresistible handheld meal.
This hearty cheesy grilled breakfast crunchwrap is not only delicious but also incredibly practical. Whether you’re rushing out the door on a weekday morning or enjoying a slow weekend brunch, this recipe delivers comfort and convenience in every bite.
Why You’ll Love This Recipe
There are so many reasons this Hearty Cheesy Grilled Breakfast Crunchwrap deserves a spot in your breakfast rotation:
- Perfectly crispy exterior with a golden grilled finish
- Loaded with cheesy goodness and savory fillings
- Easy to customize with your favorite ingredients
- Great for meal prep or on-the-go mornings
- Restaurant-quality at home
Once you make it, you’ll see why it’s a go-to breakfast favorite.
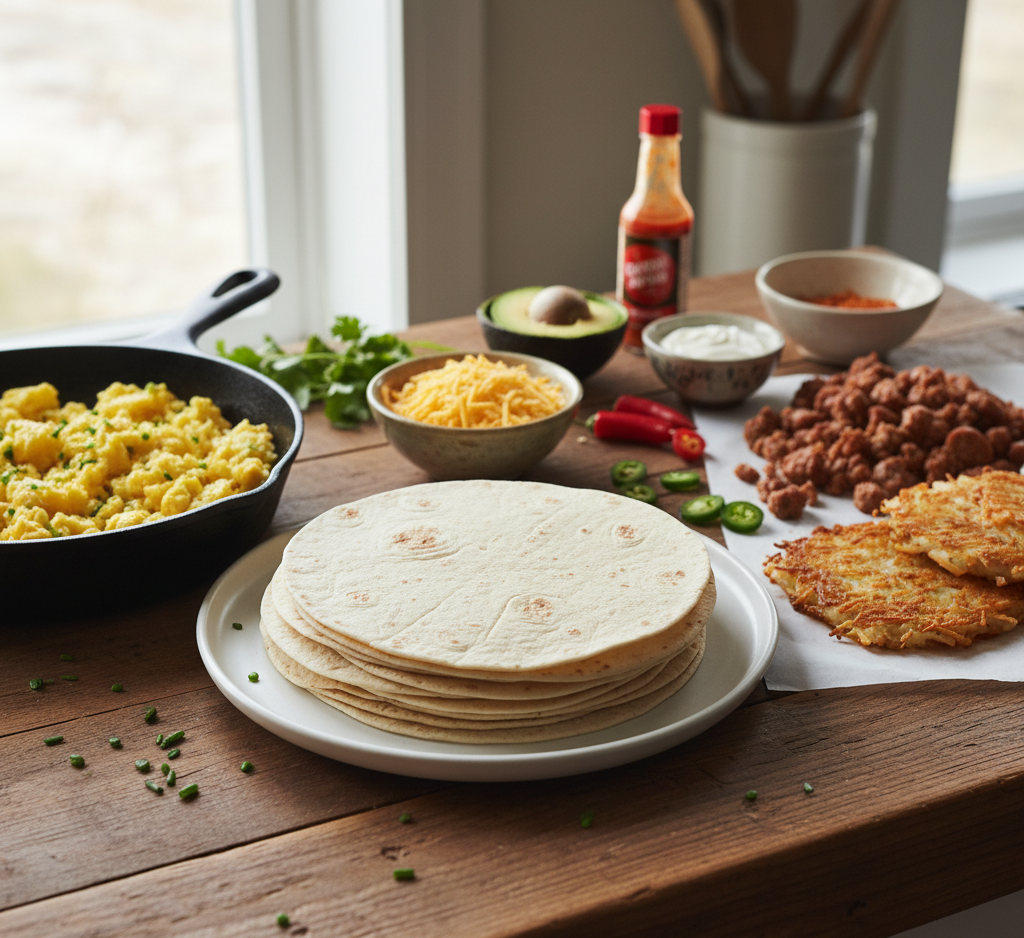
Ingredients
To make the best Hearty Cheesy Grilled Breakfast Crunchwrap, you’ll need:
- Large flour tortillas
- Scrambled eggs (4–6 eggs)
- Breakfast sausage or bacon
- Hash browns (crispy, cooked)
- Shredded cheddar or Mexican blend cheese
- Sour cream
- Optional: diced tomatoes, green onions, or jalapeños
Ingredient Notes
The magic of a great Hearty Cheesy Grilled Breakfast Crunchwrap lies in using the right ingredients:
- Tortillas: Choose large, soft tortillas for easy folding
- Eggs: Cook them soft and fluffy for the best texture
- Hash browns: Add the signature crunch factor
- Cheese: Use a good melting cheese like cheddar or Monterey Jack
You can also mix proteins like sausage and bacon for extra flavor.
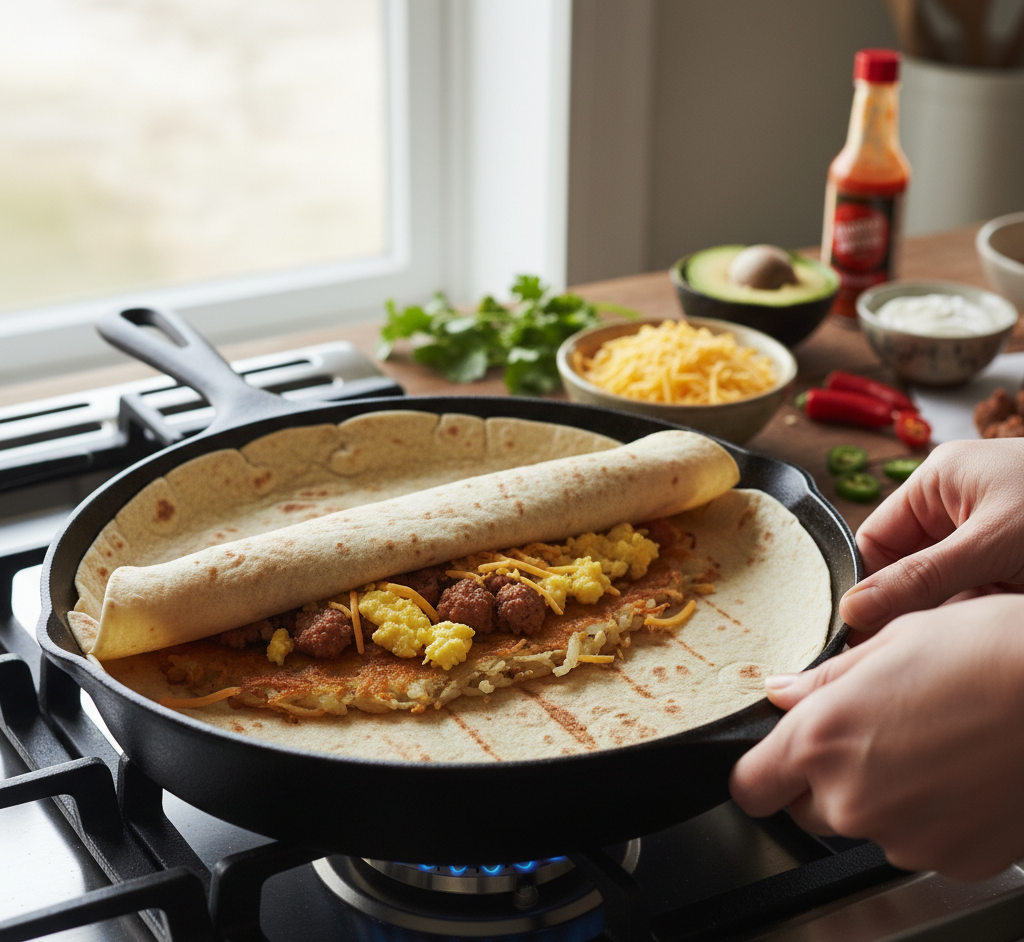
Step-by-Step Instructions
1. Cook the Fillings
Prepare scrambled eggs, cook your sausage or bacon, and crisp up the hash browns.
2. Assemble the Crunchwrap
Lay a tortilla flat and layer eggs, meat, hash browns, cheese, and toppings in the center.
3. Fold the Tortilla
Fold the edges inward to form a sealed wrap.
4. Grill
Place seam-side down in a hot skillet and cook until golden brown, then flip and grill the other side.
5. Serve
Slice in half and serve warm.
Tips for Perfect Results
For the ultimate Hearty Cheesy Grilled Breakfast Crunchwrap, follow these tips:
- Don’t overfill or it will be hard to fold
- Use medium heat to avoid burning the tortilla
- Press gently while grilling for even crispiness
- Let cheese melt fully before removing from heat
These small steps make a big difference in texture and flavor.
Variations
This Hearty Cheesy Grilled Breakfast Crunchwrap is endlessly customizable:
Veggie Crunchwrap
- Skip meat and add sautéed peppers, onions, and spinach
Spicy Version
- Add hot sauce or jalapeños
Southwest Style
- Include black beans, corn, and salsa
Low-Carb Option
- Use low-carb tortillas or wraps
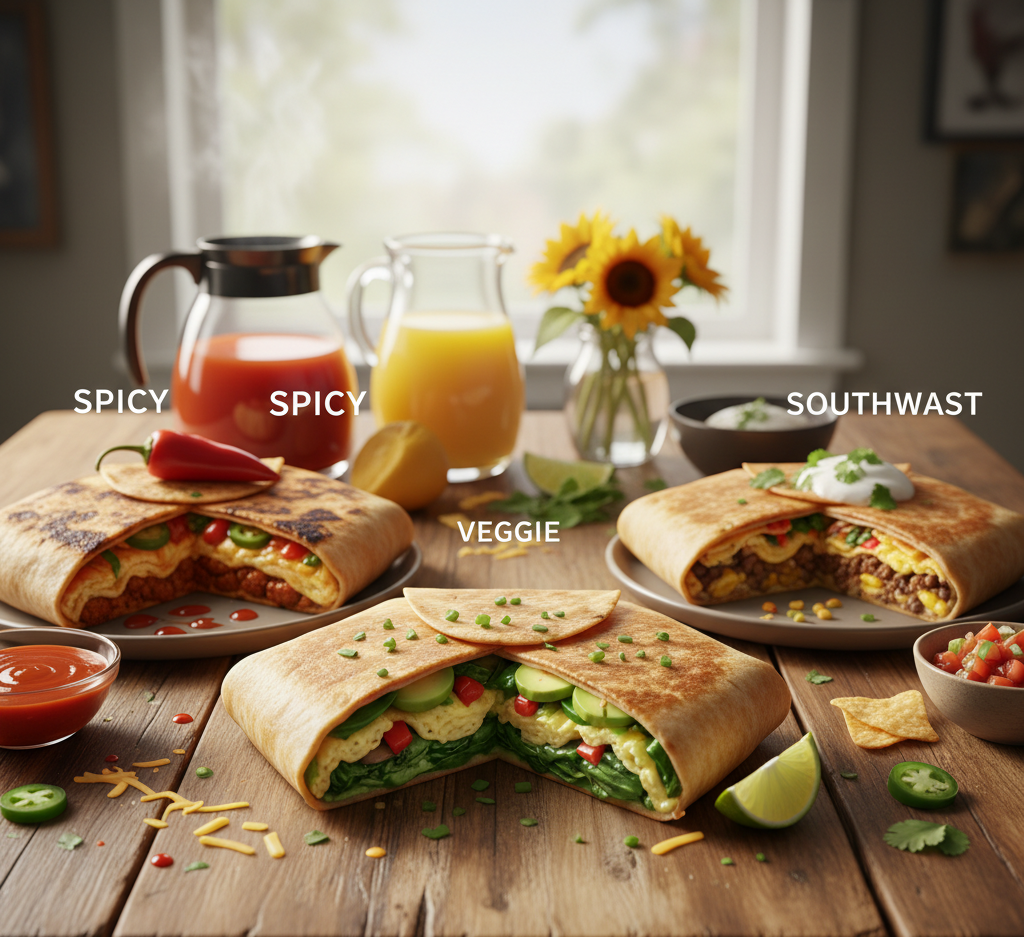
What to Serve With It
Pair your Hearty Cheesy Grilled Breakfast Crunchwrap with:
- Fresh fruit
- Orange juice or coffee
- Salsa or guacamole
- Yogurt parfait
These sides complement the richness of the crunchwrap perfectly.
Storage & Reheating
- Refrigerate: Store wrapped for up to 3 days
- Freeze: Wrap tightly and freeze for up to 1 month
- Reheat: Warm in a skillet or air fryer for best texture
- Avoid microwaving if you want to keep it crispy
Proper reheating helps maintain that signature crunch.
Common Mistakes to Avoid
When making a Hearty Cheesy Grilled Breakfast Crunchwrap, avoid:
- Overstuffing the wrap
- Using cold fillings (they won’t melt properly)
- Skipping the sealing step
- Cooking on high heat
Paying attention to these details ensures success every time.
FAQs
Can I make this ahead of time?
Yes! Assemble and refrigerate, then grill when ready to eat.
What’s the best cheese to use?
Cheddar, Monterey Jack, or a Mexican blend work great.
Can I make it vegetarian?
Absolutely—just skip the meat and add veggies.
How do I keep it crispy?
Reheat in a skillet or air fryer instead of a microwave.
Final Thoughts
This Hearty Cheesy Grilled Breakfast Crunchwrap is the ultimate combination of convenience, flavor, and comfort. It’s everything you want in a breakfast—crispy, cheesy, satisfying, and completely customizable.
Whether you’re feeding a hungry family or just treating yourself, this recipe delivers big flavor with minimal effort. Once you try it, you’ll wonder how you ever started your mornings without it.