Peanut Butter Icebox Cake (No-Bake, Creamy & Irresistible!)

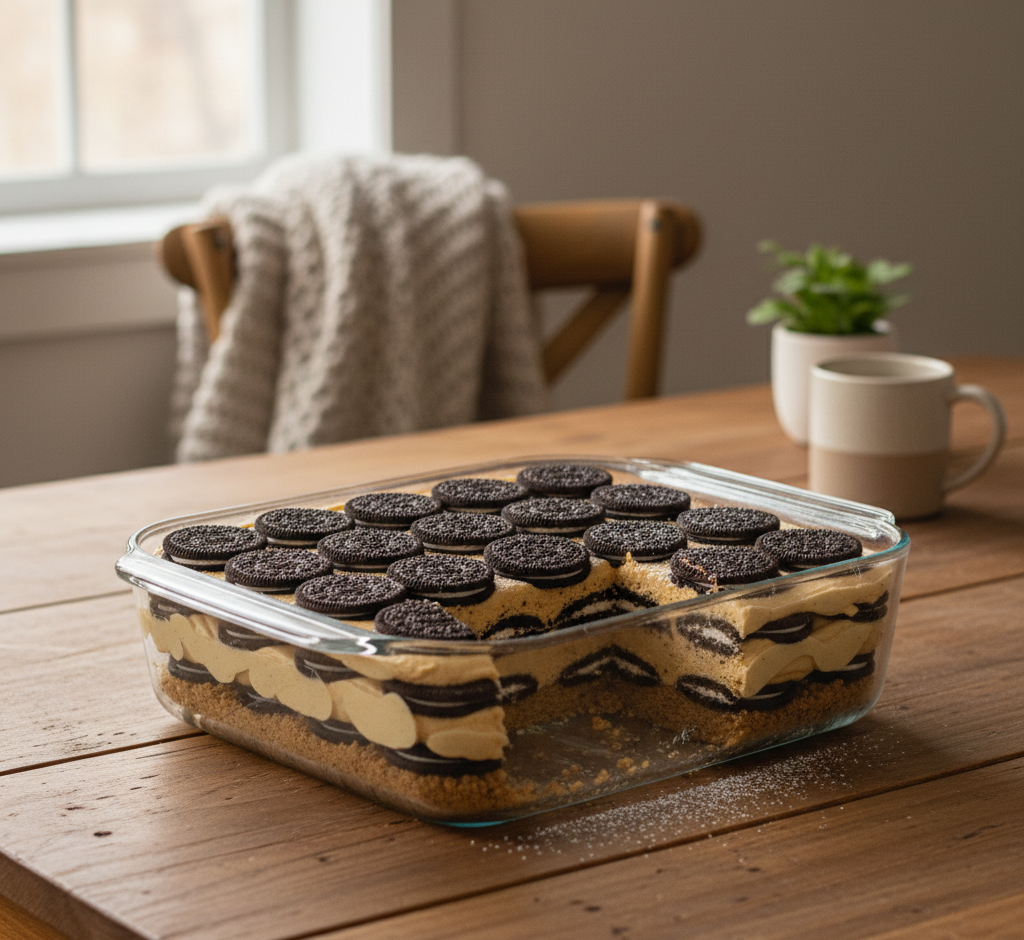
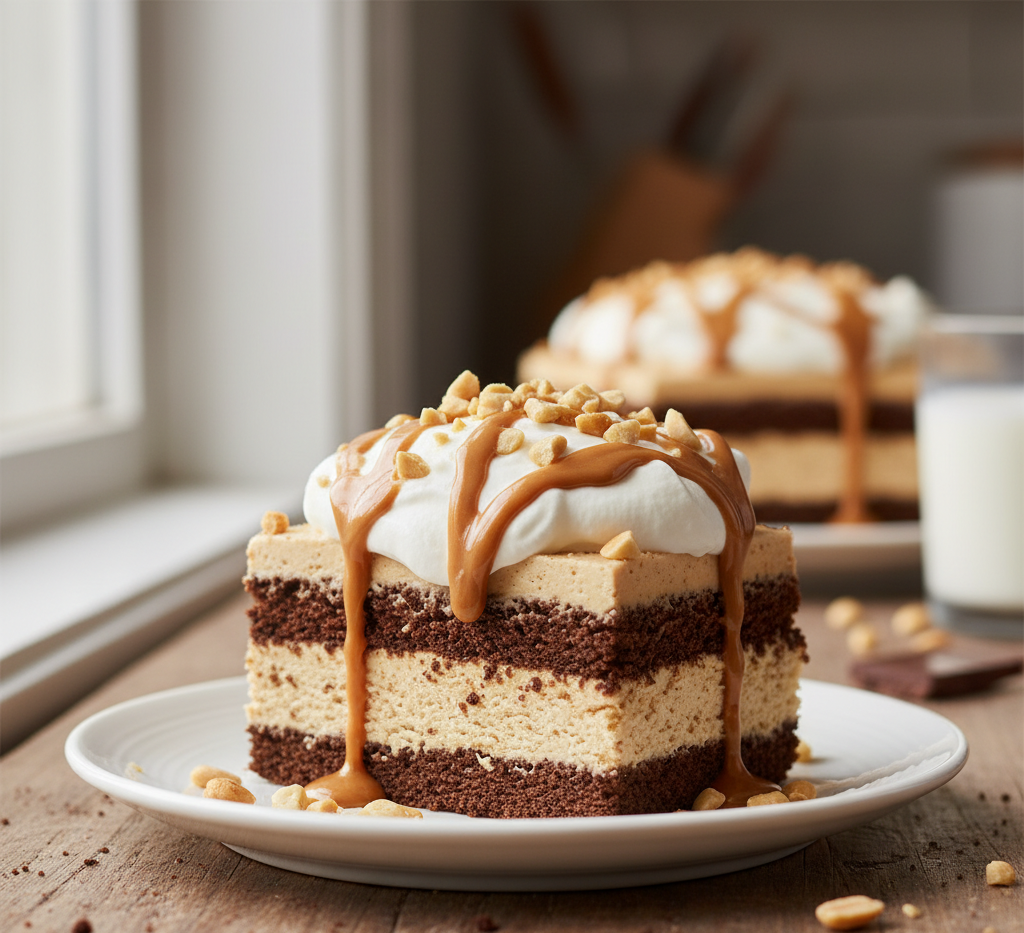
If you’re searching for a simple yet unforgettable dessert, this Peanut Butter Icebox Cake is about to become your new favorite. With layers of creamy peanut butter filling and soft, cake-like cookies that magically transform in the fridge, this no-bake treat delivers big flavor with minimal effort.

Perfect for warm days when you don’t want to turn on the oven, this dessert is as convenient as it is delicious. The combination of rich peanut butter, fluffy whipped cream, and tender cookie layers creates a texture that’s light yet indulgent. Whether you’re hosting a party or just treating yourself, this Peanut Butter Icebox Cake always impresses.

Peanut Butter Icebox

Why You’ll Love This Peanut Butter Icebox Cake

This Peanut Butter Icebox Cake is a dream dessert for both beginners and seasoned bakers.

  • No baking required—perfect for hot weather
  • Easy to assemble with simple ingredients
  • Make-ahead friendly—even better the next day
  • Rich and creamy texture with balanced sweetness
  • Crowd-pleasing dessert for all ages

It’s one of those recipes that feels fancy but couldn’t be easier to prepare.

Ingredients for Peanut Butter Icebox Cake

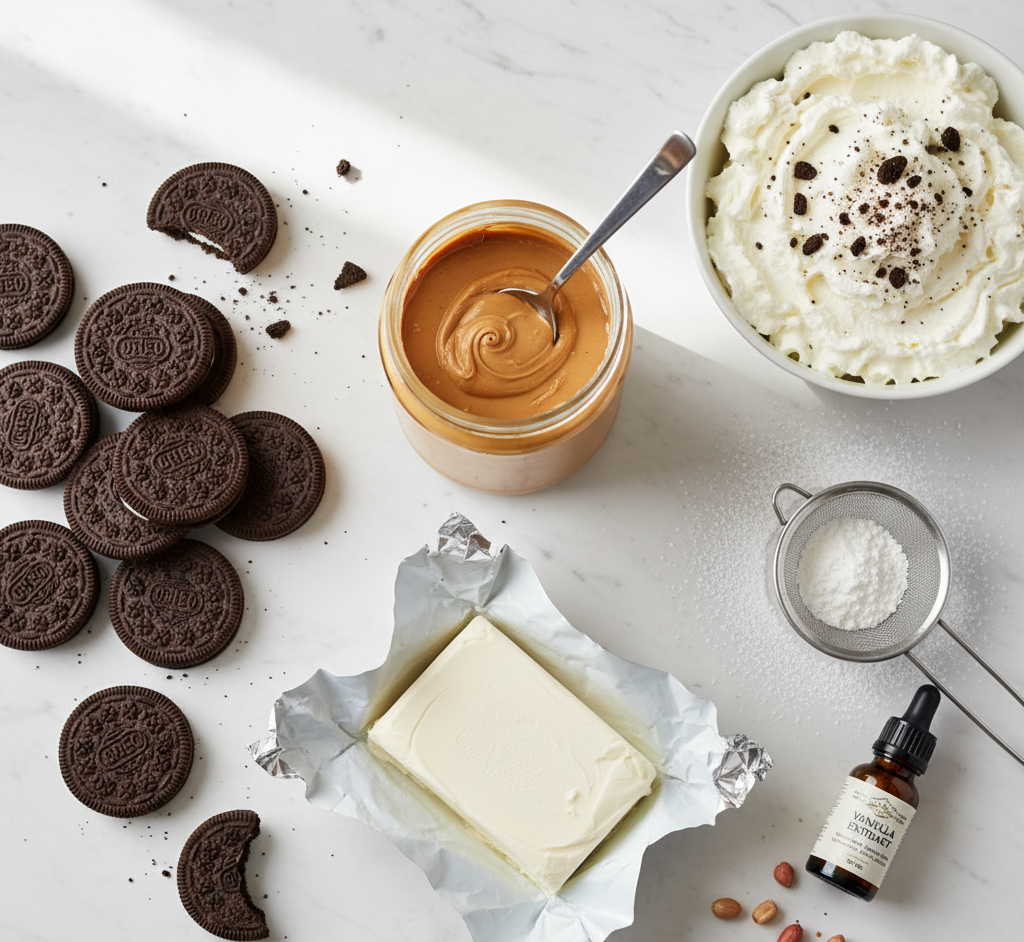
To make this delicious Peanut Butter Icebox Cake, you’ll need:

  • 2 cups heavy whipping cream
  • 1 cup creamy peanut butter
  • 8 oz cream cheese, softened
  • ¾ cup powdered sugar
  • 1 teaspoon vanilla extract
  • 1 package chocolate wafer cookies or graham crackers
  • Optional toppings: chocolate chips, peanut butter drizzle, crushed peanuts

Ingredient Notes and Substitutions

A few simple tweaks can help you customize your Peanut Butter Icebox Cake to your taste.

Peanut Butter

Use creamy peanut butter for a smooth texture, but crunchy works if you want added texture.

Cookies

Chocolate wafers are classic, but graham crackers or even vanilla wafers can be used.

Cream Cheese

Adds richness and stability to the filling—make sure it’s softened for easy mixing.

Sweetness Level

Adjust powdered sugar based on your preference for sweetness.

Step-by-Step Instructions

1. Make the Filling

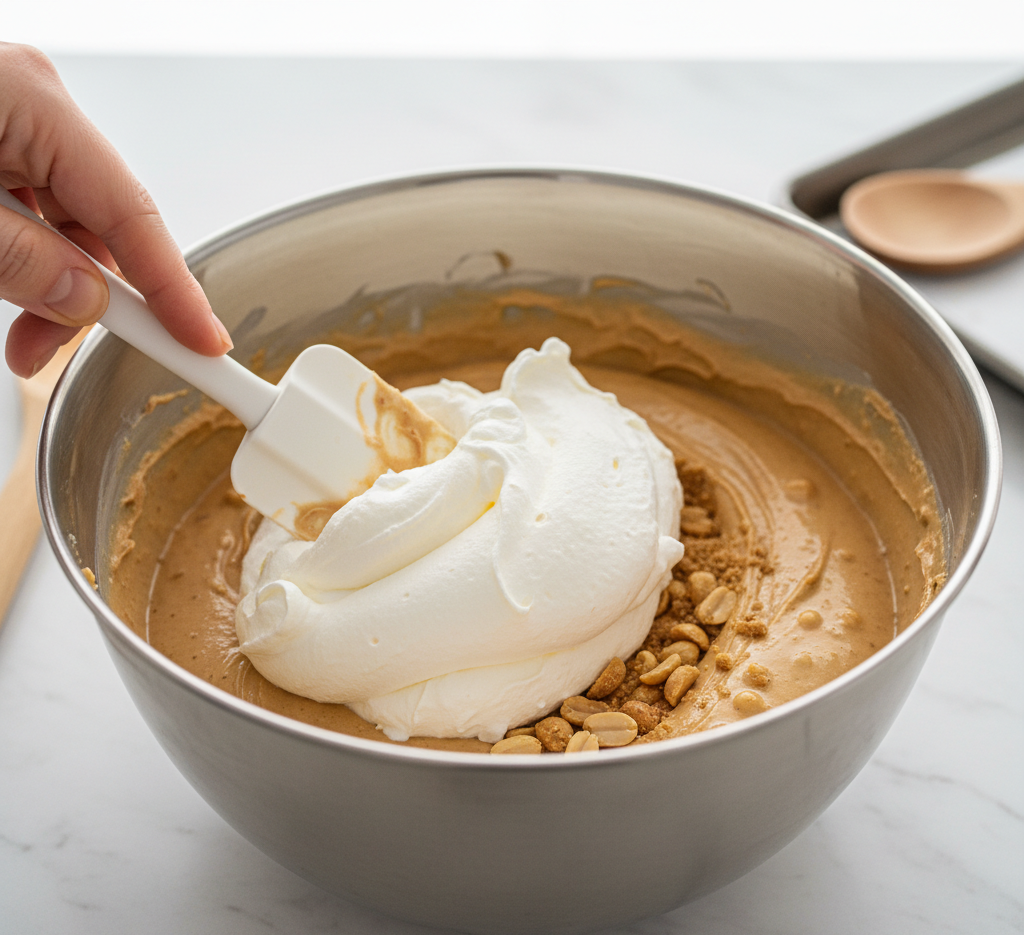
In a large bowl, beat cream cheese, peanut butter, powdered sugar, and vanilla until smooth and creamy.
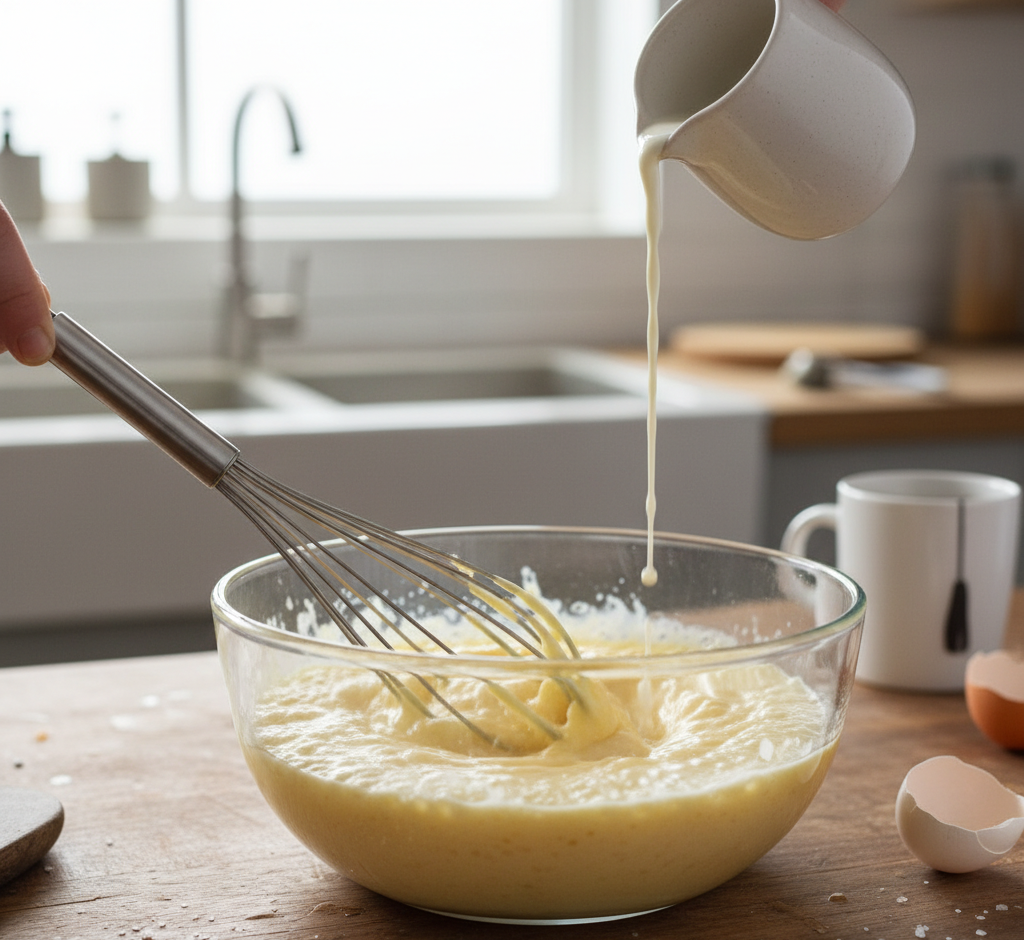
2. Whip the Cream

In a separate bowl, whip heavy cream until stiff peaks form, then gently fold it into the peanut butter mixture.
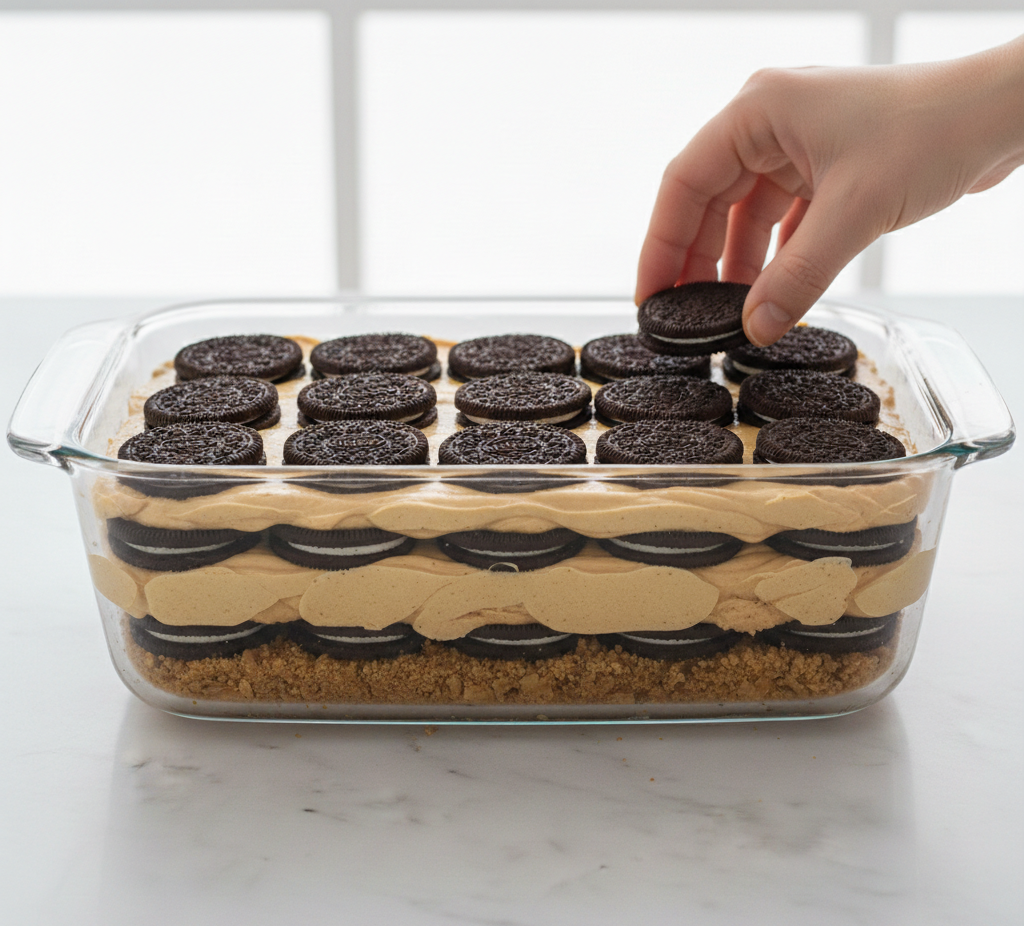
3. Layer the Cake

Spread a thin layer of filling in a dish, then add a layer of cookies. Repeat layers until all ingredients are used.

4. Chill and Set

Cover and refrigerate for at least 6 hours or overnight to allow the cookies to soften.

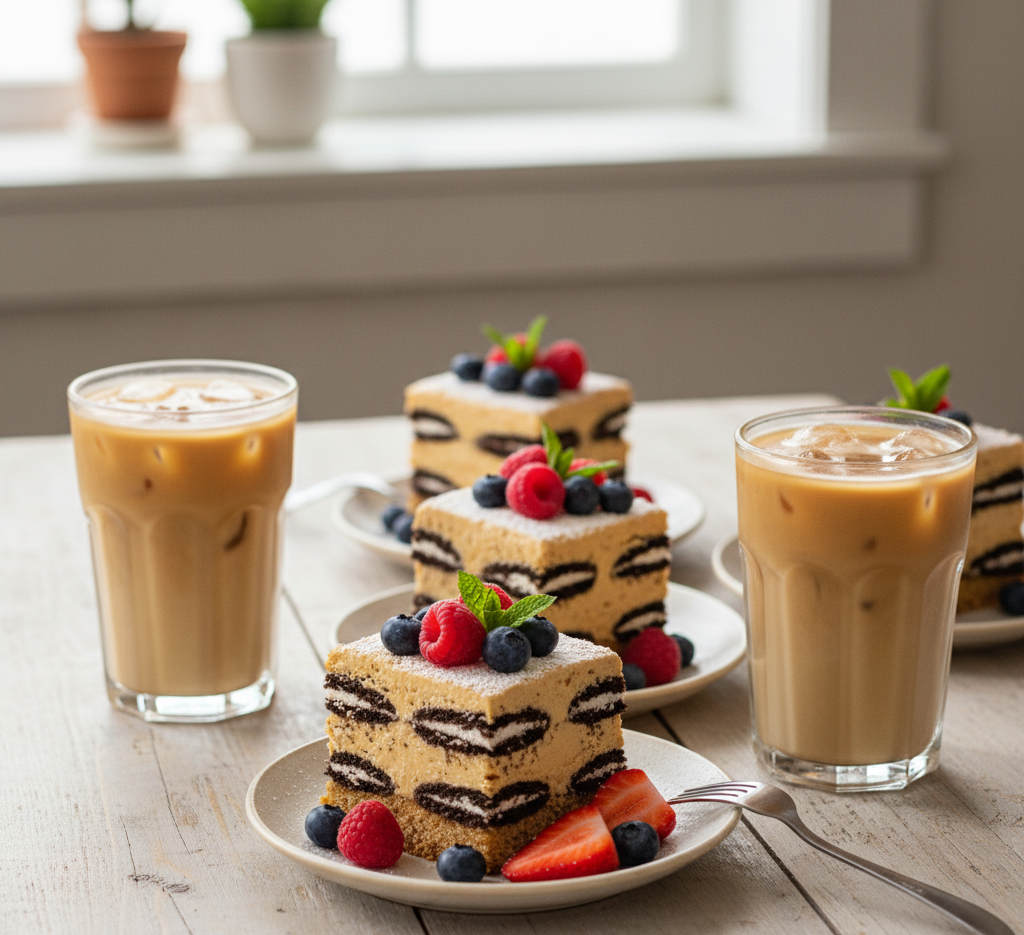
5. Garnish and Serve

Top with whipped cream, chocolate drizzle, or crushed peanuts before serving.

Tips for Perfect Peanut Butter Icebox Cake

To get the best results with your Peanut Butter Icebox Cake, keep these tips in mind:

  • Chill overnight for best texture
  • Use full-fat ingredients for richness
  • Layer evenly for a clean slice
  • Don’t skip the folding step to keep the filling light

These simple techniques ensure a smooth, creamy dessert every time.

Delicious Variations to Try

This Peanut Butter Icebox Cake is incredibly versatile.

Chocolate Peanut Butter Version

Add a layer of chocolate ganache between layers.

Banana Twist

Add sliced bananas between layers for a classic flavor combo.

Oreo Icebox Cake

Use Oreo cookies instead of wafers.

Nutella Swirl

Swirl Nutella into the filling for extra indulgence.

What to Serve With Peanut Butter Icebox Cake

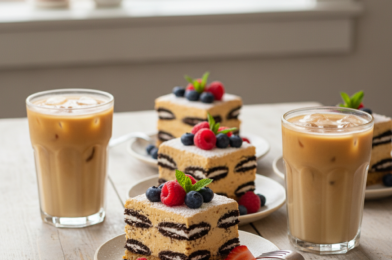
This rich dessert pairs well with lighter, refreshing options.

  • Fresh berries
  • Vanilla ice cream
  • Iced coffee or cold brew
  • Milk or hot chocolate

Storage & Reheating Tips

This Peanut Butter Icebox Cake stores beautifully, making it ideal for planning ahead.

  • Refrigerate: Store covered for up to 4–5 days
  • Freeze: Freeze for up to 1 month for a firmer texture
  • Serve chilled: Best enjoyed straight from the fridge

No reheating needed—just slice and enjoy!

Common Mistakes to Avoid

Avoid these common issues when making Peanut Butter Icebox Cake:

  • Not chilling long enough (layers won’t set properly)
  • Overmixing whipped cream (can deflate texture)
  • Using dry or stale cookies
  • Skipping even layering

Paying attention to these details ensures perfect results.

Frequently Asked Questions

1. Can I make Peanut Butter Icebox Cake ahead of time?

Yes! It’s actually better when made a day in advance.

2. Can I freeze this dessert?

Absolutely. It freezes well and can even be served slightly frozen.

3. What’s the best cookie to use?

Chocolate wafers are classic, but graham crackers or Oreos work great.

4. Is this dessert very sweet?

It’s rich but balanced—adjust sugar to your taste if needed.

Final Thoughts

This Peanut Butter Icebox Cake is the ultimate no-bake dessert—simple, creamy, and packed with flavor. It’s perfect for any occasion, from casual family dinners to special celebrations.

With its layers of peanut butter goodness and soft, cake-like texture, it’s a recipe you’ll come back to again and again. Give it a try, and enjoy a dessert that’s as easy to make as it is delicious.

Ultimate Beef Bacon Ranch Mac and Cheese – Crowd Favorite

If you’re looking for the ultimate comfort food that guarantees rave reviews, this Ultimate Beef Bacon Ranch Mac and Cheese – Crowd Favorite is exactly what you need. Imagine tender pasta coated in a rich, creamy cheese sauce, loaded with savory ground beef, crispy beef bacon, and a punch of ranch flavor that ties it all together. It’s hearty, indulgent, and completely irresistible.

This dish is perfect for potlucks, family dinners, game day spreads, or anytime you want something filling and satisfying. The combination of cheesy goodness, smoky beef bacon, and seasoned beef makes this recipe stand out from your typical mac and cheese. One bite, and you’ll see why it’s truly a crowd favorite.

Ultimate Beef Bacon

Why You’ll Love This Beef Bacon Ranch Mac and Cheese

This Ultimate Beef Bacon Ranch Mac and Cheese – Crowd Favorite delivers big on flavor, texture, and convenience.

  • Ultra creamy and cheesy with bold ranch flavor
  • Hearty and filling thanks to beef and bacon
  • Perfect for feeding a crowd
  • Easy to customize with different cheeses and add-ins
  • Great for leftovers and meal prep

It’s comfort food taken to the next level—rich, satisfying, and absolutely unforgettable.

Ingredients for Ultimate Beef Bacon Ranch Mac and Cheese

Here’s everything you need to make this flavorful beef bacon ranch mac and cheese:

  • 1 lb ground beef
  • 6 slices beef bacon, cooked and crumbled
  • 8 oz elbow macaroni or pasta of choice
  • 2 cups shredded cheddar cheese
  • 1 cup mozzarella cheese
  • 1½ cups milk
  • ½ cup heavy cream
  • 2 tablespoons butter
  • 2 tablespoons flour
  • 1 packet ranch seasoning mix
  • 1 teaspoon garlic powder
  • Salt and pepper to taste


Ingredient Notes and Substitutions

To make the best Ultimate Beef Bacon Ranch Mac and Cheese – Crowd Favorite, consider these helpful tips and swaps.

Ground Beef

Use lean ground beef to avoid excess grease, or substitute ground turkey for a lighter option.

Beef Bacon

Adds a smoky, savory flavor. You can use turkey bacon if preferred.

Cheese Blend

Cheddar provides sharpness, while mozzarella adds creaminess. You can also include Colby Jack or Monterey Jack.

Ranch Seasoning

A store-bought packet works great, but homemade ranch seasoning can enhance freshness.

Step-by-Step Instructions

1. Cook the Pasta

Boil salted water and cook pasta until al dente. Drain and set aside.

2. Brown the Beef

In a large skillet, cook ground beef over medium heat until browned. Drain excess grease if needed.

3. Make the Cheese Sauce

In the same pan, melt butter and whisk in flour to create a roux. Slowly add milk and cream, stirring until thickened.

4. Add Cheese and Seasoning

Stir in shredded cheeses, ranch seasoning, and garlic powder until smooth and creamy.

5. Combine Everything

Add cooked pasta, ground beef, and crumbled beef bacon. Mix until everything is evenly coated.

6. Optional Bake

Transfer to a baking dish, top with extra cheese, and bake until bubbly and golden.

Tips for Perfect Results

To get the most out of your Ultimate Beef Bacon Ranch Mac and Cheese – Crowd Favorite, keep these tips in mind:

  • Use freshly shredded cheese for smoother melting
  • Don’t overcook pasta to maintain texture
  • Season gradually to balance flavors
  • Let it rest slightly before serving to thicken

These small steps make a big difference in the final result.

Delicious Variations to Try

This beef bacon ranch mac and cheese is incredibly versatile and easy to customize.

Spicy Version

Add jalapeños or red pepper flakes for heat.

Veggie Boost

Mix in broccoli, spinach, or bell peppers.

Extra Cheesy

Add cream cheese or more shredded cheese for richness.

BBQ Twist

Drizzle in a bit of BBQ sauce for a smoky-sweet flavor.

What to Serve With Beef Bacon Ranch Mac and Cheese

Pair this hearty dish with lighter sides to balance the meal.

  • Fresh green salad
  • Steamed vegetables
  • Garlic bread
  • Coleslaw
  • Lemonade or iced tea

Storage & Reheating Tips

Leftovers of this Ultimate Beef Bacon Ranch Mac and Cheese – Crowd Favorite are just as delicious.

  • Refrigerate: Store in an airtight container for up to 4 days
  • Freeze: Freeze for up to 2 months
  • Reheat: Warm on the stove with a splash of milk to restore creaminess

Proper reheating keeps the dish smooth and flavorful.

Common Mistakes to Avoid

Avoid these common pitfalls when making beef bacon ranch mac and cheese:

  • Using pre-shredded cheese (can cause grainy sauce)
  • Overheating the sauce (may separate)
  • Skipping seasoning adjustments
  • Not draining beef properly

Paying attention to these details ensures perfect results every time.

Frequently Asked Questions

1. Can I make this dish ahead of time?

Yes! Assemble it ahead and bake just before serving.

2. Can I use a different protein?

Absolutely—try ground turkey, chicken, or even sausage.

3. Is ranch flavor overpowering?

No, it adds a subtle tangy boost, but you can adjust to taste.

4. Can I make it gluten-free?

Yes, use gluten-free pasta and flour alternatives.

Final Thoughts

This Ultimate Beef Bacon Ranch Mac and Cheese – Crowd Favorite truly lives up to its name. It’s creamy, hearty, and packed with bold, comforting flavors that everyone loves. Whether you’re feeding a crowd or just treating yourself, this dish delivers satisfaction in every bite.

With its rich cheese sauce, savory beef, and smoky bacon, it’s the kind of recipe you’ll come back to again and again. Try it once, and it just might become your new go-to comfort food favorite.

The Best Chicken Tikka Masala Recipe (Rich, Creamy & Restaurant-Quality!)

If you’ve ever fallen in love with the rich, creamy, and boldly spiced flavors of The Best Chicken Tikka Masala Recipe, you’re not alone. This iconic dish has become a favorite across the U.S., blending tender marinated chicken with a velvety tomato-based sauce that’s both comforting and complex.

What makes this recipe truly special is how it balances smoky, spiced chicken with a creamy, slightly tangy sauce. The good news? You don’t need a restaurant or a tandoor oven to recreate it. With a few simple steps and pantry-friendly spices, you can make The Best Chicken Tikka Masala Recipe right in your own kitchen—and it might even taste better than takeout.

Why You’ll Love This Chicken Tikka Masala Recipe

This truly is The Best Chicken Tikka Masala Recipe for home cooks who want bold flavor without complicated steps.

  • Restaurant-quality taste at home
  • Rich and creamy sauce packed with spices
  • Customizable heat level
  • Perfect for meal prep
  • Pairs beautifully with rice or naan

It’s the kind of dish that impresses guests but is simple enough for a cozy weeknight dinner.

Ingredients for The Best Chicken Tikka Masala Recipe

To make this flavorful Chicken Tikka Masala, you’ll need two main components: the marinade and the sauce.

For the Chicken Marinade:

  • 1½ lbs boneless chicken (thighs or breasts)
  • 1 cup plain yogurt
  • 1 tablespoon lemon juice
  • 2 teaspoons garam masala
  • 1 teaspoon cumin
  • 1 teaspoon paprika
  • 1 teaspoon garlic (minced)
  • Salt to taste

For the Sauce:

  • 2 tablespoons butter
  • 1 small onion, finely chopped
  • 3 cloves garlic, minced
  • 1 tablespoon ginger, grated
  • 1 can (14 oz) crushed tomatoes
  • 1 cup heavy cream
  • 1 teaspoon turmeric
  • 1 teaspoon chili powder
  • 1 teaspoon garam masala
  • Salt and pepper to taste


Ingredient Notes and Substitutions

Making The Best Chicken Tikka Masala Recipe is all about layering flavor, and your ingredient choices matter.

Chicken Cuts

Chicken thighs are more flavorful and juicy, but breasts work well for a leaner option.

Yogurt Marinade

Full-fat yogurt gives the best texture and helps tenderize the chicken beautifully.

Spice Blend

Garam masala is essential for authentic flavor—don’t skip it.

Cream Alternatives

You can use coconut milk for a dairy-free version with a slightly different flavor profile.

Step-by-Step Instructions

1. Marinate the Chicken

Combine all marinade ingredients and coat the chicken thoroughly. Let it marinate for at least 1 hour (overnight is best).

2. Cook the Chicken

Grill, bake, or pan-sear the marinated chicken until cooked through and slightly charred.

3. Sauté Aromatics

In a large pan, melt butter and sauté onion, garlic, and ginger until soft and fragrant.

4. Build the Sauce

Add crushed tomatoes and spices. Simmer until thickened, then stir in heavy cream.

5. Combine and Simmer

Add the cooked chicken to the sauce and simmer for 10–15 minutes to meld flavors.

6. Garnish and Serve

Top with fresh cilantro and serve hot with rice or naan.

Tips for Perfect Chicken Tikka Masala

To truly master The Best Chicken Tikka Masala Recipe, keep these tips in mind:

  • Marinate longer for deeper flavor
  • Char the chicken slightly for a smoky taste
  • Use fresh spices for maximum aroma
  • Simmer the sauce gently to avoid curdling

These small steps elevate your dish from good to unforgettable.

Delicious Variations to Try

Once you’ve mastered The Best Chicken Tikka Masala Recipe, try these variations:

Spicy Version

Add extra chili powder or fresh chilies.

Vegetarian Option

Swap chicken for paneer, tofu, or chickpeas.

Dairy-Free Version

Use coconut milk instead of cream and dairy-free yogurt.

Instant Pot Method

Cook everything in one pot for convenience and speed.

What to Serve With Chicken Tikka Masala

Pair your Chicken Tikka Masala with these classic sides:

  • Basmati rice
  • Garlic naan
  • Cucumber raita
  • Roasted vegetables

Storage & Reheating Tips

This Chicken Tikka Masala stores beautifully and tastes even better the next day.

  • Refrigerate: Store in an airtight container for up to 4 days
  • Freeze: Freeze for up to 2 months
  • Reheat: Warm gently on the stove, adding a splash of cream if needed

The flavors deepen over time, making leftovers especially delicious.

Common Mistakes to Avoid

Avoid these pitfalls when making The Best Chicken Tikka Masala Recipe:

  • Skipping the marinade (reduces flavor)
  • Overcooking the chicken (makes it dry)
  • Using low-quality spices (dulls the taste)
  • Boiling the sauce too hard (can separate cream)

Paying attention to these details ensures a perfect dish every time.

Frequently Asked Questions

1. Is chicken tikka masala spicy?

It has mild to moderate heat, but you can easily adjust the spice level.

2. Can I make this recipe ahead of time?

Yes! It actually tastes better after the flavors meld overnight.

3. What’s the difference between tikka masala and butter chicken?

Tikka masala is usually more spiced and tomato-forward, while butter chicken is richer and sweeter.

4. Can I grill the chicken instead?

Absolutely! Grilling adds a delicious smoky flavor.

Final Thoughts

This truly is The Best Chicken Tikka Masala Recipe for anyone who loves bold, comforting flavors. With its creamy sauce, tender chicken, and aromatic spices, it’s a dish that feels both indulgent and approachable.

Whether you’re making it for a special dinner or a cozy night at home, this recipe delivers restaurant-quality results with simple ingredients. Once you try it, it’s sure to become a regular favorite in your kitchen.

Buffalo Chicken Wings (Crispy, Saucy & Game-Day Perfect!)

There’s nothing quite like a plate of Buffalo chicken wings—crispy on the outside, juicy on the inside, and tossed in that iconic tangy, buttery hot sauce. Whether you’re hosting a game-day party, planning a casual get-together, or simply craving a bold and satisfying snack, this classic recipe never disappoints.

Originating from Buffalo, New York, these wings have become a staple across the U.S., loved for their irresistible combination of crunch and heat. The good news? You don’t need a restaurant or deep fryer to make incredible Buffalo chicken wings at home. With the right technique and a few key tips, you can achieve perfectly crispy wings every time.

Buffalo Chicken

Why You’ll Love These Buffalo Chicken Wings

These homemade Buffalo chicken wings deliver everything you want in a classic wing recipe—and more.

  • Crispy texture without complicated techniques
  • Bold, tangy flavor from the signature buffalo sauce
  • Perfect for gatherings like game day or parties
  • Customizable heat levels to suit your taste
  • Multiple cooking methods (baked, fried, or air-fried)

Once you master this recipe, you’ll never need to order takeout wings again.

Ingredients for Buffalo Chicken Wings

To make the best Buffalo chicken wings, you’ll need simple ingredients that pack a punch:

  • 2 lbs chicken wings (split into flats and drumettes)
  • 1 tablespoon baking powder (for crispiness)
  • 1 teaspoon salt
  • ½ teaspoon black pepper
  • 1 teaspoon garlic powder

For the Buffalo Sauce:

  • ⅓ cup hot sauce
  • ¼ cup unsalted butter
  • 1 tablespoon honey (optional)
  • ½ teaspoon Worcestershire sauce

Ingredient Notes and Substitutions

Understanding your ingredients can make all the difference when preparing Buffalo chicken wings.

Chicken Wings

Fresh wings are best, but frozen wings work if fully thawed and patted dry.

Baking Powder Trick

This is the secret to crispy baked wings—it helps dry out the skin for a crunchy finish.

Hot Sauce

Classic cayenne-based sauces work best, but you can experiment with different brands or spice levels.

Butter Balance

Butter mellows the heat and creates that signature silky buffalo sauce.

Step-by-Step Instructions

1. Prep the Wings

Pat the chicken wings completely dry with paper towels. Toss them with baking powder, salt, pepper, and garlic powder.

2. Arrange and Bake

Place wings on a wire rack over a baking sheet. Bake at 425°F for 40–45 minutes, flipping halfway through.

3. Make the Buffalo Sauce

In a saucepan, melt butter and whisk in hot sauce, honey, and Worcestershire sauce until smooth.

4. Toss the Wings

Once crispy, toss the wings in the buffalo sauce until evenly coated.

5. Serve Immediately

Serve hot with your favorite dipping sauces and sides.

Tips for Perfect Buffalo Chicken Wings

Achieving restaurant-quality Buffalo chicken wings at home is easier than you think with these tips:

  • Dry wings thoroughly for maximum crispiness
  • Use a wire rack to allow air circulation
  • Bake at high heat for a crispy exterior
  • Don’t overcrowd the pan
  • Sauce just before serving to keep wings crispy

These small techniques make a big difference in texture and flavor.

Delicious Variations to Try

Once you’ve mastered classic Buffalo chicken wings, try these fun variations:

Garlic Parmesan Wings

Skip buffalo sauce and toss in garlic butter and Parmesan.

Honey Buffalo Wings

Add extra honey for a sweet and spicy twist.

Extra Hot Wings

Increase the hot sauce or add cayenne pepper.

BBQ Buffalo Hybrid

Mix buffalo sauce with BBQ sauce for a smoky-sweet flavor.

What to Serve With Buffalo Chicken Wings

Complete your spread with these classic pairings:

  • Celery and carrot sticks
  • Ranch or blue cheese dressing
  • French fries or potato wedges
  • Coleslaw
  • Cold drinks like soda or beer

Storage & Reheating Tips

Leftover Buffalo chicken wings can still be delicious if stored properly.

  • Refrigerate: Store in an airtight container for up to 4 days
  • Reheat: Bake at 375°F until heated through and crispy
  • Avoid microwaving: It softens the skin

Reheating in the oven helps restore that crispy texture.

Common Mistakes to Avoid

Avoid these common pitfalls when making Buffalo chicken wings:

  • Not drying the wings (leads to soggy skin)
  • Skipping the wire rack (prevents even cooking)
  • Over-saucing too early (makes wings soggy)
  • Cooking at too low a temperature

Keeping these in mind ensures perfectly crispy, flavorful wings.

Frequently Asked Questions

1. Can I air fry Buffalo chicken wings?

Yes! Air fry at 400°F for about 20–25 minutes, flipping halfway through.

2. Are Buffalo wings very spicy?

They have a moderate kick, but you can adjust the heat by changing the sauce ratio.

3. Can I make them ahead of time?

You can bake the wings ahead and reheat before tossing in sauce.

4. What’s the best dipping sauce?

Ranch and blue cheese are classic favorites.

Final Thoughts

These Buffalo chicken wings are everything you want in a classic American favorite—crispy, saucy, and bursting with bold flavor. Whether baked, fried, or air-fried, they’re guaranteed to be a hit at any gathering.

Once you try making them at home, you’ll realize just how easy and rewarding it is to recreate this iconic dish. So grab your ingredients, fire up the oven, and get ready to enjoy the ultimate wing experience.

Buffalo Chicken Mac and Cheese (Ultra Creamy, Spicy & Irresistible!)

If you’re a fan of bold, spicy comfort food, this Buffalo Chicken Mac and Cheese is about to become your new favorite dish. It combines everything you love about classic mac and cheese—creamy sauce, tender pasta, and gooey melted cheese—with the tangy, spicy kick of buffalo chicken. The result is a rich, satisfying meal that’s perfect for weeknights, game days, or whenever you’re craving something indulgent.

This recipe strikes the perfect balance between creamy and spicy, with just enough heat to keep things exciting without overpowering the dish. Whether you’re cooking for family, friends, or just yourself, this Buffalo Chicken Mac and Cheese delivers comfort and flavor in every bite.

Buffalo Chicken Mac

Why You’ll Love This Buffalo Chicken Mac and Cheese

There are so many reasons this Buffalo Chicken Mac and Cheese deserves a spot on your dinner rotation.

  • Bold flavor: Combines creamy cheese with spicy buffalo sauce
  • Comfort food upgrade: Takes classic mac and cheese to the next level
  • Easy to make: Simple ingredients and straightforward steps
  • Crowd-pleaser: Perfect for gatherings and family meals
  • Customizable heat level: Adjust spice to your liking

It’s the kind of dish that feels indulgent yet approachable—exactly what great home cooking should be.

Ingredients for Buffalo Chicken Mac and Cheese

To make this rich and flavorful Buffalo Chicken Mac and Cheese, you’ll need:

  • 2 cups cooked chicken (shredded or diced)
  • 8 oz elbow macaroni
  • 2 cups shredded cheddar cheese
  • 1 cup mozzarella cheese
  • 1 cup milk
  • ½ cup heavy cream
  • ⅓ cup buffalo sauce
  • 2 tablespoons butter
  • 2 tablespoons flour
  • ½ teaspoon garlic powder
  • Salt and pepper to taste

Ingredient Notes and Substitutions

A few smart choices can elevate your Buffalo Chicken Mac and Cheese and make it perfectly suited to your taste.

Chicken Options

Rotisserie chicken is quick and flavorful, but grilled or baked chicken works just as well.

Cheese Choices

Cheddar provides sharp flavor, while mozzarella adds creaminess. You can also try Monterey Jack or Colby.

Buffalo Sauce

Choose your favorite brand—mild, medium, or hot depending on your spice tolerance.

Pasta Types

Elbow macaroni is classic, but shells or cavatappi hold the sauce beautifully.

Step-by-Step Instructions

1. Cook the Pasta

Bring salted water to a boil and cook the pasta until al dente. Drain and set aside.

2. Make the Roux

In a large skillet, melt butter over medium heat. Whisk in flour and cook for 1–2 minutes.

3. Build the Cheese Sauce

Slowly whisk in milk and cream. Cook until thickened, then stir in shredded cheese until melted and smooth.

4. Add Buffalo Flavor

Mix in buffalo sauce and garlic powder, adjusting the amount to taste.

5. Combine Everything

Add cooked pasta and chicken to the sauce, stirring until fully coated and heated through.

6. Optional Bake

Transfer to a baking dish, top with extra cheese, and broil for a golden, bubbly finish.

Tips for Perfect Buffalo Chicken Mac and Cheese

To make your Buffalo Chicken Mac and Cheese absolutely perfect, follow these tips:

  • Use freshly shredded cheese for better melting
  • Don’t overcook pasta to avoid mushy texture
  • Add buffalo sauce gradually to control spice level
  • Stir constantly to keep the sauce smooth

These small details help create a creamy, restaurant-quality dish at home.

Delicious Variations to Try

This Buffalo Chicken Mac and Cheese is incredibly versatile and easy to customize.

Blue Cheese Lovers

Add crumbled blue cheese for a classic buffalo pairing.

Crispy Topping

Top with breadcrumbs and bake for added crunch.

Low-Carb Version

Use cauliflower instead of pasta.

Extra Protein

Mix in bacon or even shrimp for a unique twist.

What to Serve With Buffalo Chicken Mac and Cheese

Balance out the richness of this dish with fresh and light sides.

  • Celery and carrot sticks
  • Crisp green salad
  • Garlic bread
  • Roasted vegetables
  • Lemonade or iced tea

Storage & Reheating Tips

This Buffalo Chicken Mac and Cheese stores well and makes great leftovers.

  • Refrigerate: Store in an airtight container for up to 4 days
  • Reheat: Warm on the stove with a splash of milk
  • Freeze: Freeze for up to 2 months (best without pasta overcooked)

Reheating gently helps maintain that creamy consistency.

Common Mistakes to Avoid

Avoid these common pitfalls when making Buffalo Chicken Mac and Cheese:

  • Using pre-shredded cheese (can make sauce grainy)
  • Adding buffalo sauce all at once (may overpower dish)
  • Overheating cheese sauce (causes separation)
  • Skipping seasoning (leads to bland flavor)

Paying attention to these details ensures a perfect result every time.

Frequently Asked Questions

1. Can I make Buffalo Chicken Mac and Cheese ahead of time?

Yes! Prepare it in advance and reheat with a bit of milk to keep it creamy.

2. Is it very spicy?

It depends on the buffalo sauce you use. You can easily adjust the heat level.

3. Can I use a different protein?

Absolutely—try turkey, shredded pork, or even plant-based alternatives.

4. What’s the best cheese combination?

Cheddar and mozzarella are ideal, but adding Monterey Jack or blue cheese enhances flavor.

Final Thoughts

This Buffalo Chicken Mac and Cheese is the ultimate comfort food with a bold twist. Creamy, cheesy, and perfectly spicy, it’s a dish that delivers big flavor with minimal effort. Whether you’re making it for a cozy dinner or a crowd-pleasing party dish, it’s guaranteed to impress.

Once you try it, you’ll see why this recipe is such a favorite—it’s rich, satisfying, and endlessly customizable. Don’t be surprised if it becomes a regular request in your kitchen!

Cheesy Rotel Chicken Pasta (Creamy, Spicy, and Comforting!)

When it comes to easy comfort food that delivers bold flavor with minimal effort, Cheesy Rotel Chicken Pasta is a true standout. This creamy, cheesy pasta dish combines tender chicken, zesty Rotel tomatoes, and perfectly cooked pasta in a rich, satisfying sauce that hits all the right notes—savory, slightly spicy, and irresistibly creamy.

Whether you’re feeding a hungry family, meal prepping for the week, or just craving something cozy and indulgent, this recipe is a reliable go-to. The best part? It comes together quickly using simple pantry staples, making it ideal for busy weeknights when you want something homemade without the hassle.

Chicken Pasta

Why You’ll Love This Cheesy Rotel Chicken Pasta

This Cheesy Rotel Chicken Pasta isn’t just another pasta recipe—it’s a flavor-packed dish that checks all the boxes for comfort and convenience.

  • Quick and easy: Ready in about 30 minutes
  • One-pot friendly: Fewer dishes, less cleanup
  • Bold flavor: Rotel adds a zesty, slightly spicy kick
  • Family-approved: Creamy and cheesy with just the right amount of heat
  • Customizable: Easy to adjust spice level and ingredients

If you’re looking for a dinner that feels indulgent yet approachable, this recipe delivers every time.

Ingredients for Cheesy Rotel Chicken Pasta

Here’s what you’ll need to make this creamy and delicious Cheesy Rotel Chicken Pasta:

  • 2 cups cooked chicken (shredded or diced)
  • 8 oz pasta (penne, rotini, or shells)
  • 1 can (10 oz) Rotel diced tomatoes with green chilies
  • 1 cup heavy cream
  • 1½ cups shredded cheddar cheese
  • ½ cup cream cheese
  • 2 cloves garlic, minced
  • 1 tablespoon olive oil
  • 1 teaspoon paprika
  • Salt and pepper to taste

Ingredient Notes and Substitutions

A few thoughtful tweaks can take your Cheesy Rotel Chicken Pasta to the next level.

Chicken Options

Rotisserie chicken is a fantastic shortcut, but grilled or baked chicken works just as well.

Pasta Choices

Short pasta shapes like penne or rotini hold the creamy sauce beautifully, but any pasta you have on hand will work.

Cheese Variations

Cheddar is classic, but mixing in Monterey Jack or pepper jack adds extra creaminess and a little kick.

Spice Level

Rotel comes in mild, original, and hot varieties—choose based on your heat preference.

Step-by-Step Instructions

1. Cook the Pasta

Bring a large pot of salted water to a boil and cook the pasta according to package instructions. Drain and set aside.

2. Sauté the Garlic

In a large skillet, heat olive oil over medium heat. Add minced garlic and sauté until fragrant.

3. Build the Sauce

Add the Rotel tomatoes (with juices), heavy cream, and cream cheese. Stir until smooth and well combined.

4. Add Chicken and Cheese

Stir in the cooked chicken and shredded cheddar cheese, allowing it to melt into the sauce.

5. Combine Everything

Add the cooked pasta to the skillet and toss until fully coated in the creamy sauce.

6. Serve Warm

Serve immediately, garnished with extra cheese or fresh herbs if desired.

Tips for Perfect Cheesy Rotel Chicken Pasta

To make your Cheesy Rotel Chicken Pasta absolutely perfect, keep these tips in mind:

  • Don’t overcook pasta: Keep it al dente for best texture
  • Use room temperature cream cheese: Helps it melt smoothly
  • Stir constantly: Prevents the sauce from separating
  • Adjust consistency: Add a splash of pasta water if needed

These small steps ensure a creamy, cohesive dish every time.

Delicious Variations to Try

One of the best things about Cheesy Rotel Chicken Pasta is how versatile it is.

Spicy Kick Version

Add red pepper flakes or jalapeños for extra heat.

Veggie-Packed Pasta

Mix in spinach, bell peppers, or mushrooms.

Bacon Lover’s Twist

Add crispy bacon bits for a smoky flavor boost.

Lighter Version

Use half-and-half instead of heavy cream and reduce the cheese slightly.

What to Serve With Cheesy Rotel Chicken Pasta

This rich dish pairs perfectly with lighter sides to balance the meal.

  • Fresh green salad with vinaigrette
  • Garlic bread or breadsticks
  • Steamed broccoli or roasted vegetables
  • Iced tea or sparkling water

Storage & Reheating Tips

Leftovers of Cheesy Rotel Chicken Pasta are just as delicious the next day.

  • Refrigerate: Store in an airtight container for up to 4 days
  • Reheat: Warm on the stove with a splash of milk or cream
  • Freeze: Freeze for up to 2 months (texture may slightly change)

Reheating gently helps maintain that creamy texture.

Common Mistakes to Avoid

Avoid these pitfalls to ensure your Cheesy Rotel Chicken Pasta turns out perfect:

  • Using pre-shredded cheese (doesn’t melt as smoothly)
  • Overheating the sauce (can cause separation)
  • Not seasoning enough (balance is key)
  • Skipping the pasta water (helps bind the sauce)

Paying attention to these details makes a big difference in flavor and texture.

Frequently Asked Questions

1. Can I make Cheesy Rotel Chicken Pasta ahead of time?

Yes! Prepare it in advance and reheat gently with added liquid to keep it creamy.

2. Is this dish very spicy?

It depends on the Rotel you use. Mild versions are very family-friendly.

3. Can I use a different protein?

Absolutely—try shrimp, ground beef, or even sausage.

4. What’s the best cheese for this recipe?

Cheddar is classic, but blending cheeses adds depth and richness.

Final Thoughts

This Cheesy Rotel Chicken Pasta is everything you want in a comfort meal—creamy, flavorful, easy, and incredibly satisfying. It’s the kind of recipe you’ll come back to again and again because it’s reliable, customizable, and always a hit.

Whether you’re cooking for your family or just treating yourself to a cozy homemade dinner, this dish delivers big flavor with minimal effort. Give it a try, and don’t be surprised if it becomes a regular on your weekly menu.

Savory Baked Chicken Chimichangas with a Golden Crunch

If you’re craving a crispy, satisfying meal without the heaviness of deep frying, these Savory Baked Chicken Chimichangas with a Golden Crunch are exactly what you need. Packed with seasoned chicken, melty cheese, and bold Tex-Mex flavors, these oven-baked chimichangas deliver all the indulgence you love—without the extra oil.

This recipe is perfect for busy weeknights, family dinners, or meal prep. The best part? You get that irresistible golden crunch straight from the oven. Once you try these baked chicken chimichangas, you may never go back to frying again.

Savory Baked

Why You’ll Love This Recipe

These Savory Baked Chicken Chimichangas with a Golden Crunch are more than just delicious—they’re practical, healthier, and incredibly satisfying.

  • Healthier option: No deep frying required
  • Crispy texture: Oven-baked to golden perfection
  • Easy to make: Simple ingredients and straightforward steps
  • Family-friendly: Loved by kids and adults alike
  • Perfect for leftovers: Reheat beautifully

They strike the perfect balance between comfort food and a lighter, modern approach to classic Mexican-inspired dishes.

Ingredients for Baked Chicken Chimichangas

To make these flavorful baked chicken chimichangas, you’ll need:

  • 2 cups cooked shredded chicken
  • 1 cup shredded cheddar or Mexican blend cheese
  • ½ cup salsa
  • ¼ cup sour cream
  • 1 teaspoon cumin
  • 1 teaspoon chili powder
  • ½ teaspoon garlic powder
  • 6 large flour tortillas
  • 2 tablespoons melted butter or olive oil
  • Salt and pepper to taste

Ingredient Notes and Substitutions

When making Savory Baked Chicken Chimichangas with a Golden Crunch, a few ingredient swaps can tailor the recipe to your preferences.

Chicken Options

Rotisserie chicken is a huge time-saver and adds extra flavor, but any cooked shredded chicken works well.

Cheese Choices

A Mexican blend melts beautifully, but you can also use Monterey Jack, pepper jack, or cheddar for different flavor profiles.

Tortillas

Large flour tortillas are ideal for wrapping and crisping. Whole wheat tortillas can be used for a healthier twist.

Spice Level

Adjust chili powder or add jalapeños if you prefer more heat.

Step-by-Step Instructions

1. Prepare the Filling

In a large bowl, mix shredded chicken, cheese, salsa, sour cream, and spices until well combined.

2. Assemble the Chimichangas

Place the filling in the center of each tortilla. Fold in the sides, then roll tightly like a burrito.

3. Brush and Arrange

Place the chimichangas seam-side down on a baking sheet. Brush the tops with melted butter or olive oil for that golden finish.

4. Bake Until Golden

Bake at 400°F for 20–25 minutes, flipping halfway through, until crispy and golden brown.

5. Serve and Enjoy

Remove from the oven and let cool slightly before serving. Garnish with your favorite toppings.

Tips for Perfect Results

To get that signature crunch in your baked chicken chimichangas, keep these tips in mind:

  • Don’t overfill: Prevents tearing and uneven cooking
  • Brush generously: Helps achieve a crispy, golden exterior
  • Flip halfway: Ensures even browning on all sides
  • Use a wire rack: Allows heat to circulate for extra crispiness

Small adjustments like these can make a big difference in texture and flavor.

Delicious Variations to Try

These Savory Baked Chicken Chimichangas with a Golden Crunch are incredibly versatile.

Beef Chimichangas

Swap chicken for seasoned ground beef.

Vegetarian Version

Use black beans, rice, sautéed peppers, and corn.

Spicy Chipotle Style

Add chipotle sauce or smoked paprika for a smoky kick.

Breakfast Chimichangas

Fill with scrambled eggs, cheese, and breakfast sausage.

What to Serve With Chimichangas

Make your meal complete by pairing these baked chicken chimichangas with delicious sides:

  • Spanish rice or cilantro lime rice
  • Refried beans or black beans
  • Fresh guacamole and chips
  • Corn salad or street corn
  • Margaritas or iced tea

Storage & Reheating Tips

These Savory Baked Chicken Chimichangas with a Golden Crunch store beautifully, making them ideal for meal prep.

  • Refrigerate: Store in an airtight container for up to 4 days
  • Freeze: Wrap individually and freeze up to 2 months
  • Reheat: Bake at 375°F until heated through for best texture

Avoid microwaving if you want to keep that crispy exterior intact.

Common Mistakes to Avoid

Even simple recipes can have pitfalls. Avoid these when making baked chicken chimichangas:

  • Skipping the oil or butter (leads to dry tortillas)
  • Overfilling the tortillas (causes bursting)
  • Not sealing properly (filling may leak)
  • Baking at too low a temperature (won’t crisp up)

Keeping these in mind will ensure your chimichangas turn out perfectly every time.

Frequently Asked Questions

1. Can I make baked chicken chimichangas ahead of time?

Yes! Assemble them in advance and refrigerate until ready to bake.

2. How do I keep chimichangas crispy?

Brush with oil and bake at a high temperature. Reheat in the oven instead of the microwave.

3. Can I air fry these instead?

Absolutely! Air fry at 375°F for about 10–12 minutes, flipping halfway.

4. What toppings go best with chimichangas?

Sour cream, guacamole, salsa, shredded lettuce, and fresh cilantro are all great options.

Final Thoughts

These Savory Baked Chicken Chimichangas with a Golden Crunch prove that you don’t need a deep fryer to enjoy crispy, satisfying comfort food. With bold flavors, a golden exterior, and endless customization options, this recipe is a must-try for anyone who loves easy, delicious meals.

Whether you’re cooking for your family or prepping meals for the week, these baked chimichangas are sure to become a staple in your kitchen. Once you taste that crunchy, cheesy goodness, you’ll be hooked for good.

Chicken Caesar Smash Tacos (Crispy, Juicy & Flavor-Packed!)

If you love bold flavors and creative comfort food, these Chicken Caesar Smash Tacos are about to become your new obsession. This viral-inspired recipe combines everything you love about a classic Caesar salad—savory chicken, creamy dressing, crisp lettuce, and Parmesan—with the irresistible texture of crispy smashed tacos. The result? A handheld meal that’s crunchy, juicy, and bursting with flavor in every bite.

Perfect for weeknight dinners, casual gatherings, or even game day spreads, these tacos are surprisingly easy to make and incredibly satisfying. Once you try them, you’ll understand why Chicken Caesar Smash Tacos are quickly becoming a must-make recipe across kitchens in the U.S.

Chicken Caesar Smash

Why You’ll Love This Recipe

These Chicken Caesar Smash Tacos check all the boxes when it comes to flavor, texture, and ease. They’re not just trendy—they’re genuinely delicious and practical.

  • Crispy and juicy: The smashed chicken cooks directly onto the tortilla for maximum flavor
  • Quick to make: Ready in under 30 minutes
  • Family-friendly: Familiar Caesar flavors in a fun format
  • Customizable: Easy to tweak with different toppings or sauces
  • Perfect fusion dish: Combines salad and tacos in one bite

If you’re tired of the same old chicken dinners, this recipe brings something exciting to the table without requiring complicated steps.

Ingredients for Chicken Caesar Smash Tacos

Here’s everything you need to make these irresistible Chicken Caesar Smash Tacos:

  • 1 lb ground chicken
  • 6 small flour tortillas
  • 1 cup shredded romaine lettuce
  • ½ cup Caesar dressing
  • ½ cup grated Parmesan cheese
  • 1 teaspoon garlic powder
  • 1 teaspoon onion powder
  • Salt and black pepper to taste
  • 1 tablespoon olive oil

Ingredient Notes and Substitutions

The beauty of Chicken Caesar Smash Tacos lies in their simplicity, but a few smart choices can elevate the dish even further.

Chicken Options

Ground chicken works best for smashing onto tortillas, but you can also finely chop chicken breast if needed.

Caesar Dressing

Use a high-quality store-bought dressing or make your own for a fresher, more robust flavor.

Tortillas

Flour tortillas crisp up beautifully, but corn tortillas can be used for a gluten-free option (just handle them gently).

Cheese Variations

Freshly grated Parmesan melts better and offers a richer taste than pre-packaged options.

Step-by-Step Instructions

1. Prep the Chicken Mixture

In a bowl, combine ground chicken with garlic powder, onion powder, salt, and pepper. Mix until just combined.

2. Smash Onto Tortillas

Take a portion of the chicken mixture and press it evenly onto one side of each tortilla.

3. Cook Until Crispy

Heat a skillet over medium-high heat with olive oil. Place the tortilla chicken-side down and cook until the chicken is fully cooked and crispy. Flip to lightly toast the tortilla side.

4. Add Caesar Toppings

Remove from heat and top with shredded romaine, Caesar dressing, and grated Parmesan.

5. Fold and Serve

Fold the tacos in half and serve immediately while hot and crispy.

Tips for Perfect Chicken Caesar Smash Tacos

Getting the perfect texture and flavor is easy with a few expert tips:

  • Press thin and even: Helps the chicken cook quickly and evenly
  • Use a hot skillet: Ensures a crispy, golden crust
  • Don’t overcrowd the pan: Cook in batches if needed
  • Add toppings last: Keeps lettuce crisp and fresh

These small details make a big difference in achieving restaurant-quality results at home.

Delicious Variations to Try

Once you master the classic Chicken Caesar Smash Tacos, try switching things up:

Spicy Caesar Tacos

Add chili flakes or hot sauce to the chicken mixture for heat.

Bacon Caesar Smash Tacos

Top with crispy bacon bits for extra indulgence.

Low-Carb Option

Use low-carb tortillas or lettuce wraps.

Grilled Chicken Version

Swap ground chicken for grilled chicken slices for a different texture.

What to Serve With Chicken Caesar Smash Tacos

These tacos are satisfying on their own, but pairing them with the right sides takes your meal to the next level.

  • Sweet potato fries
  • Classic coleslaw
  • Roasted vegetables
  • Chips and guacamole
  • Sparkling lemonade or iced tea

Storage & Reheating Tips

While Chicken Caesar Smash Tacos are best enjoyed fresh, you can still store leftovers:

  • Refrigerate: Store cooked tacos (without toppings) for up to 3 days
  • Reheat: Warm in a skillet or oven to maintain crispiness
  • Store toppings separately: Keeps lettuce from wilting

Avoid microwaving if possible, as it can make the tortillas soggy.

Common Mistakes to Avoid

Even a simple recipe like Chicken Caesar Smash Tacos can go wrong if you’re not careful.

  • Using too much chicken (makes tacos bulky and uneven)
  • Cooking on low heat (prevents crisping)
  • Adding toppings too early (leads to sogginess)
  • Skipping seasoning (results in bland flavor)

Keeping these in mind ensures consistent, delicious results every time.

Frequently Asked Questions

1. Can I make Chicken Caesar Smash Tacos ahead of time?

You can prep the chicken mixture ahead, but cook the tacos fresh for the best texture.

2. Are these tacos healthy?

They can be! Use light Caesar dressing and whole wheat tortillas for a healthier version.

3. Can I use rotisserie chicken instead?

Not for smashing, but you can use it as a topping alternative.

4. What’s the best pan to use?

A cast iron skillet works best for achieving a crispy, golden crust.

Final Thoughts

These Chicken Caesar Smash Tacos are the perfect example of how simple ingredients can turn into something truly exciting. With their crispy texture, creamy toppings, and bold Caesar flavor, they’re guaranteed to impress anyone who tries them.

Whether you’re cooking for your family or just looking to shake up your weekly dinner routine, this recipe delivers big flavor with minimal effort. Once you make them, don’t be surprised if they become a regular request at your table.

Irresistibly Easy BBQ Hawaiian Pizza for Family Fun Nights

If you’re looking for a crowd-pleasing dinner that’s equal parts fun, flavorful, and incredibly easy to make, this BBQ Hawaiian pizza is about to become your new go-to recipe. Combining the smoky richness of barbecue sauce with the sweet, juicy burst of pineapple and savory toppings, this pizza delivers a perfect balance that keeps everyone coming back for more.

Whether you’re hosting a family pizza night, planning a casual get-together, or just craving something comforting yet exciting, this recipe checks every box. Even better? It’s simple enough for beginners but delicious enough to rival your favorite pizzeria.

Hawaiian Pizza

Why You’ll Love This BBQ Hawaiian Pizza

This BBQ Hawaiian pizza isn’t just delicious—it’s a total game-changer for busy households and fun nights in. Here’s why:

  • Quick and easy: Ready in under 30 minutes with minimal prep
  • Family-friendly: Sweet and savory flavors appeal to kids and adults alike
  • Customizable: Easily adjust toppings to suit your taste
  • Budget-friendly: Uses simple, accessible ingredients
  • Perfect for gatherings: Great for sharing and entertaining

The contrast of tangy BBQ sauce with caramelized pineapple creates an unforgettable flavor experience that feels both indulgent and comforting.

Ingredients for BBQ Hawaiian Pizza

To make this easy BBQ Hawaiian pizza, you’ll need:

  • 1 pre-made pizza dough (or homemade if preferred)
  • ½ cup BBQ sauce
  • 1½ cups shredded mozzarella cheese
  • 1 cup cooked ham or Canadian bacon, diced
  • 1 cup pineapple chunks (fresh or canned, drained)
  • ¼ cup red onion, thinly sliced
  • 2 tablespoons chopped fresh cilantro (optional)
  • 1 tablespoon olive oil

3. Add the Sauce

Spread BBQ sauce evenly over the dough, leaving a small border around the edges.

4. Layer the Toppings

Sprinkle mozzarella cheese evenly, then add ham, pineapple chunks, and red onion slices.

5. Bake to Perfection

Bake for 12–15 minutes, or until the crust is golden and the cheese is bubbly.

Remove from the oven, sprinkle with fresh cilantro, slice, and serve immediately.

Tips for Perfect BBQ Hawaiian Pizza

  • Don’t overload toppings: Too many can make the pizza soggy
  • Pre-cook watery ingredients: Helps avoid excess moisture
  • Use high heat: Ensures a crispy crust
  • Drain pineapple well: Prevents sogginess

These small tweaks make a big difference in achieving that perfect balance of crispy, cheesy, and juicy.

Delicious Variations to Try

One of the best things about this BBQ Hawaiian pizza is how versatile it is. Try these variations:

BBQ Chicken Hawaiian Pizza

Swap ham for grilled chicken for a smoky protein upgrade.

Spicy Hawaiian Pizza

Add jalapeños or red pepper flakes for heat.

Vegetarian Version

Skip the meat and add bell peppers, mushrooms, or spinach.

Flatbread Style

Use naan or flatbread for a quicker, thinner crust option.

What to Serve With BBQ Hawaiian Pizza

Round out your meal with these tasty sides:

  • Fresh garden salad with vinaigrette
  • Garlic bread or cheesy breadsticks
  • Coleslaw for a crunchy contrast
  • Lemonade or iced tea for a refreshing drink

Storage & Reheating Tips

Got leftovers? No problem.

  • Refrigerate: Store slices in an airtight container for up to 3 days
  • Freeze: Wrap tightly and freeze for up to 2 months
  • Reheat: Use an oven or skillet for best texture (avoid microwave if possible)

Reheating in the oven at 375°F keeps the crust crisp and the cheese perfectly melty.

Common Mistakes to Avoid

Even simple recipes can go wrong if you’re not careful. Watch out for these:

  • Using too much sauce (can make pizza soggy)
  • Not preheating the oven fully
  • Skipping the draining step for pineapple
  • Overbaking (dries out toppings)

Avoiding these pitfalls ensures your BBQ Hawaiian pizza turns out perfect every time.

Frequently Asked Questions

1. Can I use fresh pineapple instead of canned?

Absolutely! Fresh pineapple adds a brighter flavor and works beautifully in this recipe.

2. What’s the best cheese for BBQ Hawaiian pizza?

Mozzarella is the classic choice, but adding smoked gouda or cheddar enhances the flavor.

3. Can I make this pizza ahead of time?

Yes, you can assemble it ahead and refrigerate for a few hours before baking.

4. Is BBQ Hawaiian pizza kid-friendly?

Definitely! The sweet and savory combo is usually a big hit with kids.

Final Thoughts

This irresistibly easy BBQ Hawaiian pizza is more than just a recipe—it’s an experience. From the sweet tang of pineapple to the smoky richness of BBQ sauce, every bite brings comfort and excitement to the table. It’s the kind of dish that turns ordinary evenings into memorable family moments.

Whether you stick to the classic version or experiment with creative variations, this pizza is guaranteed to impress. So roll up your sleeves, preheat that oven, and get ready to enjoy one of the most delicious homemade pizzas you’ve ever made.

Loaded Scrambled Eggs: Breakfast Bliss in 20 Minutes

If you’re looking for a quick, satisfying breakfast that doesn’t skimp on flavor, these loaded scrambled eggs are exactly what you need. Packed with fluffy eggs, melty cheese, crispy bacon, and fresh veggies, this dish transforms a simple morning staple into something truly crave-worthy. Best of all, you can whip it up in just 20 minutes—perfect for busy weekdays or relaxed weekend brunches.

Loaded scrambled eggs are all about balance: creamy, savory, and slightly crispy with every bite. Whether you’re feeding your family or just treating yourself, this recipe delivers comfort and nourishment in one delicious skillet.

Loaded Scrambled

Why You’ll Love This Loaded Scrambled Eggs Recipe

These loaded scrambled eggs are more than just breakfast—they’re a complete meal that’s both hearty and versatile. With the perfect combination of protein and flavor, they’ll keep you energized throughout the day.

Here’s why you’ll love them:

  • Ready in just 20 minutes
  • Packed with protein and nutrients
  • Customizable with your favorite ingredients
  • Perfect for breakfast, brunch, or even dinner
  • Great for meal prep

Once you try this recipe, you’ll never look at scrambled eggs the same way again.

Ingredients

To make the ultimate loaded scrambled eggs, gather these simple ingredients:

  • 6 large eggs
  • ¼ cup milk or cream
  • ½ cup shredded cheddar cheese
  • 4 strips bacon (cooked and crumbled)
  • ½ cup diced bell peppers
  • ¼ cup chopped onions
  • ¼ cup chopped spinach
  • Salt and pepper to taste
  • 1 tablespoon butter

Ingredient Notes & Substitutions

One of the best things about loaded scrambled eggs is how flexible the recipe is. You can easily swap ingredients based on what you have on hand.

  • Use turkey bacon or sausage instead of regular bacon
  • Swap cheddar for mozzarella, feta, or pepper jack
  • Add mushrooms, tomatoes, or avocado for extra flavor
  • Use dairy-free milk and cheese for a lactose-free version

These substitutions allow you to customize your loaded scrambled eggs to suit your taste and dietary needs.

Step-by-Step Instructions

Step 1: Prep Ingredients

Cook the bacon until crispy, then crumble it. Chop all vegetables and set aside.

Step 2: Whisk the Eggs

In a bowl, whisk together eggs, milk, salt, and pepper until smooth and slightly frothy.

Step 3: Sauté the Vegetables

Melt butter in a skillet over medium heat. Add onions and bell peppers, cooking until softened. Stir in spinach until wilted.

Step 4: Cook the Eggs

Pour the egg mixture into the skillet. Let it sit for a few seconds, then gently stir, forming soft curds.

Step 5: Add Toppings

When eggs are nearly set, fold in cheese and bacon. Cook until cheese melts and eggs are fully cooked but still soft.

Tips for Perfect Results

Making perfect loaded scrambled eggs is all about technique. Here are some pro tips:

  • Cook on medium-low heat for soft, creamy eggs
  • Stir gently to avoid breaking the curds
  • Remove from heat slightly before fully cooked (they’ll continue cooking)
  • Use fresh eggs for the best flavor and texture

These tips ensure your eggs stay tender and never dry.

Variations to Try

Loaded scrambled eggs are incredibly versatile, making it easy to experiment with flavors.

Flavor Variations:

  • Southwest style with black beans and salsa
  • Mediterranean with feta, olives, and tomatoes
  • Breakfast taco version with tortillas

Protein Add-Ins:

  • Diced ham
  • Cooked sausage
  • Smoked salmon

Mix and match ingredients to create your perfect version.

What to Serve With Loaded Scrambled Eggs

These loaded scrambled eggs pair wonderfully with a variety of sides to create a complete meal.

  • Toast or English muffins
  • Hash browns or roasted potatoes
  • Fresh fruit or smoothie
  • Coffee or fresh juice

This combination makes for a balanced and satisfying breakfast or brunch.

Storage & Reheating

If you have leftovers, loaded scrambled eggs can be stored and reheated easily.

  • Refrigerate: Store in an airtight container for up to 3 days
  • Reheat: Warm gently in a skillet or microwave
  • Avoid overcooking: Reheat slowly to maintain texture

While best enjoyed fresh, they still taste great the next day.

Common Mistakes to Avoid

Avoid these common mistakes to get the best results:

  • Cooking eggs on high heat (leads to dryness)
  • Overmixing while cooking
  • Adding cheese too early
  • Skipping seasoning

Keeping these in mind will help you achieve perfectly creamy loaded scrambled eggs every time.

FAQs

Can I make loaded scrambled eggs ahead of time?

Yes, but they’re best fresh. If needed, store and reheat gently.

How do I keep scrambled eggs creamy?

Cook on low heat and remove from heat before they fully set.

Can I make this recipe dairy-free?

Absolutely! Use plant-based milk and cheese alternatives.

What’s the best cheese for loaded scrambled eggs?

Cheddar is classic, but any melty cheese like mozzarella or Monterey Jack works well.

Final Thoughts

These loaded scrambled eggs are the ultimate breakfast upgrade—quick, flavorful, and endlessly customizable. With just a few simple ingredients and 20 minutes, you can create a dish that feels both comforting and indulgent.

Whether you’re cooking for yourself or feeding a crowd, this recipe is guaranteed to impress. Once you master these loaded scrambled eggs, breakfast will never be boring again!