Delicious Chicken and Waffles Recipe with Homemade Maple Syrup

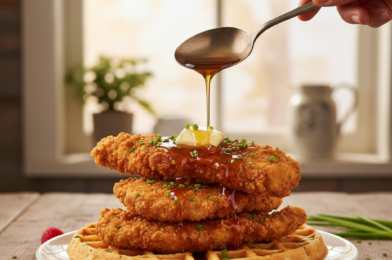
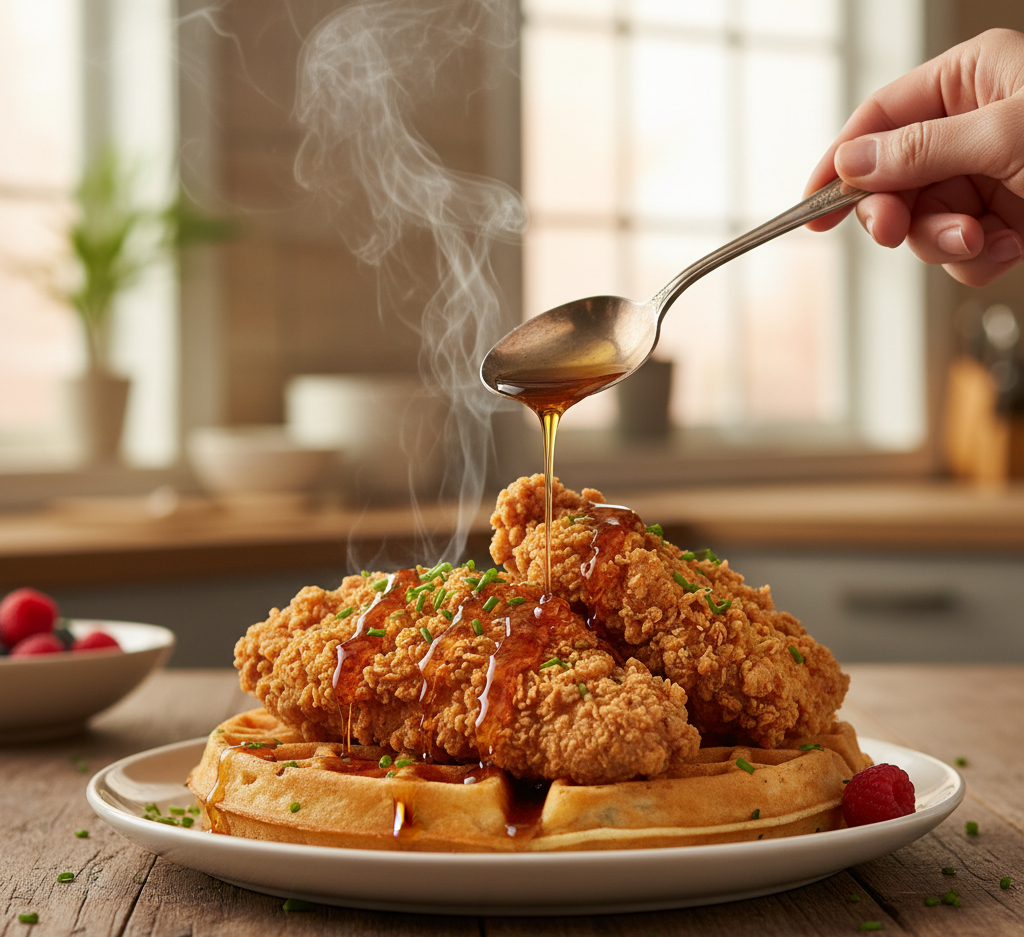
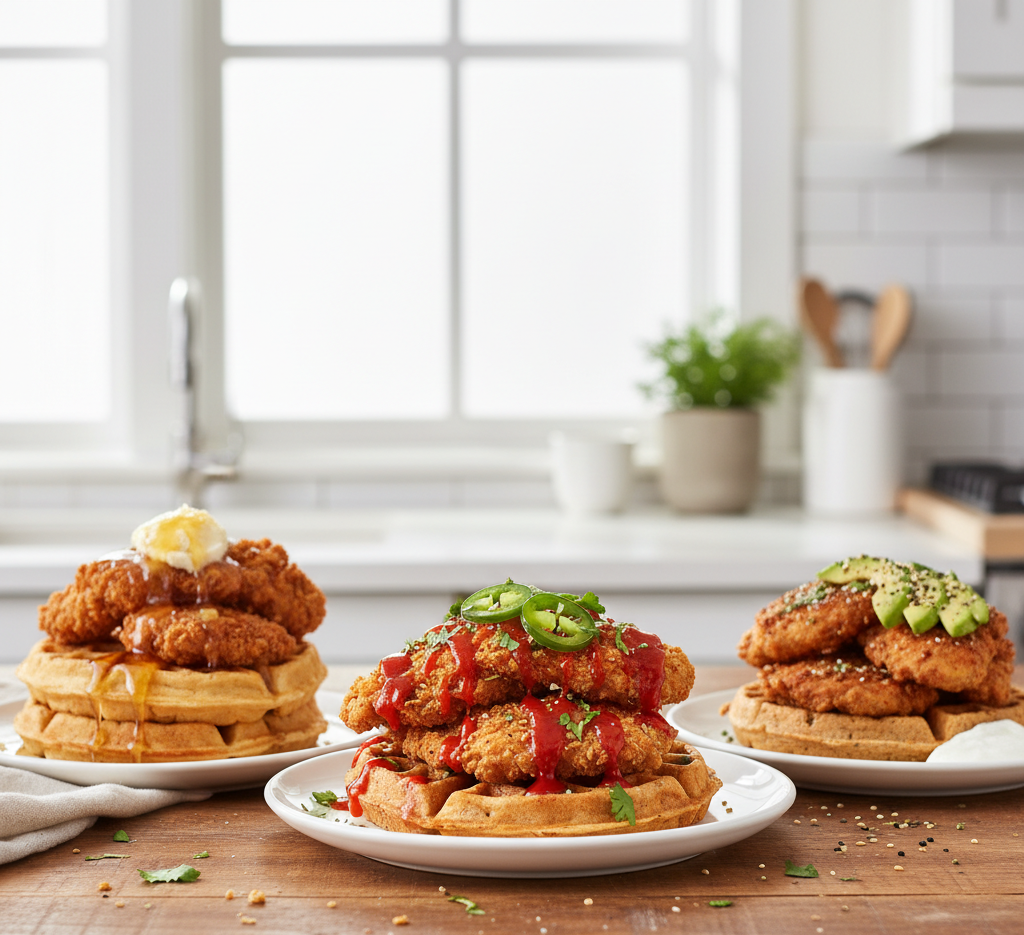
There’s something undeniably special about a plate of chicken and waffles with homemade maple syrup. This iconic dish brings together crispy, golden fried chicken and fluffy waffles, all drizzled with rich, sweet syrup for the ultimate sweet-and-savory experience. Whether you’re making it for a weekend brunch or a cozy dinner, this recipe delivers restaurant-quality results right in your own kitchen.

What makes this version stand out is the homemade maple syrup, which adds a deep, caramel-like sweetness that perfectly complements the crunchy, juicy chicken. Once you try it from scratch, you’ll never go back to store-bought.

Why You’ll Love This Chicken and Waffles Recipe

This chicken and waffles recipe with homemade maple syrup is everything you want in a comfort food dish—crispy, fluffy, sweet, and savory all at once.

  • Perfect balance of flavors: Sweet syrup meets savory fried chicken
  • Crispy and juicy texture: Golden crust with tender meat inside
  • Homemade syrup upgrade: Richer and more flavorful than bottled
  • Great for brunch or dinner: Versatile enough for any occasion
  • Impressive yet doable: Feels gourmet but is easy to make

Once you master this recipe, it’s guaranteed to become a favorite for special occasions or indulgent weekends.


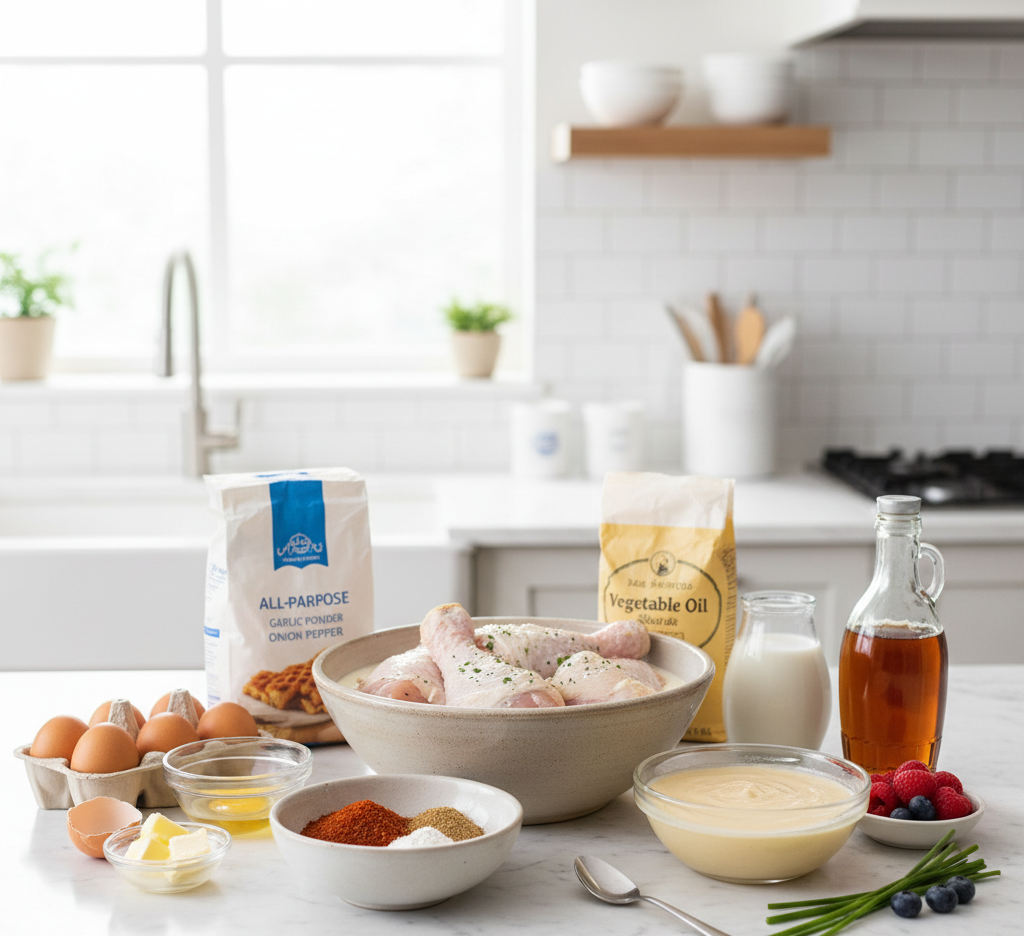
Ingredients for Chicken and Waffles with Homemade Maple Syrup

Here’s everything you’ll need to bring this delicious dish together:

For the Fried Chicken:

  • Bone-in or boneless chicken thighs or breasts
  • Buttermilk
  • All-purpose flour
  • Cornstarch
  • Paprika
  • Garlic powder
  • Onion powder
  • Salt and pepper
  • Oil for frying

For the Waffles:

  • All-purpose flour
  • Baking powder
  • Sugar
  • Eggs
  • Milk
  • Butter (melted)
  • Vanilla extract

For the Homemade Maple Syrup:

  • Maple syrup (pure)
  • Brown sugar
  • Butter
  • Vanilla extract
  • Pinch of salt

Ingredient Notes and Substitutions

When making chicken and waffles with homemade maple syrup, ingredient quality makes a big difference. Buttermilk is key for tenderizing the chicken and adding flavor, but if you don’t have it, you can make a quick substitute with milk and lemon juice.

For the waffles, using real butter and vanilla extract enhances the flavor and creates that classic golden texture. As for the syrup, starting with real maple syrup and enhancing it with brown sugar and butter creates a rich, decadent topping that’s far superior to standard pancake syrup.

You can also experiment with gluten-free flour blends or dairy-free milk alternatives if needed—this recipe is flexible enough to adapt.

Step-by-Step Instructions

1. Marinate the Chicken

Soak the chicken in buttermilk for at least 1 hour (or overnight for best results). This step ensures juicy, flavorful meat.

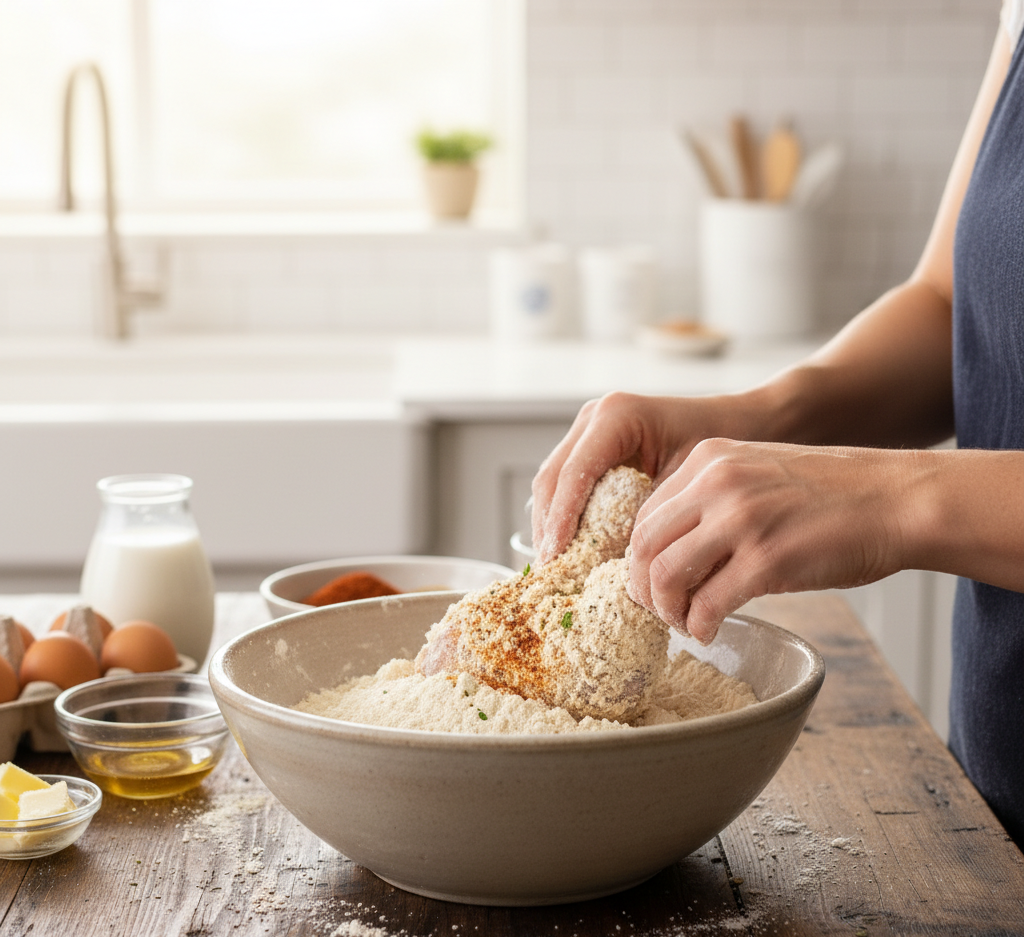
2. Prepare the Coating

In a bowl, mix flour, cornstarch, and spices. Dredge the marinated chicken in the mixture, pressing firmly to create a crispy coating.

3. Fry the Chicken

Heat oil in a deep skillet and fry the chicken until golden brown and cooked through (internal temperature of 165°F). Place on a wire rack to drain.
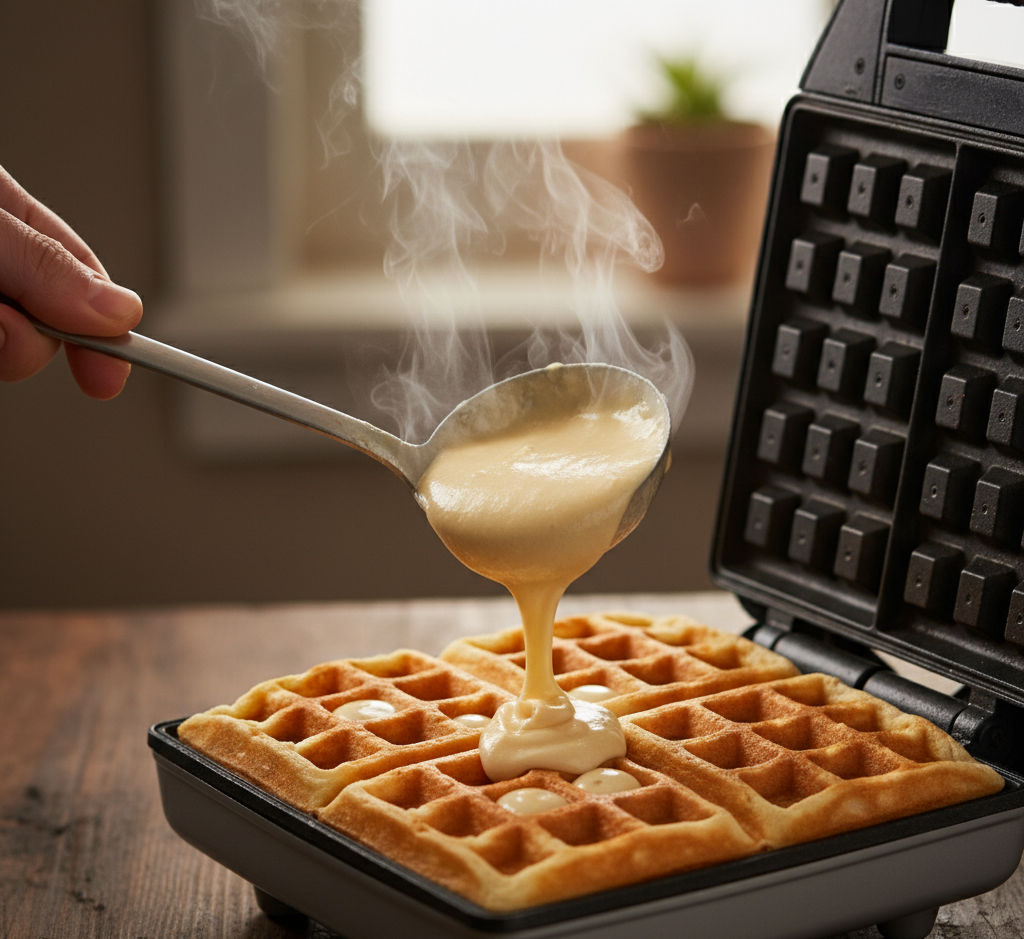
4. Make the Waffles

Whisk together the waffle batter ingredients and cook in a preheated waffle iron until golden and crisp.

5. Prepare the Homemade Maple Syrup

In a saucepan, combine maple syrup, brown sugar, butter, vanilla, and salt. Simmer gently until slightly thickened.

6. Assemble and Serve

Place crispy chicken over warm waffles and drizzle generously with homemade maple syrup.

Tips for Perfect Chicken and Waffles

Creating the best chicken and waffles with homemade maple syrup comes down to a few expert tips:

  • Double dredge the chicken: For extra crispiness
  • Use a thermometer: Ensures perfectly cooked chicken
  • Don’t overcrowd the pan: Keeps the coating crispy
  • Serve immediately: Best enjoyed hot and fresh
  • Preheat the waffle iron properly: Ensures even cooking

These small steps elevate your dish from good to unforgettable.

Delicious Variations

This classic recipe can easily be customized to suit your taste.

Spicy Chicken and Waffles

Add cayenne pepper or hot sauce to the marinade for heat.

Honey Butter Version

Swap maple syrup for honey butter for a sweeter twist.

Southern-Style

Add a pinch of cayenne and serve with hot sauce on the side.

Healthier Option

Air fry the chicken and use whole wheat waffles.

What to Serve With Chicken and Waffles

While chicken and waffles with homemade maple syrup is a complete meal, a few sides can enhance the experience:

  • Fresh fruit salad
  • Scrambled eggs
  • Coleslaw
  • Hash browns
  • Freshly brewed coffee or iced tea

These additions balance the richness and round out your meal.

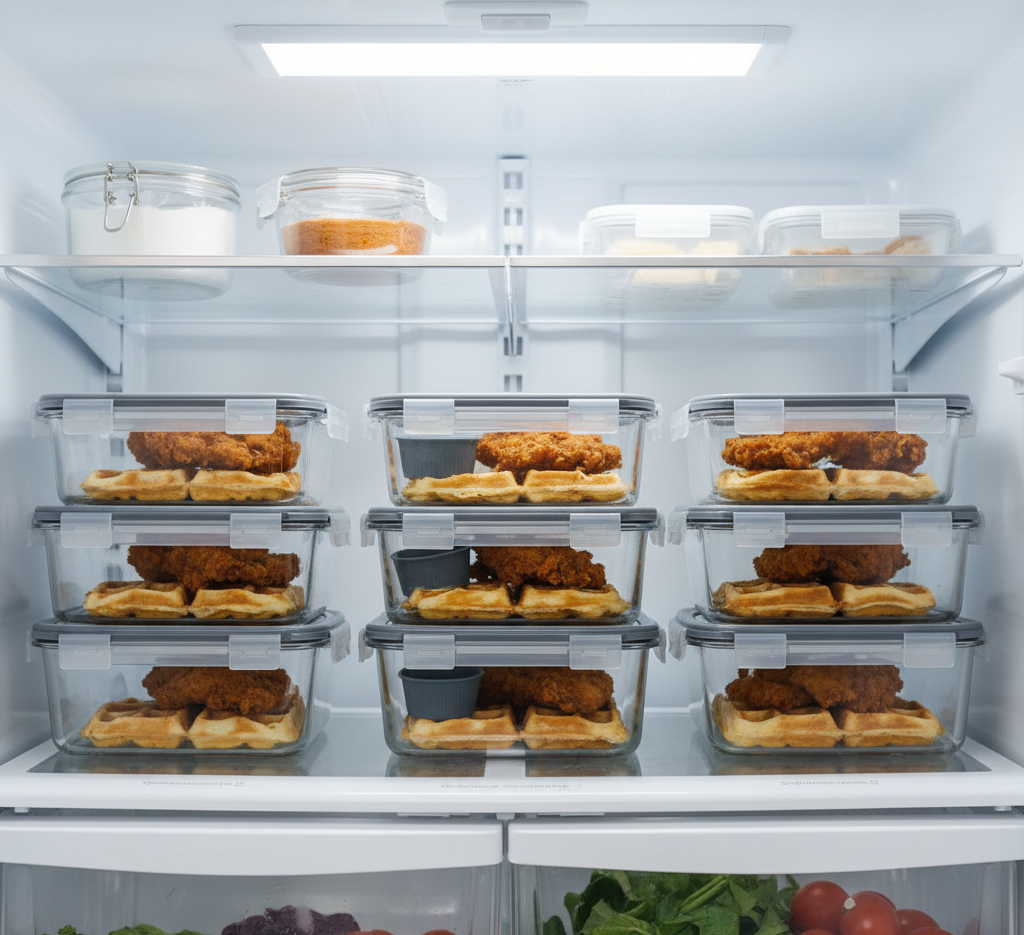
Storage & Reheating Tips

If you have leftovers, don’t worry—this dish stores surprisingly well.

  • Refrigerate: Store chicken and waffles separately for up to 3 days
  • Freeze: Freeze fried chicken for up to 2 months
  • Reheat: Use an oven or air fryer to maintain crispiness

Common Mistakes to Avoid

To get the best results, avoid these common pitfalls:

  • Skipping the buttermilk marinade
  • Frying at the wrong oil temperature
  • Using thin waffle batter
  • Overcooking the chicken
  • Using low-quality syrup

Paying attention to these details ensures your dish turns out perfectly every time.

Frequently Asked Questions

Can I make chicken and waffles ahead of time?

Yes, you can prep the chicken and waffles separately and reheat before serving.

What oil is best for frying chicken?

Neutral oils like vegetable or canola oil work best due to their high smoke point.

Can I bake the chicken instead of frying?

Absolutely. Bake at 400°F until crispy and cooked through for a lighter option.

How do I keep waffles crispy?

Place cooked waffles on a wire rack in a warm oven until ready to serve.

Final Thoughts

This Delicious Chicken and Waffles Recipe with Homemade Maple Syrup is the perfect combination of comfort and indulgence. With crispy fried chicken, fluffy waffles, and rich homemade syrup, every bite is packed with flavor and texture.

Whether you’re hosting brunch, celebrating a special occasion, or simply treating yourself, this dish is guaranteed to impress. Once you try making chicken and waffles with homemade maple syrup from scratch, it’ll quickly become a staple in your recipe collection.

Baked Salsa Chicken (Easy, Juicy, Flavor-Packed Weeknight Dinner)

If you’re searching for a dinner that’s quick, healthy, and bursting with flavor, this baked salsa chicken is about to become your new go-to recipe. With just a handful of ingredients and minimal prep, you can create a dish that’s juicy, tender, and packed with bold Tex-Mex flavor—all in under 40 minutes.

What makes this recipe so special is its simplicity. The salsa does double duty as both marinade and sauce, infusing the chicken with tangy, zesty goodness while keeping it perfectly moist as it bakes. Whether you’re cooking for your family or meal prepping for the week, baked salsa chicken is a reliable, delicious option you’ll come back to again and again.

Baked Salsa Chicken

Why You’ll Love This Baked Salsa Chicken

This baked salsa chicken recipe is all about convenience without sacrificing flavor. It’s perfect for busy home cooks who still want a homemade meal.

  • Only a few simple ingredients
  • Ready in about 30–40 minutes
  • Naturally low-carb and gluten-free
  • Packed with bold, zesty flavor
  • Perfect for meal prep and leftovers

It’s one of those recipes that feels effortless but tastes like you put in a lot more work.

Ingredients

To make this flavorful baked salsa chicken, you’ll need:

  • 4 boneless, skinless chicken breasts
  • 1 1/2 cups salsa (your favorite variety)
  • 1 cup shredded Mexican blend cheese
  • 1 teaspoon garlic powder
  • 1 teaspoon chili powder
  • Salt and pepper to taste
  • Fresh cilantro (optional, for garnish)

Ingredient Notes

The beauty of baked salsa chicken lies in its flexibility. Here’s how to make the most of your ingredients:

Chicken

Boneless, skinless chicken breasts are lean and cook evenly, but thighs can be used for extra juiciness.

Salsa

Choose a salsa you love—mild, medium, or hot. Chunky salsa adds texture, while smooth salsa creates a more uniform sauce.

Cheese

A Mexican blend works great, but cheddar, Monterey Jack, or even pepper jack can add a unique twist.

Step-by-Step Instructions

Making baked salsa chicken couldn’t be easier.

1. Preheat the Oven

Preheat your oven to 375°F and lightly grease a baking dish.

2. Season the Chicken

Place chicken breasts in the dish and season with garlic powder, chili powder, salt, and pepper.

3. Add Salsa

Pour salsa evenly over the chicken, making sure each piece is well coated.

4. Bake

Bake uncovered for 25–30 minutes, or until the chicken is cooked through.

5. Add Cheese

Sprinkle shredded cheese over the top and return to the oven for 5 minutes, or until melted.

6. Garnish and Serve

Top with fresh cilantro and serve hot.

Tips for Perfect Results

To get the best baked salsa chicken, keep these tips in mind:

  • Pound chicken to even thickness for consistent cooking
  • Use a meat thermometer (165°F internal temp)
  • Don’t skip resting time—keeps juices locked in
  • Choose high-quality salsa for the best flavor

These small adjustments can make a big difference in the final dish.

Variations

One of the best things about baked salsa chicken is how easy it is to customize.

Creamy Version

Add a layer of cream cheese or sour cream before baking.

Low-Carb Option

Serve over cauliflower rice or with a side of roasted veggies.

Taco Style

Shred the chicken after baking and use it in tacos, burritos, or quesadillas.

Extra Spicy

Use hot salsa and add jalapeños or crushed red pepper flakes.

What to Serve With It

This baked salsa chicken pairs beautifully with a variety of sides:

  • Cilantro lime rice
  • Black beans or refried beans
  • Corn salad
  • Tortillas or chips
  • Fresh avocado or guacamole

These sides turn your dish into a complete, satisfying meal.

Storage & Reheating

This recipe is excellent for leftovers and meal prep.

Storage

  • Store in an airtight container in the fridge for up to 4 days

Reheating

  • Microwave for 1–2 minutes
  • Reheat in the oven at 350°F until warmed through

Freezing

  • Freeze cooked chicken for up to 2 months

Common Mistakes to Avoid

Avoid these mistakes when making baked salsa chicken:

  • Overcooking the chicken – leads to dryness
  • Using too little salsa – reduces flavor and moisture
  • Skipping seasoning – layers of flavor matter
  • Adding cheese too early – can burn before chicken cooks

Keeping an eye on these details ensures perfect results every time.

FAQs

Can I use frozen chicken?

Yes, but thaw it completely before baking for even cooking.

What type of salsa works best?

Any kind you enjoy! Fresh or jarred salsa both work well.

Can I make baked salsa chicken in advance?

Absolutely. Prepare it ahead and reheat when ready to serve.

How do I know when the chicken is done?

Use a meat thermometer—165°F is the safe internal temperature.

Final Thoughts

This baked salsa chicken is proof that simple ingredients can create incredibly flavorful meals. It’s quick, versatile, and perfect for everything from busy weeknights to meal prep.

With juicy chicken, bold salsa, and melty cheese, this dish delivers comfort and convenience in every bite. Once you try it, you’ll see why it’s a staple recipe worth keeping on repeat.

Sour Cream Noodle Bake (Creamy, Cheesy, Classic Comfort Food)

If you’re looking for a cozy, crowd-pleasing dinner that feels like a warm hug on a plate, this sour cream noodle bake is exactly what you need. It’s a classic American comfort dish that layers tender egg noodles with a rich beef sauce and a creamy, tangy sour cream mixture—then bakes it all together with melted cheese on top.

This recipe has been a staple in home kitchens for decades, and for good reason. It’s simple, hearty, and incredibly satisfying. Whether you’re feeding a hungry family or prepping meals for the week, this sour cream noodle bake delivers big flavor with minimal fuss.

Sour Cream Noodle

Why You’ll Love This Sour Cream Noodle Bake

This sour cream noodle bake is the kind of recipe you’ll come back to again and again. It’s comforting, reliable, and full of nostalgic flavor.

  • Creamy, cheesy, and rich
  • Easy to prepare with simple ingredients
  • Perfect for make-ahead meals
  • Family-friendly and filling
  • Great for leftovers

It’s the ultimate balance of savory beef, tender noodles, and creamy sauce—all baked into one irresistible dish.

Ingredients

To make this delicious sour cream noodle bake, you’ll need:

  • 1 pound ground beef
  • 12 ounces egg noodles
  • 1 can (15 oz) tomato sauce
  • 1/2 cup sour cream
  • 1 cup cottage cheese
  • 1 1/2 cups shredded cheddar cheese
  • 1/2 onion, diced
  • 2 cloves garlic, minced
  • 1 teaspoon Italian seasoning
  • Salt and pepper to taste

Ingredient Notes

A few thoughtful choices can take your sour cream noodle bake to the next level.

Noodles

Egg noodles are traditional and work best for their soft, tender texture that holds up well in baking.

Dairy

The combination of sour cream and cottage cheese creates a creamy, slightly tangy layer that makes this dish unique.

Cheese

Sharp cheddar adds bold flavor, but you can mix in mozzarella for extra meltiness.

Step-by-Step Instructions

Making this sour cream noodle bake is simple and straightforward.

1. Cook the Noodles

Boil egg noodles according to package directions. Drain and set aside.

2. Prepare the Beef Sauce

In a skillet over medium heat, cook ground beef with diced onion until browned. Add garlic, tomato sauce, Italian seasoning, salt, and pepper. Simmer for 5–10 minutes.

3. Mix the Creamy Layer

In a bowl, combine sour cream and cottage cheese until smooth.

4. Assemble the Bake

In a greased baking dish:

  • Layer half the noodles
  • Spread half the sour cream mixture
  • Add half the beef sauce
    Repeat layers, then top with shredded cheddar cheese.

5. Bake

Bake at 350°F for 25–30 minutes until hot and bubbly.

6. Rest and Serve

Let it sit for 10 minutes before serving for cleaner slices.

Tips for Perfect Results

To make the best sour cream noodle bake, keep these tips in mind:

  • Don’t overcook the noodles—they’ll soften more in the oven
  • Use full-fat dairy for the creamiest texture
  • Let the dish rest before serving
  • Season each layer lightly for balanced flavor

These simple techniques ensure a perfectly baked, flavorful dish every time.

Variations

This sour cream noodle bake is easy to customize based on your preferences.

Ground Turkey Option

Swap ground beef for turkey for a lighter version.

Extra Veggies

Add mushrooms, spinach, or bell peppers to the sauce.

Spicy Twist

Mix in red pepper flakes or a dash of hot sauce.

Cheesy Upgrade

Use a blend of cheddar, mozzarella, and Parmesan for extra richness.

What to Serve With It

This hearty dish pairs well with lighter sides that balance its richness:

  • Green salad with vinaigrette
  • Garlic bread or dinner rolls
  • Steamed broccoli or green beans
  • Roasted vegetables

These sides add freshness and make the meal feel complete.

Storage & Reheating

This sour cream noodle bake is perfect for leftovers and meal prep.

Storage

  • Store in an airtight container in the fridge for up to 4 days

Reheating

  • Reheat in the oven at 350°F until warmed through
  • Microwave individual portions for convenience

Freezing

  • Freeze before or after baking for up to 2 months

Common Mistakes to Avoid

Avoid these common mistakes when making sour cream noodle bake:

  • Overcooking noodles – results in mushy texture
  • Skipping seasoning – leads to bland layers
  • Not draining beef – makes the dish greasy
  • Cutting too soon – causes messy servings

Paying attention to these details makes a big difference in the final result.

FAQs

Can I make sour cream noodle bake ahead of time?

Yes! Assemble it ahead and refrigerate, then bake when ready.

Can I substitute cottage cheese?

You can use ricotta cheese for a smoother texture.

Is sour cream noodle bake freezer-friendly?

Absolutely. It freezes well both before and after baking.

Can I use a different pasta?

Yes, but egg noodles work best for the traditional texture.

Final Thoughts

This sour cream noodle bake is a timeless comfort food recipe that’s easy, satisfying, and full of flavor. With its creamy layers, hearty beef sauce, and cheesy topping, it’s a dish that brings people together around the table.

Whether you’re making it for a weeknight dinner, a potluck, or meal prep, this recipe delivers every time. Once you try it, you’ll see why it’s been a beloved classic for generations.

One Skillet Creamy Cajun Chicken and Cheddar Mac (Easy Weeknight Comfort Meal)

If you’re craving a bold, comforting, and ultra-satisfying dinner that doesn’t leave a pile of dishes behind, this one skillet creamy Cajun chicken and cheddar mac is exactly what you need. It combines tender, seasoned chicken with rich, cheesy pasta and a creamy Cajun-spiced sauce—all cooked in a single pan for maximum flavor and minimal cleanup.

This dish brings together the warmth of Southern-inspired spices with the nostalgic comfort of mac and cheese. It’s perfect for busy weeknights, family dinners, or anytime you want something hearty and homemade without spending hours in the kitchen.

One Skillet Creamy

Why You’ll Love This One Skillet Creamy Cajun Chicken and Cheddar Mac

There are so many reasons this one skillet creamy Cajun chicken and cheddar mac deserves a spot in your regular dinner rotation.

  • One-pan meal for easy cleanup
  • Ready in about 40 minutes
  • Rich, creamy, and full of bold Cajun flavor
  • Family-friendly with customizable spice levels
  • Perfect balance of protein, carbs, and comfort

It’s the kind of dish that feels indulgent but is surprisingly simple to pull together.

Ingredients

To make this one skillet creamy Cajun chicken and cheddar mac, you’ll need:

  • 2 boneless, skinless chicken breasts (cubed)
  • 2 cups elbow macaroni (uncooked)
  • 2 cups shredded cheddar cheese
  • 1 1/2 cups milk
  • 2 cups chicken broth
  • 2 tablespoons butter
  • 1 tablespoon olive oil
  • 2 teaspoons Cajun seasoning
  • 1/2 teaspoon garlic powder
  • Salt and pepper to taste

Ingredient Notes

A few smart ingredient choices can take your one skillet creamy Cajun chicken and cheddar mac from good to unforgettable.

Cajun Seasoning

Use a store-bought blend or make your own. Adjust the amount depending on how spicy you like it.

Cheese

Sharp cheddar adds the best flavor, but you can mix in Monterey Jack or Colby for extra creaminess.

Pasta

Elbow macaroni is classic, but shells or rotini work great for holding onto that creamy sauce.

Step-by-Step Instructions

Making this one skillet creamy Cajun chicken and cheddar mac is straightforward and beginner-friendly.

1. Cook the Chicken

Heat olive oil in a large skillet over medium heat. Add cubed chicken, season with Cajun seasoning, salt, and pepper, and cook until browned and cooked through. Remove and set aside.

2. Build the Base

In the same skillet, melt butter and add garlic powder. Pour in chicken broth and milk, then bring to a gentle simmer.

3. Cook the Pasta

Add uncooked macaroni directly into the skillet. Stir occasionally and let it cook until tender and most of the liquid is absorbed.

4. Add Cheese and Chicken

Lower the heat and stir in shredded cheddar cheese until melted and creamy. Return the cooked chicken to the skillet and mix well.

5. Serve

Let it sit for a few minutes to thicken, then serve warm.

Tips for Perfect Results

To make the best one skillet creamy Cajun chicken and cheddar mac, keep these tips in mind:

  • Stir frequently to prevent pasta from sticking
  • Use freshly shredded cheese for smoother melting
  • Adjust Cajun seasoning to control spice level
  • Don’t overcook the pasta—it should be tender but not mushy

These small tweaks ensure a creamy, flavorful result every time.

Variations

This one skillet creamy Cajun chicken and cheddar mac is incredibly versatile and easy to customize.

Shrimp Version

Swap chicken for shrimp for a seafood twist with classic Cajun flavors.

Veggie Boost

Add bell peppers, spinach, or mushrooms for extra nutrition and color.

Extra Creamy

Stir in a splash of heavy cream or cream cheese for an even richer sauce.

Spicy Kick

Add red pepper flakes or hot sauce for more heat.

What to Serve With It

This hearty dish pairs well with lighter sides that balance the richness:

  • Simple green salad with vinaigrette
  • Garlic bread or dinner rolls
  • Roasted broccoli or asparagus
  • Coleslaw for a refreshing crunch

These sides round out the meal without overpowering the main dish.

Storage & Reheating

Leftovers of this one skillet creamy Cajun chicken and cheddar mac are just as delicious the next day.

Storage

  • Store in an airtight container in the fridge for up to 4 days

Reheating

  • Reheat on the stovetop with a splash of milk to restore creaminess
  • Microwave in short intervals, stirring in between

Freezing

  • Freeze for up to 2 months, though texture may slightly change

Common Mistakes to Avoid

Avoid these common pitfalls to get the best results:

  • Adding cheese on high heat – can cause clumping
  • Using too little liquid – pasta won’t cook properly
  • Overcooking chicken – leads to dryness
  • Skipping seasoning adjustments – taste and tweak as needed

Attention to these details ensures your dish turns out perfectly creamy and flavorful.

FAQs

Can I make this one skillet creamy Cajun chicken and cheddar mac ahead of time?

Yes, but it’s best served fresh. Reheat with added milk to keep it creamy.

Is this dish very spicy?

It depends on your Cajun seasoning. You can easily adjust the spice level to your preference.

Can I use pre-cooked chicken?

Absolutely. Rotisserie chicken works great and saves time.

What’s the best cheese for this recipe?

Sharp cheddar is ideal, but blending cheeses adds depth and creaminess.

Final Thoughts

This one skillet creamy Cajun chicken and cheddar mac is the ultimate comfort food with a flavorful twist. It’s rich, satisfying, and incredibly easy to make, proving that a delicious homemade meal doesn’t have to be complicated.

Whether you’re cooking for your family or just want something cozy after a long day, this dish delivers every single time. Once you try it, it’s guaranteed to become a regular in your dinner rotation.

Samoa Brownies: Decadent Caramel Coconut Chocolate Bars You’ll Crave

If you’re a fan of rich chocolate desserts and nostalgic cookie flavors, these Samoa brownies are about to become your new favorite treat. Inspired by the iconic caramel coconut cookie, this indulgent dessert combines a fudgy brownie base with layers of toasted coconut, gooey caramel, and a drizzle of chocolate on top. It’s the kind of dessert that looks bakery-level impressive but is surprisingly easy to make at home.

Perfect for parties, holidays, or simply satisfying a sweet craving, Samoa brownies strike that perfect balance between chewy, crunchy, and melt-in-your-mouth goodness. Every bite is loaded with flavor and texture, making it nearly impossible to stop at just one square

Samoa Brownies

Why You’ll Love These Samoa Brownies

These Samoa brownies aren’t just another dessert—they’re a full-on experience. From the first bite to the last crumb, they deliver layers of flavor that keep you coming back for more.

  • Rich, fudgy brownie base
  • Sweet and chewy caramel coconut topping
  • Chocolate drizzle for the perfect finish
  • Great for gatherings and special occasions
  • Easy to customize and make ahead

They’re ideal when you want something a little extra special without spending all day in the kitchen.

Ingredients

To make these irresistible Samoa brownies, you’ll need:

For the Brownie Base:

  • 1 box brownie mix (or homemade brownie batter)
  • Ingredients listed on the box (eggs, oil, water)

For the Topping:

  • 2 cups shredded sweetened coconut
  • 1 1/2 cups soft caramels (or caramel bits)
  • 3 tablespoons heavy cream
  • 1 cup semi-sweet chocolate chips

Ingredient Notes

Choosing the right ingredients can make your Samoa brownies truly unforgettable.

Coconut

Sweetened shredded coconut works best for that classic Samoa flavor. Toasting it brings out a nutty, rich aroma that elevates the topping.

Caramel

Soft caramels melt smoothly and create that signature chewy texture. Caramel bits are a convenient alternative.

Chocolate

Semi-sweet chocolate balances the sweetness of the caramel and coconut perfectly. You can also use dark chocolate for a deeper flavor.

Step-by-Step Instructions

Making these Samoa brownies is easier than it looks, and the results are absolutely worth it.

1. Bake the Brownies

Prepare and bake the brownie mix according to package instructions in a 9×13-inch pan. Let cool completely.

2. Toast the Coconut

Spread shredded coconut on a baking sheet and toast at 350°F for 5–7 minutes, stirring occasionally, until golden brown.

3. Melt the Caramel

In a microwave-safe bowl, combine caramels and heavy cream. Heat in intervals, stirring until smooth.

4. Mix the Topping

Stir the toasted coconut into the melted caramel until fully coated.

5. Assemble

Spread the caramel coconut mixture evenly over the cooled brownies, pressing gently to adhere.

6. Add Chocolate Drizzle

Melt chocolate chips and drizzle over the top using a spoon or piping bag.

7. Set and Slice

Allow the brownies to set before slicing into squares.

Tips for Perfect Results

Getting perfect Samoa brownies every time is all about technique and timing.

  • Let brownies cool completely before adding topping
  • Stir coconut frequently while toasting to avoid burning
  • Use parchment paper for easy removal
  • Slightly grease your knife before cutting for clean slices

These small tips make a big difference in both presentation and texture.

Variations

One of the best things about Samoa brownies is how easy they are to customize.

Homemade Brownies

Skip the box mix and use your favorite homemade brownie recipe for a richer base.

Extra Chocolate

Add chocolate chips directly into the brownie batter for double chocolate goodness.

Salted Caramel Twist

Sprinkle flaky sea salt over the top for a sweet-and-salty flavor boost.

Gluten-Free Option

Use a gluten-free brownie mix to make this dessert accessible for everyone.

What to Serve With Samoa Brownies

These rich brownies pair beautifully with simple accompaniments that balance their sweetness.

  • Vanilla ice cream
  • Fresh berries
  • Hot coffee or espresso
  • Cold milk

Serving them slightly warm with ice cream takes this dessert to the next level.

Storage & Reheating

These Samoa brownies store well, making them perfect for prepping ahead.

Storage

  • Keep in an airtight container at room temperature for up to 3 days
  • Refrigerate for up to 1 week

Freezing

  • Freeze individual slices wrapped tightly for up to 2 months

Reheating

  • Microwave for 10–15 seconds for a warm, gooey texture

Common Mistakes to Avoid

Avoid these pitfalls to ensure your Samoa brownies turn out perfectly:

  • Overbaking the brownies – leads to a dry base
  • Burning the coconut – keep a close eye while toasting
  • Using too little caramel – the topping won’t hold together
  • Cutting too soon – results in messy slices

Taking your time with each step will reward you with bakery-quality results.

FAQs

What are Samoa brownies?

They are brownies topped with caramel, toasted coconut, and chocolate drizzle, inspired by the classic Samoa cookie.

Can I make Samoa brownies ahead of time?

Yes! They actually taste even better the next day as the flavors meld together.

Can I use store-bought caramel sauce?

You can, but melted soft caramels provide a thicker, more authentic texture.

How do I keep the topping from falling off?

Press the topping firmly onto the brownies and allow it to fully set before slicing.

Final Thoughts

These Samoa brownies are the ultimate dessert for chocolate and caramel lovers. They combine everything you love about a classic cookie with the richness of a fudgy brownie, creating a treat that’s both nostalgic and indulgent.

Whether you’re baking for a party, a holiday, or just because, this recipe is guaranteed to impress. Once you try these homemade Samoa brownies, they’ll quickly earn a permanent spot in your dessert rotation.

Quick & Easy Grilled Cheese Burrito (Better Than Takeout!)

If you’ve ever craved something cheesy, crispy, and unbelievably satisfying, this quick & easy grilled cheese burrito is about to become your new obsession. Inspired by popular fast-food favorites but made right in your own kitchen, this recipe delivers bold flavors, melty cheese, and a golden, crispy exterior—all in one irresistible bite.

The best part? You don’t need any fancy ingredients or complicated techniques. This recipe is perfect for busy weeknights, lazy weekends, or anytime you want comfort food fast. Once you try this homemade version, you might never go back to takeout again.

 Grilled Cheese

Why You’ll Love This Quick & Easy Grilled Cheese Burrito

This recipe hits every mark when it comes to flavor, convenience, and comfort. It’s designed to be approachable while still delivering restaurant-quality results.

  • Ready in about 30 minutes
  • Uses simple, easy-to-find ingredients
  • Perfect balance of crispy and cheesy textures
  • Customizable to suit your taste
  • Family-friendly and budget-conscious

Every bite combines creamy, crunchy, and savory elements, making this dish a standout even among your favorite comfort foods.

Ingredients

To make this quick & easy grilled cheese burrito, you’ll need:

  • 1 pound ground beef
  • 1 cup cooked rice
  • 1 cup shredded cheddar cheese (plus extra for grilling)
  • 1/2 cup nacho cheese sauce
  • 1/2 cup sour cream
  • 1/4 cup tortilla strips or crushed chips
  • 4 large flour tortillas
  • 1 packet taco seasoning

Ingredient Notes

Even simple ingredients can make a big difference when chosen thoughtfully.

Ground Beef

Go for 80/20 ground beef for the best flavor. You can also substitute ground turkey or chicken for a lighter option.

Cheese

Cheddar is classic, but a Mexican blend or Monterey Jack works beautifully. The extra cheese on the outside is what gives that signature crispy crust.

Tortillas

Use large, soft flour tortillas to hold all the fillings without tearing.

Crunch Factor

Tortilla strips or crushed chips add a satisfying crunch that elevates the texture of this burrito.

Step-by-Step Instructions

Making this quick & easy grilled cheese burrito is easier than you think.

1. Cook the Beef

In a skillet over medium heat, cook the ground beef until browned. Drain excess grease, then stir in taco seasoning and a splash of water. Simmer for a few minutes until thickened.

2. Prepare the Fillings

Warm the cooked rice and have all your ingredients ready for assembly.

3. Assemble the Burrito

Layer the following in the center of each tortilla:

  • Seasoned beef
  • Rice
  • Nacho cheese sauce
  • Sour cream
  • Shredded cheese
  • Tortilla strips

Fold in the sides and roll tightly into a burrito.

4. Grill with Cheese

Sprinkle shredded cheese directly onto a hot skillet. Place the burrito seam-side down on top of the cheese. Cook until the cheese forms a crispy crust, then flip and lightly toast the other side.

5. Serve Hot

Remove from the skillet, let cool slightly, then slice and enjoy.

Tips for Perfect Results

To get that perfect restaurant-style finish, keep these tips in mind:

  • Don’t overfill the burrito—this makes rolling difficult
  • Use medium heat to avoid burning the cheese crust
  • Press gently while grilling for even crispiness
  • Let the burrito rest briefly before slicing

These small adjustments make a big difference in texture and presentation.

Variations

This quick & easy grilled cheese burrito is incredibly versatile.

Chicken Version

Swap ground beef for shredded rotisserie chicken mixed with taco seasoning.

Vegetarian Option

Use black beans, sautéed veggies, and extra rice for a meatless version.

Spicy Kick

Add jalapeños, hot sauce, or spicy queso for extra heat.

Breakfast Burrito Twist

Fill with scrambled eggs, sausage, and hash browns for a morning version.

What to Serve With It

While this burrito is a meal on its own, pairing it with sides makes it even better:

  • Guacamole or sliced avocado
  • Salsa or pico de gallo
  • Mexican rice or cilantro lime rice
  • Refried beans
  • Corn salad

These sides complement the rich, cheesy flavors perfectly.

Storage & Reheating

If you have leftovers (which isn’t likely!), here’s how to store them:

Storage

  • Wrap tightly in foil or store in an airtight container
  • Refrigerate for up to 3 days

Reheating

  • Reheat in a skillet for best texture
  • Microwave for 1–2 minutes if short on time
  • Avoid overheating to prevent sogginess

Common Mistakes to Avoid

Even simple recipes can go wrong if you’re not careful.

  • Using too much filling – leads to bursting burritos
  • Skipping the cheese crust step – misses the signature texture
  • Cooking on high heat – burns the cheese instead of crisping it
  • Not sealing the burrito properly – causes it to fall apart

Avoiding these mistakes ensures a perfect result every time.

FAQs

What makes a grilled cheese burrito different?

The crispy cheese layer on the outside sets it apart from a regular burrito, adding both texture and flavor.

Can I make this ahead of time?

Yes, you can assemble the burritos ahead and grill them just before serving for best results.

Can I freeze grilled cheese burritos?

You can freeze them before grilling. Thaw overnight and cook fresh for the best texture.

What’s the best cheese for the outside crust?

Cheddar works best because it melts well and crisps up beautifully.

Final Thoughts

This quick & easy grilled cheese burrito is everything you want in a comfort meal—crispy, cheesy, hearty, and incredibly satisfying. It’s proof that you don’t need complicated recipes to create something truly delicious at home.

Whether you’re feeding a hungry family, meal prepping for the week, or just treating yourself, this burrito delivers bold flavor with minimal effort. Once you master it, you’ll find yourself coming back to it again and again.

Easy Lazy Girl Lasagna Recipe: 5-Ingredient Comfort Meal Made Perfect

If you’ve ever wanted a homemade lasagna without the time, stress, or endless ingredient list, this easy lazy girl lasagna recipe is about to become your new go-to dinner. Designed for busy weeknights, beginner cooks, or anyone craving cozy comfort food with minimal effort, this recipe strips traditional lasagna down to its essentials—without sacrificing flavor.

This 5-ingredient comfort meal delivers all the rich, cheesy goodness you love, but with a fraction of the work. No complicated layering techniques, no obscure ingredients—just simple, satisfying cooking that fits your real life.

Easy Lazy Girl Lasagna

Why You’ll Love This Easy Lazy Girl Lasagna Recipe

This recipe is all about simplicity and comfort. Whether you’re cooking for your family or just yourself, it hits all the right notes.

  • Only 5 simple ingredients
  • Ready with minimal prep time
  • Perfect for beginner cooks
  • Budget-friendly and filling
  • Classic lasagna flavor without the hassle

The beauty of this dish lies in its balance: it’s indulgent yet practical, hearty yet effortless. You don’t need to spend hours in the kitchen to enjoy a satisfying homemade meal.

Ingredients

Here’s everything you need to make this easy lazy girl lasagna recipe:

  • 1 pound ground beef (or Italian sausage)
  • 1 jar (24 oz) marinara sauce
  • 2 cups shredded mozzarella cheese
  • 1 cup ricotta cheese
  • 9 lasagna noodles (oven-ready or cooked)

Ingredient Notes

Even with just five ingredients, a few thoughtful choices can elevate your dish:

Meat

Ground beef works beautifully, but Italian sausage adds extra flavor. You can also use ground turkey for a lighter option.

Sauce

Use your favorite store-bought marinara or pasta sauce. A high-quality sauce makes a big difference since it’s a key flavor component.

Cheese

Whole milk ricotta and mozzarella will give you the creamiest texture. Pre-shredded cheese works, but freshly shredded melts better.

Step-by-Step Instructions

Making this easy lazy girl lasagna recipe couldn’t be simpler:

1. Preheat and Prep

Preheat your oven to 375°F. Lightly grease a baking dish.

2. Cook the Meat

In a skillet over medium heat, cook the ground beef until browned. Drain excess fat, then stir in the marinara sauce.

3. Layer the Lasagna

In your baking dish:

  • Spread a thin layer of meat sauce
  • Add noodles
  • Spread ricotta
  • Sprinkle mozzarella
    Repeat layers until ingredients are used, finishing with mozzarella on top.

4. Bake

Cover with foil and bake for 25 minutes. Remove foil and bake another 10–15 minutes until bubbly and golden.

5. Rest and Serve

Let it sit for 10 minutes before slicing for clean layers.

Tips for Perfect Results

Even a lazy recipe benefits from a few pro tips:

  • Don’t skip resting time—it helps the layers set
  • Use enough sauce to keep noodles tender
  • Cover with foil to prevent over-browning early
  • Add a pinch of salt and pepper to each layer for extra flavor

These small steps ensure your lasagna turns out perfectly every time.

Variations

One of the best things about this easy lazy girl lasagna recipe is how adaptable it is.

Make It Vegetarian

Swap the meat for sautéed mushrooms, spinach, or zucchini.

Add More Flavor

Mix in garlic powder, Italian seasoning, or red pepper flakes.

Make It Creamier

Add a layer of cream cheese or béchamel sauce for extra richness.

Low-Carb Option

Replace noodles with thinly sliced zucchini or eggplant.

What to Serve With It

This dish is hearty on its own, but pairing it with the right sides makes it even better:

  • Garlic bread or breadsticks
  • Simple green salad with vinaigrette
  • Roasted vegetables
  • Caesar salad

These sides balance the richness and create a complete meal experience.

Storage & Reheating

This lasagna stores beautifully, making it ideal for meal prep.

Storage

  • Refrigerate in an airtight container for up to 4 days
  • Freeze for up to 2 months

Reheating

  • Microwave individual portions for 2–3 minutes
  • Reheat in the oven at 350°F covered with foil until warmed through

Common Mistakes to Avoid

Even simple recipes can go wrong if you’re not careful:

  • Using too little sauce – leads to dry lasagna
  • Skipping foil while baking – can burn the cheese
  • Not draining meat properly – results in greasy layers
  • Overloading layers – makes slicing messy

Avoid these pitfalls and your lasagna will turn out perfect every time.

FAQs

Can I use no-boil lasagna noodles?

Yes! Oven-ready noodles work perfectly and save even more time.

Can I make this ahead of time?

Absolutely. Assemble it, cover, and refrigerate for up to 24 hours before baking.

What’s the best cheese substitute for ricotta?

Cottage cheese is a great alternative and slightly lighter.

Can I freeze it before baking?

Yes, assemble it, wrap tightly, and freeze. Bake straight from frozen, adding extra time.

Final Thoughts

This easy lazy girl lasagna recipe proves that comfort food doesn’t have to be complicated. With just five ingredients and minimal effort, you can create a rich, satisfying meal that feels like it took hours to prepare.

Whether you’re cooking for a busy weeknight, meal prepping for the week, or just craving something warm and cheesy, this recipe delivers every time. Keep it simple, make it your own, and enjoy every delicious bite.

Melt in Your Mouth Chicken: The Ultimate Easy, Creamy Baked Chicken Recipe

If you’re searching for a simple dinner that tastes like pure comfort, this melt in your mouth chicken recipe is exactly what you need. True to its name, this dish delivers incredibly tender, juicy chicken coated in a rich, creamy topping that bakes to golden perfection.

What makes this recipe so special is how effortlessly it comes together. With just a handful of pantry staples, you can create a meal that feels indulgent and satisfying without spending hours in the kitchen. Whether you’re cooking for your family or hosting guests, this melt in your mouth chicken is guaranteed to impress.

 Your Mouth Chicken

Why You’ll Love This Recipe

There are countless chicken recipes out there, but this melt in your mouth chicken stands out for its simplicity and flavor:

  • Incredibly Tender: The creamy topping keeps the chicken moist and juicy
  • Minimal Ingredients: Uses simple pantry staples
  • Quick Prep: Ready for the oven in just minutes
  • Family-Friendly: A hit with both kids and adults
  • Versatile: Pairs with almost any side dish

Once you try it, this recipe will quickly become part of your regular dinner rotation.

Ingredients

To make this delicious dish, you’ll need:

  • 4 boneless, skinless chicken breasts
  • 1 cup mayonnaise (or Greek yogurt for a lighter option)
  • ½ cup grated Parmesan cheese
  • 1 teaspoon garlic powder
  • 1 teaspoon onion powder
  • ½ teaspoon paprika
  • Salt and black pepper to taste
  • Optional: chopped parsley for garnish

Ingredient Notes

  • Chicken Breasts: Use evenly sized pieces for consistent cooking
  • Mayonnaise: Adds richness and helps create the signature creamy topping
  • Parmesan Cheese: Brings a savory, slightly nutty flavor
  • Spices: Simple seasonings enhance flavor without overpowering

Step-by-Step Instructions

  1. Preheat the Oven: Set your oven to 375°F (190°C) and lightly grease a baking dish.
  2. Prepare the Chicken: Place chicken breasts in the baking dish and season lightly with salt and pepper.
  3. Mix the Topping: In a bowl, combine mayonnaise, Parmesan cheese, garlic powder, onion powder, and paprika.
  4. Spread Evenly: Coat each chicken breast with the creamy mixture, spreading it evenly on top.
  5. Bake: Bake for 35–40 minutes, or until the chicken reaches an internal temperature of 165°F (74°C) and the top is golden.
  6. Serve: Let rest for a few minutes before serving. Garnish with parsley if desired.

Tips for Perfect Results

  • Don’t Overcook: Use a meat thermometer to keep chicken juicy
  • Use Fresh Parmesan: Freshly grated cheese melts better and adds more flavor
  • Even Coating: Spread the topping evenly for consistent texture
  • Rest Before Serving: Helps lock in juices

Variations

Customize Your Melt in Your Mouth Chicken

This melt in your mouth chicken recipe is easy to adapt:

  • Healthier Version: Substitute Greek yogurt for mayonnaise
  • Cheesy Upgrade: Add shredded mozzarella or cheddar on top
  • Spicy Kick: Mix in cayenne pepper or hot sauce
  • Herb Flavor: Add Italian seasoning or fresh herbs

What to Serve With It

This dish pairs beautifully with:

  • Mashed potatoes or roasted potatoes
  • Steamed vegetables like broccoli or green beans
  • Rice or pasta
  • A fresh garden salad

Storage & Reheating

  • Refrigeration: Store leftovers in an airtight container for up to 4 days
  • Freezing: Freeze cooked chicken for up to 2 months
  • Reheating: Warm in the oven at 350°F or microwave until heated through
  • Meal Prep Tip: Prepare ahead and bake when ready

Common Mistakes

  • Overbaking: Leads to dry chicken
  • Too Much Salt: Parmesan already adds saltiness
  • Skipping Rest Time: Juices may run out if cut too soon
  • Uneven Chicken Thickness: Can cause uneven cooking

FAQs

1. Can I use chicken thighs instead of breasts?
Yes! Chicken thighs work great and are even more juicy.

2. Can I make melt in your mouth chicken ahead of time?
Absolutely. Assemble the dish and refrigerate until ready to bake.

3. Is Greek yogurt a good substitute for mayonnaise?
Yes, it creates a lighter version with a slightly tangy flavor.

4. How do I know when the chicken is done?
Use a thermometer—internal temperature should reach 165°F (74°C).

Final Thoughts

This melt in your mouth chicken recipe proves that simple ingredients can create extraordinary results. It’s creamy, flavorful, and incredibly tender—everything you want in a comforting homemade meal.

Whether you’re cooking for a busy weeknight dinner or a cozy weekend meal, this dish delivers consistent, delicious results every time. Once you try it, you’ll understand why it’s such a beloved classic.

Cheesy Baked Ziti | Easy Weeknight Pasta Bake with Ricotta & Mozzarella

There’s something undeniably comforting about a bubbling dish of cheesy baked ziti, fresh out of the oven with golden, melted mozzarella on top. This easy weeknight pasta bake with ricotta & mozzarella is everything you want in a cozy dinner—rich, hearty, and incredibly satisfying.

Perfect for busy families, meal prep lovers, or anyone craving classic Italian-American comfort food, baked ziti delivers bold flavor with minimal effort. With layers of tender pasta, creamy ricotta, savory marinara, and gooey mozzarella, this dish is a guaranteed crowd-pleaser that never goes out of style.

Cheesy Baked Ziti

Why You’ll Love This Recipe

This cheesy baked ziti | easy weeknight pasta bake with ricotta & mozzarella is a staple for so many reasons:

  • Quick & Easy: Simple steps and pantry-friendly ingredients
  • Family Favorite: Loved by both kids and adults
  • Perfect for Leftovers: Tastes even better the next day
  • Make-Ahead Friendly: Ideal for meal prep or freezing
  • Ultra Cheesy: Layers of melty mozzarella and creamy ricotta

It’s the kind of meal you can rely on when you want something comforting without spending hours in the kitchen.

Ingredients

To make this delicious baked ziti, you’ll need:

  • 1 lb ziti pasta
  • 1 lb ground beef or Italian sausage
  • 3 cups marinara sauce
  • 1 cup ricotta cheese
  • 2 cups shredded mozzarella cheese
  • ½ cup grated Parmesan cheese
  • 1 egg
  • 2 teaspoons Italian seasoning
  • 2 cloves garlic, minced
  • Salt and pepper to taste
  • Optional: fresh basil or parsley for garnish

Ingredient Notes

  • Ziti Pasta: Its tubular shape holds sauce and cheese perfectly
  • Ricotta Cheese: Adds creaminess and richness to the dish
  • Mozzarella: Use low-moisture shredded mozzarella for best melting
  • Marinara Sauce: Choose a high-quality jarred sauce or homemade for deeper flavor

Step-by-Step Instructions

  1. Cook the Pasta: Boil ziti in salted water until al dente. Drain and set aside.
  2. Prepare the Sauce: In a skillet, cook ground beef or sausage with garlic until browned. Drain excess fat and stir in marinara sauce.
  3. Mix Ricotta Layer: In a bowl, combine ricotta, egg, Parmesan, Italian seasoning, salt, and pepper.
  4. Assemble the Dish: In a baking dish, spread a layer of sauce, followed by pasta, ricotta mixture, and mozzarella. Repeat layers.
  5. Top with Cheese: Finish with a generous layer of mozzarella and Parmesan.
  6. Bake: Cover with foil and bake at 375°F (190°C) for 25 minutes. Remove foil and bake another 10–15 minutes until golden and bubbly.
  7. Rest & Serve: Let rest for 10 minutes before serving.

Tips for Perfect Results

  • Cook Pasta Al Dente: Prevents it from becoming mushy during baking
  • Use Enough Sauce: Keeps the dish moist and flavorful
  • Layer Evenly: Ensures every bite has a balance of pasta, sauce, and cheese
  • Let It Rest: Helps the baked ziti hold its shape when serving

Variations

Customize Your Cheesy Baked Ziti

This easy weeknight pasta bake with ricotta & mozzarella is highly adaptable:

  • Vegetarian Version: Skip the meat and add sautéed vegetables like spinach, mushrooms, or zucchini
  • Spicy Kick: Use spicy Italian sausage or add red pepper flakes
  • Extra Cheesy: Add provolone or fontina for more depth
  • Healthier Option: Use whole wheat pasta and low-fat cheese

What to Serve With It

Pair your cheesy baked ziti with:

  • Garlic bread or breadsticks
  • Caesar salad or mixed greens
  • Roasted vegetables
  • A glass of red wine or sparkling water

Storage & Reheating

  • Refrigeration: Store in an airtight container for up to 4 days
  • Freezing: Freeze baked or unbaked for up to 3 months
  • Reheating: Warm in the oven at 350°F or microwave individual portions
  • Make-Ahead Tip: Assemble ahead and bake when ready

Common Mistakes

  • Overcooking Pasta: Leads to mushy texture
  • Too Little Sauce: Results in dry baked ziti
  • Skipping the Rest Time: Causes the dish to fall apart
  • Uneven Layers: Affects texture and flavor balance

FAQs

1. Can I make cheesy baked ziti ahead of time?
Yes! Assemble it a day in advance and refrigerate until ready to bake.

2. Can I freeze baked ziti?
Absolutely. It freezes well both before and after baking.

3. What’s the best cheese combination?
Ricotta, mozzarella, and Parmesan create the perfect creamy, melty balance.

4. Can I use a different pasta?
Yes! Penne or rigatoni work great as substitutes.

Final Thoughts

This cheesy baked ziti | easy weeknight pasta bake with ricotta & mozzarella is the ultimate comfort food that never disappoints. It’s simple, satisfying, and packed with rich, cheesy goodness that brings everyone to the table.

Whether you’re cooking for your family, hosting a casual dinner, or prepping meals for the week, this baked ziti recipe is a reliable favorite you’ll turn to again and again. Once you taste it, you’ll understand why it’s a timeless classic in American kitchens.

Savory Cheesy Baked Dumpling Lasagna: The Ultimate Comfort Food Fusion

If you love comfort food that’s rich, cheesy, and incredibly satisfying, this savory cheesy baked dumpling lasagna is about to become your new favorite recipe. This creative twist on traditional lasagna swaps out pasta sheets for tender dumplings, layering them with savory sauce and gooey melted cheese for a dish that’s both familiar and exciting.

This recipe is perfect for busy weeknights, cozy weekends, or whenever you’re craving something warm and hearty. The dumplings soak up all the flavors of the sauce while baking, creating a soft, pillowy texture that pairs beautifully with melted cheese. It’s the kind of dish that brings everyone to the table—and keeps them coming back for seconds.

Cheesy

Why You’ll Love This Recipe

There are so many reasons this savory cheesy baked dumpling lasagna stands out from classic comfort food recipes:

  • Unique Twist: Dumplings replace traditional lasagna noodles for a fun variation
  • Ultra Comforting: Warm, cheesy, and hearty in every bite
  • Easy to Make: Simple ingredients and minimal prep
  • Family-Friendly: A guaranteed hit with kids and adults alike
  • Customizable: Works with different proteins, sauces, and cheeses

This recipe is perfect for anyone who wants a comforting, homemade meal with a creative edge.

Ingredients

To make this delicious dumpling lasagna, you’ll need:

  • 1 bag (about 20–24) frozen dumplings (chicken, pork, or vegetable)
  • 1 lb ground beef or Italian sausage
  • 2 cups marinara sauce
  • 1 cup ricotta cheese
  • 2 cups shredded mozzarella cheese
  • ½ cup grated Parmesan cheese
  • 1 teaspoon Italian seasoning
  • ½ teaspoon garlic powder
  • Salt and pepper to taste
  • Optional: fresh basil or parsley for garnish

Ingredient Notes

  • Dumplings: Frozen dumplings work perfectly and save time—no need to thaw beforehand.
  • Meat: Ground beef adds richness, while sausage brings extra flavor. You can also use ground turkey for a lighter option.
  • Cheese: A blend of ricotta, mozzarella, and Parmesan creates the perfect creamy, melty texture.
  • Sauce: Use your favorite marinara or homemade tomato sauce for the best flavor.

Step-by-Step Instructions

  1. Preheat the Oven: Set oven to 375°F (190°C). Lightly grease a baking dish.
  2. Cook the Meat: In a skillet over medium heat, cook ground beef or sausage until browned. Drain excess fat and stir in marinara sauce.
  3. Prepare Cheese Mixture: In a bowl, mix ricotta cheese with Italian seasoning, garlic powder, salt, and pepper.
  4. Layer the Dish: Spread a thin layer of sauce on the bottom of the baking dish. Add a layer of dumplings, followed by ricotta mixture, meat sauce, and mozzarella. Repeat layers until ingredients are used.
  5. Top with Cheese: Finish with a generous layer of mozzarella and Parmesan cheese.
  6. Bake: Cover with foil and bake for 25 minutes. Remove foil and bake an additional 10–15 minutes until bubbly and golden.
  7. Rest & Serve: Let the lasagna rest for 5–10 minutes before serving. Garnish with fresh herbs if desired.

Tips for Perfect Results

  • Don’t Overcrowd Dumplings: Arrange evenly for consistent cooking
  • Use Enough Sauce: Keeps dumplings moist and tender
  • Cover While Baking: Prevents cheese from burning before the dish is fully heated
  • Let It Rest: Helps layers set for easier slicing

Variations

Creative Ways to Customize

This savory cheesy baked dumpling lasagna can easily be adapted to suit your preferences:

  • Vegetarian Version: Use veggie dumplings and skip the meat
  • Spicy Kick: Add red pepper flakes or spicy sausage
  • Alfredo Style: Replace marinara with creamy Alfredo sauce
  • Asian-Inspired Twist: Use soy-based sauce, green onions, and sesame oil for a fusion dish

What to Serve With It

Pair your dumpling lasagna with:

  • Garlic bread or crusty rolls
  • A crisp green salad with vinaigrette
  • Roasted vegetables like broccoli or carrots
  • A light soup for a complete meal

Storage & Reheating

  • Refrigeration: Store leftovers in an airtight container for up to 4 days
  • Freezing: Freeze fully cooked or assembled (unbaked) for up to 2 months
  • Reheating: Warm in the oven at 350°F until heated through, or microwave individual portions
  • Make-Ahead Tip: Assemble the dish ahead and bake when ready

Common Mistakes

  • Skipping Sauce Layers: Can lead to dry dumplings
  • Overbaking: Makes cheese too hard and dumplings tough
  • Not Draining Meat: Adds excess grease to the dish
  • Cutting Too Soon: Causes layers to fall apart

FAQs

1. Can I use fresh dumplings instead of frozen?
Yes! Fresh dumplings work well but may cook slightly faster, so adjust baking time accordingly.

2. Do I need to cook dumplings before baking?
No, they cook perfectly in the oven while absorbing the sauce.

3. Can I make this dish ahead of time?
Absolutely. Assemble it ahead and refrigerate until ready to bake.

4. What’s the best cheese combination?
Mozzarella, ricotta, and Parmesan create the perfect balance of creaminess and flavor.

Final Thoughts

This savory cheesy baked dumpling lasagna is the ultimate comfort food mashup that brings together the best of two worlds. It’s hearty, flavorful, and incredibly satisfying, making it perfect for family dinners or special occasions.

With its gooey cheese, rich sauce, and tender dumplings, this dish offers a fresh take on classic lasagna that’s both fun and delicious. Once you try it, you’ll love how easy it is to prepare and how impressive it looks when served.