BLT Pasta Salad Recipe (Creamy & Crunchy)

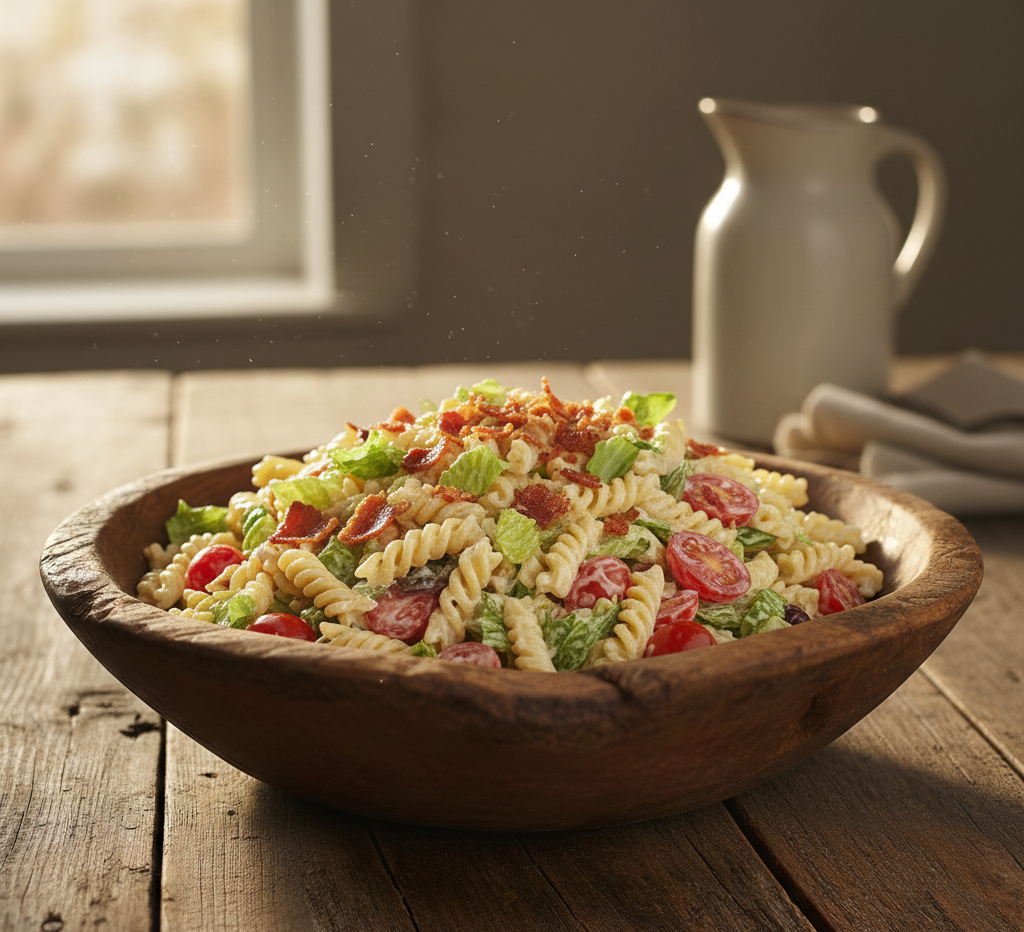
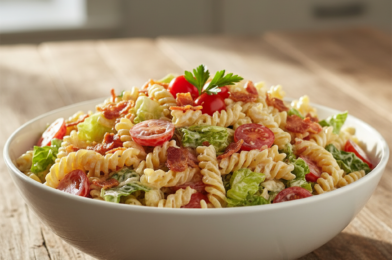
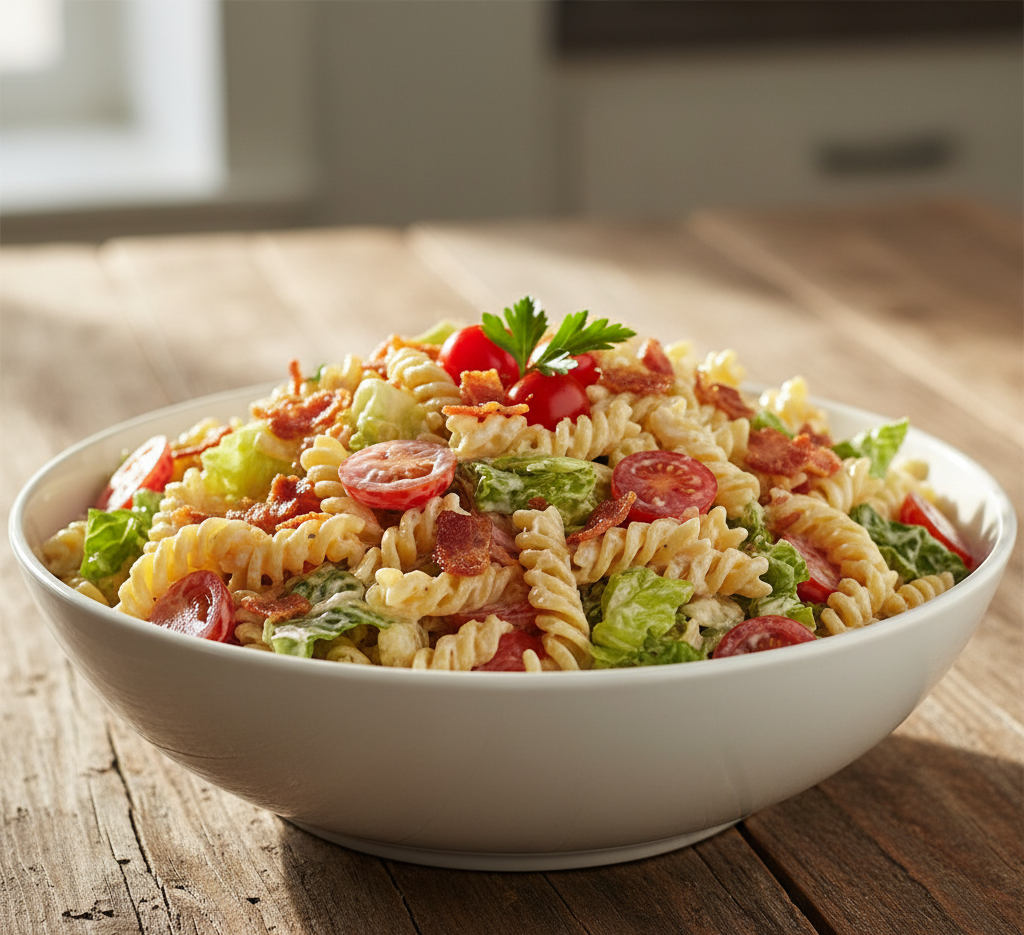
If you love the classic flavors of a BLT sandwich, you’re going to fall in love with this BLT Pasta Salad Recipe (Creamy & Crunchy). It takes everything people adore about the traditional bacon, lettuce, and tomato sandwich and transforms it into a refreshing pasta salad that’s perfect for gatherings, meal prep, or easy weeknight dinners.

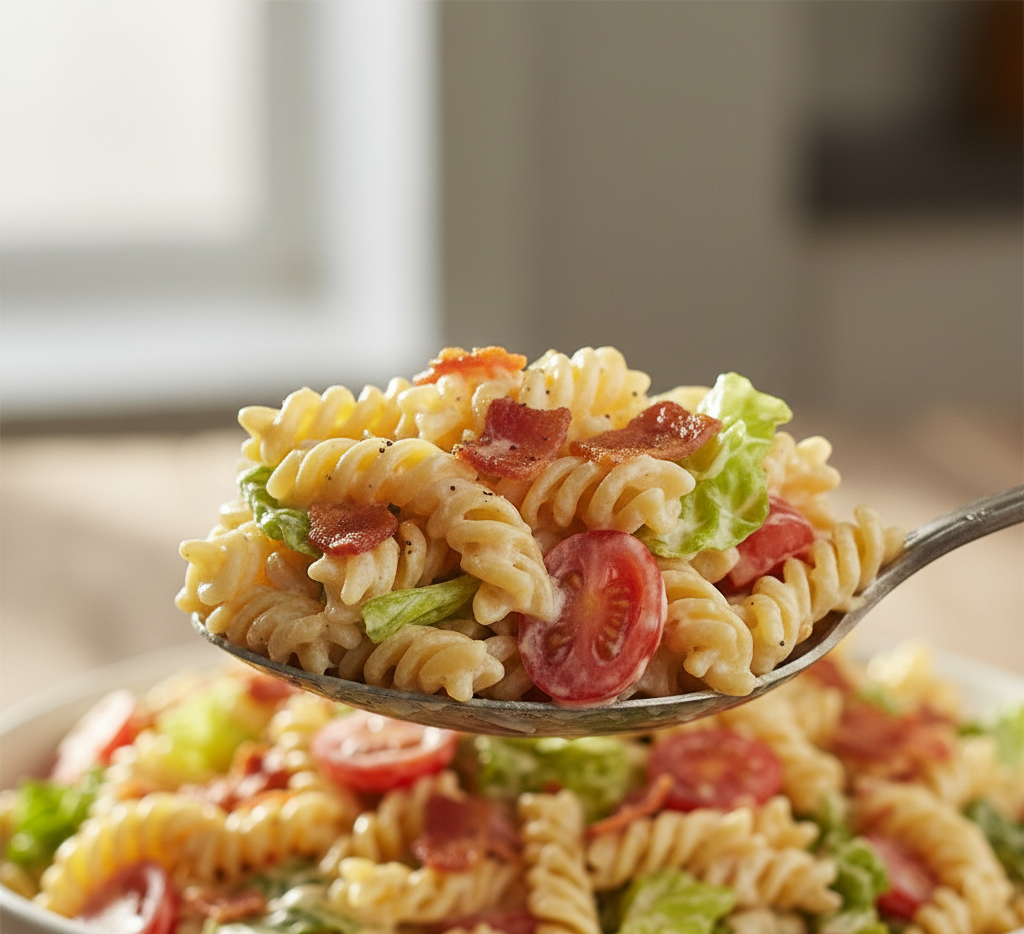
This BLT pasta salad recipe combines crispy bacon, juicy tomatoes, tender pasta, and crisp lettuce tossed in a creamy dressing. The result is a dish that’s rich, satisfying, and full of contrasting textures. Every bite delivers smoky bacon, fresh vegetables, and creamy pasta goodness.

Whether you’re preparing a summer barbecue menu, a picnic spread, or simply craving a comforting yet fresh pasta salad, this creamy BLT pasta salad is guaranteed to become a favorite.

BLT Pasta

Why You’ll Love This BLT Pasta Salad Recipe

There are plenty of pasta salad recipes, but this BLT pasta salad recipe stands out because of its incredible flavor and satisfying crunch.

Here are a few reasons people love it:

  • Combines classic BLT sandwich flavors

  • Perfect balance of creamy and crunchy

  • Ideal for BBQs, picnics, and potlucks

  • Easy to prepare ahead of time

  • Family-friendly and crowd-pleasing

Because it’s so simple to customize, this creamy BLT pasta salad can easily become your go-to side dish for gatherings.

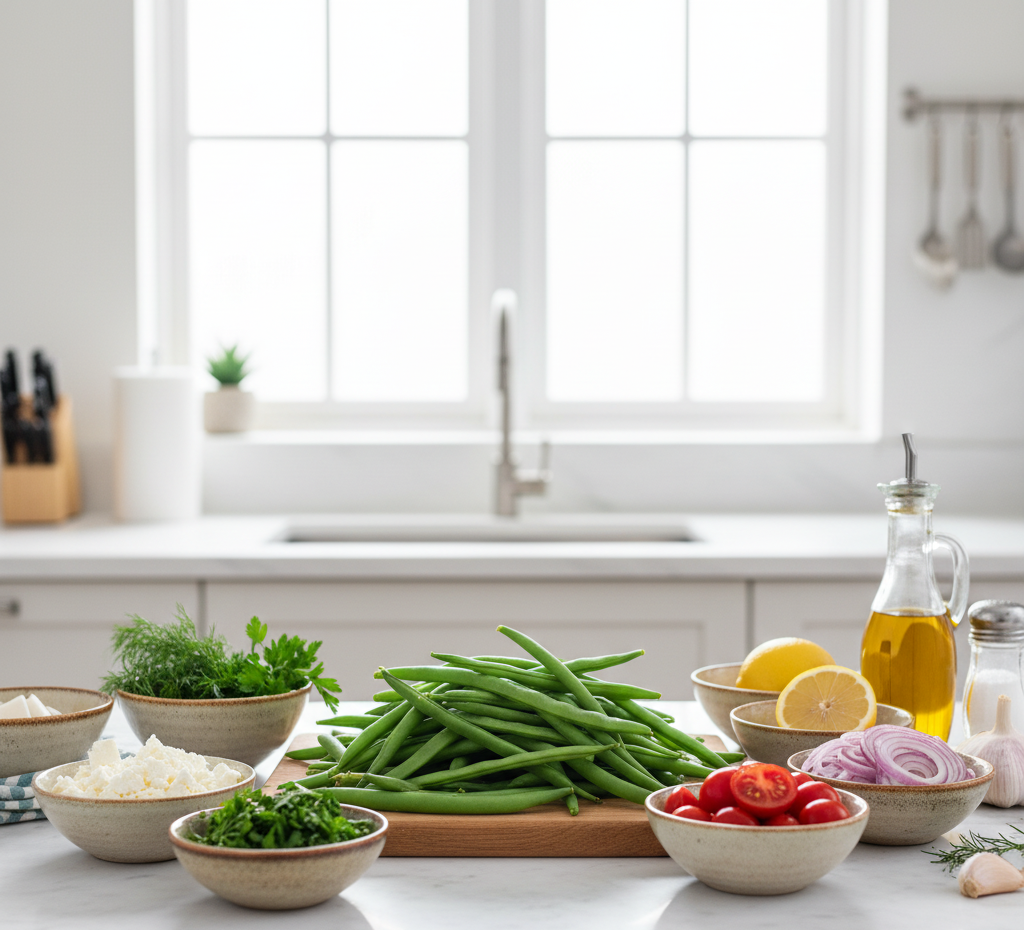
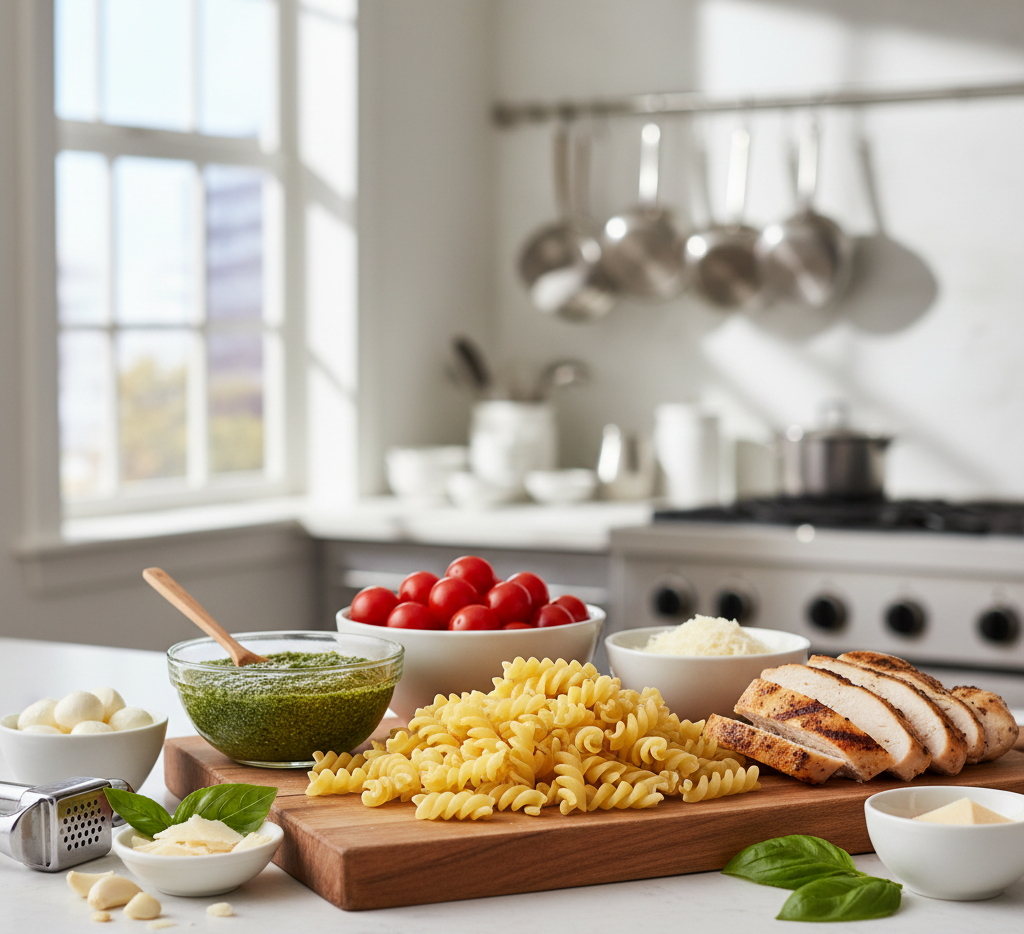
Ingredients for BLT Pasta Salad

This BLT Pasta Salad Recipe (Creamy & Crunchy) uses everyday ingredients that work together to create bold flavor.

Main Ingredients

  • 12 ounces rotini or bowtie pasta

  • 8 slices bacon, cooked and crumbled

  • 1 ½ cups cherry tomatoes, halved

  • 2 cups chopped romaine or iceberg lettuce

  • ¼ cup red onion, finely diced

  • ¼ cup shredded cheddar cheese (optional)

Creamy Dressing

  • ¾ cup mayonnaise

  • 2 tablespoons sour cream

  • 1 tablespoon lemon juice

  • 1 teaspoon Dijon mustard

  • Salt and black pepper to taste

Ingredient Notes

Choosing the right ingredients can elevate your BLT pasta salad recipe from good to amazing.

  • Pasta: Short pasta shapes like rotini or bowtie hold the dressing well.

  • Bacon: Thick-cut bacon provides the best flavor and crunch.

  • Lettuce: Romaine stays crisp longer than softer lettuces.

  • Tomatoes: Cherry or grape tomatoes add natural sweetness.

For even more flavor, try adding a sprinkle of freshly cracked black pepper or chopped chives.

Step-by-Step Instructions

Step 1: Cook the Pasta

Bring a large pot of salted water to a boil and cook the pasta according to package instructions until al dente. Drain and rinse briefly with cool water to stop cooking.

Allow the pasta to cool before assembling the BLT pasta salad.

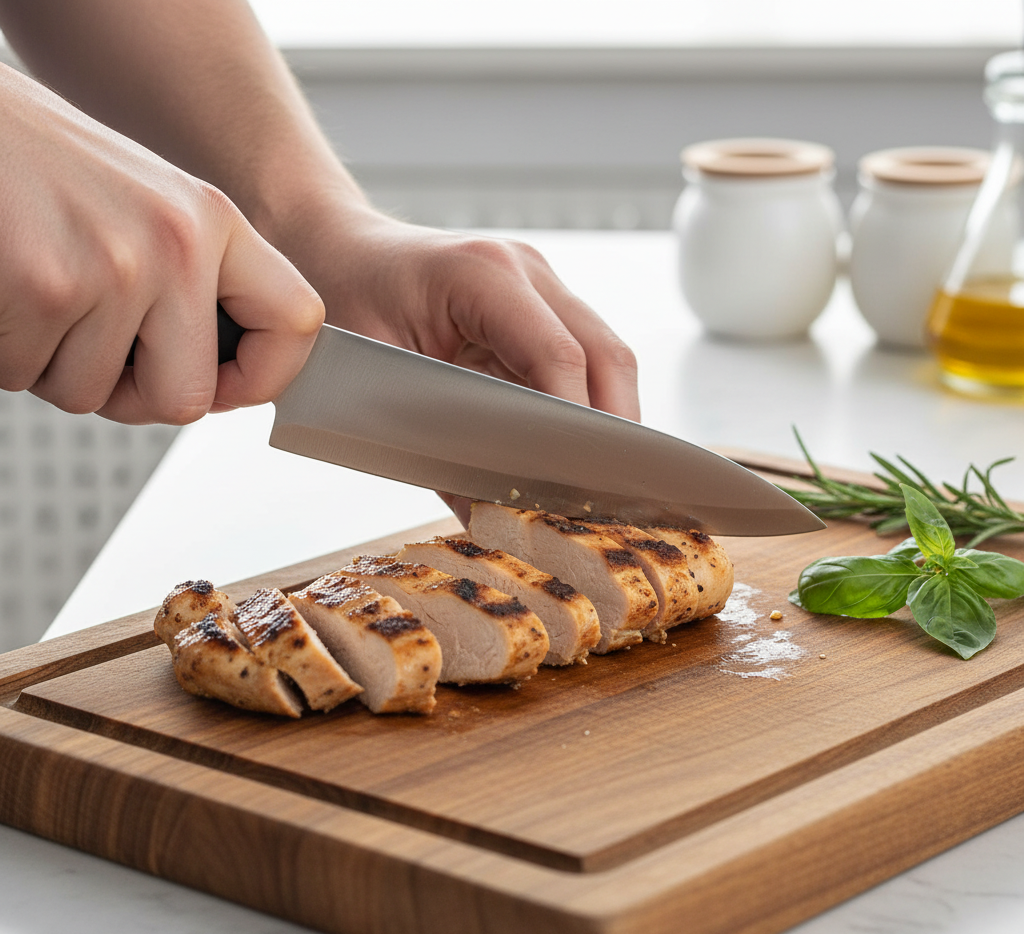
Step 2: Cook the Bacon

Cook bacon in a skillet over medium heat until crispy. Transfer to a paper towel-lined plate and crumble once cooled.

Crispy bacon is the heart of this BLT pasta salad recipe, providing smoky flavor and crunchy texture.

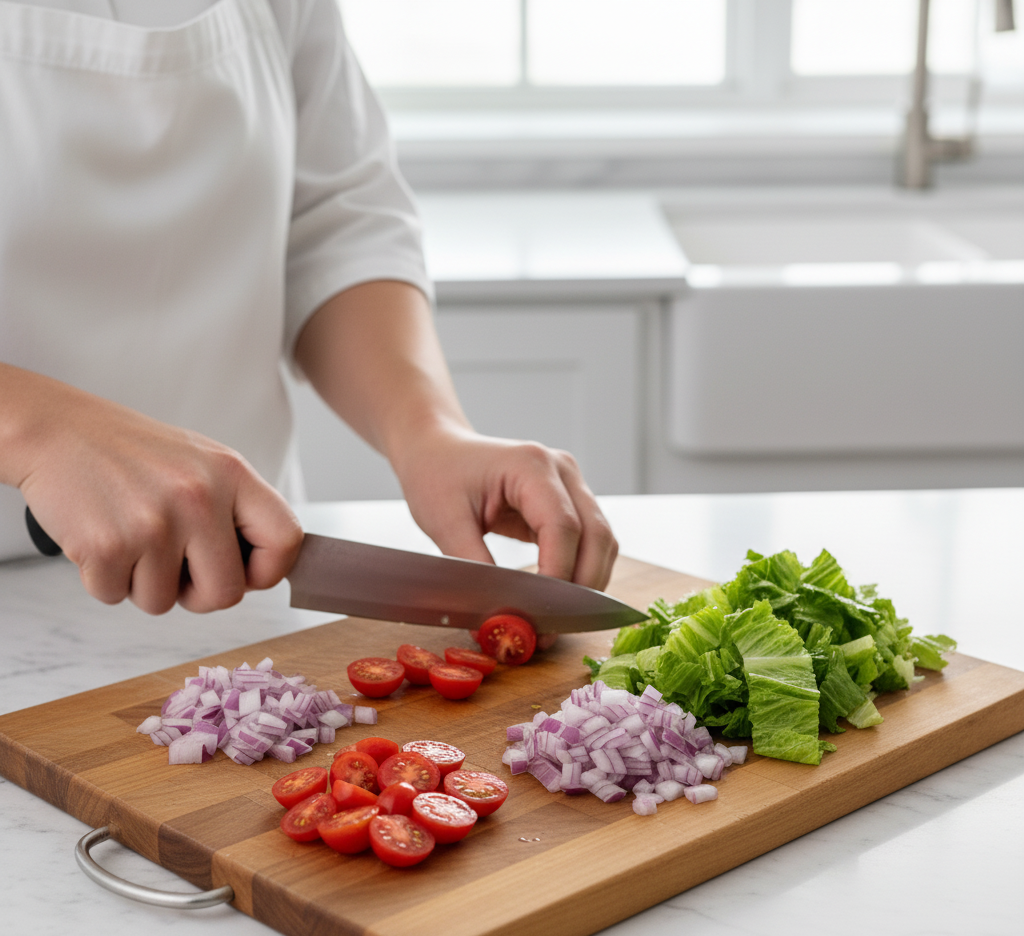
Step 3: Prepare the Vegetables

Slice the cherry tomatoes, dice the red onion, and chop the lettuce. Place them in a large mixing bowl along with the cooled pasta.

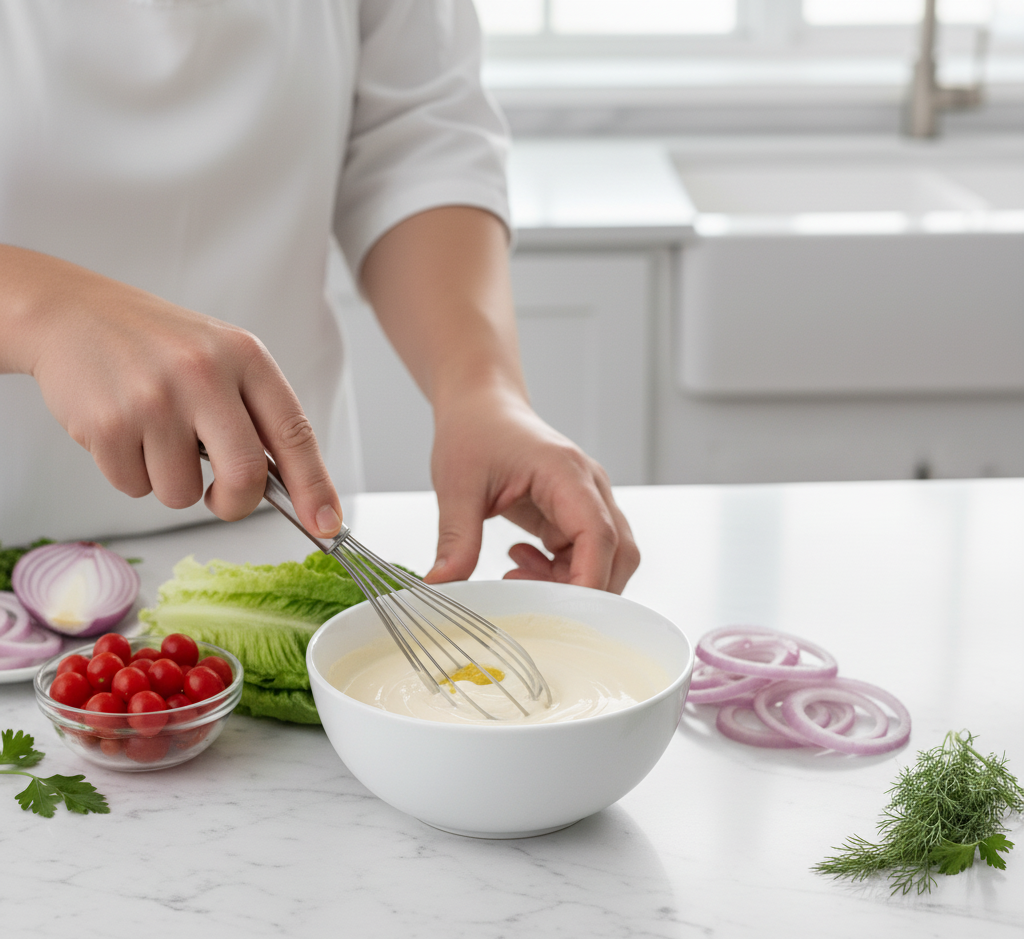
Step 4: Make the Creamy Dressing

In a small bowl, whisk together:

  • Mayonnaise

  • Sour cream

  • Lemon juice

  • Dijon mustard

  • Salt and pepper

This creamy dressing gives the BLT pasta salad recipe its signature richness.

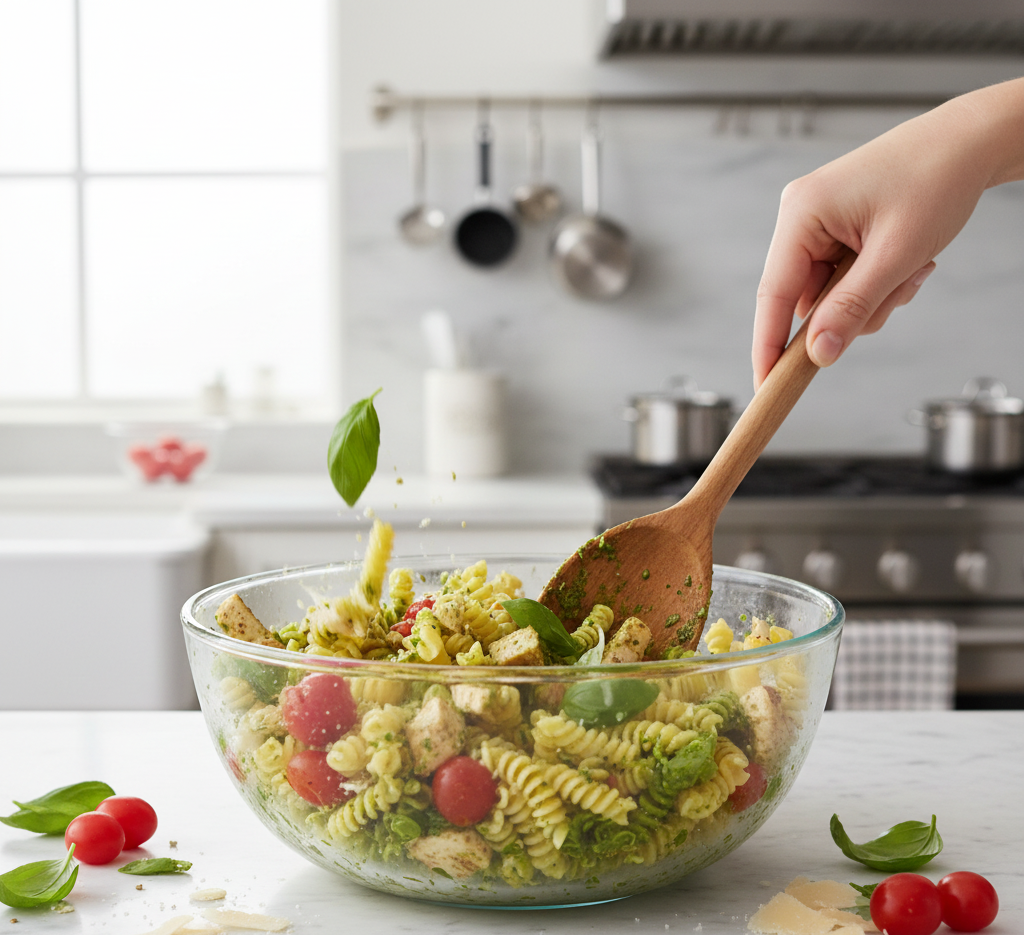
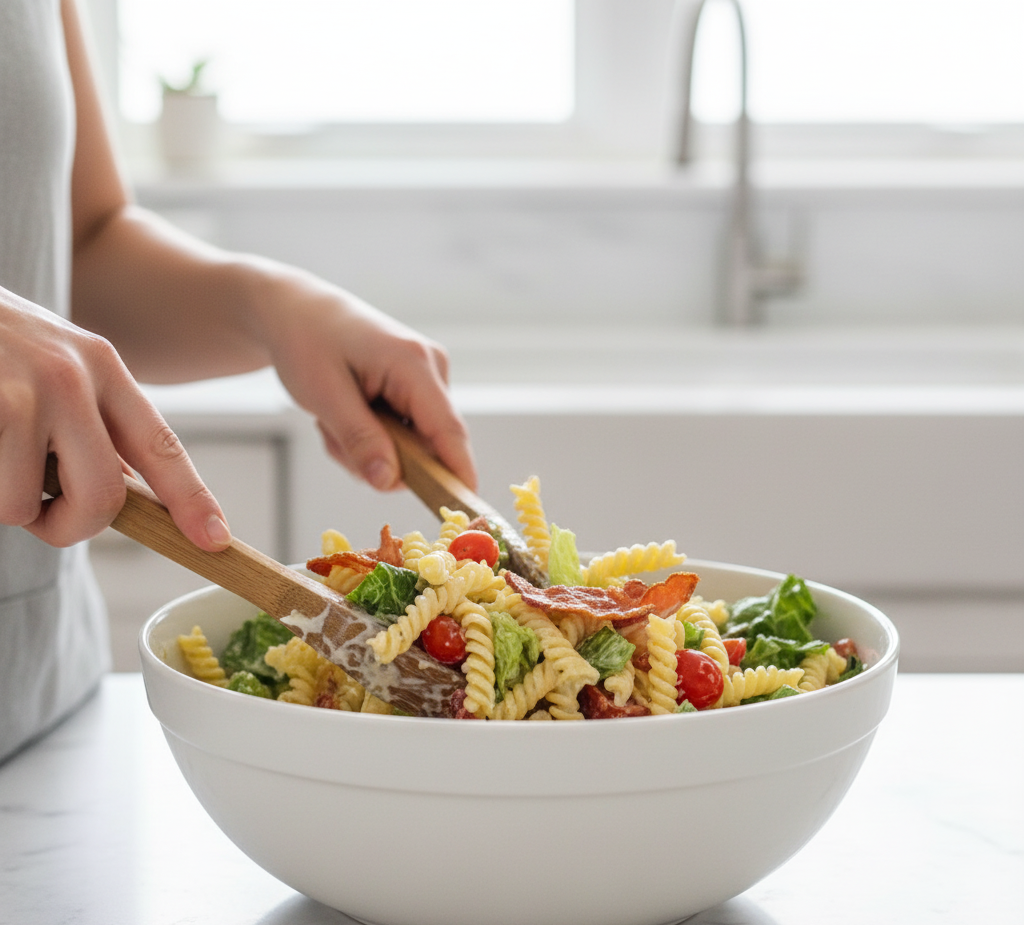
Step 5: Assemble the Salad

Add the crumbled bacon and dressing to the pasta mixture. Toss gently until everything is evenly coated.

Add the chopped lettuce last to maintain its crisp texture.

Tips for Perfect BLT Pasta Salad

To make the best BLT pasta salad recipe, follow these simple tips:

  • Cook pasta just until al dente

  • Let pasta cool before adding dressing

  • Use freshly cooked crispy bacon

  • Add lettuce just before serving

  • Chill the salad briefly to enhance flavor

These techniques help ensure your creamy BLT pasta salad stays flavorful and perfectly textured.

Delicious Variations

One of the best things about this BLT pasta salad recipe is how easy it is to customize.

Avocado BLT Pasta Salad

Add diced avocado for extra creaminess.

Ranch BLT Pasta Salad

Replace the dressing with ranch dressing.

Chicken BLT Pasta Salad

Add grilled chicken for a protein-packed meal.

Spicy BLT Pasta Salad

Add chopped jalapeños or a dash of hot sauce.

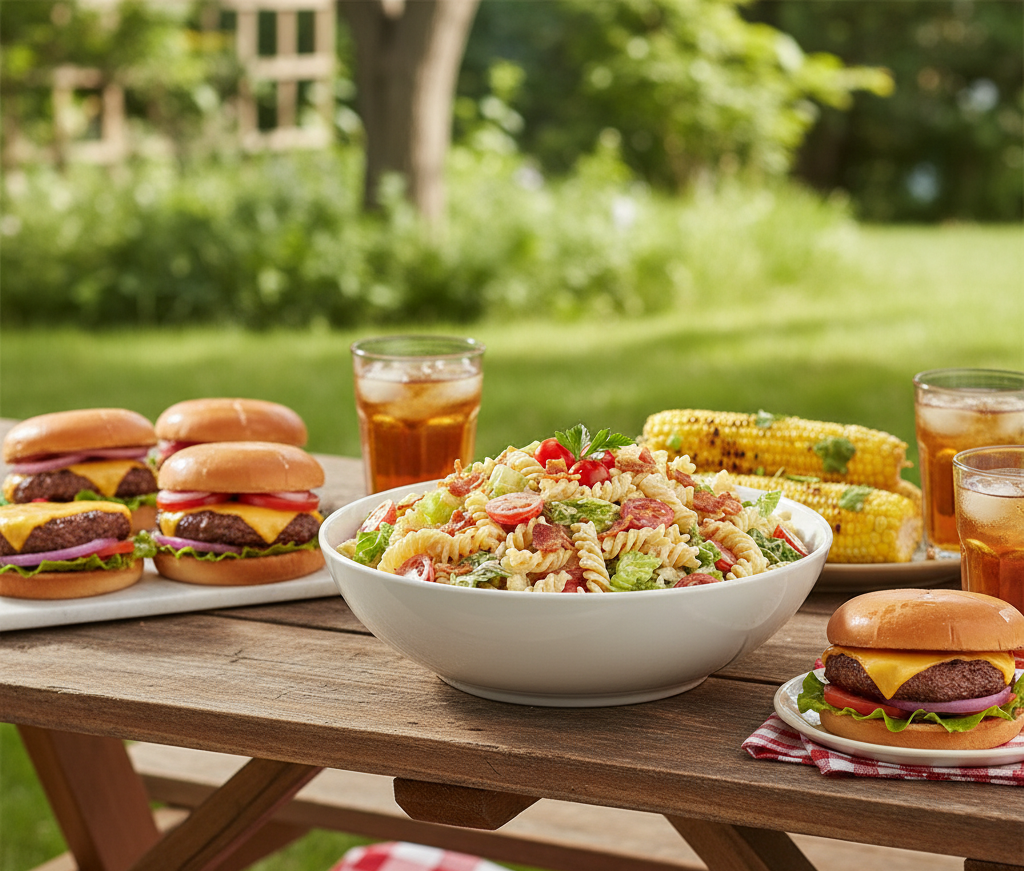
What to Serve With BLT Pasta Salad

This creamy BLT pasta salad pairs well with many classic dishes.

Try serving it with:

  • Grilled burgers

  • BBQ chicken

  • Pulled pork sandwiches

  • Grilled vegetables

  • Corn on the cob

Storage Tips

This BLT pasta salad recipe stores well if prepared correctly.

Refrigeration

Store in an airtight container in the refrigerator for up to 3 days.

Refreshing the Salad

If the salad becomes dry, stir in a spoonful of mayonnaise or sour cream before serving.

For the best texture, add fresh lettuce right before serving.

Common Mistakes to Avoid

Avoid these mistakes when making BLT pasta salad:

  • Overcooking the pasta

  • Using soggy bacon

  • Adding lettuce too early

  • Using too much dressing

Paying attention to these details will keep your salad fresh and balanced.

FAQs About BLT Pasta Salad

Can I make BLT pasta salad ahead of time?

Yes. Prepare the pasta and dressing ahead, but add the lettuce just before serving.

What pasta works best for BLT pasta salad?

Rotini, bowtie, or penne pasta hold the dressing well.

Can I make this pasta salad lighter?

Yes, substitute Greek yogurt for some of the mayonnaise.

Is BLT pasta salad good for meal prep?

Absolutely. Just store the lettuce separately and mix it in before serving.
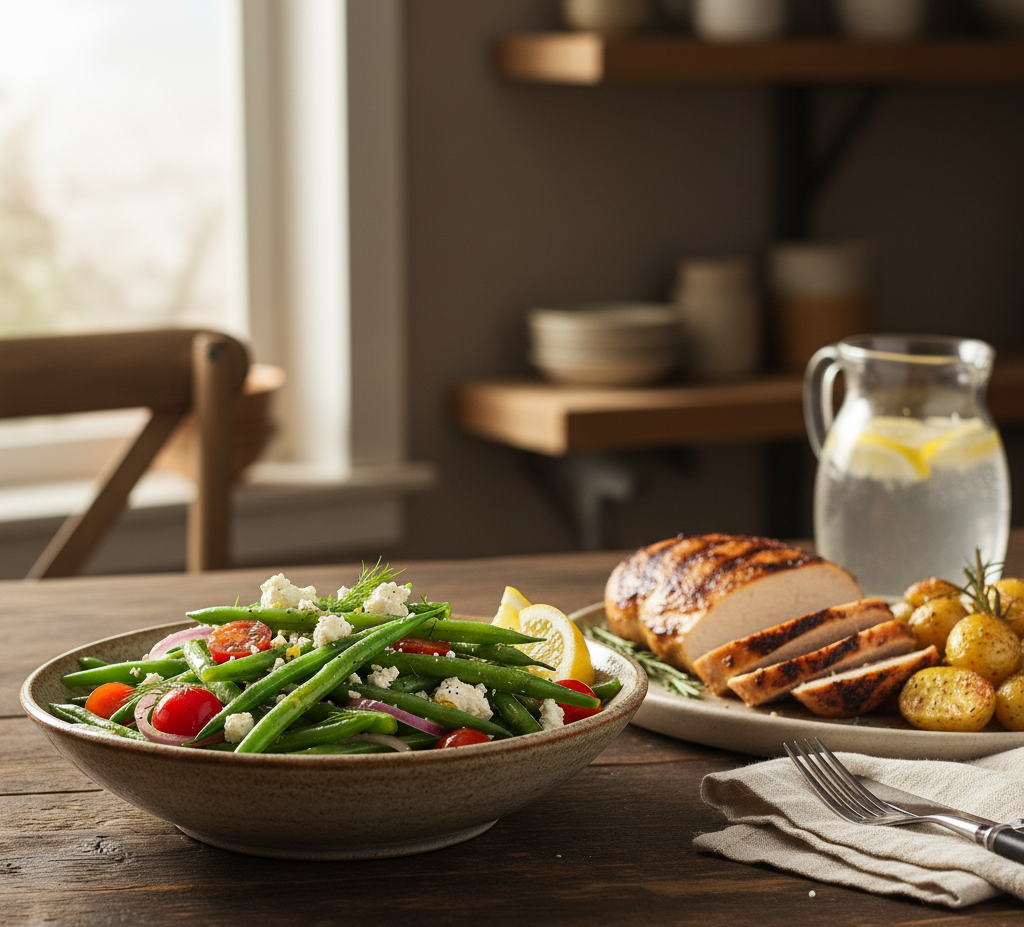
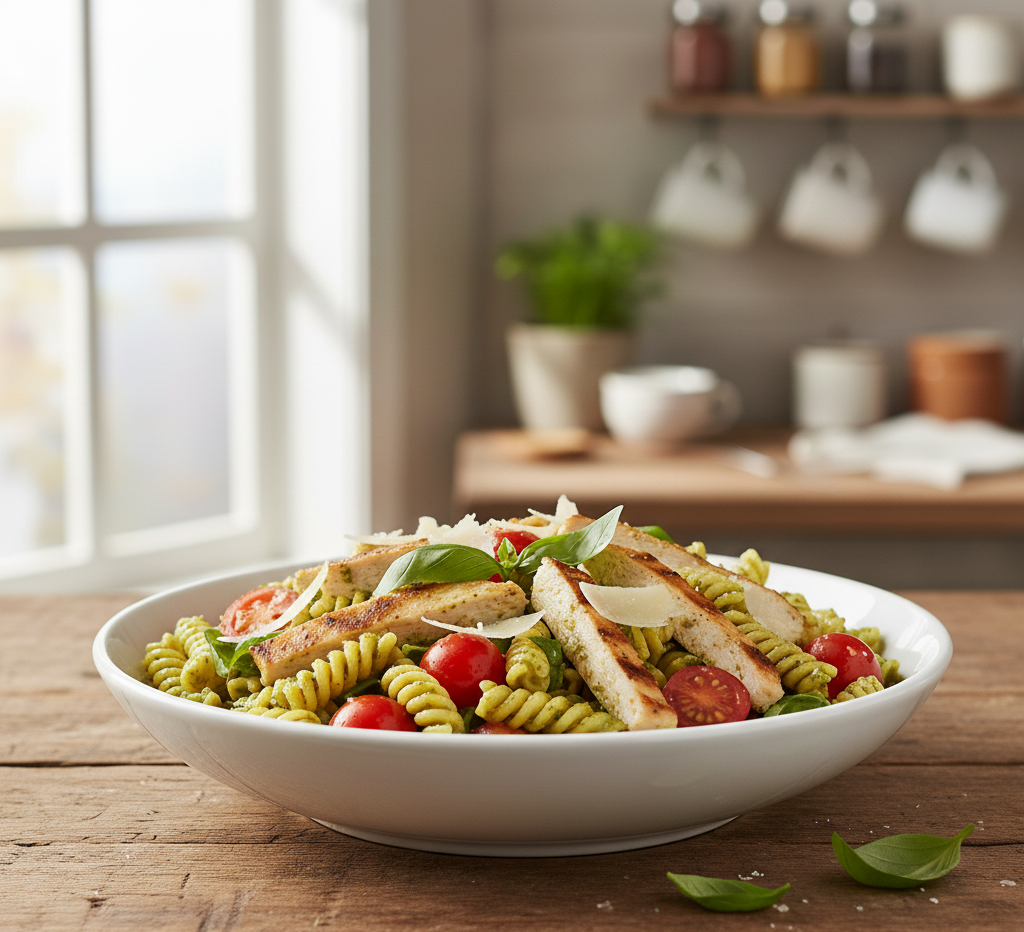
Final Thoughts

This BLT Pasta Salad Recipe (Creamy & Crunchy) is a fun and flavorful twist on the beloved BLT sandwich. With crispy bacon, juicy tomatoes, fresh lettuce, and creamy pasta, it’s a dish that’s both comforting and refreshing.

Perfect for picnics, cookouts, potlucks, or everyday meals, this BLT pasta salad recipe is easy to make and guaranteed to please a crowd. Once you try it, it may quickly become one of your favorite go-to pasta salads.

Green Bean and Feta Salad – Fresh, Zesty & Easy Mediterranean Side

If you’re searching for a light, vibrant dish that’s both simple and full of flavor, this Green Bean and Feta Salad is a must-try. It combines crisp-tender green beans, creamy feta cheese, and a bright lemon vinaigrette that brings everything together beautifully.

This green bean and feta salad is inspired by Mediterranean flavors, where fresh vegetables, olive oil, and tangy cheeses are staples of everyday cooking. The result is a salad that feels refreshing yet satisfying, making it perfect for everything from casual weeknight dinners to elegant holiday meals.

One of the best things about this recipe is its versatility. It works wonderfully as a side dish for grilled meats, roasted chicken, seafood, or even as a light lunch when paired with crusty bread. Plus, the ingredients are simple and the preparation is quick, making it ideal for busy cooks.

Green Bean and

Why You’ll Love This Green Bean and Feta Salad

There are countless vegetable side dishes out there, but this green bean and feta salad stands out thanks to its perfect balance of flavors and textures.

Here’s why this salad deserves a place on your table:

  • Quick and easy to prepare

  • Packed with fresh Mediterranean flavors

  • Crisp, creamy, and tangy in every bite

  • Perfect for summer meals and holiday spreads

  • Naturally gluten-free and nutritious

Because the ingredients are so fresh and simple, this green bean and feta salad highlights how delicious vegetables can be when prepared the right way.

Ingredients for Green Bean and Feta Salad

This Green Bean and Feta Salad uses fresh ingredients that create a simple yet elegant dish.

Main Ingredients

  • 1 pound fresh green beans, trimmed

  • ½ cup crumbled feta cheese

  • 1 cup cherry tomatoes, halved

  • ¼ small red onion, thinly sliced

  • 2 tablespoons chopped fresh parsley

Lemon Vinaigrette

  • 3 tablespoons extra virgin olive oil

  • 1 tablespoon fresh lemon juice

  • 1 teaspoon Dijon mustard

  • 1 small garlic clove, minced

  • Salt and black pepper to taste

Ingredient Notes

The beauty of this green bean and feta salad lies in its simplicity, so choosing good ingredients really matters.

Here are a few helpful tips:

  • Green beans: Fresh, crisp beans provide the best flavor and texture.

  • Feta cheese: Use block feta and crumble it yourself for better taste.

  • Olive oil: High-quality extra virgin olive oil enhances the dressing.

  • Fresh herbs: Parsley or dill adds brightness and color.

You can also include ingredients like toasted almonds or olives to deepen the Mediterranean character of the salad.

Step-by-Step Instructions

Step 1: Blanch the Green Beans

Bring a large pot of salted water to a boil. Add the green beans and cook for about 3–4 minutes until they are bright green and crisp-tender.

Immediately transfer them to an ice bath to stop the cooking process.

Step 2: Prepare the Vegetables

While the beans cool, slice the red onion, halve the cherry tomatoes, and chop the parsley.

Place everything into a large mixing bowl.

Step 3: Make the Lemon Vinaigrette

In a small bowl, whisk together olive oil, lemon juice, Dijon mustard, minced garlic, salt, and pepper.

This bright vinaigrette adds a refreshing flavor that perfectly complements the green bean and feta salad.

Step 4: Assemble the Salad

Add the cooled green beans to the bowl with the vegetables. Pour the dressing over the salad and gently toss to coat.

Finish by sprinkling the crumbled feta cheese and fresh herbs on top.

Tips for Perfect Green Bean and Feta Salad

To make the best green bean and feta salad, keep these tips in mind:

  • Don’t overcook the green beans

  • Use an ice bath to keep beans bright and crisp

  • Add feta cheese just before serving

  • Taste the dressing and adjust lemon or salt as needed

  • Let the salad rest for 10 minutes before serving

These simple techniques help ensure the salad stays vibrant and flavorful.

Delicious Variations

This green bean and feta salad can easily be customized to suit your taste.

Mediterranean Green Bean Salad

Add olives and roasted red peppers.

Nutty Green Bean Salad

Sprinkle toasted almonds or pine nuts on top.

Protein-Packed Version

Add grilled chicken or chickpeas.

Herb-Lovers Salad

Mix in fresh basil, dill, or mint for extra freshness.

What to Serve With Green Bean and Feta Salad

This green bean and feta salad pairs beautifully with many main dishes.

Great serving ideas include:

  • Grilled chicken

  • Roasted salmon

  • Steak or lamb

  • Mediterranean-style rice

  • Crusty artisan bread

Storage Tips

This green bean and feta salad stores well and can even taste better after resting.

Refrigeration

Store in an airtight container in the refrigerator for up to 3 days.

Make Ahead Tip

Prepare the beans and dressing ahead of time but add the feta cheese right before serving.

Common Mistakes to Avoid

Even simple salads can be improved by avoiding these mistakes:

  • Overcooking the green beans

  • Using low-quality feta cheese

  • Skipping the ice bath

  • Adding too much dressing

Following the recipe carefully ensures the best flavor and texture.

FAQs About Green Bean and Feta Salad

Can I make green bean and feta salad ahead of time?

Yes! You can prepare it several hours ahead and store it in the refrigerator.

Can I use frozen green beans?

Fresh beans are best, but frozen beans can work if cooked carefully.

Is green bean and feta salad healthy?

Yes, it’s packed with fiber, vitamins, and healthy fats from olive oil.

Can I serve this salad warm?

Absolutely. It tastes great warm, room temperature, or chilled.

Final Thoughts

This Green Bean and Feta Salad proves that simple ingredients can create something truly special. With crisp green beans, creamy feta, and a bright lemon dressing, it’s a dish that feels both refreshing and satisfying.

Whether you’re serving it at a family dinner, summer barbecue, or holiday gathering, this green bean and feta salad brings vibrant flavor and color to the table. Once you try it, it may quickly become one of your favorite go-to side dishes.

Curried Chickpea Salad (Quick, Healthy & Flavorful)

If you’re searching for a quick, nutritious meal that doesn’t sacrifice flavor, this Curried Chickpea Salad (Quick, Healthy & Flavorful) deserves a place in your weekly rotation. Packed with protein-rich chickpeas, crunchy vegetables, and a creamy curry-spiced dressing, this salad delivers bold flavor in every bite.

One of the biggest reasons people love curried chickpea salad is its incredible versatility. It can be served as a sandwich filling, scooped onto fresh greens, stuffed into wraps, or enjoyed straight from the bowl. The warm spices of curry powder pair beautifully with the creamy dressing and the slightly nutty flavor of chickpeas.

Even better, this recipe takes only about 15 minutes to prepare. That makes it perfect for quick lunches, healthy meal prep, or a refreshing plant-based dinner option.

Curried Chickpea Salad

Why You’ll Love This Curried Chickpea Salad

There are many reasons why this curried chickpea salad has become a favorite among healthy food lovers and busy home cooks alike.

Here’s what makes this recipe stand out:

  • Ready in 15 minutes

  • High in plant-based protein and fiber

  • Perfect for vegan and vegetarian diets

  • Great for meal prep

  • Bold curry flavor with creamy texture

This quick and healthy curried chickpea salad is also incredibly satisfying while still feeling light and refreshing.

Ingredients for Curried Chickpea Salad

This Curried Chickpea Salad (Quick, Healthy & Flavorful) uses simple ingredients that combine to create a vibrant, flavorful dish.

Main Ingredients

  • 2 cans chickpeas (garbanzo beans), drained and rinsed

  • ½ cup celery, finely diced

  • ¼ cup red onion, finely chopped

  • ¼ cup shredded carrots

  • 2 tablespoons fresh cilantro or parsley, chopped

Creamy Curry Dressing

  • ⅓ cup Greek yogurt or mayonnaise

  • 1 tablespoon lemon juice

  • 1–2 teaspoons curry powder

  • 1 teaspoon Dijon mustard

  • Salt and black pepper to taste

Ingredient Notes

Using fresh ingredients can elevate the flavor of your curried chickpea salad.

Here are a few helpful tips:

  • Chickpeas: Canned chickpeas are convenient, but freshly cooked chickpeas work wonderfully too.

  • Curry powder: Different blends vary in intensity, so adjust according to your taste.

  • Greek yogurt: Provides a tangy, lighter alternative to mayonnaise.

  • Fresh herbs: Cilantro or parsley adds brightness and freshness.

For extra texture, you can also add chopped nuts, raisins, or diced apples.

Step-by-Step Instructions

Step 1: Prepare the Chickpeas

Drain and rinse the chickpeas thoroughly. Place them in a large mixing bowl and lightly mash about one-third of them with a fork.

This technique helps create the perfect texture for curried chickpea salad—a mix of creamy and chunky.

Step 2: Chop the Vegetables

Finely dice the celery, red onion, and carrots. Add them to the bowl with the chickpeas.

These vegetables add freshness, crunch, and vibrant color to the salad.

Step 3: Make the Curry Dressing

In a small bowl, whisk together:

  • Greek yogurt or mayonnaise

  • Curry powder

  • Lemon juice

  • Dijon mustard

  • Salt and pepper

This creamy dressing gives the curried chickpea salad its signature flavor.

Step 4: Combine Everything

Pour the curry dressing over the chickpea mixture and gently stir until everything is evenly coated.

Fold in the fresh herbs and taste to adjust seasoning if needed.

Tips for Perfect Curried Chickpea Salad

To make the best Curried Chickpea Salad (Quick, Healthy & Flavorful), keep these tips in mind:

  • Mash only a portion of the chickpeas for better texture

  • Chill the salad for 20–30 minutes for deeper flavor

  • Taste and adjust curry seasoning

  • Use fresh lemon juice instead of bottled

  • Add herbs just before serving for freshness

These simple tricks help maximize flavor and texture.

Delicious Variations

One of the best things about curried chickpea salad is how easy it is to customize.

Sweet & Savory Chickpea Salad

Add raisins or chopped dried cranberries.

Crunchy Chickpea Salad

Mix in toasted almonds or cashews.

Spicy Curried Chickpea Salad

Add cayenne pepper or diced jalapeños.

Mediterranean Chickpea Salad

Include cucumbers, olives, and feta cheese.

What to Serve With Curried Chickpea Salad

This curried chickpea salad can be served in many delicious ways.

Try it with:

  • Whole grain sandwich bread

  • Lettuce wraps

  • Pita pockets

  • Crackers

  • Fresh salad greens

Storage & Meal Prep Tips

One of the best things about curried chickpea salad is how well it stores.

Refrigeration

Store in an airtight container for up to 4 days in the refrigerator.

Meal Prep

Prepare the salad ahead of time and portion it into containers for easy lunches.

Refreshing the Salad

If it thickens after refrigeration, stir in a splash of lemon juice or yogurt.

Common Mistakes to Avoid

Even simple salads benefit from proper technique.

Avoid these mistakes when making curried chickpea salad:

  • Using too much curry powder

  • Not seasoning properly

  • Over-mashing the chickpeas

  • Skipping the chilling time

Paying attention to these small details will make your salad taste much better.

FAQs About Curried Chickpea Salad

Is curried chickpea salad healthy?

Yes! Curried chickpea salad is high in plant-based protein, fiber, and healthy nutrients.

Can I make this salad vegan?

Absolutely. Just use vegan mayonnaise or dairy-free yogurt.

Can I make it ahead of time?

Yes, and it actually tastes better after chilling for a few hours.

How can I make it lower in calories?

Use Greek yogurt instead of mayonnaise for a lighter version.

Final Thoughts

This Curried Chickpea Salad (Quick, Healthy & Flavorful) is proof that healthy meals can also be incredibly delicious. With protein-packed chickpeas, crunchy vegetables, and a creamy curry dressing, it’s a satisfying dish that’s both simple and exciting.

Whether you’re preparing quick lunches, healthy meal prep, or a refreshing plant-based dinner, this curried chickpea salad offers bold flavor, great nutrition, and endless versatility.

Once you try it, you’ll likely find yourself making this recipe again and again.

Mediterranean Shrimp and Avocado Salad – Fresh, Healthy, and Flavor-Packed

If you’re looking for a fresh, vibrant, and satisfying meal that feels both healthy and indulgent, this Mediterranean Shrimp and Avocado Salad is exactly what you need. Packed with juicy shrimp, creamy avocado, crisp vegetables, and a bright lemon-olive oil dressing, this salad delivers bold Mediterranean flavors in every bite.

One of the best things about this Mediterranean shrimp and avocado salad is how beautifully the ingredients complement each other. The shrimp provide lean protein, the avocado adds rich creaminess, and the fresh vegetables contribute crunch and color. Toss everything with a simple Mediterranean-style dressing, and you have a dish that feels light yet incredibly satisfying.

Whether you’re preparing a quick weekday lunch, a refreshing summer dinner, or a healthy dish for entertaining guests, this Mediterranean shrimp and avocado salad is guaranteed to impress.

Mediterranean

Why You’ll Love This Mediterranean Shrimp and Avocado Salad

There are countless salad recipes out there, but this Mediterranean shrimp and avocado salad stands out because it’s flavorful, nutritious, and incredibly easy to make.

Here are a few reasons people love this recipe:

  • Ready in about 20 minutes

  • Packed with Mediterranean flavors

  • High in protein and healthy fats

  • Perfect for low-carb and gluten-free diets

  • Light yet satisfying

Because the ingredients are so fresh and vibrant, this salad tastes like something you’d enjoy at a seaside café along the Mediterranean coast.

Ingredients for Mediterranean Shrimp and Avocado Salad

This Mediterranean shrimp and avocado salad relies on simple, wholesome ingredients that combine to create a beautiful and flavorful dish.

Main Ingredients

  • 1 pound large shrimp, peeled and deveined

  • 2 ripe avocados, diced

  • 1 cup cherry tomatoes, halved

  • 1 cucumber, diced

  • ¼ red onion, thinly sliced

  • ¼ cup crumbled feta cheese

  • 2 tablespoons fresh parsley, chopped

Lemon Dressing

  • 3 tablespoons olive oil

  • 2 tablespoons fresh lemon juice

  • 1 clove garlic, minced

  • Salt and black pepper to taste


Ingredient Notes

Using fresh, high-quality ingredients will elevate your Mediterranean shrimp and avocado salad.

Here are a few helpful tips:

  • Shrimp: Large or jumbo shrimp provide the best texture.

  • Avocados: Choose ripe but firm avocados so they hold their shape.

  • Olive oil: Use extra virgin olive oil for authentic Mediterranean flavor.

  • Feta cheese: Adds a salty, creamy contrast that enhances the salad.

You can also add olives or roasted red peppers if you want to deepen the Mediterranean flavor profile.


Step-by-Step Instructions

Step 1: Cook the Shrimp

Heat a skillet over medium heat with a drizzle of olive oil. Season the shrimp with salt and pepper, then cook for about 2–3 minutes per side until pink and opaque.

Remove from the heat and allow the shrimp to cool slightly.

Step 2: Prepare the Vegetables

While the shrimp cools, dice the avocado, cucumber, and tomatoes. Thinly slice the red onion and chop the parsley.

Place everything into a large mixing bowl.

Step 3: Make the Lemon Dressing

In a small bowl, whisk together olive oil, lemon juice, minced garlic, salt, and pepper.

This simple dressing ties the entire Mediterranean shrimp and avocado salad together with bright, fresh flavor.

Step 4: Assemble the Salad

Add the cooked shrimp to the bowl with the vegetables. Pour the lemon dressing over the salad and gently toss to combine.

Top with crumbled feta cheese and fresh parsley before serving.

Tips for Perfect Mediterranean Shrimp and Avocado Salad

To make the best Mediterranean shrimp and avocado salad, keep these tips in mind:

  • Do not overcook the shrimp

  • Add avocado just before serving to keep it fresh

  • Use freshly squeezed lemon juice for the dressing

  • Chill the salad briefly for enhanced flavor

  • Taste and adjust seasoning before serving

These small steps will ensure your salad tastes bright and perfectly balanced.

What to Serve With Mediterranean Shrimp and Avocado Salad

Although this Mediterranean shrimp and avocado salad can be served as a complete meal, it also pairs beautifully with simple sides.

Consider serving it with:

  • Warm pita bread

  • Garlic flatbread

  • Mediterranean hummus

  • Lemon rice

  • Grilled vegetables

Storage Tips

Because avocado is delicate, Mediterranean shrimp and avocado salad is best enjoyed fresh.

Refrigeration

Store leftovers in an airtight container for up to 1 day.

Prevent Browning

Add a squeeze of lemon juice over the avocado to help prevent browning.

For meal prep, keep the avocado separate and add it just before serving.

Common Mistakes to Avoid

Avoid these mistakes when making Mediterranean shrimp and avocado salad:

  • Overcooking the shrimp

  • Using underripe avocados

  • Skipping seasoning

  • Adding dressing too early

Taking a few extra moments with preparation ensures the flavors stay fresh and vibrant.

FAQs About Mediterranean Shrimp and Avocado Salad

Can I use frozen shrimp?

Yes! Just thaw the shrimp completely and pat them dry before cooking.

Is this salad healthy?

Absolutely. Mediterranean shrimp and avocado salad is high in protein, healthy fats, and fresh vegetables.

Can I make this salad ahead of time?

You can prepare most ingredients ahead, but add the avocado right before serving.

What herbs work best in this salad?

Parsley, cilantro, and basil all complement the Mediterranean flavors beautifully.

Final Thoughts

This Mediterranean shrimp and avocado salad is the perfect balance of fresh, light, and satisfying. With juicy shrimp, creamy avocado, crisp vegetables, and a bright lemon dressing, it’s a dish that feels both nourishing and indulgent.

Whether you’re serving it as a quick lunch, a healthy dinner, or a refreshing dish for guests, this salad delivers incredible flavor with minimal effort. Once you try this Mediterranean shrimp and avocado salad, it may quickly become one of your favorite go-to healthy recipes.

Easy Chicken Pesto Pasta Salad (25-Minutes)

When you need a quick meal that’s fresh, flavorful, and satisfying, this Easy Chicken Pesto Pasta Salad (25-Minutes) is the perfect solution. Combining tender pasta, juicy chicken, and vibrant basil pesto, this dish delivers bright Italian-inspired flavors with very little effort.

What makes this chicken pesto pasta salad especially appealing is its versatility. It can be served as a hearty lunch, a refreshing summer dinner, or a crowd-pleasing side dish at barbecues and potlucks. The pesto coats the pasta beautifully while the chicken adds protein, turning a simple pasta salad into a complete meal.

Another reason this recipe is so popular is how quickly it comes together. With just a handful of ingredients and about 25 minutes of prep time, you can create a delicious homemade dish that feels both wholesome and gourmet.

Easy Chicken Pesto

Why You’ll Love This Easy Chicken Pesto Pasta Salad

There are plenty of pasta salad recipes out there, but this easy chicken pesto pasta salad stands out because of its bright flavor and simple preparation.

Here’s why this recipe deserves a spot in your weekly meal rotation:

  • Ready in just 25 minutes

  • Uses simple, fresh ingredients

  • Perfect for meal prep

  • Delicious served warm or cold

  • Ideal for picnics, potlucks, and quick dinners

Because the flavors improve as the salad rests, many people find that this chicken pesto pasta salad tastes even better the next day.

Ingredients for Chicken Pesto Pasta Salad

This Easy Chicken Pesto Pasta Salad (25-Minutes) uses a small list of ingredients that combine to create big flavor.

Main Ingredients

  • 12 ounces rotini or penne pasta

  • 2 cups cooked chicken (grilled, baked, or rotisserie)

  • ¾ cup basil pesto

  • 1 cup cherry tomatoes, halved

  • ½ cup mozzarella pearls

  • ¼ cup grated Parmesan cheese

  • 2 tablespoons olive oil

  • Salt and black pepper to taste

  • Optional: fresh basil leaves

Ingredient Notes

Using quality ingredients can make a big difference in the flavor of your chicken pesto pasta salad.

Here are a few helpful tips:

  • Pasta: Rotini works especially well because its spirals hold the pesto sauce.

  • Chicken: Rotisserie chicken is convenient and flavorful.

  • Pesto: Fresh basil pesto provides the most vibrant flavor.

  • Cheese: Mozzarella pearls add a creamy, mild contrast to the pesto.

For the best results, allow the pasta to cool slightly before mixing it with the pesto so the sauce stays fresh and vibrant.

Step-by-Step Instructions

Step 1: Cook the Pasta

Bring a large pot of salted water to a boil and cook the pasta according to the package instructions until al dente.

Drain the pasta and rinse briefly with cool water to stop the cooking process.

Step 2: Prepare the Chicken

If you’re not using rotisserie chicken, cook and dice or shred your chicken breast ahead of time.

Grilled or baked chicken works especially well in this easy chicken pesto pasta salad because it adds extra flavor.

Step 3: Combine the Ingredients

In a large mixing bowl, combine the cooked pasta, chicken, cherry tomatoes, and mozzarella pearls.

Add the pesto and olive oil, then gently toss everything together until evenly coated.

Step 4: Finish the Salad

Sprinkle Parmesan cheese over the pasta salad and season with salt and pepper to taste.

Top with fresh basil leaves for a beautiful presentation.

Tips for Perfect Chicken Pesto Pasta Salad

Follow these tips to make the best Easy Chicken Pesto Pasta Salad (25-Minutes) every time:

  • Cook pasta just until al dente so it stays firm

  • Use fresh pesto for maximum flavor

  • Let the pasta cool slightly before adding pesto

  • Add extra olive oil if the pasta absorbs too much sauce

  • Taste and adjust seasoning before serving

These simple techniques help create a balanced and flavorful pasta salad.

Delicious Variations

One of the best things about chicken pesto pasta salad is how easy it is to customize.

Mediterranean Style

Add olives, cucumbers, and feta cheese.

Creamy Pesto Pasta Salad

Stir in a spoonful of Greek yogurt or mayonnaise for a creamier texture.

Veggie-Loaded Version

Add roasted zucchini, spinach, or sun-dried tomatoes.

Low-Carb Option

Use chickpea pasta or another high-protein pasta alternative.

What to Serve With Chicken Pesto Pasta Salad

This Easy Chicken Pesto Pasta Salad (25-Minutes) works well as either a main dish or a side.

Here are some great serving ideas:

  • Garlic bread

  • Grilled vegetables

  • Fresh garden salad

  • Roasted asparagus

  • Lemon vinaigrette salad

Storage & Make-Ahead Tips

One of the best features of chicken pesto pasta salad is how well it stores.

Refrigeration

Store leftovers in an airtight container for up to 4 days.

Refreshing the Salad

If the pasta absorbs too much pesto, add a drizzle of olive oil or extra pesto before serving.

Meal Prep

This recipe is perfect for weekly meal prep lunches.

Common Mistakes to Avoid

Even a simple pasta salad can go wrong without the right technique.

Avoid these mistakes when making easy chicken pesto pasta salad:

  • Overcooking the pasta

  • Adding pesto to very hot pasta

  • Using too little seasoning

  • Not tossing the salad thoroughly

Paying attention to these details will help you achieve the best flavor and texture.

FAQs About Chicken Pesto Pasta Salad

Can I make chicken pesto pasta salad ahead of time?

Yes! In fact, it often tastes even better after chilling in the refrigerator for a few hours.

Can I use store-bought pesto?

Absolutely. Store-bought pesto works well, but fresh homemade pesto provides the brightest flavor.

Can I serve this pasta salad warm?

Yes. This easy chicken pesto pasta salad can be served warm, room temperature, or chilled.

What pasta works best for pesto pasta salad?

Short pasta shapes like rotini, penne, or fusilli are ideal because they hold the pesto sauce well.

Final Thoughts

This Easy Chicken Pesto Pasta Salad (25-Minutes) is a perfect example of how simple ingredients can create a flavorful and satisfying dish. With tender pasta, juicy chicken, fresh pesto, and bright vegetables, it’s a meal that feels light yet filling.

Whether you’re preparing a quick weeknight dinner, packing lunches for the week, or bringing a dish to a summer gathering, this chicken pesto pasta salad is always a crowd-pleaser.

Once you try this recipe, it will likely become one of your favorite go-to pasta salads.

BBQ Chicken Grilled Cheese – The Ultimate Cheesy Comfort Sandwich

If you love classic grilled cheese but want something heartier and packed with bold flavor, this BBQ Chicken Grilled Cheese recipe is about to become your new favorite comfort food. It combines juicy shredded chicken tossed in smoky barbecue sauce with layers of melty cheese, all sandwiched between perfectly toasted golden bread.

The beauty of this BBQ Chicken Grilled Cheese sandwich lies in its balance of flavors and textures. You get the sweetness and smokiness of barbecue sauce, the creamy richness of melted cheese, and the crispy crunch of buttered bread. Every bite feels indulgent, satisfying, and incredibly comforting.

Best of all, this recipe is quick and easy enough for busy weeknights. In about 20 minutes, you can create a restaurant-quality sandwich right in your kitchen. Whether you’re making lunch, dinner, or a weekend comfort meal, this BBQ chicken sandwich delivers big flavor with minimal effort.

 Chicken Grilled Cheese

Why You’ll Love This BBQ Chicken Grilled Cheese

There are countless grilled cheese variations out there, but this BBQ Chicken Grilled Cheese recipe stands out for its incredible flavor and satisfying texture.

Here are a few reasons people love this sandwich:

  • Ready in under 20 minutes

  • Uses simple pantry ingredients

  • Packed with smoky BBQ flavor

  • Crispy, buttery bread with melty cheese

  • Perfect for lunch, dinner, or game day

It’s also a great way to use leftover rotisserie chicken or grilled chicken, making it both convenient and delicious.

Ingredients for BBQ Chicken Grilled Cheese

This BBQ Chicken Grilled Cheese recipe uses simple ingredients that work together to create bold flavor.

Main Ingredients

  • 2 cups cooked shredded chicken

  • ½ cup barbecue sauce

  • 4 slices thick sandwich bread (sourdough or Texas toast works well)

  • 1 cup shredded cheddar cheese

  • ½ cup shredded mozzarella cheese

  • 2 tablespoons butter (softened)

  • Optional: thinly sliced red onion

  • Optional: chopped cilantro

Ingredient Notes

Choosing quality ingredients will make your BBQ Chicken Grilled Cheese sandwich even better.

  • Shredded chicken: Rotisserie chicken is quick and flavorful.

  • Barbecue sauce: Choose a smoky or honey BBQ sauce depending on your taste preference.

  • Bread: Thick bread like sourdough or brioche creates the best crispy exterior.

  • Cheese blend: Combining cheddar and mozzarella provides both flavor and stretch.

You can also experiment with cheeses like Monterey Jack, gouda, or pepper jack for different flavor profiles.

Step-by-Step Instructions

Step 1: Prepare the BBQ Chicken

In a small bowl, combine the shredded chicken with the barbecue sauce. Stir until the chicken is evenly coated.

This step ensures every bite of your BBQ Chicken Grilled Cheese is packed with smoky, tangy flavor.

Step 2: Butter the Bread

Spread softened butter on one side of each slice of bread. The butter will help create that signature crispy grilled cheese crust.

Place the bread slices butter-side down on your work surface.

Step 3: Assemble the Sandwich

On the unbuttered side of two slices of bread, add:

  • A layer of shredded cheddar cheese

  • A generous scoop of BBQ chicken

  • Optional sliced red onions

  • Mozzarella cheese on top

Place the remaining bread slices on top with the buttered side facing outward.

Step 4: Cook the Sandwich

Heat a skillet over medium heat. Place the sandwich in the skillet and cook for about 3–4 minutes per side until the bread becomes golden brown and the cheese melts.

Press gently with a spatula for even browning.

Step 5: Slice and Serve

Remove the sandwich from the skillet and let it rest for about a minute. Slice it in half and serve while the cheese is hot and gooey.

Tips for the Best BBQ Chicken Grilled Cheese

Follow these tips to make the perfect BBQ Chicken Grilled Cheese sandwich:

  • Use medium heat to prevent burning the bread before the cheese melts

  • Mix the chicken thoroughly with barbecue sauce

  • Use freshly shredded cheese for better melting

  • Press the sandwich lightly while cooking

  • Let the sandwich rest briefly before cutting

These simple steps help ensure crispy bread and perfectly melted cheese.

Delicious Variations

This BBQ Chicken Grilled Cheese recipe is easy to customize.

Spicy BBQ Chicken Grilled Cheese

Add sliced jalapeños or pepper jack cheese for heat.

Bacon BBQ Chicken Grilled Cheese

Add crispy bacon for extra smoky flavor.

Hawaiian BBQ Grilled Cheese

Add pineapple slices for a sweet and savory twist.

Ranch BBQ Chicken Grilled Cheese

Drizzle a little ranch dressing inside the sandwich for extra creaminess.

What to Serve With BBQ Chicken Grilled Cheese

This hearty BBQ Chicken Grilled Cheese sandwich pairs wonderfully with classic comfort sides.

Great serving ideas include:

  • Tomato soup

  • French fries

  • Coleslaw

  • Pickles

  • Sweet potato fries

  • Fresh green salad

Storage & Reheating Tips

Although BBQ Chicken Grilled Cheese is best enjoyed fresh, leftovers can still be saved.

Storage

Wrap the sandwich tightly and store it in the refrigerator for up to 2 days.

Reheating

Reheat in a skillet over medium heat to restore the crispy bread. Avoid microwaving if possible, as it can make the bread soggy.

Common Mistakes to Avoid

Even simple sandwiches can go wrong without the right technique.

Avoid these mistakes when making BBQ Chicken Grilled Cheese:

  • Cooking on heat that is too high

  • Using too much barbecue sauce

  • Skipping the butter on the bread

  • Not using enough cheese

Balancing the ingredients ensures the sandwich stays crispy and flavorful.

FAQs About BBQ Chicken Grilled Cheese

Can I use rotisserie chicken?

Yes! Rotisserie chicken works perfectly and saves time when making BBQ Chicken Grilled Cheese.

What cheese melts best for grilled cheese?

Cheddar, mozzarella, Monterey Jack, and gouda all melt beautifully.

Can I make this sandwich in an air fryer?

Yes. Cook the sandwich in the air fryer at 375°F for about 6–8 minutes, flipping halfway.

Can I make BBQ Chicken Grilled Cheese ahead of time?

It’s best made fresh, but you can prepare the BBQ chicken mixture ahead of time.

Final Thoughts

This BBQ Chicken Grilled Cheese recipe takes a classic grilled cheese sandwich and transforms it into something truly special. With smoky barbecue chicken, melted cheese, and crispy golden bread, it’s the kind of comfort food that feels both simple and indulgent.

Whether you’re making a quick lunch, a satisfying dinner, or a crowd-pleasing game day meal, this sandwich delivers bold flavor and irresistible texture in every bite.

Once you try this BBQ Chicken Grilled Cheese sandwich, it might just become your new favorite way to enjoy grilled cheese.

Easy Cajun Smoked Sausage Pasta Recipe – A Flavor-Packed Weeknight Dinner

If you’re craving a bold, comforting meal that comes together quickly, this Cajun smoked sausage pasta recipe is exactly what you need. Packed with smoky sausage, creamy sauce, tender pasta, and vibrant Cajun spices, this dish brings the warm flavors of Louisiana straight to your kitchen.

What makes this easy Cajun smoked sausage pasta so popular is its perfect balance of smoky, creamy, and slightly spicy flavors. The sausage adds depth, the Cajun seasoning delivers a gentle kick, and the creamy sauce ties everything together into a rich and satisfying dinner.

Even better, this recipe is ideal for busy weeknights because it’s simple, quick, and requires minimal cleanup. Most of the cooking happens in one pan, which means less time washing dishes and more time enjoying a delicious homemade meal with family or friends.

Cajun Smoked

Why You’ll Love This Cajun Smoked Sausage Pasta Recipe

There are plenty of reasons this Cajun smoked sausage pasta recipe has become a favorite comfort food dinner for many home cooks.

Here’s why it deserves a place in your weekly meal rotation:

  • Ready in about 30 minutes

  • Made in one skillet

  • Bold Cajun-inspired flavors

  • Perfect for family dinners

  • Budget-friendly ingredients

  • Easy to customize with vegetables or different proteins

Whether you’re cooking for a busy weeknight dinner or looking for a comforting pasta dish with big flavor, this easy Cajun smoked sausage pasta is guaranteed to satisfy.

Ingredients for Cajun Smoked Sausage Pasta

This Cajun smoked sausage pasta recipe uses simple pantry ingredients combined with bold seasoning for maximum flavor.

Main Ingredients

  • 12 ounces penne pasta (or similar pasta)

  • 14 ounces smoked sausage, sliced

  • 1 tablespoon olive oil

  • 1 small onion, diced

  • 3 cloves garlic, minced

  • 1 red bell pepper, sliced

  • 2 teaspoons Cajun seasoning

  • 1 cup heavy cream

  • 1 cup chicken broth

  • 1 cup shredded Parmesan cheese

  • Salt and black pepper to taste

  • Fresh parsley for garnish

Ingredient Notes

Using the right ingredients ensures your Cajun smoked sausage pasta turns out rich, flavorful, and perfectly balanced.

Here are a few helpful tips:

  • Smoked sausage like andouille works best for authentic Cajun flavor.

  • Heavy cream creates the silky texture in the sauce.

  • Cajun seasoning delivers the signature spice and smoky flavor.

  • Parmesan cheese adds depth and helps thicken the sauce.

If you enjoy spicy food, you can also add a pinch of red pepper flakes to enhance the Cajun heat.


Step-by-Step Instructions

Step 1: Cook the Pasta

Bring a large pot of salted water to a boil and cook the pasta according to the package instructions. Drain and set aside.

Step 2: Brown the Smoked Sausage

Heat olive oil in a large skillet over medium heat. Add the sliced smoked sausage and cook for 4–5 minutes until lightly browned.

Browning the sausage enhances its smoky flavor and adds depth to the dish.

Step 3: Cook the Vegetables

Add the diced onion and sliced bell pepper to the skillet. Cook for about 4 minutes until softened.

Then stir in the minced garlic and cook for another 30 seconds until fragrant.

Step 4: Build the Cajun Sauce

Sprinkle the Cajun seasoning over the sausage and vegetables. Pour in the chicken broth and heavy cream.

Let the mixture simmer for about 5 minutes so the flavors can combine and the sauce begins to thicken.

Step 5: Combine Pasta and Sauce

Add the cooked pasta to the skillet and toss everything together until the pasta is fully coated in the creamy Cajun sauce.

Stir in the Parmesan cheese and let it melt into the sauce.

Tips for Perfect Cajun Smoked Sausage Pasta

Follow these simple tips to make the best Cajun smoked sausage pasta recipe every time:

  • Brown the sausage first to enhance flavor

  • Use freshly grated Parmesan cheese for the best texture

  • Don’t overcook the pasta

  • Adjust Cajun seasoning depending on your spice preference

  • Add a splash of pasta water if the sauce becomes too thick

These small adjustments can make your pasta dish taste restaurant-quality.

Delicious Variations

One of the great things about easy Cajun smoked sausage pasta is how easy it is to customize.

Cajun Chicken Sausage Pasta

Swap smoked sausage for sliced Cajun-seasoned chicken.

Shrimp Cajun Pasta

Add shrimp during the last few minutes of cooking.

Vegetable Cajun Pasta

Add mushrooms, zucchini, or spinach for extra nutrition.

Extra Creamy Cajun Pasta

Stir in a few ounces of cream cheese for a richer sauce.

What to Serve With Cajun Smoked Sausage Pasta

This Cajun smoked sausage pasta recipe pairs wonderfully with simple side dishes.

Try serving it with:

  • Garlic bread

  • Caesar salad

  • Roasted broccoli

  • Cornbread

  • Fresh garden salad

These sides balance the richness of the pasta and create a complete meal.

Storage & Reheating Tips

Leftover Cajun smoked sausage pasta stores well and tastes even better the next day.

Refrigeration

Store leftovers in an airtight container for up to 4 days.

Freezing

Freeze the pasta in a freezer-safe container for up to 2 months.

Reheating

Reheat gently in a skillet or microwave with a splash of cream or broth to loosen the sauce.

Common Mistakes to Avoid

Avoid these common mistakes when making Cajun smoked sausage pasta:

  • Overcooking the pasta

  • Using low-quality sausage

  • Adding too much Cajun seasoning

  • Skipping the browning step for the sausage

Paying attention to these details will greatly improve the flavor and texture of the dish.

FAQs About Cajun Smoked Sausage Pasta

What sausage works best for Cajun pasta?

Andouille sausage is the most traditional option because it has a smoky and spicy flavor.

Is Cajun smoked sausage pasta spicy?

It has a mild to moderate spice level, but you can easily adjust the heat by adding more or less Cajun seasoning.

Can I make this pasta ahead of time?

Yes, you can cook it ahead and reheat it later with a little cream or broth to refresh the sauce.

Can I use a different pasta shape?

Absolutely. Penne, rigatoni, or rotini all work well with this creamy Cajun sauce.

Final Thoughts

This Cajun smoked sausage pasta recipe is a perfect example of how simple ingredients can create bold, comforting flavors. With smoky sausage, creamy sauce, and just the right amount of Cajun spice, it’s a dish that feels both satisfying and exciting.

Best of all, it’s quick enough for weeknight dinners but flavorful enough to serve when entertaining guests. Once you try this easy Cajun smoked sausage pasta, it will likely become one of your favorite go-to pasta recipes.

Salisbury Steak Meatballs Recipe – Easy Comfort Food Dinner

If you’re looking for a cozy, satisfying dinner that the whole family will love, this Salisbury steak meatballs recipe is exactly what you need. Inspired by the classic American comfort dish, these juicy beef meatballs are simmered in a rich, savory onion gravy that tastes like it came straight from grandma’s kitchen.

Traditional Salisbury steak is usually served as a large beef patty, but transforming it into tender Salisbury steak meatballs makes the dish even more versatile and fun to serve. The meatballs soak up the flavorful gravy beautifully, making every bite incredibly delicious.

This recipe is perfect for busy weeknights because it uses simple ingredients and comes together in about 40 minutes. Whether you serve it over creamy mashed potatoes, buttered noodles, or fluffy rice, this dish delivers classic comfort food flavor that feels both nostalgic and satisfying.

Salisbury Steak

Why You’ll Love This Salisbury Steak Meatballs Recipe

There are plenty of reasons this Salisbury steak meatballs recipe has become a favorite comfort food meal for home cooks across America.

Here’s why you’ll want to make it again and again:

  • Easy one-pan dinner recipe

  • Juicy, flavorful beef meatballs

  • Rich homemade onion gravy

  • Ready in under 45 minutes

  • Perfect for family dinners or meal prep

Unlike many complicated comfort food dishes, these Salisbury steak meatballs deliver deep, savory flavor with minimal effort.

Ingredients for Salisbury Steak Meatballs

This Salisbury steak meatballs recipe uses pantry staples that create classic comfort food flavor.

For the Meatballs

  • 1 pound ground beef

  • ½ cup breadcrumbs

  • 1 large egg

  • ¼ cup milk

  • 1 teaspoon garlic powder

  • 1 teaspoon onion powder

  • ½ teaspoon salt

  • ½ teaspoon black pepper

  • 1 tablespoon Worcestershire sauce

  • 2 tablespoons finely chopped parsley (optional)

For the Onion Gravy

  • 2 tablespoons butter

  • 1 medium onion, thinly sliced

  • 2 tablespoons all-purpose flour

  • 2 cups beef broth

  • 1 tablespoon Worcestershire sauce

  • ½ teaspoon salt

  • ½ teaspoon black pepper

Ingredient Notes

Using the right ingredients helps elevate your Salisbury steak meatballs from ordinary to truly memorable.

Here are a few tips:

  • Ground beef (80/20) works best for juicy meatballs.

  • Worcestershire sauce adds deep savory flavor to both the meatballs and gravy.

  • Beef broth creates a rich, classic Salisbury steak taste.

  • Breadcrumbs and milk keep the meatballs soft and tender.

Fresh onions are also essential because they caramelize slightly and create the signature gravy flavor that makes Salisbury steak so comforting.

Step-by-Step Instructions

Step 1: Prepare the Meatball Mixture

In a large mixing bowl, combine the ground beef, breadcrumbs, egg, milk, garlic powder, onion powder, salt, pepper, Worcestershire sauce, and parsley.

Mix gently until just combined. Avoid overmixing, which can make the meatballs tough.

Step 2: Form the Meatballs

Shape the mixture into medium-sized meatballs, about 1½ inches in diameter. This recipe typically makes 16–18 meatballs.

Place them on a plate or baking sheet while you prepare the skillet.

Step 3: Brown the Meatballs

Heat a large skillet over medium heat and add a tablespoon of oil. Brown the meatballs on all sides for about 6–8 minutes.

They do not need to be fully cooked yet since they will finish cooking in the gravy.

Step 4: Cook the Onions

Remove the meatballs and set them aside. In the same skillet, melt the butter and add the sliced onions.

Cook for 5–6 minutes until the onions become soft and lightly caramelized.

Step 5: Make the Gravy

Sprinkle the flour over the onions and stir for about one minute. Slowly whisk in the beef broth and Worcestershire sauce.

Let the mixture simmer until the gravy thickens.

Step 6: Finish the Dish

Return the meatballs to the skillet and simmer in the gravy for about 10 minutes until fully cooked.

The meatballs will absorb the delicious savory sauce, making them incredibly flavorful.

Tips for Perfect Salisbury Steak Meatballs

Follow these simple tips to ensure your Salisbury steak meatballs recipe turns out perfect every time:

  • Use fresh ground beef for the best flavor

  • Don’t overmix the meatball mixture

  • Brown the meatballs before adding them to the gravy

  • Let the gravy simmer long enough to thicken properly

  • Taste and adjust seasoning at the end

These small steps make a big difference in achieving restaurant-quality comfort food.

Delicious Variations

Once you master the classic Salisbury steak meatballs recipe, you can easily customize it.

Mushroom Gravy Version

Add sliced mushrooms to the onions while making the gravy.

Turkey Salisbury Meatballs

Substitute ground turkey for a lighter version.

Creamy Salisbury Meatballs

Add a splash of heavy cream to the gravy for extra richness.

Slow Cooker Version

Brown the meatballs first, then cook everything in a slow cooker on low for 4 hours.

What to Serve With Salisbury Steak Meatballs

These Salisbury steak meatballs pair beautifully with many classic side dishes.

Popular serving ideas include:

  • Creamy mashed potatoes

  • Buttered egg noodles

  • Steamed white rice

  • Roasted vegetables

  • Homemade dinner rolls

The gravy makes these sides even more delicious.

Storage & Reheating Tips

One of the best things about this Salisbury steak meatballs recipe is that it stores and reheats wonderfully.

Refrigeration

Store leftovers in an airtight container for up to 4 days.

Freezing

Freeze cooked meatballs and gravy for up to 3 months.

Reheating

Reheat gently in a skillet or microwave until warmed through. Add a splash of beef broth if the gravy thickens too much.

Common Mistakes to Avoid

Avoid these common mistakes when making Salisbury steak meatballs:

  • Overmixing the meatball mixture

  • Using very lean beef

  • Skipping the browning step

  • Not thickening the gravy properly

Taking the time to follow each step ensures rich flavor and perfectly tender meatballs.

FAQs About Salisbury Steak Meatballs

What is Salisbury steak made of?

Traditional Salisbury steak is made from seasoned ground beef mixed with breadcrumbs and spices, served with brown onion gravy.

Can I make Salisbury steak meatballs ahead of time?

Yes! You can prepare the meatballs a day ahead and store them in the refrigerator until ready to cook.

Can I freeze Salisbury steak meatballs?

Absolutely. Both the meatballs and gravy freeze well for up to three months.

How do I make the gravy thicker?

Simmer the gravy longer or add a small slurry of cornstarch and water.


Final Thoughts

This Salisbury steak meatballs recipe is the perfect example of classic American comfort food made simple. Juicy beef meatballs simmered in a rich onion gravy create a warm, hearty meal that’s perfect for weeknight dinners or cozy family gatherings.

With simple ingredients, easy preparation, and incredible flavor, this dish is guaranteed to become a regular favorite in your kitchen.

Once you try these homemade Salisbury steak meatballs, you’ll understand why they’re such a beloved comfort food classic.

Bakery-Style Ultra Thick Chocolate Chip Cookies

There’s something magical about biting into a bakery-style ultra thick chocolate chip cookie. The crisp golden edges, the soft and gooey center, and the rich pockets of melted chocolate create a cookie experience that feels indulgent and unforgettable. If you’ve ever wondered how bakeries achieve those perfectly thick cookies that look as good as they taste, this recipe will show you exactly how.

This bakery-style ultra thick chocolate chip cookies recipe is designed to deliver that same bakery-quality texture at home. Each cookie is generously sized, beautifully thick, and loaded with chocolate chips in every bite. Unlike thin or overly crispy cookies, these stay soft in the middle with just the right amount of chewiness.

Whether you’re baking for a family gathering, holiday cookie tray, or simply satisfying a sweet craving, this recipe guarantees cookies that look and taste like they came straight from a professional bakery.

Bakery-Style

Why You’ll Love These Bakery-Style Chocolate Chip Cookies

These bakery-style ultra thick chocolate chip cookies stand out from ordinary cookie recipes because of their incredible texture and flavor. They’re rich, buttery, and perfectly balanced between soft and chewy.

Here are a few reasons why home bakers love this recipe:

  • Thick, bakery-style cookies with soft centers

  • Loaded with rich chocolate chips

  • Crisp edges with a gooey interior

  • Easy-to-follow recipe with consistent results

  • Perfect for freezing or make-ahead baking

Once you try these ultra thick chocolate chip cookies, they’ll likely become your go-to cookie recipe for years to come.

Ingredients for Bakery-Style Ultra Thick Chocolate Chip Cookies

This bakery-style chocolate chip cookie recipe uses classic ingredients that create a rich, flavorful dough.

Cookie Dough Ingredients

  • 3 cups all-purpose flour

  • 1 teaspoon baking soda

  • 1 teaspoon baking powder

  • 1 teaspoon salt

  • 1 cup unsalted butter, cold and cubed

  • 1 cup brown sugar

  • ½ cup granulated sugar

  • 2 large eggs

  • 2 teaspoons vanilla extract

  • 2 cups semi-sweet chocolate chips

  • Optional: ½ cup chocolate chunks for extra richness

Ingredient Notes

Choosing the right ingredients is key to achieving perfect bakery-style ultra thick chocolate chip cookies.

A few important tips:

  • Cold butter helps create thicker cookies that don’t spread too much.

  • Brown sugar adds moisture and chewiness.

  • High-quality chocolate chips or chunks improve flavor dramatically.

  • Extra flour contributes to the thick bakery-style structure.

Using these ingredient techniques ensures your cookies bake tall, soft, and beautifully golden.

Step-by-Step Instructions

Step 1: Mix the Dry Ingredients

In a medium bowl, whisk together the flour, baking soda, baking powder, and salt. Set the mixture aside.

Step 2: Cream the Butter and Sugars

In a large mixing bowl, beat the cold butter, brown sugar, and granulated sugar until the mixture becomes light and fluffy.

Step 3: Add Eggs and Vanilla

Mix in the eggs one at a time, then add the vanilla extract. Beat until smooth and well combined.

Step 4: Combine the Ingredients

Gradually add the dry ingredients to the wet mixture. Mix until a thick cookie dough forms.

Fold in the chocolate chips and optional chocolate chunks.

Step 5: Shape the Cookies

Form large dough balls—about 3 tablespoons each—to create thick bakery-style cookies.

Place them on a parchment-lined baking sheet with plenty of space between them.

Step 6: Chill the Dough

Refrigerate the dough balls for 30–60 minutes. This step helps the cookies stay thick during baking.

Step 7: Bake the Cookies

Bake at 400°F (200°C) for 10–12 minutes until the edges are golden but the centers remain soft.

Tips for Perfect Bakery-Style Cookies

To achieve perfect bakery-style ultra thick chocolate chip cookies, keep these baking tips in mind:

  • Chill the dough before baking

  • Use large dough balls for thicker cookies

  • Slightly underbake for soft centers

  • Use parchment paper to prevent sticking

  • Sprinkle a pinch of sea salt on top for extra flavor

These small tricks make a huge difference in texture and taste.

Delicious Variations

One of the best things about bakery-style chocolate chip cookies is how easy they are to customize.

Double Chocolate Cookies

Add cocoa powder to the dough and mix in dark chocolate chips.

Nutty Chocolate Chip Cookies

Add chopped walnuts or pecans for crunch.

Caramel Chocolate Cookies

Add caramel bits for a gooey surprise center.

Dark Chocolate Lovers

Use dark chocolate chunks instead of semi-sweet chips.

These variations help keep this recipe exciting every time you bake.

What to Serve With These Cookies

These bakery-style ultra thick chocolate chip cookies pair wonderfully with classic dessert beverages.

Try serving them with:

  • Cold milk

  • Hot coffee

  • Vanilla ice cream

  • Hot chocolate

  • A homemade milkshake

Together they create the ultimate comforting dessert experience.

Storage & Reheating Tips

If you somehow have leftover bakery-style chocolate chip cookies, they store very well.

Storage

  • Room temperature: up to 4 days in an airtight container

  • Refrigerator: up to 1 week

Freezing

Freeze baked cookies or raw dough balls for up to 3 months.

Reheating

Warm cookies in the microwave for 10–15 seconds to restore their gooey center.

Common Mistakes to Avoid

Even simple cookie recipes can go wrong without the right technique.

Avoid these common baking mistakes:

  • Skipping the dough chilling step

  • Overmixing the dough

  • Using warm butter instead of cold

  • Overbaking the cookies

Following the recipe carefully ensures your cookies stay thick, soft, and bakery-quality.


FAQs About Bakery-Style Chocolate Chip Cookies

Why are my chocolate chip cookies flat?

This usually happens if the butter is too warm or the dough wasn’t chilled before baking.

Can I freeze the cookie dough?

Yes! Freeze the dough balls and bake directly from frozen—just add 1–2 extra minutes of baking time.

How do I make cookies extra thick?

Use large dough balls, chill the dough, and bake at a slightly higher temperature.

What chocolate works best?

High-quality semi-sweet or dark chocolate chips create the best flavor and texture.

Final Thoughts

These bakery-style ultra thick chocolate chip cookies are the ultimate homemade cookie experience. With crisp edges, soft centers, and rich melted chocolate in every bite, they bring bakery-quality results straight to your kitchen.

Whether you’re baking for family, friends, or simply satisfying your sweet tooth, this recipe delivers cookies that look impressive and taste even better.

Once you try this recipe, you’ll understand why it’s considered one of the best bakery-style chocolate chip cookie recipes you can make at home.

Nachos With Beer Cheese Sauce Recipe (Ultimate Game Day Snack)

Few snacks are as crowd-pleasing and satisfying as a big plate of nachos with beer cheese sauce. Crispy tortilla chips piled high and smothered in creamy, rich beer cheese create the perfect combination of crunch, flavor, and indulgence. Whether you’re hosting a game-day party, preparing a casual family snack, or looking for a quick appetizer, this nachos with beer cheese sauce recipe delivers bold flavor in every bite.

The star of the dish is the velvety beer cheese sauce. Made with sharp cheddar, smooth butter, and your favorite beer, it adds a deep savory flavor that pairs perfectly with crunchy tortilla chips and classic nacho toppings. The result is a dish that tastes like something you’d order at your favorite sports bar—only better because it’s homemade.

Nachos With Beer

Why You’ll Love This Nachos With Beer Cheese Sauce Recipe

This nachos with beer cheese sauce recipe stands out because it balances simplicity with incredible flavor. The homemade beer cheese sauce is smooth, rich, and incredibly easy to make in just a few minutes.

Here are a few reasons you’ll love this recipe:

  • Quick and easy appetizer ready in under 30 minutes

  • Creamy homemade beer cheese sauce

  • Perfect for game day, parties, or movie nights

  • Customizable with your favorite toppings

  • Restaurant-quality flavor made at home

Once you make these nachos with beer cheese sauce, they’ll quickly become one of your go-to snacks for entertaining or casual gatherings.

Ingredients for Nachos With Beer Cheese Sauce

This nachos with beer cheese sauce recipe uses simple ingredients that come together for bold flavor.

For the Nachos

  • 1 large bag tortilla chips

  • 1 cup diced tomatoes

  • ½ cup sliced jalapeños

  • ½ cup sliced green onions

  • ½ cup sour cream (optional)

  • ½ cup cooked ground beef or shredded chicken (optional)

For the Beer Cheese Sauce

  • 2 tablespoons butter

  • 2 tablespoons all-purpose flour

  • 1 cup beer (lager or pale ale works well)

  • 1 cup whole milk

  • 2 cups shredded sharp cheddar cheese

  • ½ teaspoon garlic powder

  • ½ teaspoon paprika

  • Salt and pepper to taste

Ingredient Notes

The quality of your ingredients plays a big role in how flavorful your nachos with beer cheese sauce will be.

A few helpful tips:

  • Sharp cheddar cheese provides the best flavor and melts beautifully.

  • Lager or pale ale adds depth without overpowering the sauce.

  • Freshly shredded cheese melts smoother than pre-shredded varieties.

  • Sturdy tortilla chips hold up better under the rich cheese sauce.

Using fresh ingredients ensures your nachos stay crispy while the beer cheese sauce remains silky and smooth.

Step-by-Step Instructions

Step 1: Prepare the Beer Cheese Sauce

In a medium saucepan, melt the butter over medium heat. Add the flour and whisk continuously for about 1 minute to create a roux.

Slowly pour in the beer while whisking to prevent lumps. Then add the milk and continue whisking until the mixture thickens slightly.

Step 2: Add the Cheese

Lower the heat and gradually add the shredded cheddar cheese, stirring until melted and smooth. Stir in garlic powder, paprika, salt, and pepper.

Step 3: Assemble the Nachos

Spread tortilla chips evenly on a large serving platter or baking sheet. Top with diced tomatoes, jalapeños, and any optional toppings like ground beef or chicken.

Step 4: Pour the Beer Cheese Sauce

Drizzle the warm beer cheese sauce generously over the chips and toppings.

Step 5: Garnish and Serve

Finish the nachos with green onions and a dollop of sour cream. Serve immediately while the cheese sauce is warm and creamy.

Tips for Perfect Nachos With Beer Cheese Sauce

Follow these tips to make the best nachos with beer cheese sauce recipe every time:

  • Use freshly shredded cheese for smoother sauce

  • Keep heat low when melting cheese to avoid grainy texture

  • Serve immediately so chips stay crispy

  • Layer toppings evenly for balanced flavor

  • Warm the serving dish slightly to keep nachos hot longer

These small tricks help create nachos that taste just like your favorite restaurant appetizer.

Delicious Variations

One of the best parts of making nachos with beer cheese sauce is how easy they are to customize.

BBQ Chicken Nachos

Top with shredded BBQ chicken and red onions.

Spicy Jalapeño Nachos

Add extra jalapeños and hot sauce to the beer cheese sauce.

Loaded Steak Nachos

Add grilled steak slices and caramelized onions.

Vegetarian Nachos

Use black beans, corn, avocado, and fresh salsa.

These variations make it easy to turn this recipe into a new flavor experience every time.

What to Serve With Nachos

Although nachos with beer cheese sauce are satisfying on their own, they pair wonderfully with other party foods.

Try serving them with:

  • Fresh guacamole

  • Salsa or pico de gallo

  • Chicken wings

  • Fresh lime margaritas

  • Cold craft beer

Together, these dishes create the perfect game-day snack spread.

Storage & Reheating Tips

If you have leftovers from this nachos with beer cheese sauce recipe, store components separately for best results.

Storage

  • Beer cheese sauce: refrigerate up to 4 days

  • Nacho toppings: store in airtight containers

Reheating

Reheat the beer cheese sauce gently on the stovetop or microwave while stirring to maintain a smooth texture.

Add a splash of milk if the sauce becomes too thick.

Common Mistakes to Avoid

Even simple nacho recipes can go wrong without the right technique.

Avoid these common mistakes:

  • Overheating cheese sauce (causes grainy texture)

  • Using thin chips that break easily

  • Pouring sauce too early before serving

  • Adding too many toppings that weigh down chips

Keeping these tips in mind ensures your nachos with beer cheese sauce stay crispy and flavorful.

FAQs About Nachos With Beer Cheese Sauce

What kind of beer is best for beer cheese sauce?

Lagers and pale ales work best because they add flavor without overwhelming the cheese.

Can I make beer cheese sauce without alcohol?

Yes. Substitute the beer with chicken broth or milk for a similar creamy consistency.

How do I keep nachos from getting soggy?

Add the beer cheese sauce right before serving and use thick tortilla chips.

Can I make beer cheese sauce ahead of time?

Absolutely. Store it in the refrigerator and gently reheat when ready to use.


Final Thoughts

This nachos with beer cheese sauce recipe is everything you want in the ultimate snack—crispy, cheesy, bold, and incredibly satisfying. The homemade beer cheese sauce adds rich flavor that turns simple tortilla chips into an unforgettable appetizer.

Whether you’re preparing for game day, movie night, or a casual party, these nachos are guaranteed to be a hit. With endless topping possibilities and easy preparation, this recipe is one you’ll want to make again and again.