Tater Tot Breakfast Casserole – Easy, Cheesy & Perfect for Busy Mornings

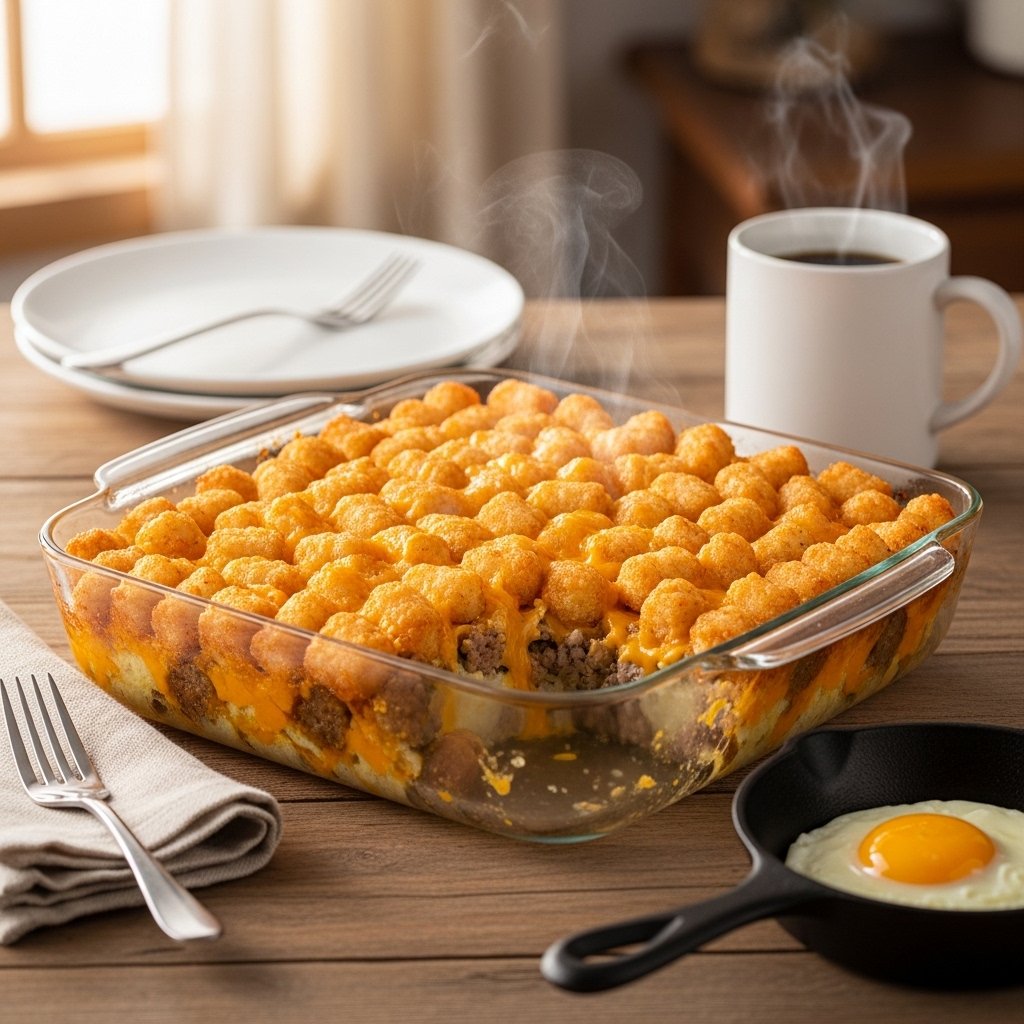
If you’re searching for a breakfast that’s easy, filling, and guaranteed to make everyone at the table happy, this Tater Tot Breakfast Casserole is exactly what you need. It combines crispy golden tater tots, savory breakfast sausage, fluffy eggs, and melted cheese into one irresistible baked dish.

This tater tot breakfast casserole recipe is perfect for busy mornings, weekend brunch, holiday gatherings, or meal prep for the week. It’s simple to assemble, budget-friendly, and always delivers comforting, crowd-pleasing flavor.

Why You’ll Love This Tater Tot Breakfast Casserole

This Tater Tot Breakfast Casserole is a family favorite for many reasons:

  • Easy one-pan breakfast recipe
  • Perfect for feeding a crowd
  • Budget-friendly ingredients
  • Great for make-ahead meal prep
  • Crispy, cheesy, and incredibly satisfying

It’s the kind of recipe you’ll make again and again.
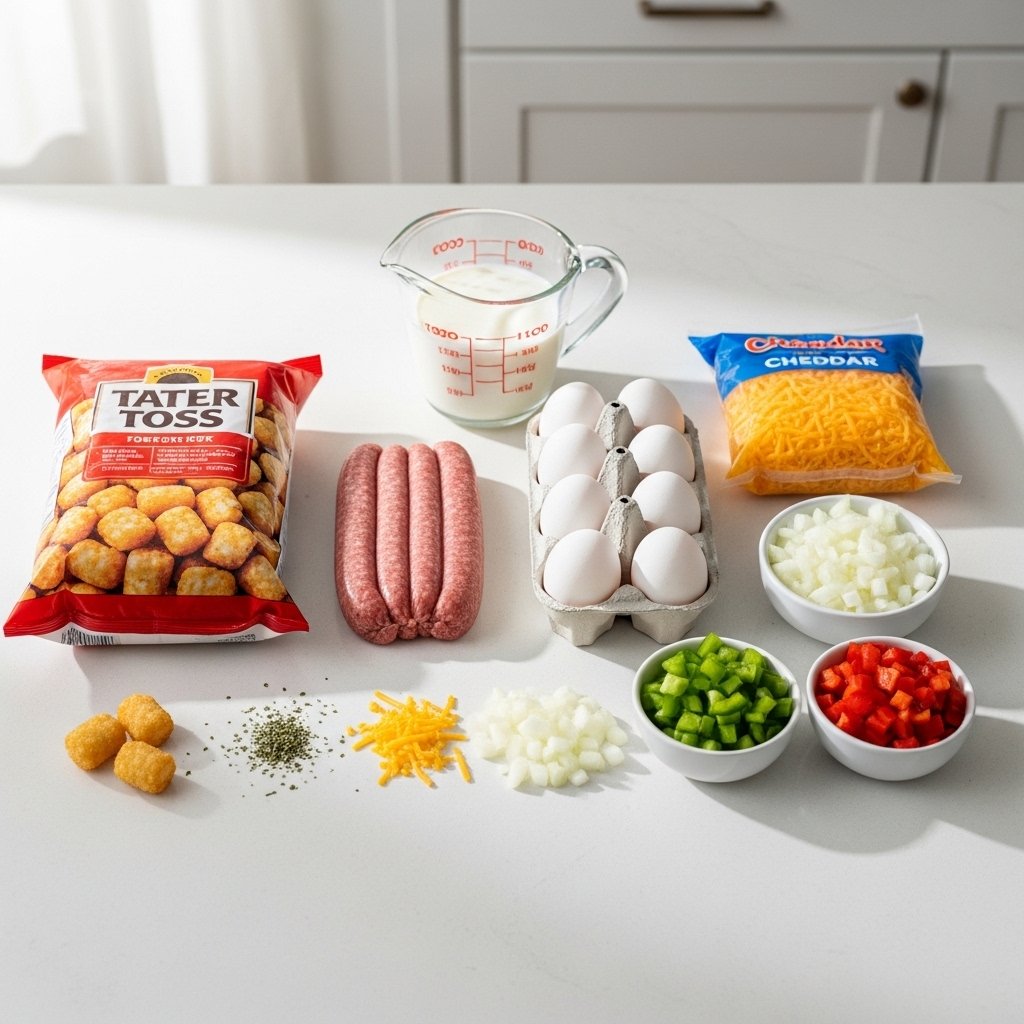
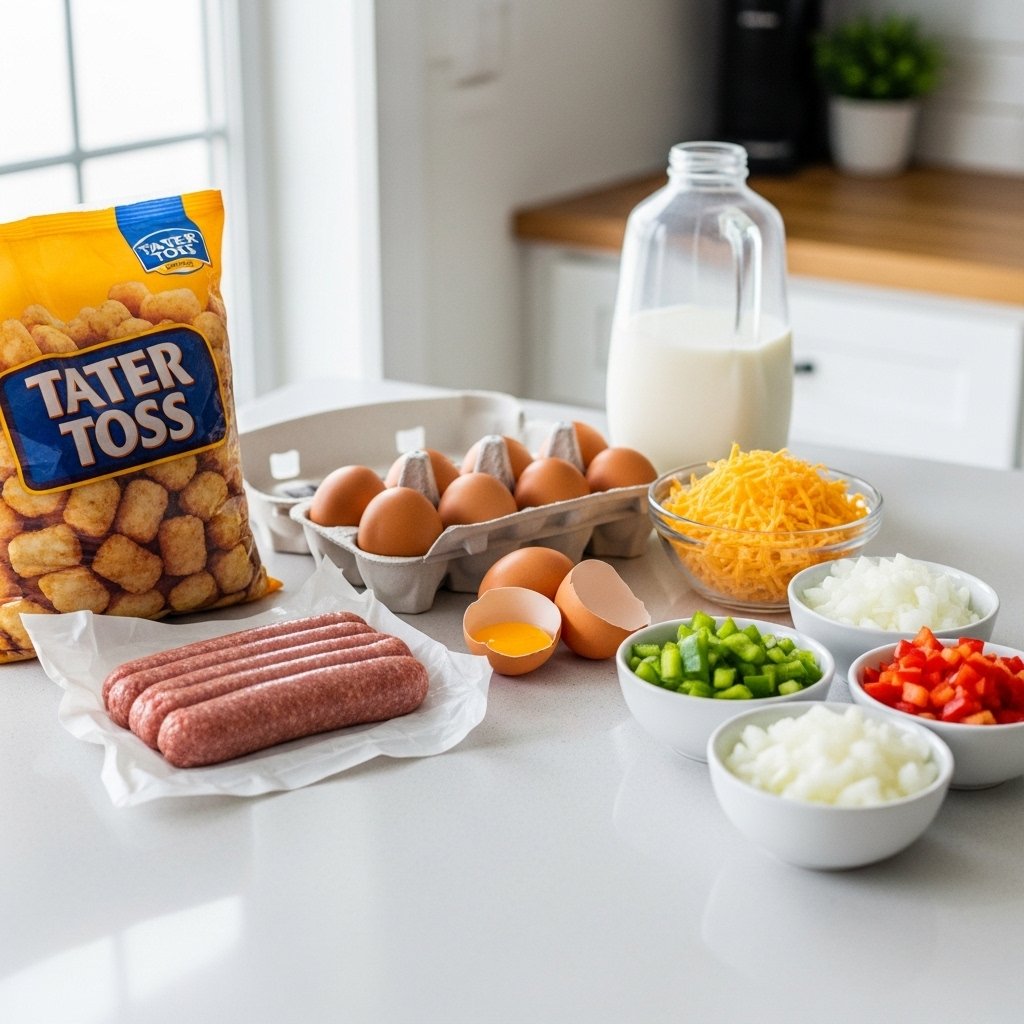
Ingredients

To make this tater tot breakfast casserole recipe, you’ll need:

  • 1 bag (32 oz) frozen tater tots
  • 1 lb breakfast sausage (or bacon)
  • 8 large eggs
  • 2 cups shredded cheddar cheese
  • 1 cup milk
  • 1/2 onion, diced
  • 1/2 bell pepper, diced
  • Salt and pepper to taste
  • Optional: green onions for garnish

Ingredient Notes

Tater Tots

Frozen tater tots are key for that crispy, golden top layer.

Sausage

Breakfast sausage adds rich, savory flavor, but bacon or ham also work well.

Cheese

Cheddar is classic, but mixing cheeses makes it extra creamy and flavorful.

Step-by-Step Instructions

1. Preheat Oven

Preheat oven to 375°F and grease a baking dish.

2. Cook Sausage

Brown sausage in a skillet and drain excess grease.

3. Mix Egg Base

Whisk together eggs, milk, salt, and pepper.

4. Assemble Casserole

Layer sausage, vegetables, cheese, and tater tots in baking dish.

5. Add Egg Mixture

Pour egg mixture evenly over everything.

6. Bake

Bake for 40–45 minutes until eggs are set and top is golden.

Tips for Perfect Results

To make the best Tater Tot Breakfast Casserole, follow these tips:

  • Don’t thaw tater tots before baking
  • Fully cook sausage before adding
  • Use freshly shredded cheese for best melt
  • Let casserole rest before slicing
  • Bake until eggs are fully set

These small steps make a big difference in texture and flavor.

Variations

This tater tot breakfast casserole recipe is very flexible:

Vegetarian Version

Skip meat and add mushrooms, spinach, or zucchini.

Spicy Version

Add jalapeños or hot sauce for heat.
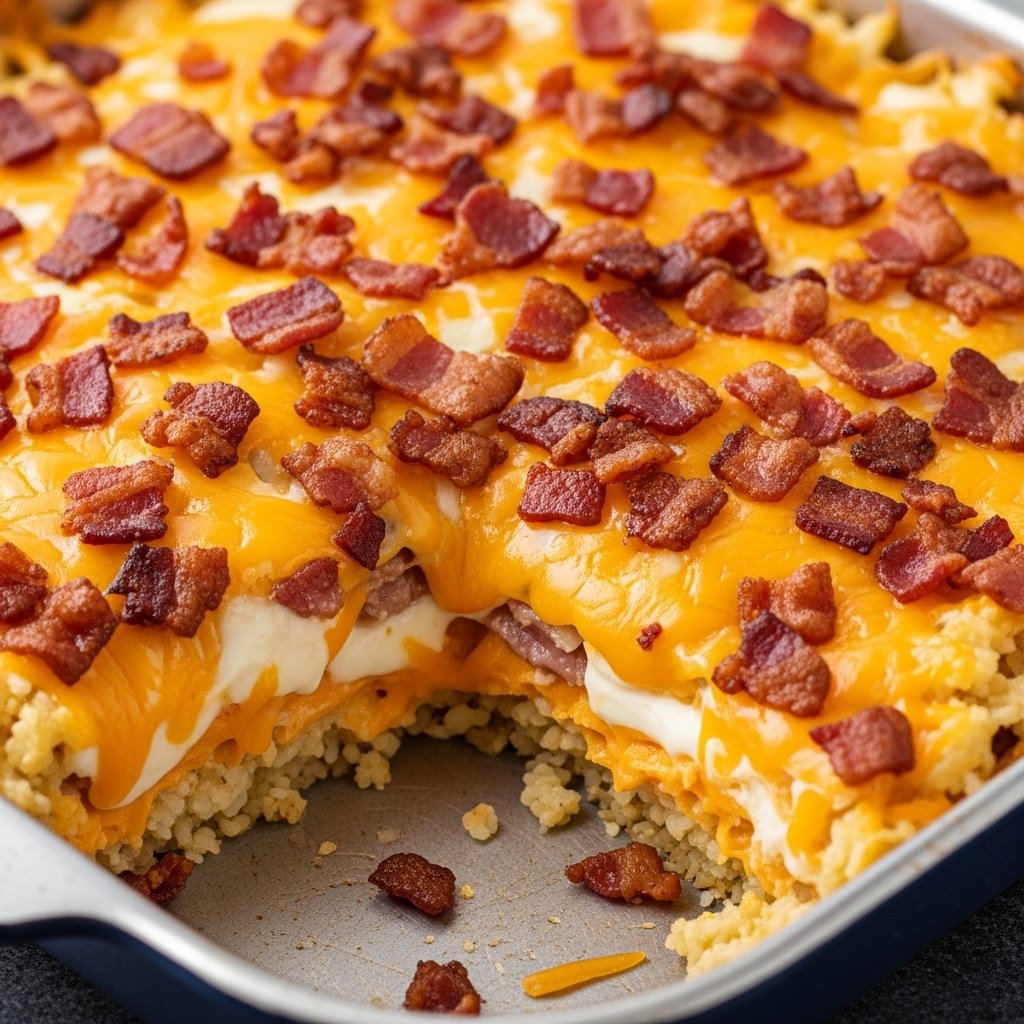
Loaded Version

Add bacon, extra cheese, and sour cream topping.

Southwest Style

Add black beans, corn, and taco seasoning.

What to Serve With It

This Tater Tot Breakfast Casserole pairs well with:

  • Fresh fruit salad
  • Toast or biscuits
  • Orange juice or coffee
  • Yogurt parfaits

It’s a complete breakfast that doesn’t need much else.

Storage & Reheating

  • Refrigerator: Store up to 4 days
  • Freezer: Freeze up to 2 months
  • Reheat: Oven or microwave until warmed through

For best texture, reheat in the oven when possible.

Common Mistakes to Avoid

When making tater tot breakfast casserole, avoid:

  • Overloading with liquid
  • Not cooking meat first
  • Cutting before it sets
  • Overbaking and drying out eggs

Avoiding these ensures perfect results every time.

FAQs

Can I make Tater Tot Breakfast Casserole ahead of time?

Yes, assemble it the night before and bake in the morning.

Can I use different meats?

Yes, bacon, ham, or turkey sausage all work.

How do I know it’s done baking?

The eggs should be fully set and the top golden brown.

Can I freeze leftovers?

Yes, it freezes and reheats very well.

Final Thoughts

This Tater Tot Breakfast Casserole is the ultimate comfort breakfast—easy, cheesy, and packed with flavor. It’s perfect for busy mornings, family gatherings, or meal prep for the week.

Once you try it, it will quickly become a regular in your breakfast rotation.

Tater Tot Breakfast Casserole – Easy, Cheesy & Crowd-Pleasing

If you’re looking for a hearty, comforting breakfast that’s easy to prepare and guaranteed to please a crowd, this Tater Tot Breakfast Casserole is the answer. Packed with crispy tater tots, fluffy eggs, savory sausage, and melted cheese, it’s the ultimate morning comfort food.

This tater tot breakfast casserole recipe is perfect for busy mornings, weekend brunches, or holiday gatherings. It’s simple to assemble, can be made ahead of time, and bakes into a golden, bubbly dish everyone will love.

Why You’ll Love This Tater Tot Breakfast Casserole

This Tater Tot Breakfast Casserole is a go-to recipe for so many reasons:

  • Easy one-dish meal
  • Perfect for meal prep or feeding a crowd
  • Crispy, cheesy, and full of flavor
  • Customizable with your favorite ingredients
  • Great for breakfast, brunch, or even dinner

It’s comfort food at its finest with minimal effort.

Ingredients

Here’s everything you need for this tater tot breakfast casserole recipe:

  • 1 bag (32 oz) frozen tater tots
  • 1 lb breakfast sausage (or bacon)
  • 8 large eggs
  • 2 cups shredded cheddar cheese
  • 1 cup milk
  • 1/2 cup diced onion
  • 1/2 cup diced bell peppers
  • Salt and pepper to taste
  • Optional: green onions for garnish

Ingredient Notes

Tater Tots

Frozen tater tots provide a crispy, golden topping and soft interior.

Protein Options

Sausage is classic, but bacon, ham, or even vegetarian substitutes work well.

Cheese

Cheddar is a favorite, but feel free to mix in Monterey Jack or mozzarella.

Step-by-Step Instructions

1. Preheat Oven

Preheat to 375°F and grease a casserole dish.

2. Cook Sausage

Brown sausage in a skillet and drain excess grease.

3. Prepare Egg Mixture

Whisk eggs, milk, salt, and pepper.

4. Assemble Casserole

Layer sausage, vegetables, cheese, and tater tots.

5. Pour Egg Mixture

Evenly pour over the top.

6. Bake

Bake for 40–45 minutes until golden and set.

Tips for Perfect Results

To make the best Tater Tot Breakfast Casserole, keep these tips in mind:

  • Don’t thaw tater tots before baking
  • Cook sausage fully before adding
  • Use full-fat cheese for better melting
  • Let casserole rest before slicing
  • Bake until eggs are fully set

These tips ensure perfect texture and flavor.

Variations

This tater tot breakfast casserole recipe is easy to customize:

Vegetarian Version

Skip meat and add mushrooms or spinach.

Spicy Version

Add jalapeños or hot sauce.

Southwest Style

Add black beans, corn, and taco seasoning.

Loaded Version

Add bacon, extra cheese, and sour cream topping.

What to Serve With It

This Tater Tot Breakfast Casserole pairs well with:

  • Fresh fruit
  • Toast or biscuits
  • Orange juice or coffee
  • Side salad for brunch

It’s a complete meal that works for any time of day.

Storage & Reheating

  • Refrigerator: Store up to 4 days
  • Freezer: Freeze portions up to 2 months
  • Reheating: Warm in oven or microwave

Add a splash of milk when reheating to keep it moist.

Common Mistakes to Avoid

When making tater tot breakfast casserole, avoid:

  • Using too much liquid
  • Not cooking meat beforehand
  • Overbaking (can dry out eggs)
  • Cutting before it sets

Avoiding these ensures the perfect casserole every time.

FAQs

Can I make this ahead of time?

Yes, assemble it the night before and bake in the morning.

Can I use bacon instead of sausage?

Absolutely, bacon works great.

How do I know it’s done?

The eggs should be fully set and the top golden.

Can I freeze leftovers?

Yes, it freezes and reheats well.

Final Thoughts

This Tater Tot Breakfast Casserole is the ultimate comfort breakfast—easy, hearty, and packed with flavor. Whether you’re feeding your family or hosting brunch, it’s a reliable, crowd-pleasing dish.

Once you try it, this recipe will quickly become a staple in your kitchen.

Ultimate Four Cheese Grilled Cheese Sandwich – Crispy, Gooey & Irresistible

There’s grilled cheese… and then there’s the Ultimate Four Cheese Grilled Cheese Sandwich. This is not your average sandwich—it’s a next-level comfort food experience packed with layers of rich, melty cheese and perfectly golden, crispy bread.

If you’re craving something indulgent yet easy to make, this four cheese grilled cheese sandwich delivers everything you want. It’s creamy, gooey, crunchy, and unbelievably satisfying in every bite.

Why You’ll Love This Ultimate Four Cheese Grilled Cheese Sandwich

This Ultimate Four Cheese Grilled Cheese Sandwich is a dream for cheese lovers.

  • Extra cheesy and ultra gooey
  • Crispy, buttery golden crust
  • Simple ingredients with big flavor
  • Ready in under 15 minutes
  • Perfect comfort food for any time

It’s everything you love about grilled cheese—just better.

Ingredients

Here’s what you’ll need for the ultimate four cheese grilled cheese sandwich:

  • 2 slices of thick bread (sourdough or white)
  • 1 tablespoon butter (softened)
  • 1/4 cup shredded cheddar cheese
  • 1/4 cup shredded mozzarella
  • 1/4 cup shredded Monterey Jack
  • 1/4 cup grated Parmesan cheese

Optional:

  • Garlic powder
  • Fresh herbs
  • Tomato slices

Ingredient Notes

Cheese Blend

The magic of this four cheese grilled cheese sandwich comes from combining cheeses:

  • Cheddar for sharp flavor
  • Mozzarella for stretchiness
  • Monterey Jack for creaminess
  • Parmesan for depth and saltiness

Bread Choice

Use sturdy bread that can hold the melted cheese without getting soggy.

Step-by-Step Instructions

1. Prep the Bread

Spread butter evenly on one side of each slice.

2. Add Cheese

Layer all four cheeses evenly on the unbuttered side.

3. Assemble Sandwich

Place slices together, buttered sides out.

4. Cook

Cook on medium heat until golden brown and cheese melts.

5. Flip Carefully

Flip once and cook the other side until crispy.

Tips for Perfect Results

To make the best Ultimate Four Cheese Grilled Cheese Sandwich, follow these tips:

  • Cook on medium-low heat to melt cheese evenly
  • Use freshly shredded cheese for better melt
  • Press lightly with a spatula for even browning
  • Don’t rush—slow cooking creates perfect texture
  • Let sandwich rest briefly before slicing

These tips ensure a crispy outside and gooey inside.

Variations

This four cheese grilled cheese sandwich is easy to customize:

Garlic Butter Version

Add garlic to the butter for extra flavor.

Tomato Melt

Add sliced tomatoes for freshness.

Bacon Grilled Cheese

Add crispy bacon for a smoky twist.

Spicy Version

Add jalapeños or hot sauce.

What to Serve With It

This Ultimate Four Cheese Grilled Cheese Sandwich pairs perfectly with:

  • Tomato soup
  • French fries
  • Pickles
  • Side salad
  • Chips

It’s a classic comfort meal combo.

Storage & Reheating

  • Refrigerator: Store up to 2 days
  • Reheating: Use a skillet or oven for crispiness
  • Avoid Microwave: It makes bread soggy

Fresh is always best, but reheating properly helps maintain texture.

Common Mistakes to Avoid

When making a four cheese grilled cheese sandwich, avoid:

  • Using heat that’s too high
  • Not enough butter
  • Overloading with cheese
  • Using weak bread

These mistakes can ruin the texture and flavor.

FAQs

What’s the best cheese combo for grilled cheese?

Cheddar, mozzarella, Monterey Jack, and Parmesan work perfectly.

Can I use pre-shredded cheese?

Yes, but freshly shredded melts better.

What bread works best?

Sourdough or thick white bread is ideal.

How do I make it extra crispy?

Use butter generously and cook slowly.

Final Thoughts

This Ultimate Four Cheese Grilled Cheese Sandwich takes a simple classic and turns it into something truly special. With its crispy golden crust and rich, melty center, it’s comfort food at its finest.

Whether for lunch, dinner, or a quick snack, this sandwich is guaranteed to satisfy every cheese craving.

Easy Cranberry Orange Scones – Bakery-Style Recipe at Home

There’s something truly special about freshly baked Easy Cranberry Orange Scones. With their tender crumb, buttery texture, and bright citrus flavor, these scones bring bakery-quality goodness right into your kitchen. Whether you’re planning a cozy breakfast, brunch with friends, or a simple afternoon treat, this recipe delivers every time.

What makes these easy cranberry orange scones so irresistible is the perfect balance of tart cranberries and sweet, fragrant orange zest. They’re simple enough for beginners yet impressive enough to serve guests.

Image Prompt: Freshly baked cranberry orange scones arranged on a rustic wooden table, golden tops with visible cranberries and orange zest, lightly glazed, soft natural lighting, shallow depth of field, realistic food photography, 4k resolution.

Why You’ll Love This Easy Cranberry Orange Scones Recipe

These easy cranberry orange scones check all the boxes when it comes to flavor, texture, and convenience.

  • Soft and flaky texture
  • Perfect balance of sweet and tart
  • Quick and easy to make
  • Great for breakfast, brunch, or snacks
  • Freezer-friendly and meal prep friendly

Once you try them, they’ll become a staple in your baking routine.

Ingredients

To make these easy cranberry orange scones, gather the following:

  • 2 cups all-purpose flour
  • 1/3 cup granulated sugar
  • 1 tablespoon baking powder
  • 1/2 teaspoon salt
  • 1/2 cup cold unsalted butter (cubed)
  • 1/2 cup heavy cream
  • 1 large egg
  • 1 tablespoon orange zest
  • 1/4 cup fresh orange juice
  • 1 cup dried or fresh cranberries

Optional glaze:

  • 1 cup powdered sugar
  • 2–3 tablespoons orange juice

Ingredient Notes

Cranberries

Fresh cranberries add tartness, while dried cranberries provide sweetness—both work beautifully in easy cranberry orange scones.

Orange Flavor

Use fresh orange zest and juice for the best flavor. It makes a huge difference.

Cold Butter

Cold butter is key to achieving flaky, tender scones.

Step-by-Step Instructions

1. Preheat Oven

Preheat to 400°F and line a baking sheet.

2. Mix Dry Ingredients

Combine flour, sugar, baking powder, and salt.

3. Cut in Butter

Use a pastry cutter or hands to mix butter until crumbly.

4. Add Wet Ingredients

Mix in cream, egg, orange zest, and juice.

5. Fold in Cranberries

Gently fold cranberries into dough.

6. Shape and Bake

Form into a circle, cut into wedges, and bake until golden.

Tips for Perfect Results

For the best easy cranberry orange scones, keep these tips in mind:

  • Don’t overmix the dough
  • Keep ingredients cold
  • Use fresh orange zest for stronger flavor
  • Bake until lightly golden, not overdone
  • Let scones cool slightly before glazing

These small details ensure bakery-quality results.

Variations

You can easily customize these easy cranberry orange scones:

Lemon Cranberry Scones

Swap orange for lemon zest and juice.

Chocolate Cranberry Scones

Add white chocolate chips.

Glazed Scones

Drizzle with orange glaze for extra sweetness.

Healthy Version

Use whole wheat flour and reduce sugar.

What to Serve With It

These easy cranberry orange scones pair beautifully with:

  • Coffee or tea
  • Fresh fruit
  • Yogurt
  • Butter or jam

They’re perfect for a cozy breakfast or elegant brunch spread.

Storage & Reheating

  • Room Temperature: Store up to 2 days
  • Refrigerator: Up to 5 days
  • Freezer: Freeze up to 2 months
  • Reheating: Warm in oven or microwave

Proper storage keeps them fresh and delicious.

Common Mistakes to Avoid

When making easy cranberry orange scones, avoid:

  • Overworking the dough
  • Using warm butter
  • Skipping orange zest
  • Overbaking

These mistakes can lead to dense or dry scones.

FAQs

Can I use dried cranberries instead of fresh?

Yes, dried cranberries work perfectly.

Can I make the dough ahead of time?

Yes, refrigerate overnight before baking.

Why are my scones dry?

Overmixing or overbaking can cause dryness.

Can I freeze baked scones?

Yes, they freeze well and reheat easily.

Final Thoughts

These Easy Cranberry Orange Scones are everything you want in a homemade baked treat—simple, flavorful, and beautifully textured. With their bright citrus notes and bursts of cranberry, they’re perfect for any time of day.

Once you make them, you’ll see just how easy it is to bring bakery-style scones into your own kitchen.

Lunch Box Pasta Salad – Easy, Fresh & Perfect for Meal Prep

If you’re tired of boring lunches and looking for something fresh, flavorful, and easy to pack, this lunch box pasta salad is exactly what you need. It’s light yet satisfying, packed with colorful ingredients, and perfect for busy weekdays.

What makes this lunch box pasta salad recipe stand out is its versatility. You can customize it with your favorite vegetables, proteins, and dressings, making it a go-to option for both adults and kids. Plus, it tastes even better after chilling, making it ideal for meal prep.

Why You’ll Love This Lunch Box Pasta Salad

This lunch box pasta salad is a must-have in your weekly rotation.

  • Perfect for meal prep
  • Easy to customize
  • Served cold—no reheating needed
  • Packed with fresh flavors
  • Great for work, school, or picnics

It’s the kind of recipe that makes lunch something to look forward to.

Ingredients

Here’s what you’ll need for this lunch box pasta salad recipe:

  • 3 cups cooked pasta (rotini, penne, or bowtie)
  • 1 cup cherry tomatoes, halved
  • 1 cup cucumber, diced
  • 1/2 cup black olives, sliced
  • 1/2 cup cheese cubes (mozzarella or cheddar)
  • 1/4 cup red onion, finely chopped
  • 1/2 cup cooked chicken or salami (optional)
  • 1/3 cup Italian dressing
  • Salt and pepper to taste
  • Fresh parsley or basil for garnish

Ingredient Notes

Pasta Choice

Short pasta shapes like rotini or penne work best because they hold the dressing well.

Fresh Vegetables

Use crisp vegetables to keep your lunch box pasta salad refreshing and crunchy.

Dressing

Italian dressing is classic, but you can swap it for vinaigrette or creamy options.

Step-by-Step Instructions

1. Cook Pasta

Boil pasta according to package instructions, then cool completely.

2. Prep Ingredients

Chop vegetables, cheese, and protein.

3. Mix Everything

Combine pasta, veggies, and dressing in a large bowl.

4. Season

Add salt, pepper, and fresh herbs.

5. Chill

Refrigerate for at least 30 minutes before serving.

Tips for Perfect Results

To make the best lunch box pasta salad, keep these tips in mind:

  • Rinse pasta with cold water to stop cooking
  • Don’t overdress—add gradually
  • Let it chill for better flavor
  • Use fresh herbs for brightness
  • Keep ingredients bite-sized

These tips ensure a perfectly balanced salad every time.

Variations

This lunch box pasta salad recipe is incredibly flexible:

Mediterranean Style

Add feta cheese, olives, and cucumbers.

Creamy Pasta Salad

Use mayo or Greek yogurt-based dressing.

Vegetarian Version

Skip meat and add chickpeas or beans.

Protein-Packed Version

Add grilled chicken, tuna, or turkey.

What to Serve With It

This lunch box pasta salad pairs well with:

  • Sandwiches or wraps
  • Fresh fruit
  • Crackers or breadsticks
  • Yogurt or dessert cups

It’s a complete and balanced meal option.

Storage & Reheating

  • Refrigerator: Store up to 4 days
  • Meal Prep: Divide into containers for easy grab-and-go lunches
  • Reheating: Not needed—best served cold

This makes it perfect for busy schedules.

Common Mistakes to Avoid

When making lunch box pasta salad, avoid:

  • Using warm pasta (makes it soggy)
  • Adding too much dressing at once
  • Skipping seasoning
  • Not chilling before serving

These mistakes can affect flavor and texture.

FAQs

Can I make pasta salad ahead of time?

Yes, it’s even better after chilling.

What pasta works best?

Short pasta like rotini or penne.

Can I make it healthier?

Yes, use whole wheat pasta and light dressing.

How do I keep it fresh in a lunch box?

Use airtight containers and keep refrigerated.

Final Thoughts

This lunch box pasta salad is the perfect combination of convenience, flavor, and nutrition. It’s easy to prepare, endlessly customizable, and ideal for meal prep.

Once you try it, you’ll find yourself making this recipe again and again for quick, delicious lunches.