Shredded Brussels Sprouts Salad

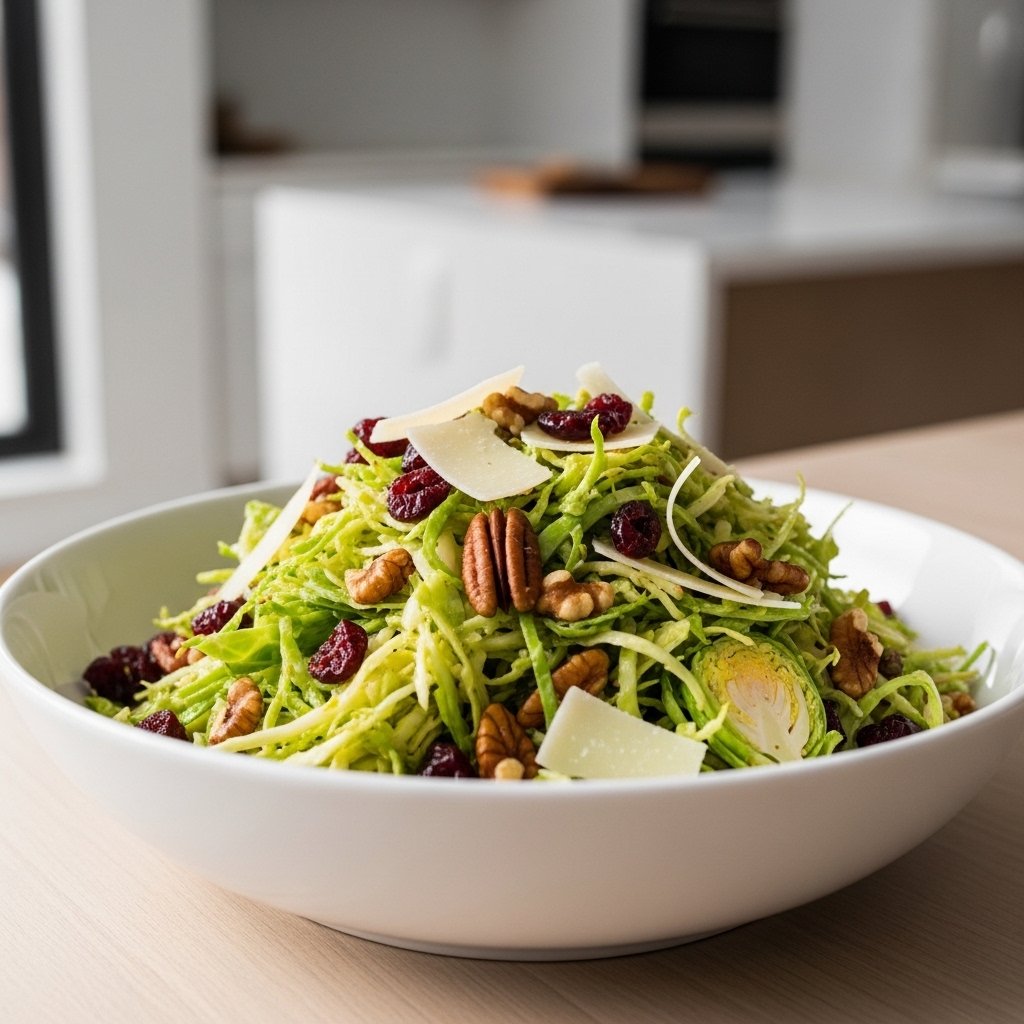
If you think Brussels sprouts are only meant to be roasted or sautéed, it’s time to rethink everything. This Shredded Brussels Sprouts Salad is crisp, vibrant, and packed with flavor, offering a refreshing twist on a classic vegetable. With finely sliced sprouts, a tangy dressing, and a mix of textures, this salad transforms humble ingredients into something truly irresistible.

This salad has quickly become a staple in many American kitchens—and for good reason. It’s nutritious, easy to prepare, and incredibly versatile, making it perfect for everything from weekday lunches to holiday gatherings.

Why You’ll Love This Recipe

This Shredded Brussels Sprouts Salad stands out because it balances crunch, tang, and subtle sweetness in every bite. Unlike traditional leafy salads, Brussels sprouts hold up beautifully to dressing, meaning no soggy leftovers.

Here’s why you’ll keep coming back to it:

  • Crisp texture that stays fresh longer than lettuce
  • Bold flavor from a simple homemade dressing
  • Quick prep time—ready in under 20 minutes
  • Highly customizable with endless add-ins
  • Perfect for meal prep and make-ahead meals

Ingredients

To make this fresh and flavorful salad, gather the following:

For the Salad:

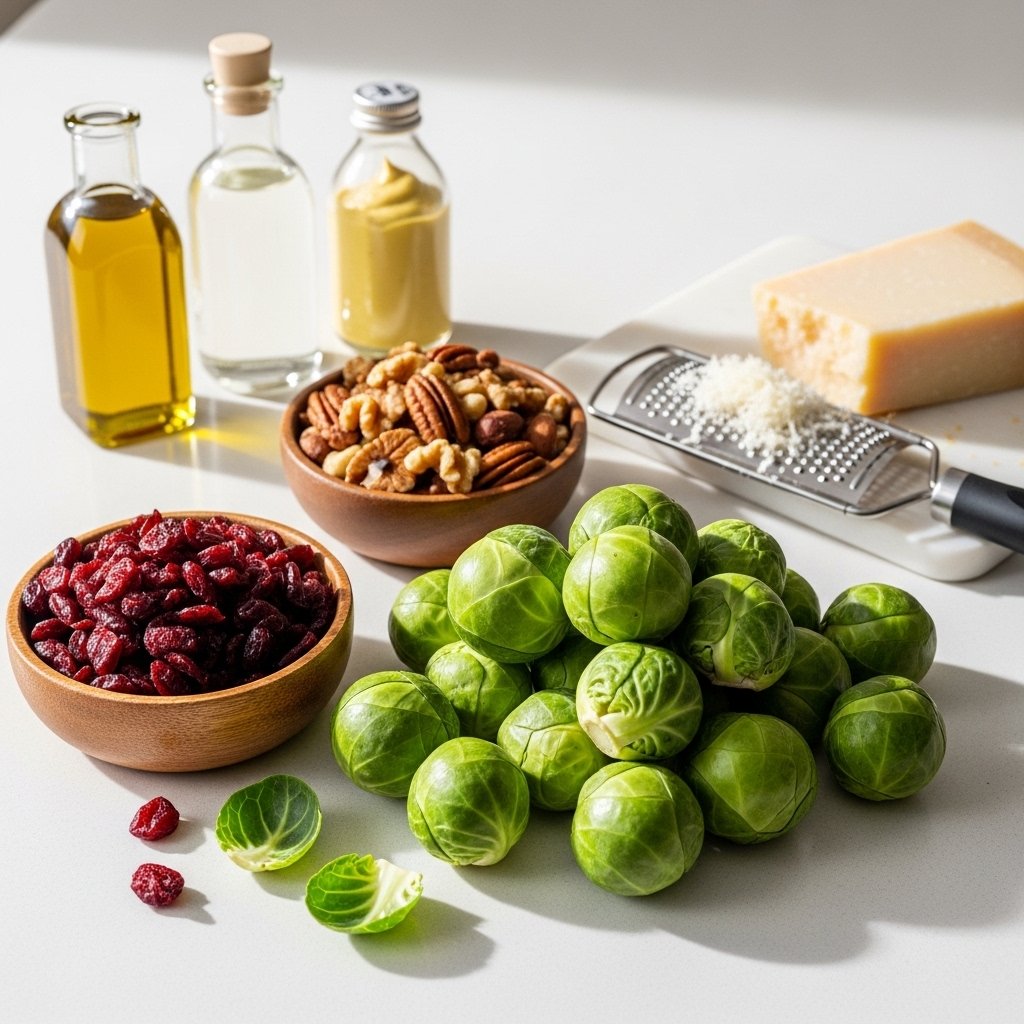
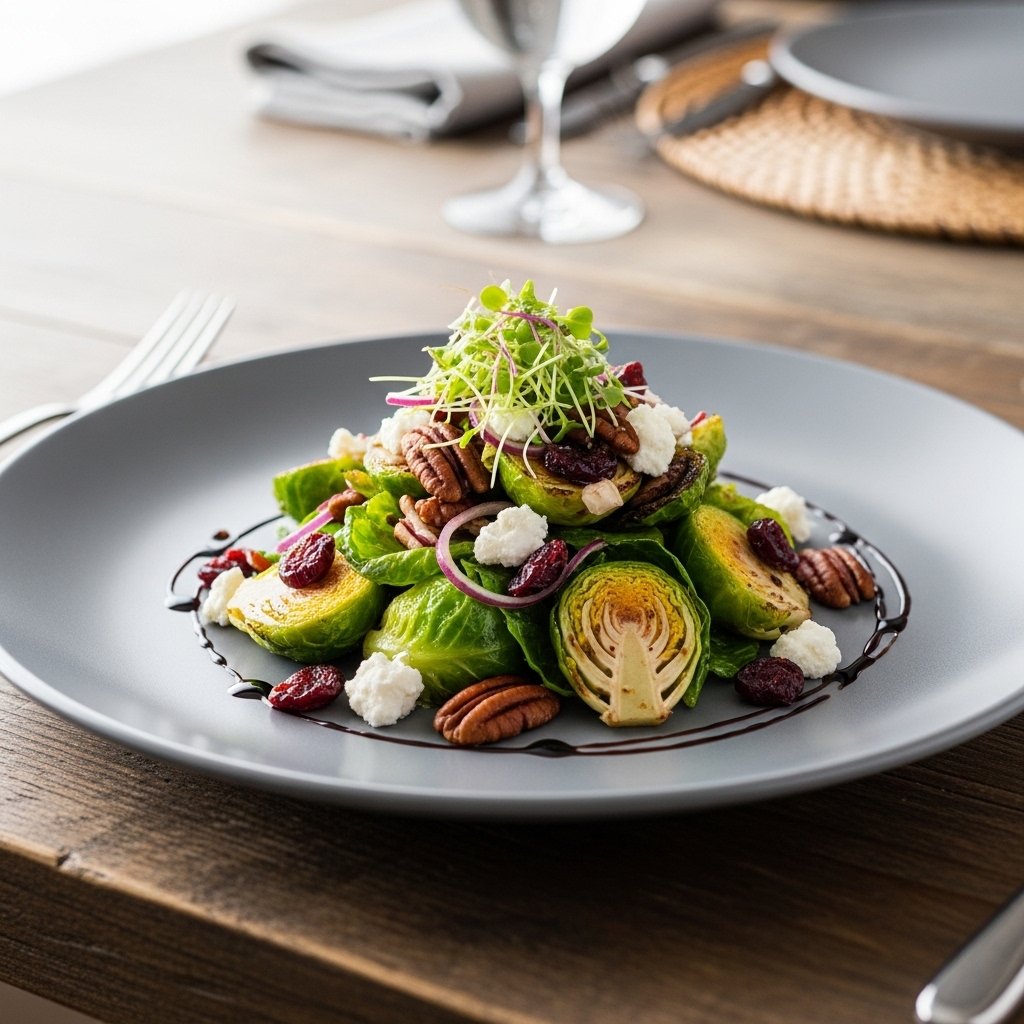
  • 1 lb Brussels sprouts (shredded)
  • 1/3 cup dried cranberries
  • 1/3 cup toasted almonds or pecans
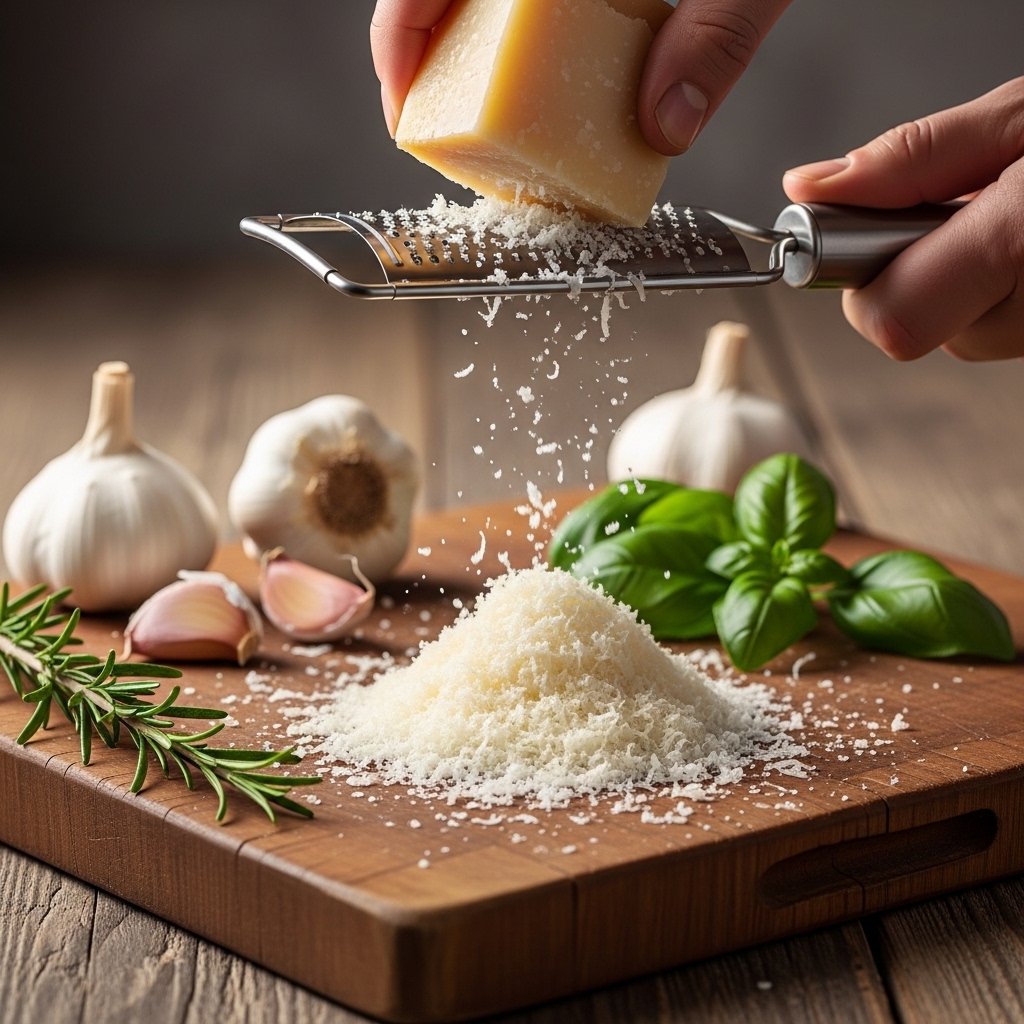
  • 1/4 cup shaved Parmesan cheese

For the Dressing:

  • 3 tablespoons olive oil
  • 2 tablespoons apple cider vinegar
  • 1 tablespoon Dijon mustard
  • 1 tablespoon honey
  • Salt and pepper to taste

Ingredient Notes

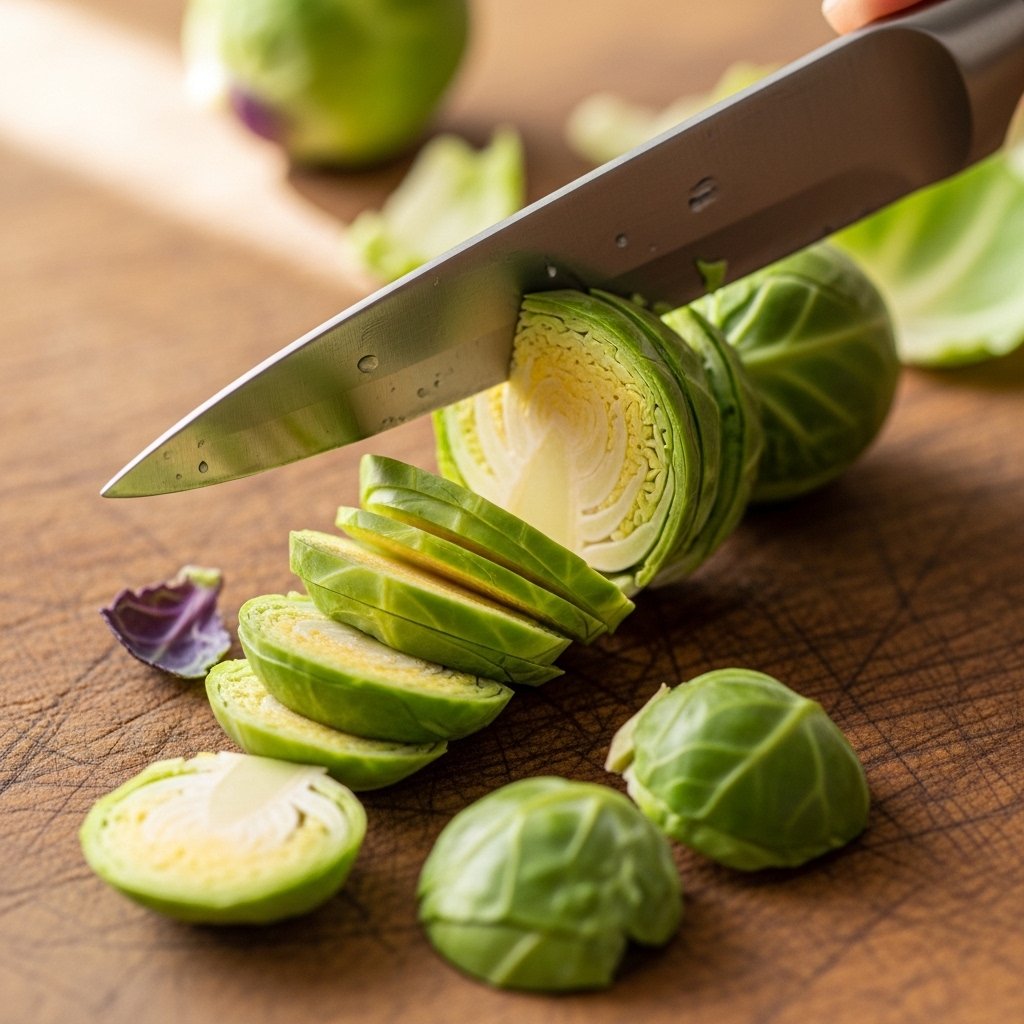
The key to a great Shredded Brussels Sprouts Salad starts with fresh, firm Brussels sprouts. Look for bright green heads with tightly packed leaves. You can shred them using a sharp knife, mandoline, or food processor for convenience.

Using high-quality olive oil and freshly shaved Parmesan makes a noticeable difference in flavor. Toasting your nuts before adding them enhances their crunch and brings out a deeper, nuttier taste.

Step-by-Step Instructions

1. Prepare the Brussels Sprouts

Trim the ends and remove any outer leaves. Thinly slice the sprouts or use a food processor to shred them.

2. Make the Dressing

In a small bowl, whisk together olive oil, apple cider vinegar, Dijon mustard, honey, salt, and pepper until well combined.

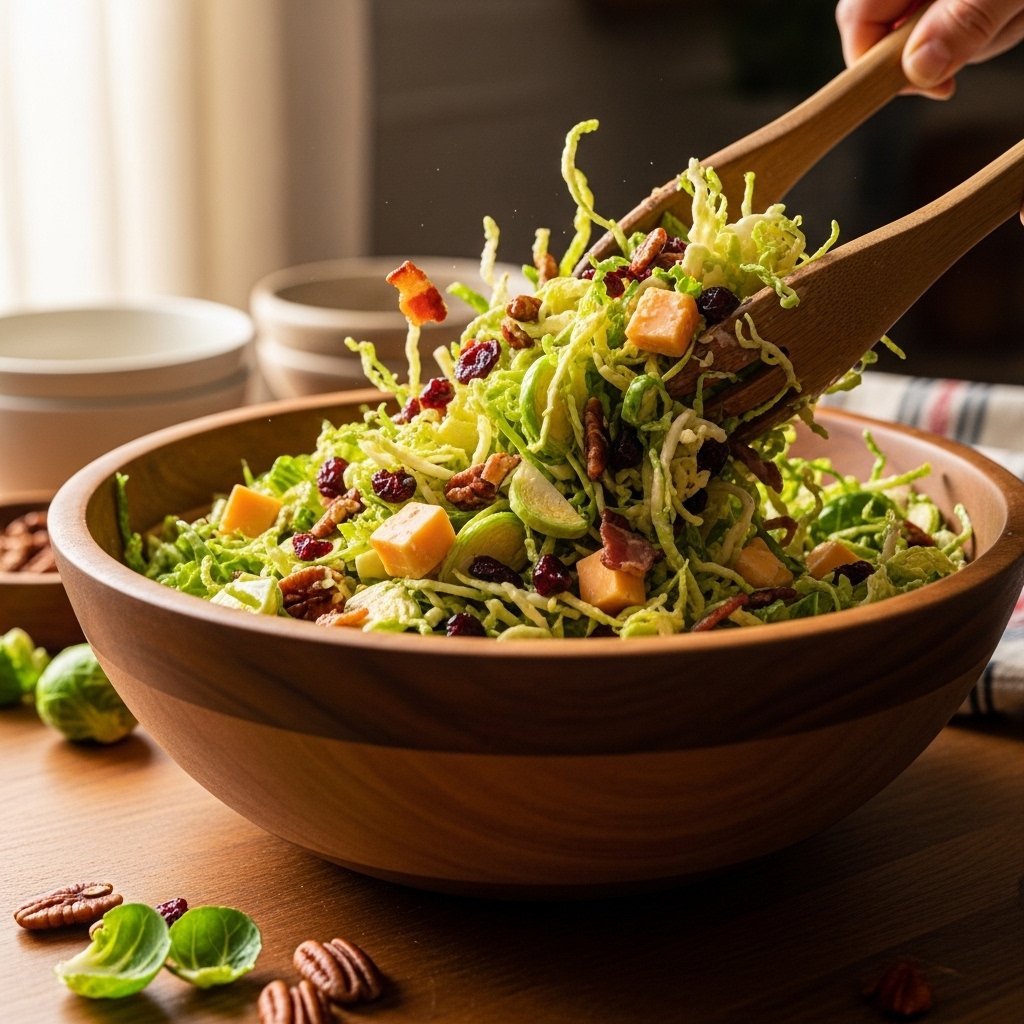
3. Assemble the Salad

In a large bowl, combine shredded Brussels sprouts, cranberries, nuts, and Parmesan cheese.

4. Toss and Serve

Pour the dressing over the salad and toss well to coat evenly. Let it sit for 5–10 minutes before serving to allow flavors to meld.

Tips for Perfect Results

To make the best Shredded Brussels Sprouts Salad, keep these tips in mind:

  • Slice thinly for the best texture
  • Massage the sprouts lightly to soften them
  • Balance flavors by adjusting sweetness or acidity
  • Let it rest briefly before serving for better flavor

These small steps elevate your salad from good to unforgettable.
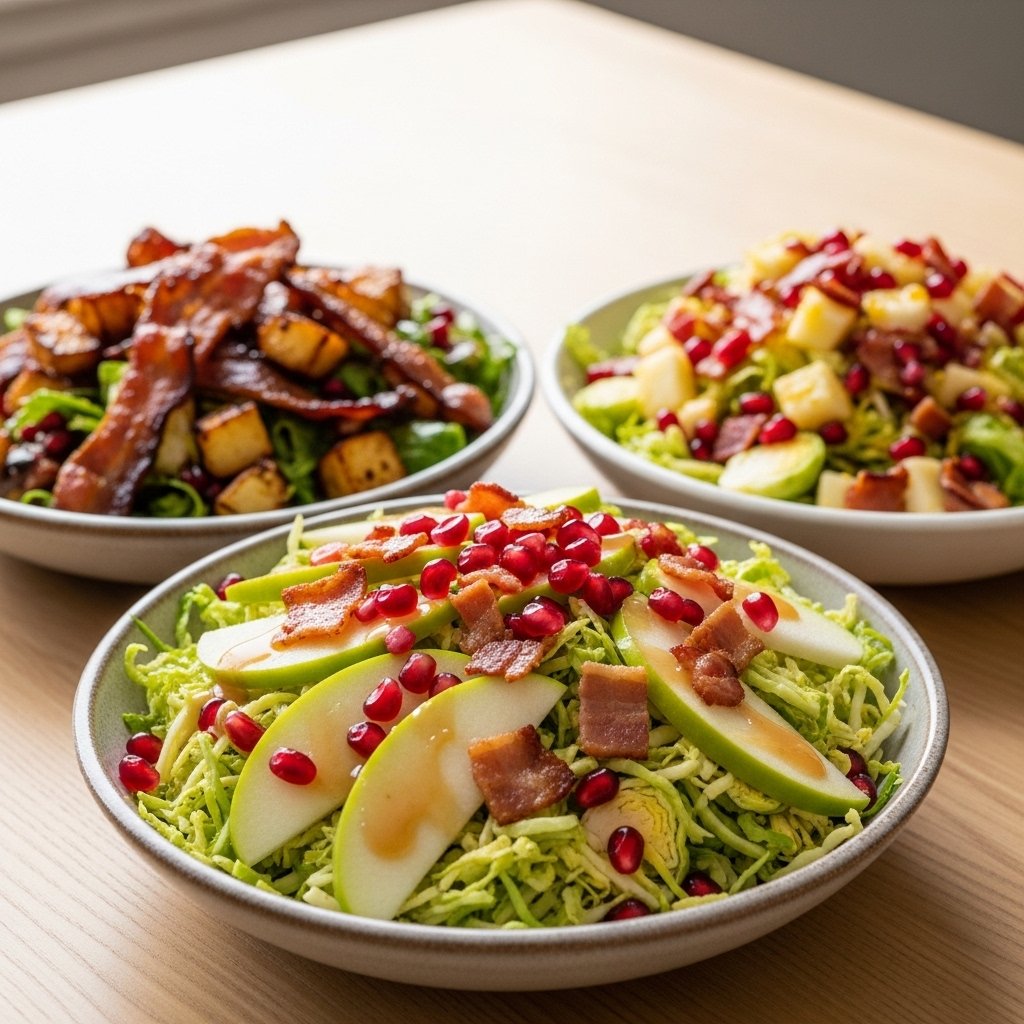
Variations

One of the best things about this salad is how easy it is to customize. Try these variations:

  • Add crispy bacon bits for a savory twist
  • Include thinly sliced apples for extra freshness
  • Swap cranberries for pomegranate seeds
  • Add grilled chicken for a protein-packed meal

What to Serve With It

This Shredded Brussels Sprouts Salad pairs beautifully with a variety of dishes:

  • Grilled chicken or steak
  • Roasted salmon
  • Holiday mains like turkey or ham
  • Sandwiches or wraps

Its crisp texture and tangy flavor make it the perfect contrast to rich, hearty meals.
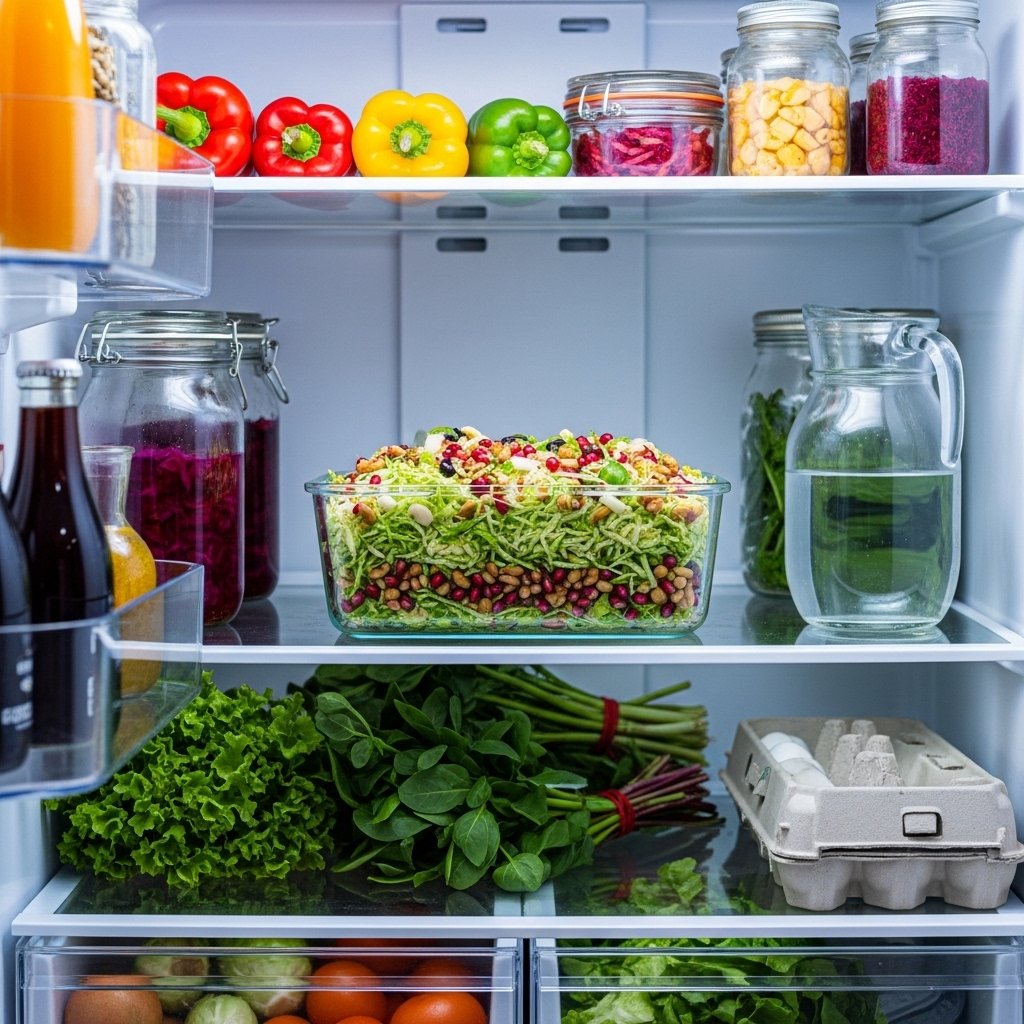
Storage & Reheating

Store leftovers in an airtight container in the refrigerator for up to 3 days. Unlike leafy salads, this one holds up well without wilting.

  • No reheating needed—serve chilled or at room temperature
  • If needed, refresh with a splash of dressing before serving

Common Mistakes to Avoid

  • Cutting sprouts too thick (results in tough texture)
  • Overdressing the salad (can overpower flavors)
  • Skipping the resting time (flavors won’t develop fully)
  • Using old Brussels sprouts (affects taste and texture)

Avoiding these mistakes ensures your salad turns out perfectly every time.

FAQs

1. Can I make this salad ahead of time?

Yes! It actually tastes better after sitting for a bit, making it perfect for meal prep.

2. How do I shred Brussels sprouts easily?

Use a food processor or mandoline for quick and even slicing.

3. Is this salad healthy?

Absolutely. It’s packed with fiber, vitamins, and healthy fats.

4. Can I make it vegan?

Yes—just omit the Parmesan or use a plant-based alternative.

Final Thoughts

This Shredded Brussels Sprouts Salad is proof that simple ingredients can create something truly special. With its crisp texture, balanced flavors, and easy preparation, it’s a recipe you’ll turn to again and again.

Whether you’re serving it as a side dish or enjoying it as a light main course, this salad delivers freshness and flavor in every bite. Give it a try—you might just find your new favorite salad.

Southern Style Creamy Parmesan Chicken Pasta

If you’re craving a comforting, indulgent meal that feels like a warm Southern hug, this Southern Style Creamy Parmesan Chicken Pasta is exactly what you need. Combining tender, seasoned chicken with a rich, velvety Parmesan cream sauce and perfectly cooked pasta, this dish delivers bold flavor with minimal effort. It’s the kind of recipe that turns an ordinary weeknight into something special.

This recipe is inspired by classic Southern comfort food traditions—rich sauces, hearty portions, and unforgettable flavor. Whether you’re cooking for your family or hosting friends, this pasta dish is guaranteed to impress.

Why You’ll Love This Recipe

There are countless pasta recipes out there, but this one stands out for several reasons:

  • Ultra creamy texture thanks to a homemade Parmesan sauce
  • Juicy, well-seasoned chicken that’s pan-seared to perfection
  • Quick and easy—ready in under 40 minutes
  • Family-friendly flavors that everyone will love
  • Perfect for leftovers and meal prep

This Southern Style Creamy Parmesan Chicken Pasta brings together comfort and convenience in one irresistible dish.

Ingredients

To make this flavorful dish, you’ll need:

For the Chicken:

  • 2 large chicken breasts (boneless, skinless)
  • 1 teaspoon garlic powder
  • 1 teaspoon onion powder
  • 1 teaspoon paprika
  • Salt and black pepper to taste
  • 2 tablespoons olive oil

For the Pasta & Sauce:

  • 12 oz fettuccine or penne pasta
  • 2 tablespoons butter
  • 4 cloves garlic (minced)
  • 2 cups heavy cream
  • 1 cup freshly grated Parmesan cheese
  • 1/2 cup chicken broth
  • 1 teaspoon Italian seasoning
  • Fresh parsley (for garnish)

Ingredient Notes

Using high-quality ingredients makes a big difference in this recipe. Freshly grated Parmesan melts better and gives a smoother sauce compared to pre-shredded cheese. Heavy cream is essential for achieving that signature creamy texture—don’t substitute with milk if you want the full Southern-style richness.

Step-by-Step Instructions

1. Cook the Pasta

Bring a large pot of salted water to a boil and cook the pasta according to package instructions. Drain and set aside.

2. Season and Cook Chicken

Season chicken breasts with garlic powder, onion powder, paprika, salt, and pepper. Heat olive oil in a skillet over medium heat and cook chicken for 5–7 minutes per side until golden and fully cooked. Remove and slice.

3. Make the Creamy Parmesan Sauce

In the same skillet, melt butter and sauté garlic until fragrant. Add heavy cream and chicken broth, then stir in Parmesan cheese and Italian seasoning. Simmer until thick and creamy.

4. Combine Everything

Add cooked pasta to the sauce and toss until well coated. Top with sliced chicken and garnish with parsley.

Tips for Perfect Results

  • Don’t overcook the chicken—it should stay juicy and tender
  • Salt your pasta water generously for better flavor
  • Use low heat when adding cheese to avoid clumping
  • Reserve pasta water to adjust sauce consistency if needed

These small techniques make a big difference in achieving restaurant-quality results at home.

Variations

Want to customize your Southern Style Creamy Parmesan Chicken Pasta? Try these ideas:

  • Add spinach or mushrooms for extra nutrition
  • Swap chicken for shrimp or sausage
  • Use gluten-free pasta if needed
  • Add a pinch of red pepper flakes for heat

What to Serve With It

This dish pairs beautifully with:

  • Garlic bread or buttery dinner rolls
  • A fresh Caesar salad
  • Roasted vegetables like broccoli or asparagus
  • A glass of chilled white wine

The richness of the pasta balances perfectly with lighter sides.

Storage & Reheating

Store leftovers in an airtight container in the refrigerator for up to 3 days. When reheating:

  • Add a splash of cream or milk to loosen the sauce
  • Warm gently on the stove or microwave in short intervals

Avoid overheating, as the sauce can separate.

Common Mistakes to Avoid

  • Using pre-shredded cheese (can cause grainy sauce)
  • Cooking sauce on high heat (leads to separation)
  • Overcooking pasta (should be al dente)
  • Skipping seasoning on chicken

Being mindful of these ensures your dish turns out perfectly every time.

FAQs

1. Can I make this ahead of time?

Yes, but it’s best fresh. If making ahead, store sauce and pasta separately for best texture.

2. Can I use milk instead of heavy cream?

You can, but the sauce will be thinner and less rich.

3. What pasta works best?

Fettuccine, penne, or linguine all work great for holding the creamy sauce.

4. How do I thicken the sauce?

Let it simmer longer or add more Parmesan cheese.

Final Thoughts

This Southern Style Creamy Parmesan Chicken Pasta is the ultimate comfort food—rich, creamy, and full of flavor. It’s a reliable go-to for busy nights, special occasions, or whenever you want something truly satisfying. With simple ingredients and easy steps, you’ll have a restaurant-quality meal right in your own kitchen.

Once you try it, this recipe is bound to become a regular favorite in your meal rotation.

Caramelized Wild Mushroom Pappardelle Pasta Recipe: Rich, Earthy, and Irresistibly Creamy

If you’re craving a comforting yet elegant pasta dish, this Caramelized Wild Mushroom Pappardelle pasta recipe is exactly what you need. With its rich, earthy flavors and silky texture, this dish feels like something straight out of a cozy Italian restaurant—yet it’s surprisingly simple to make at home.

The magic of this recipe lies in the caramelized mushrooms. When cooked properly, they develop deep, savory notes that pair beautifully with wide, ribbon-like pappardelle pasta. Add a touch of cream, garlic, and herbs, and you’ve got a restaurant-quality meal in under an hour.

Why You’ll Love This Caramelized Wild Mushroom Pappardelle Pasta Recipe

This Caramelized Wild Mushroom Pappardelle pasta recipe is a must-try for pasta lovers.

  • Deep, rich flavor: Thanks to perfectly caramelized mushrooms
  • Restaurant-quality dish: Elegant yet easy to prepare
  • Vegetarian-friendly: Hearty and satisfying without meat
  • Comfort food upgrade: Creamy and indulgent
  • Perfect for any occasion: Weeknight dinners or special meals

It’s a dish that feels both comforting and sophisticated.

Ingredients

To make the best Caramelized Wild Mushroom Pappardelle pasta recipe, you’ll need:

Main Ingredients:

  • Pappardelle pasta
  • Mixed wild mushrooms (cremini, shiitake, oyster)
  • Garlic (minced)
  • Shallots (optional)
  • Olive oil and butter

For the Sauce:

  • Heavy cream or half-and-half
  • Parmesan cheese (grated)
  • Fresh thyme or parsley
  • Salt and black pepper

Optional Additions:

  • White wine
  • Truffle oil
  • Spinach

Ingredient Notes

The key to a perfect Caramelized Wild Mushroom Pappardelle pasta recipe is using a mix of mushrooms. Each type adds a unique flavor and texture, creating a more complex dish.

Pappardelle is ideal because its wide noodles hold onto the creamy sauce beautifully. Parmesan adds depth and saltiness, while fresh herbs bring brightness to balance the richness.

If you want to elevate the dish even further, a splash of white wine or a drizzle of truffle oil adds incredible aroma.

Step-by-Step Instructions

Step 1: Cook the Pasta

Boil pappardelle in salted water until al dente. Reserve some pasta water before draining.

Step 2: Caramelize the Mushrooms

Heat olive oil and butter in a pan. Add mushrooms and cook undisturbed until golden brown, then stir and continue cooking until deeply caramelized.

Step 3: Add Aromatics

Stir in garlic and shallots, cooking until fragrant.

Step 4: Build the Sauce

Add cream and parmesan, stirring until smooth and slightly thickened.

Step 5: Combine

Toss cooked pasta into the sauce, adding reserved pasta water if needed.

Step 6: Finish

Top with fresh herbs and extra parmesan before serving.

Tips for Perfect Results

To master this Caramelized Wild Mushroom Pappardelle pasta recipe, follow these tips:

  • Don’t overcrowd mushrooms—they need space to caramelize
  • Cook mushrooms without stirring initially for better browning
  • Use pasta water to adjust sauce consistency
  • Season gradually for balanced flavor
  • Serve immediately for best texture

These tips ensure maximum flavor and perfect texture.

Variations

This Caramelized Wild Mushroom Pappardelle pasta recipe is easy to customize:

Vegan Version

  • Use plant-based cream and skip parmesan

Protein Boost

  • Add grilled chicken or shrimp

Spicy Version

  • Add red pepper flakes

Truffle Upgrade

  • Drizzle truffle oil before serving

What to Serve With It

This dish pairs beautifully with:

  • Garlic bread
  • Simple green salad
  • Roasted vegetables
  • White wine
  • Sparkling water with lemon

These sides complement the creamy richness of the pasta.

Storage & Reheating

  • Refrigerate: Store leftovers up to 3 days
  • Reheat: Warm gently on stovetop with a splash of cream or water
  • Avoid overheating to maintain creamy texture
  • Freezing not recommended due to cream sauce

Proper storage keeps the dish enjoyable even the next day.

Common Mistakes to Avoid

Avoid these mistakes when making Caramelized Wild Mushroom Pappardelle pasta recipe:

  • Overcrowding mushrooms (prevents browning)
  • Skipping seasoning layers
  • Overcooking pasta
  • Using low-quality parmesan
  • Adding too much cream (overpowers flavor)

Attention to these details makes all the difference.

FAQs

1. Can I use regular mushrooms instead of wild mushrooms?

Yes, cremini or button mushrooms work well.

2. What pasta can I use instead of pappardelle?

Fettuccine or tagliatelle are great alternatives.

3. Can I make this dish ahead of time?

It’s best fresh, but you can reheat gently.

4. Is this recipe vegetarian?

Yes, as long as parmesan used is vegetarian-friendly.

Final Thoughts

This Caramelized Wild Mushroom Pappardelle pasta recipe is the perfect combination of comfort and elegance. With its rich, creamy sauce and deeply flavorful mushrooms, it’s a dish that feels indulgent yet simple to prepare.

Whether you’re cooking for yourself, your family, or guests, this recipe is guaranteed to impress. Once you try it, it’s sure to become a favorite in your kitchen.

Roasted Butternut Squash and Sun-Dried Tomato Chicken: A Cozy, Flavor-Packed One-Pan Dinner

If you’re looking for a comforting, flavor-rich dinner that’s both nourishing and easy to prepare, this Roasted Butternut Squash and Sun-Dried Tomato Chicken is exactly what your weeknight menu needs. This dish combines juicy roasted chicken with sweet caramelized butternut squash and tangy sun-dried tomatoes for a perfect balance of flavors.

What makes this recipe so appealing is its simplicity. Everything cooks together on one pan, allowing the ingredients to blend beautifully while keeping cleanup minimal. It’s hearty enough for a family dinner yet elegant enough to serve guests.

Why You’ll Love This Roasted Butternut Squash and Sun-Dried Tomato Chicken

This Roasted Butternut Squash and Sun-Dried Tomato Chicken is packed with benefits that make it a go-to recipe.

  • One-pan convenience: Easy cooking and cleanup
  • Balanced flavors: Sweet, savory, and tangy
  • Healthy ingredients: Lean protein and vegetables
  • Perfect for meal prep: Stores well for leftovers
  • Seasonal comfort food: Ideal for fall and winter

It’s a dish that feels both wholesome and indulgent at the same time.

Ingredients

To make the best Roasted Butternut Squash and Sun-Dried Tomato Chicken, you’ll need:

Main Ingredients:

  • Boneless, skinless chicken breasts or thighs
  • Butternut squash (peeled and cubed)
  • Sun-dried tomatoes (oil-packed preferred)
  • Garlic (minced)
  • Olive oil

Seasoning:

  • Italian seasoning
  • Paprika
  • Salt and pepper
  • Red pepper flakes (optional)

Optional Additions:

  • Spinach
  • Parmesan cheese
  • Fresh herbs like parsley or thyme

Ingredient Notes

The key to a perfect Roasted Butternut Squash and Sun-Dried Tomato Chicken lies in quality ingredients. Butternut squash becomes naturally sweet and slightly crispy when roasted, adding depth to the dish.

Sun-dried tomatoes bring a concentrated tangy flavor that contrasts beautifully with the sweetness of the squash. Using oil-packed sun-dried tomatoes adds extra richness and helps coat the chicken and vegetables.

Chicken thighs tend to be juicier, while chicken breasts offer a leaner option—both work wonderfully in this recipe.

Step-by-Step Instructions

Step 1: Preheat the Oven

Preheat your oven to 400°F (200°C) and line a sheet pan with parchment paper.

Step 2: Prepare Ingredients

Cube the butternut squash and slice the chicken if needed.

Step 3: Season Everything

In a large bowl, toss chicken, squash, sun-dried tomatoes, garlic, olive oil, and spices until well coated.

Step 4: Arrange on Sheet Pan

Spread everything evenly on the pan in a single layer.

Step 5: Roast

Bake for 25–30 minutes until chicken is cooked through and squash is tender.

Step 6: Finish and Serve

Top with fresh herbs or parmesan if desired.

Tips for Perfect Results

To get the best Roasted Butternut Squash and Sun-Dried Tomato Chicken, keep these tips in mind:

  • Cut squash into even pieces for consistent cooking
  • Don’t overcrowd the pan for better roasting
  • Use high heat to achieve caramelization
  • Stir halfway through cooking for even browning
  • Add fresh herbs after baking for brightness

These small adjustments make a big difference in flavor and texture.

Variations

This Roasted Butternut Squash and Sun-Dried Tomato Chicken is easy to customize:

Creamy Version

  • Add a splash of cream or a dollop of cream cheese

Low-Carb Version

  • Replace squash with zucchini or cauliflower

Mediterranean Style

  • Add olives and feta cheese

Spicy Version

  • Increase red pepper flakes or add chili paste

What to Serve With It

This dish pairs beautifully with:

  • Rice or quinoa
  • Garlic mashed potatoes
  • Crusty bread
  • Simple green salad
  • Roasted vegetables

These sides complement the rich flavors perfectly.

Storage & Reheating

  • Refrigerate: Store in airtight container for up to 4 days
  • Freeze: Freeze for up to 2 months
  • Reheat: Warm in oven or skillet for best texture
  • Avoid microwaving too long to prevent dryness

It’s a great recipe for meal prep and leftovers.

Common Mistakes to Avoid

Avoid these mistakes when making Roasted Butternut Squash and Sun-Dried Tomato Chicken:

  • Overcrowding the pan (causes steaming)
  • Undercooking squash (leaves it too firm)
  • Overcooking chicken (makes it dry)
  • Skipping seasoning (reduces flavor depth)

Paying attention to these ensures perfect results every time.

FAQs

1. Can I use frozen butternut squash?

Yes, but thaw and pat dry before roasting.

2. What cut of chicken works best?

Both chicken breasts and thighs work well.

3. Can I make this ahead of time?

Yes, it reheats well and is great for meal prep.

4. Is this recipe healthy?

Yes, it’s high in protein and packed with nutrients.

Final Thoughts

This Roasted Butternut Squash and Sun-Dried Tomato Chicken is the perfect combination of comfort, flavor, and simplicity. With just one pan and a handful of ingredients, you get a delicious, well-balanced meal that feels both hearty and elegant.

Whether you’re cooking for your family or prepping meals for the week, this recipe delivers on every level. Once you try it, it’s sure to become a staple in your kitchen.

Easy Sugar Cookie Christmas Fudge: A Festive No-Bake Holiday Treat

If you’re looking for a quick, festive dessert that captures the magic of the holidays, this Easy Sugar Cookie Christmas Fudge is exactly what you need. It combines the classic flavor of sugar cookies with the creamy, melt-in-your-mouth texture of fudge—no oven required.

This recipe is perfect for busy holiday schedules. Whether you’re making treats for a party, cookie exchange, or edible gifts, this fudge comes together in minutes and looks absolutely stunning with colorful sprinkles. It’s simple, fun, and guaranteed to bring holiday cheer.

Why You’ll Love This Easy Sugar Cookie Christmas Fudge

This Easy Sugar Cookie Christmas Fudge is a holiday favorite for so many reasons:

  • No baking required: Perfect for quick preparation
  • Festive appearance: Bright sprinkles make it holiday-ready
  • Creamy texture: Smooth and rich in every bite
  • Kid-friendly: Fun and easy to make together
  • Perfect for gifting: Beautiful and delicious

It’s one of those recipes that feels special without requiring hours in the kitchen.

Ingredients

To make the best Easy Sugar Cookie Christmas Fudge, you’ll need:

Main Ingredients:

  • White chocolate chips
  • Sweetened condensed milk
  • Sugar cookie mix
  • Butter
  • Vanilla extract

Decorations:

  • Holiday sprinkles (red, green, white)

Ingredient Notes

The key to perfect Easy Sugar Cookie Christmas Fudge is high-quality white chocolate chips. They create the smooth, creamy base of the fudge.

Sugar cookie mix adds that classic cookie flavor without extra effort. Sweetened condensed milk helps bind everything together while keeping the texture soft and rich.

Sprinkles are what make this fudge festive, so don’t skip them—they add both color and a fun crunch.

Step-by-Step Instructions

Step 1: Prepare the Pan

Line a square baking dish with parchment paper.

Step 2: Melt Ingredients

In a saucepan or microwave-safe bowl, melt white chocolate chips, butter, and condensed milk until smooth.

Step 3: Add Flavor

Stir in sugar cookie mix and vanilla extract until fully combined.

Step 4: Pour and Decorate

Spread mixture evenly into prepared pan and top with sprinkles.

Step 5: Chill

Refrigerate for 2–3 hours until set, then cut into squares.

Tips for Perfect Results

To make the best Easy Sugar Cookie Christmas Fudge, follow these tips:

  • Use low heat when melting chocolate to avoid burning
  • Stir constantly for a smooth texture
  • Press mixture evenly into pan for clean cuts
  • Chill fully before slicing
  • Use a sharp knife for neat squares

These small steps make your fudge look as good as it tastes.

Variations

This Easy Sugar Cookie Christmas Fudge can be customized in fun ways:

Chocolate Swirl Fudge

  • Swirl melted milk chocolate into the mixture

Peppermint Version

  • Add crushed candy canes for a holiday twist

Funfetti Style

  • Mix sprinkles directly into the fudge

Nutty Version

  • Add chopped almonds or pecans

What to Serve With It

This fudge pairs perfectly with:

  • Hot cocoa
  • Coffee or latte
  • Holiday cookies platter
  • Eggnog
  • Milk

These pairings make it even more festive and enjoyable.

Storage Tips

  • Refrigerator: Store in airtight container for up to 1 week
  • Freezer: Freeze for up to 2 months
  • Room temperature: Keep in cool place for short periods
  • Tip: Separate layers with parchment paper

Proper storage keeps your fudge fresh and creamy.

Common Mistakes to Avoid

Avoid these mistakes when making Easy Sugar Cookie Christmas Fudge:

  • Overheating chocolate (causes grainy texture)
  • Not lining the pan (makes removal difficult)
  • Skipping chilling time
  • Using low-quality chocolate
  • Uneven spreading

Attention to detail ensures perfect fudge every time.

FAQs

1. Can I make this fudge ahead of time?

Yes, it’s perfect for making a few days in advance.

2. Can I use homemade sugar cookie dough?

This recipe works best with dry cookie mix for texture.

3. How do I cut fudge cleanly?

Use a sharp knife and wipe it between cuts.

4. Can I add food coloring?

Yes, you can tint the fudge for extra festive color.

Final Thoughts

This Easy Sugar Cookie Christmas Fudge is the ultimate holiday treat—simple, festive, and absolutely delicious. With its creamy texture and sweet sugar cookie flavor, it’s perfect for sharing, gifting, or enjoying with family.

Whether you’re new to baking or an experienced home cook, this recipe makes it easy to create something beautiful and memorable during the holiday season.

Easy Molten Chocolate Lava Cake for a Sweet Homemade Treat

If you’ve ever ordered dessert at a restaurant and fallen in love with that rich, gooey chocolate cake with a molten center, you’re going to be thrilled with this Easy molten chocolate lava cake for a sweet homemade treat. It’s surprisingly simple to make at home and delivers that same indulgent, bakery-quality experience.

This dessert is all about contrast: a soft, delicate cake on the outside with a warm, flowing chocolate center inside. Best of all, it comes together quickly with just a handful of ingredients, making it perfect for date nights, dinner parties, or when you simply need a chocolate fix.

Why You’ll Love This Easy Molten Chocolate Lava Cake

This Easy molten chocolate lava cake for a sweet homemade treat is a dessert you’ll want to make again and again.

  • Quick and easy: Ready in under 30 minutes
  • Minimal ingredients: Pantry staples only
  • Restaurant-quality dessert: Impressive yet simple
  • Rich and indulgent: Perfect for chocolate lovers
  • Perfect for special occasions: Or everyday cravings

It’s one of those recipes that feels fancy but is actually very approachable.

Ingredients

To make the best Easy molten chocolate lava cake for a sweet homemade treat, you’ll need:

Main Ingredients:

  • Semi-sweet chocolate
  • Unsalted butter
  • Eggs
  • Egg yolks
  • Granulated sugar
  • All-purpose flour
  • Vanilla extract
  • Pinch of salt

Ingredient Notes

The secret to a perfect Easy molten chocolate lava cake for a sweet homemade treat lies in high-quality chocolate. Since chocolate is the star, using a good semi-sweet or dark chocolate makes a huge difference in flavor.

Eggs and egg yolks create that rich, custard-like texture, while a small amount of flour gives just enough structure to hold the cake together. Butter adds richness and helps create that silky smooth center.

Step-by-Step Instructions

Step 1: Preheat the Oven

Preheat your oven to 425°F (220°C) and grease ramekins with butter.

Step 2: Melt Chocolate and Butter

In a heatproof bowl, melt chocolate and butter together until smooth.

Step 3: Mix Eggs and Sugar

Whisk eggs, egg yolks, and sugar until light and slightly thickened.

Step 4: Combine Mixtures

Gently mix melted chocolate into the egg mixture, then fold in flour and salt.

Step 5: Fill and Bake

Pour batter into ramekins and bake for 10–12 minutes until edges are set but center is soft.

Step 6: Serve Immediately

Let cool slightly, then invert onto a plate and serve warm.

Tips for Perfect Results

To master the Easy molten chocolate lava cake for a sweet homemade treat, keep these tips in mind:

  • Do not overbake (this is key to the molten center)
  • Use room temperature eggs for better mixing
  • Grease ramekins well for easy release
  • Serve immediately after baking
  • Test bake time with one cake first

These small details ensure that perfect gooey center every time.

Variations

This Easy molten chocolate lava cake for a sweet homemade treat can be customized in many ways:

Peanut Butter Lava Cake

  • Add a spoon of peanut butter in the center

White Chocolate Version

  • Swap dark chocolate with white chocolate

Espresso Chocolate Cake

  • Add espresso powder for deeper flavor

Caramel Lava Cake

  • Insert a caramel center for extra sweetness

What to Serve With It

This dessert pairs beautifully with:

  • Vanilla ice cream
  • Fresh berries
  • Whipped cream
  • Caramel or chocolate sauce
  • Powdered sugar dusting

These additions elevate the dessert even more.

Storage & Reheating

  • Best served fresh: For molten center
  • Refrigerate: Store leftovers up to 2 days
  • Reheat: Warm in microwave for 20–30 seconds
  • Freeze batter: Prepare ahead and bake when needed

While best fresh, it can still be enjoyed later with gentle reheating.

Common Mistakes to Avoid

Avoid these mistakes when making Easy molten chocolate lava cake for a sweet homemade treat:

  • Overbaking (loses molten center)
  • Not greasing ramekins properly
  • Using low-quality chocolate
  • Overmixing batter
  • Letting cakes sit too long before serving

Avoiding these ensures perfect texture and flavor.

FAQs

1. How do I know when lava cake is done?

Edges should be set, but the center should still jiggle slightly.

2. Can I make lava cakes ahead of time?

Yes, prepare batter and refrigerate, then bake when ready.

3. Can I use muffin tins instead of ramekins?

Yes, just adjust baking time slightly.

4. Why didn’t my cake have a molten center?

It was likely overbaked—reduce baking time next time.

Final Thoughts

This Easy molten chocolate lava cake for a sweet homemade treat is proof that you don’t need complicated techniques to create a stunning dessert. With its rich flavor, gooey center, and elegant presentation, it’s a recipe that impresses every single time.

Whether you’re making it for guests or treating yourself, this dessert delivers pure chocolate indulgence in every bite. Once you try it, you’ll never need to order it at a restaurant again.

Cream Cheese Cookies Recipe – Best Cookies Recipe for Soft, Melt-In-Your-Mouth Perfection

If you’re searching for a cookie that’s incredibly soft, rich, and slightly tangy with a melt-in-your-mouth texture, this Cream Cheese Cookies Recipe – Best Cookies Recipe is exactly what you need. These cookies are a hidden gem in the baking world—simple to make, yet elegant and irresistibly delicious.

What sets this recipe apart is the addition of cream cheese, which gives the cookies a soft, tender crumb and a subtle tang that perfectly balances the sweetness. Whether you’re baking for the holidays, a special occasion, or just a cozy afternoon treat, these cookies deliver bakery-quality results every time.

Why You’ll Love This Cream Cheese Cookies Recipe – Best Cookies Recipe

This Cream Cheese Cookies Recipe – Best Cookies Recipe stands out for so many reasons:

  • Ultra-soft texture: Thanks to cream cheese
  • Rich buttery flavor: Perfectly balanced sweetness
  • Easy to make: Simple ingredients and steps
  • Versatile: Great for decorating or flavor variations
  • Perfect for any occasion: Holidays, parties, or everyday snacks

These cookies are both comforting and elegant—an ideal combination.

Ingredients

To make the best Cream Cheese Cookies Recipe – Best Cookies Recipe, you’ll need:

Dry Ingredients:

  • All-purpose flour
  • Baking powder
  • Salt

Wet Ingredients:

  • Cream cheese (softened)
  • Unsalted butter (softened)
  • Granulated sugar
  • Egg
  • Vanilla extract

Optional Add-ins:

  • Powdered sugar (for dusting)
  • Chocolate chips
  • Lemon zest

Ingredient Notes

The secret to a perfect Cream Cheese Cookies Recipe – Best Cookies Recipe is using softened cream cheese and butter. This ensures a smooth dough and even texture.

Cream cheese adds moisture and richness, while butter provides that classic cookie flavor. Vanilla enhances the overall sweetness, and a pinch of salt balances everything out beautifully.

If you want to elevate the flavor, consider adding lemon zest for a fresh twist or chocolate chips for a richer dessert.

Step-by-Step Instructions

Step 1: Preheat the Oven

Preheat your oven to 350°F (175°C) and line baking sheets with parchment paper.

Step 2: Cream Butter and Cream Cheese

In a bowl, beat butter and cream cheese until smooth and fluffy.

Step 3: Add Sugar and Egg

Mix in sugar, then add egg and vanilla extract.

Step 4: Add Dry Ingredients

Gradually mix in flour, baking powder, and salt until dough forms.

Step 5: Shape the Cookies

Scoop dough onto baking sheet and gently flatten.

Step 6: Bake

Bake for 10–12 minutes until edges are lightly golden.

Tips for Perfect Results

To make the best Cream Cheese Cookies Recipe – Best Cookies Recipe, follow these expert tips:

  • Use room temperature ingredients for smooth mixing
  • Do not overmix the dough
  • Chill dough if it feels too soft
  • Bake just until edges are golden (not overbaked)
  • Let cookies cool before serving for best texture

These tips ensure soft, bakery-style cookies every time.

Variations

This Cream Cheese Cookies Recipe – Best Cookies Recipe is incredibly versatile:

Lemon Cream Cheese Cookies

  • Add fresh lemon zest for a citrus twist

Chocolate Chip Version

  • Mix in chocolate chips for extra sweetness

Holiday Sugar Cookies

  • Roll and decorate with icing or sprinkles

Filled Cookies

  • Add jam or cream filling in the center

What to Serve With It

These cookies pair wonderfully with:

  • Coffee or latte
  • Hot tea
  • Milk
  • Hot chocolate
  • Fruit desserts

They’re perfect as a snack, dessert, or even a sweet breakfast treat.


Storage & Reheating

  • Room temperature: Store in airtight container for up to 3 days
  • Refrigerator: Lasts up to 1 week
  • Freeze: Freeze dough or baked cookies for up to 2 months
  • Reheat: Warm slightly in microwave if desired

Proper storage keeps cookies fresh and soft.

Common Mistakes to Avoid

Avoid these mistakes when making Cream Cheese Cookies Recipe – Best Cookies Recipe:

  • Using cold cream cheese (causes lumps)
  • Overbaking (makes cookies dry)
  • Adding too much flour (makes cookies dense)
  • Skipping chilling when dough is too soft

Paying attention to these details guarantees perfect cookies.

FAQs

1. Can I freeze cream cheese cookie dough?

Yes, it freezes very well for future baking.

2. Why are my cookies too soft?

They may need a bit more baking time or cooling time.

3. Can I use low-fat cream cheese?

Yes, but full-fat gives the best texture and flavor.

4. Can I decorate these cookies?

Absolutely! They’re perfect for icing and decorating.

Final Thoughts

This Cream Cheese Cookies Recipe – Best Cookies Recipe is a must-try for anyone who loves soft, rich, and flavorful cookies. With its tender texture and buttery taste, it’s a recipe that works for every occasion—from casual snacks to festive celebrations.

Once you try these cookies, you’ll understand why they’re considered one of the best cookie recipes out there. Simple, elegant, and absolutely delicious—they’re guaranteed to become a favorite in your kitchen.

Image Prompt: Final stack of cream cheese cookies dusted with powdered sugar on a rustic plate, soft golden edges, cozy kitchen setting with warm natural sunlight, shallow depth of field, ultra-realistic 4k food photography

No-Bake Oatmeal Cookies Recipe: Easy, Chewy, Chocolatey Treats Ready in Minutes

If you’re craving a sweet treat but don’t want to turn on the oven, this No-Bake Oatmeal Cookies Recipe is exactly what you need. These cookies are soft, chewy, chocolatey, and packed with peanut butter flavor—all made in one pot and ready in minutes.

What makes these cookies so popular is their simplicity. With just a few pantry staples like oats, cocoa powder, sugar, and peanut butter, you can create a nostalgic dessert that tastes like something straight from a childhood kitchen. They set up beautifully without baking, making them perfect for quick desserts, snacks, or last-minute cravings.

Why You’ll Love This No-Bake Oatmeal Cookies Recipe

This No-Bake Oatmeal Cookies Recipe is a true classic for a reason.

  • No oven needed: Perfect for hot days or quick desserts
  • Ready in minutes: Fast and beginner-friendly
  • Budget-friendly ingredients: Pantry staples only
  • Chewy chocolate texture: Rich and satisfying
  • Kid-friendly recipe: Fun to make and eat

These cookies are the perfect combination of convenience and indulgence.

Ingredients

To make the best No-Bake Oatmeal Cookies Recipe, you’ll need:

Base Ingredients:

  • Granulated sugar
  • Unsalted butter
  • Milk
  • Unsweetened cocoa powder

Texture & Flavor:

  • Quick oats
  • Peanut butter
  • Vanilla extract
  • Pinch of salt

Ingredient Notes

The secret to a perfect No-Bake Oatmeal Cookies Recipe is timing and texture. Quick oats work best because they absorb the chocolate mixture evenly, giving the cookies a soft but structured bite.

Peanut butter adds creaminess and richness, while cocoa powder delivers deep chocolate flavor. The sugar and butter mixture forms the base that binds everything together once cooled.

It’s important to boil the mixture just long enough—too short and the cookies won’t set, too long and they may become dry or crumbly.

Step-by-Step Instructions

Step 1: Prepare the Chocolate Base

In a saucepan, combine sugar, butter, milk, and cocoa powder. Bring to a boil while stirring.

Step 2: Boil Properly

Let the mixture boil for about 1 minute for the right consistency.

Step 3: Add Flavor

Remove from heat and stir in peanut butter, vanilla, and salt until smooth.

Step 4: Mix in Oats

Quickly add oats and stir until fully coated.

Step 5: Shape Cookies

Drop spoonfuls onto parchment paper and let them cool until set.

Tips for Perfect Results

To make the best No-Bake Oatmeal Cookies Recipe, follow these expert tips:

  • Measure ingredients accurately for proper setting
  • Boil mixture for exactly 1 minute for best texture
  • Work quickly once oats are added
  • Use parchment paper to prevent sticking
  • Let cookies cool completely before moving

These steps ensure perfectly set, chewy cookies every time.

Variations

This No-Bake Oatmeal Cookies Recipe is easy to customize:

Chocolate Coconut Version

  • Add shredded coconut for extra texture

Nutty Crunch Version

  • Mix in chopped almonds or walnuts

Healthier Version

  • Use honey instead of sugar

Extra Chocolate Version

  • Add chocolate chips or drizzle melted chocolate

What to Serve With It

These cookies pair perfectly with:

  • Cold milk
  • Hot coffee or espresso
  • Vanilla ice cream
  • Hot chocolate
  • Fruit smoothies

These pairings make them even more enjoyable as a snack or dessert.

Storage Tips

  • Room temperature: Store in airtight container for up to 5 days
  • Refrigerator: Keeps fresh for up to 1 week
  • Freezer: Freeze for up to 2 months
  • Tip: Separate layers with parchment paper to prevent sticking

Proper storage keeps them soft and chewy.

Common Mistakes to Avoid

Avoid these mistakes when making No-Bake Oatmeal Cookies Recipe:

  • Not boiling long enough (cookies won’t set)
  • Boiling too long (cookies become dry)
  • Using old-fashioned oats (texture becomes too hard)
  • Not working quickly after mixing oats
  • Skipping parchment paper

These small details make a big difference in final texture.

FAQs

1. Why didn’t my no-bake cookies set?

They likely didn’t boil long enough or measurements were off.

2. Can I use old-fashioned oats?

Yes, but quick oats give a softer texture.

3. Do these cookies need refrigeration?

Not required, but refrigeration helps them stay firmer.

4. Can I make them without peanut butter?

Yes, but texture and flavor will change slightly.

Final Thoughts

This No-Bake Oatmeal Cookies Recipe is the perfect quick dessert for busy days, last-minute cravings, or fun kitchen moments with kids. With simple ingredients and no oven required, you can create rich, chewy, chocolatey cookies in minutes.

Once you try them, they’ll become a go-to treat you’ll make again and again. Easy, nostalgic, and delicious—these cookies prove that sometimes the simplest recipes are the best.

Pumpkin Chocolate Chip Cookies Recipe: Soft, Chewy, Fall-Inspired Treats

If you’re looking for the perfect cozy fall dessert, this Pumpkin Chocolate Chip Cookies Recipe is exactly what you need. These cookies are soft, chewy, lightly spiced, and packed with rich chocolate chips that melt in every bite. They capture everything we love about autumn baking in one simple, irresistible treat.

Unlike traditional cookies, pumpkin adds moisture and a tender texture that keeps these cookies soft for days. Combined with warm spices like cinnamon and nutmeg, plus sweet chocolate chips, they become the ultimate comfort dessert for any season—not just fall.

Why You’ll Love This Pumpkin Chocolate Chip Cookies Recipe

This Pumpkin Chocolate Chip Cookies Recipe is a must-try for cookie lovers.

  • Soft and chewy texture: Thanks to real pumpkin puree
  • Perfect fall flavor: Warm spices in every bite
  • Easy to make: Simple pantry ingredients
  • Family-friendly treat: Loved by kids and adults
  • Great for holidays: Perfect for Thanksgiving and fall gatherings

These cookies bring bakery-quality results straight to your kitchen.

Ingredients

To make the best Pumpkin Chocolate Chip Cookies Recipe, you’ll need:

Dry Ingredients:

  • All-purpose flour
  • Baking soda
  • Baking powder
  • Cinnamon
  • Nutmeg
  • Salt

Wet Ingredients:

  • Pumpkin puree (not pumpkin pie filling)
  • Butter (softened)
  • Brown sugar
  • Granulated sugar
  • Egg
  • Vanilla extract

Add-ins:

  • Semi-sweet chocolate chips

Ingredient Notes

The secret to a great Pumpkin Chocolate Chip Cookies Recipe is using pure pumpkin puree. It adds natural moisture and gives the cookies their soft texture. Avoid pumpkin pie filling, as it already contains spices and sugar.

Brown sugar is essential for chewiness, while cinnamon and nutmeg bring that warm, cozy flavor. Semi-sweet chocolate chips balance the sweetness of the pumpkin beautifully, creating the perfect flavor contrast.

Step-by-Step Instructions

Step 1: Preheat Oven

Preheat your oven to 350°F (175°C) and line baking sheets with parchment paper.

Step 2: Mix Dry Ingredients

In a bowl, whisk together flour, baking soda, baking powder, salt, and spices.

Step 3: Cream Butter and Sugar

Beat butter, brown sugar, and granulated sugar until light and fluffy.

Step 4: Add Wet Ingredients

Mix in pumpkin puree, egg, and vanilla extract until smooth.

Step 5: Combine Everything

Gradually add dry ingredients into wet mixture, then fold in chocolate chips.

Step 6: Bake

Scoop dough onto baking sheet and bake for 10–12 minutes until set.

Tips for Perfect Results

To make the best Pumpkin Chocolate Chip Cookies Recipe, follow these expert tips:

  • Don’t overmix the dough to keep cookies soft
  • Use room temperature butter for better texture
  • Chill dough for thicker cookies
  • Do not overbake (cookies continue cooking after removal)
  • Use high-quality chocolate chips for better flavor

These tips ensure soft, bakery-style cookies every time.

Variations

This Pumpkin Chocolate Chip Cookies Recipe can easily be customized:

White Chocolate Version

  • Replace chocolate chips with white chocolate

Nutty Pumpkin Cookies

  • Add walnuts or pecans for crunch

Healthy Version

  • Use whole wheat flour and reduce sugar

Pumpkin Spice Extra Flavor

  • Add extra cinnamon and pumpkin spice mix

What to Serve With It

These cookies pair perfectly with:

  • Hot coffee or latte
  • Warm apple cider
  • Hot chocolate
  • Vanilla ice cream
  • Pumpkin spice drinks

These combinations make the cookies even more comforting.

Storage & Reheating

  • Room temperature: Store in airtight container for up to 4 days
  • Refrigerator: Lasts up to 1 week
  • Freezer: Freeze dough or baked cookies for up to 2 months
  • Reheat: Warm in microwave for 10–15 seconds

Proper storage keeps cookies soft and fresh.

Common Mistakes to Avoid

Avoid these mistakes when making Pumpkin Chocolate Chip Cookies Recipe:

  • Using pumpkin pie filling instead of puree
  • Overbaking cookies (makes them dry)
  • Skipping chilling step (if you want thicker cookies)
  • Adding too much flour (makes cookies dense)
  • Not mixing evenly (uneven texture)

Avoiding these ensures perfect cookies every time.

FAQs

1. Why are my pumpkin cookies too soft?

Pumpkin adds moisture, so slight softness is normal. Don’t overbake.

2. Can I freeze the dough?

Yes, cookie dough freezes very well for later baking.

3. Can I use fresh pumpkin instead of canned?

Yes, just make sure it’s pureed and not watery.

4. Do these cookies need refrigeration?

No, they can stay at room temperature for a few days.

Final Thoughts

This Pumpkin Chocolate Chip Cookies Recipe is the perfect combination of cozy spices, soft texture, and rich chocolate flavor. It’s simple, comforting, and ideal for fall baking or anytime you want a warm homemade treat.

Once you try these cookies, they’ll quickly become a family favorite. Soft, chewy, and full of flavor—they’re everything a perfect cookie should be.

Rosemary Roasted Butternut Squash Pizza: A Cozy Gourmet Fall-Inspired Homemade Pizza

If you’re craving a homemade pizza that feels a little more gourmet than your usual pepperoni slice, this Rosemary Roasted Butternut Squash Pizza is exactly what you need. It combines sweet caramelized butternut squash, earthy rosemary, creamy cheese, and a crispy golden crust for a flavor profile that tastes like something from a high-end pizzeria.

This pizza is especially perfect for fall and winter, when butternut squash is at its peak sweetness. Roasting it brings out deep caramelized notes that pair beautifully with savory cheese and aromatic herbs. It’s comforting, elegant, and surprisingly easy to make at home.

Why You’ll Love This Rosemary Roasted Butternut Squash Pizza

This Rosemary Roasted Butternut Squash Pizza is the perfect balance of sweet, savory, and aromatic flavors.

  • Gourmet flavor at home: Tastes like a restaurant pizza
  • Seasonal ingredients: Perfect for fall and winter cooking
  • Crispy crust + soft squash: Amazing texture contrast
  • Easy to customize: Add cheese, meats, or veggies
  • Comfort food upgrade: A cozy twist on classic pizza

It’s the kind of recipe that feels special enough for guests but simple enough for a weeknight dinner.

Ingredients

To make the best Rosemary Roasted Butternut Squash Pizza, you’ll need:

For the Pizza Dough:

  • Store-bought or homemade pizza dough
  • Olive oil

For the Roasted Squash:

  • Butternut squash (peeled and cubed)
  • Olive oil
  • Salt and pepper
  • Fresh rosemary

For the Toppings:

  • Mozzarella cheese
  • Parmesan cheese
  • Ricotta (optional)
  • Garlic (minced)
  • Extra rosemary for garnish

=Ingredient Notes

The star of this Rosemary Roasted Butternut Squash Pizza is, of course, the squash. Roasting it brings out natural sweetness and creates slightly crispy edges that contrast beautifully with melted cheese.

Fresh rosemary is essential—it adds an earthy aroma that balances the sweetness of the squash. Using a mix of mozzarella and parmesan gives both meltiness and sharp flavor depth.

A light brush of olive oil on the dough ensures a crisp, golden crust that supports all the toppings without getting soggy.

Step-by-Step Instructions

Step 1: Roast the Butternut Squash

Toss squash cubes with olive oil, salt, pepper, and rosemary. Roast at 400°F (200°C) until golden and tender.

Step 2: Prepare the Dough

Roll out pizza dough and brush lightly with olive oil.

Step 3: Assemble the Pizza

Spread roasted squash evenly over the dough, add mozzarella, parmesan, and garlic.

Step 4: Bake the Pizza

Bake at high heat (450°F / 230°C) until crust is golden and cheese is bubbling.

Step 5: Finish and Serve

Top with fresh rosemary and optional ricotta before slicing.

Tips for Perfect Results

To make the best Rosemary Roasted Butternut Squash Pizza, follow these expert tips:

  • Roast squash until slightly caramelized for deeper flavor
  • Don’t overload toppings to keep crust crispy
  • Use high oven heat for best texture
  • Preheat baking tray for extra crispiness
  • Add rosemary after baking for fresh aroma

These small steps elevate your homemade pizza instantly.

Variations

This Rosemary Roasted Butternut Squash Pizza is easy to customize:

Goat Cheese Version

  • Add creamy goat cheese for tangy flavor

Vegan Version

  • Use dairy-free cheese alternatives

Protein Boost

  • Add grilled chicken or turkey bacon

Sweet & Savory Version

  • Drizzle honey or balsamic glaze

What to Serve With It

This pizza pairs beautifully with:

  • Arugula salad with balsamic dressing
  • Creamy tomato soup
  • Roasted vegetables
  • Garlic butter breadsticks
  • White wine or sparkling water

These sides complement the rich, earthy flavors perfectly.

Storage & Reheating

  • Refrigerate: Store leftovers in airtight container for up to 3 days
  • Freeze: Wrap slices and freeze up to 1 month
  • Reheat: Use oven or air fryer for best crispiness
  • Avoid microwave to maintain crust texture

Proper reheating keeps the pizza tasting fresh and delicious.

Common Mistakes to Avoid

Avoid these mistakes when making Rosemary Roasted Butternut Squash Pizza:

  • Undercooking squash (keeps it hard)
  • Overloading toppings (makes crust soggy)
  • Skipping olive oil (reduces crispiness)
  • Using low oven temperature (prevents browning)

Attention to detail ensures a perfect pizza every time.

FAQs

1. Can I use pre-cut butternut squash?

Yes, it saves time and works just as well.

2. Can I make this pizza ahead of time?

You can roast squash ahead, but assemble and bake fresh.

3. What cheese works best?

Mozzarella and parmesan are ideal, but goat cheese is great too.

4. Is this pizza sweet or savory?

It’s a balanced mix of both—sweet squash with savory cheese and herbs.

Final Thoughts

This Rosemary Roasted Butternut Squash Pizza is the perfect combination of cozy, seasonal flavors and gourmet-style cooking. With its caramelized squash, fragrant rosemary, and melty cheese, every bite feels comforting yet elevated.

Whether you’re making it for a family dinner, fall gathering, or a cozy night in, this pizza brings warmth and flavor to the table. Once you try it, it will quickly become a seasonal favorite.