The Best Pasta Salad: Fresh, Flavorful & Perfect for Any Occasion

When it comes to crowd-pleasing dishes, nothing beats the best pasta salad. It’s colorful, refreshing, easy to customize, and perfect for everything from backyard barbecues to quick weekday meals. Packed with tender pasta, crisp vegetables, and a zesty dressing, this recipe delivers bold flavor in every bite.

Whether you’re hosting a party or prepping meals for the week, this pasta salad is a reliable favorite you’ll come back to again and again.

Why You’ll Love The Best Pasta Salad

There are countless reasons why the best pasta salad stands out:

  • Quick and easy to prepare
  • Perfect for make-ahead meals
  • Customizable with your favorite ingredients
  • Fresh, light, and satisfying
  • Ideal for gatherings, picnics, and potlucks

It’s a versatile dish that works for almost any occasion.

Ingredients

To make the best pasta salad, you’ll need:

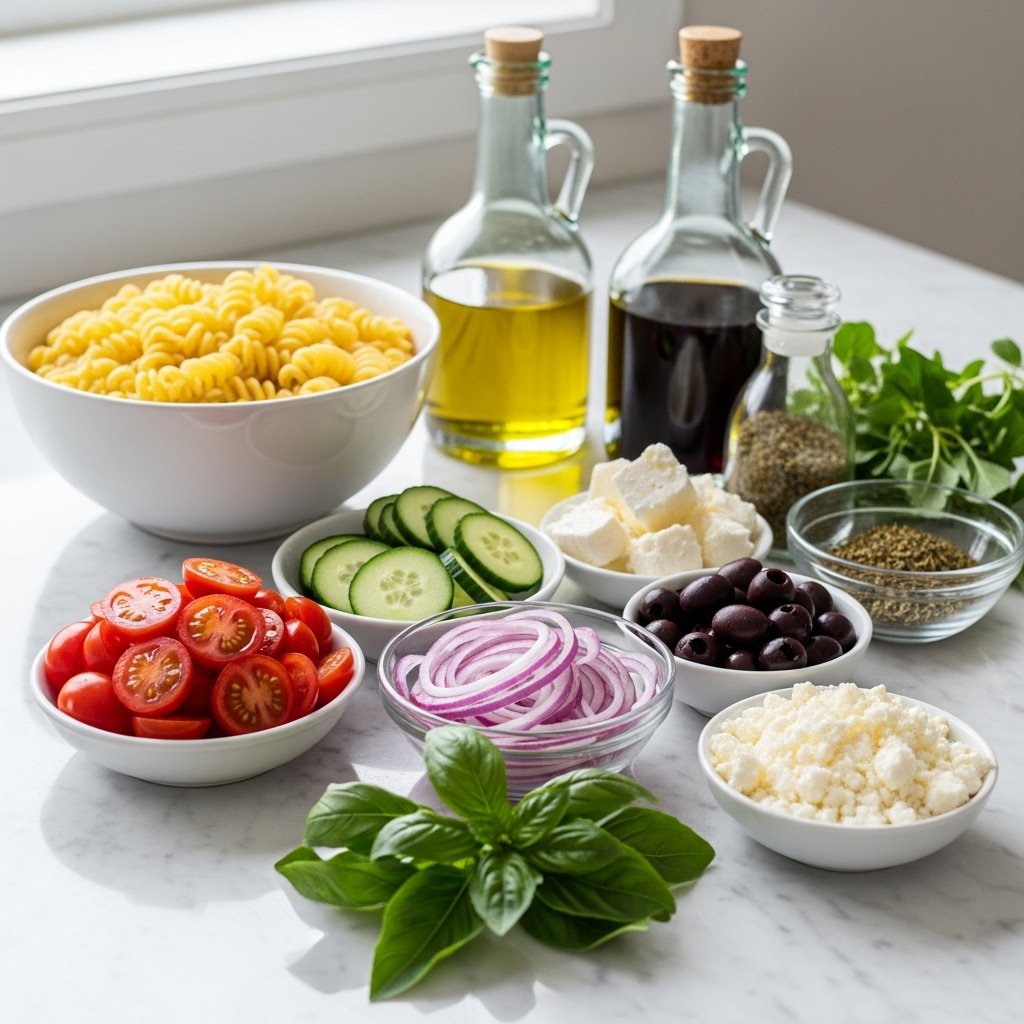
  • 3 cups cooked pasta (rotini or penne)
  • 1 cup cherry tomatoes (halved)
  • 1 cup cucumber (diced)
  • ½ cup red onion (finely chopped)
  • ½ cup black olives (sliced)
  • ½ cup feta cheese (crumbled)
  • ¼ cup fresh parsley (chopped)

For the Dressing:

  • ⅓ cup olive oil
  • 3 tablespoons red wine vinegar
  • 1 teaspoon Dijon mustard
  • 1 teaspoon garlic (minced)
  • Salt and pepper to taste

Ingredient Notes

The beauty of the best pasta salad is its flexibility. Rotini and penne are great choices because they hold the dressing well, but you can use any short pasta shape you like.

Fresh vegetables add crunch and color, while feta cheese brings a creamy, tangy element. The homemade vinaigrette ties everything together with a bright, zesty flavor.

Step-by-Step Instructions

1. Cook the Pasta

Boil pasta according to package instructions, then drain and cool.

2. Prepare the Vegetables

Chop tomatoes, cucumber, onion, and herbs.

3. Make the Dressing

Whisk olive oil, vinegar, mustard, garlic, salt, and pepper.

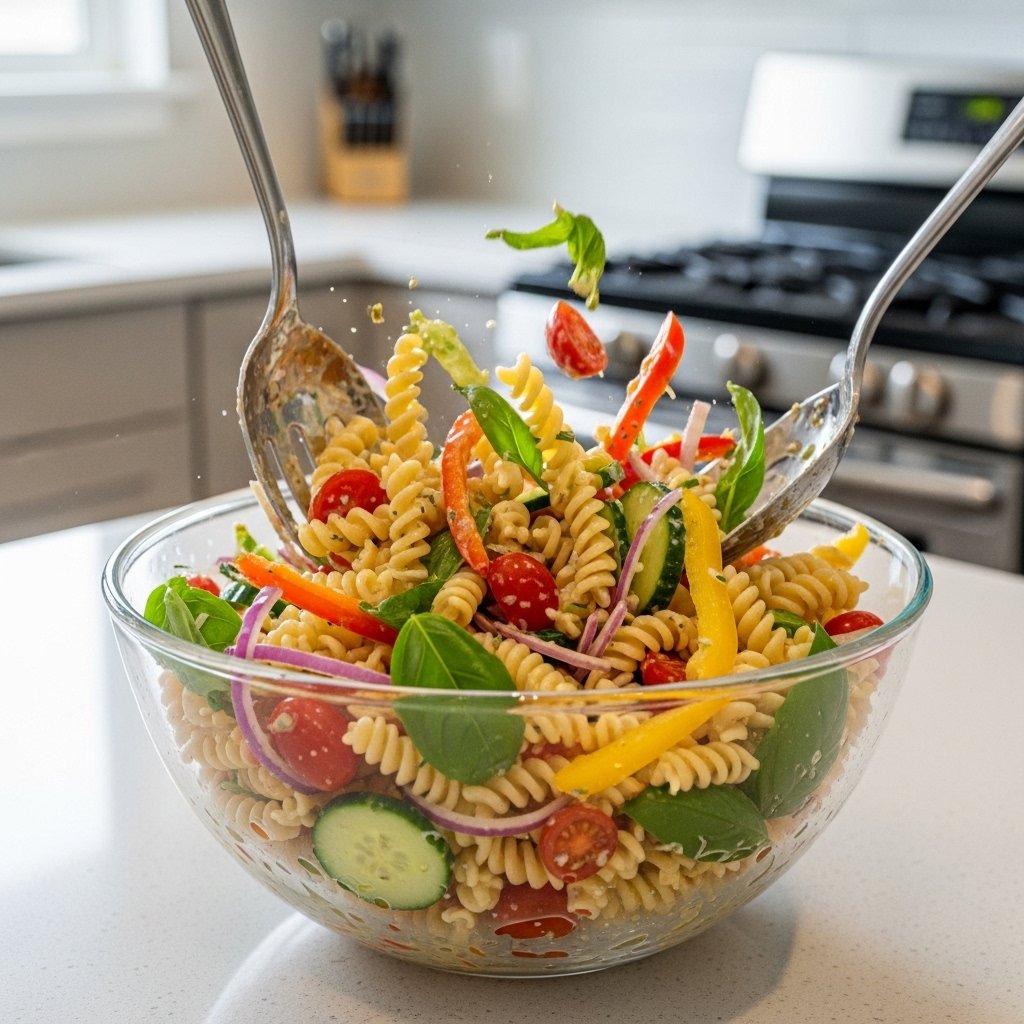
4. Combine Everything

In a large bowl, mix pasta, vegetables, olives, and feta.

5. Toss and Chill

Pour dressing over salad, toss well, and refrigerate for at least 30 minutes.

Tips for Perfect Results

To make the best pasta salad, follow these tips:

  • Rinse pasta with cold water to stop cooking
  • Don’t overcook pasta—keep it slightly firm
  • Toss with dressing while slightly warm for better absorption
  • Chill before serving for enhanced flavor
  • Adjust seasoning just before serving
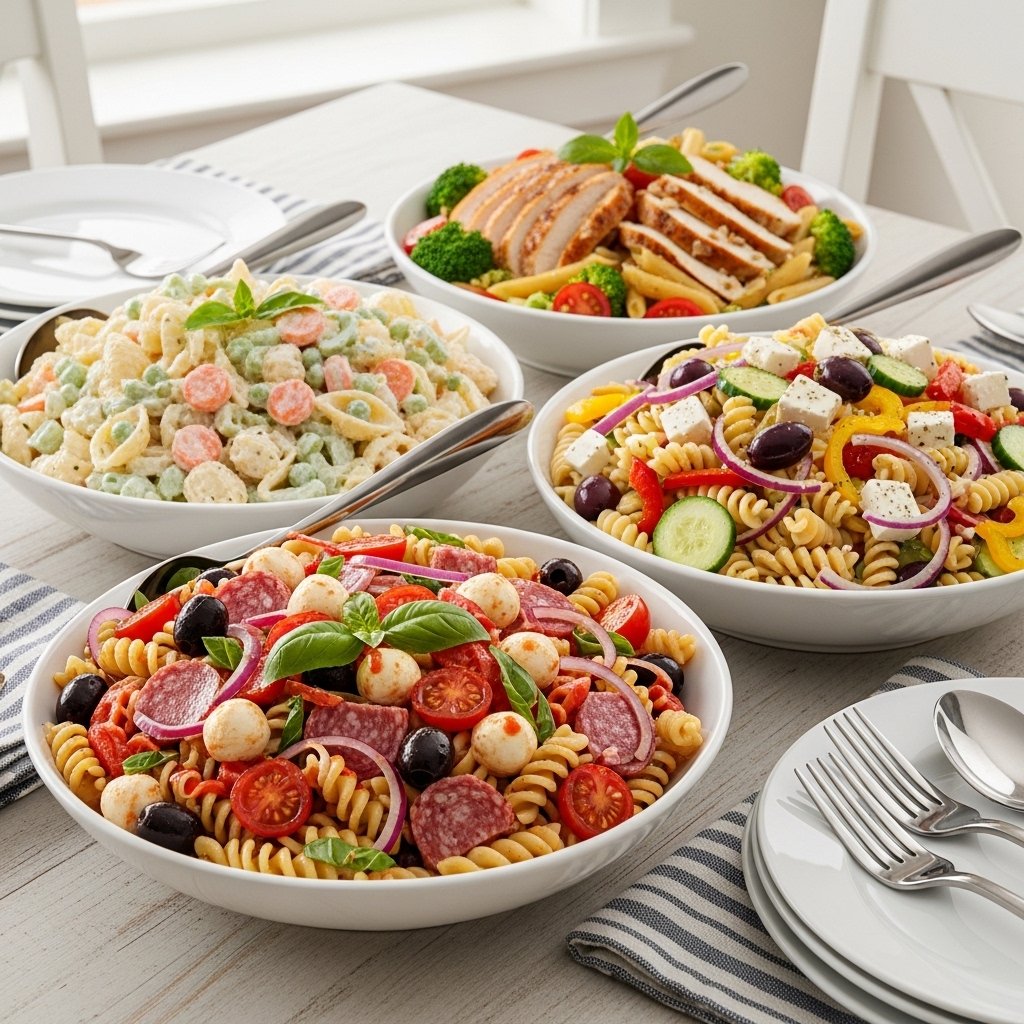
Variations to Try

Italian Pasta Salad

Add salami, mozzarella balls, and Italian dressing.
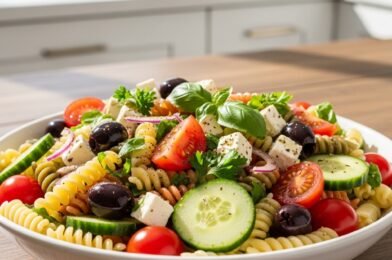
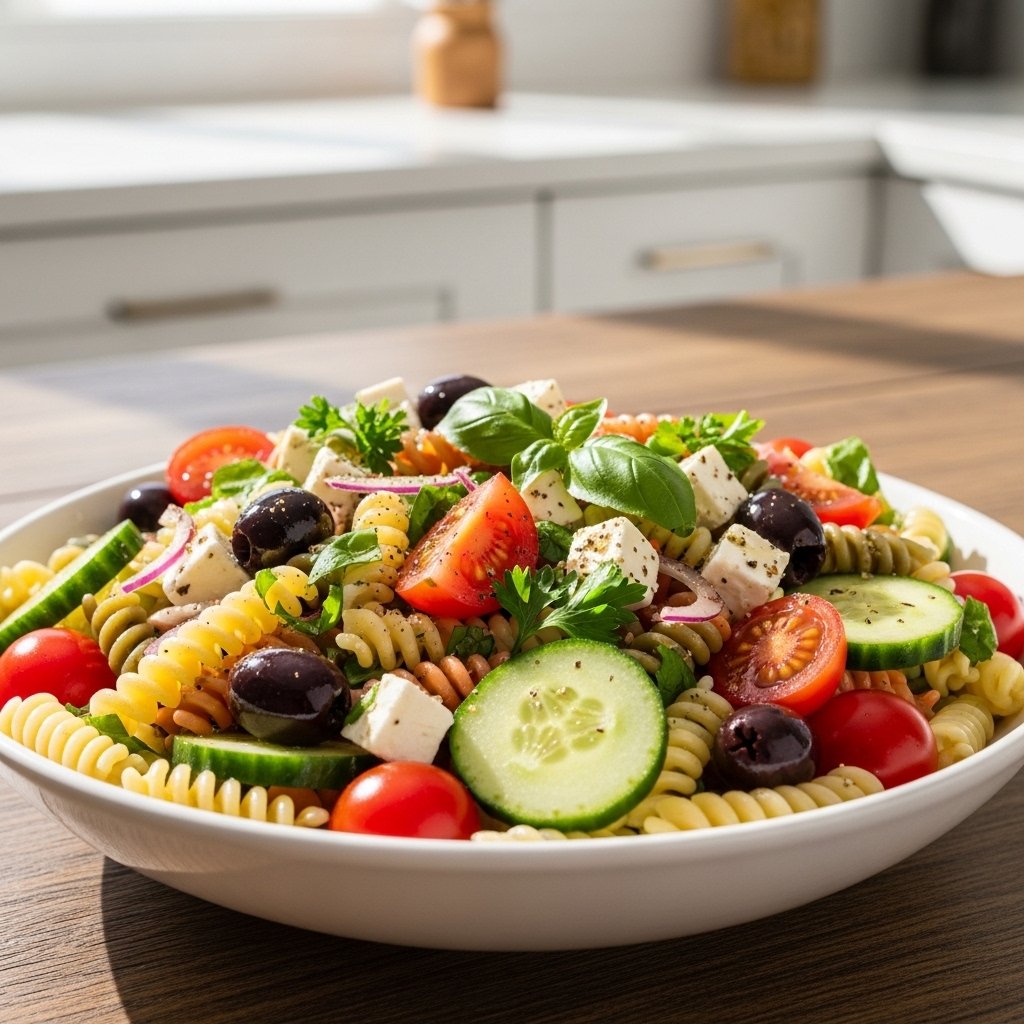
Greek Pasta Salad

Use kalamata olives, cucumbers, and extra feta.

Creamy Pasta Salad

Add mayonnaise or Greek yogurt for a creamy version.

Protein-Packed Salad

Include grilled chicken, tuna, or chickpeas.

What to Serve With It

Pair the best pasta salad with:

  • Grilled chicken or steak
  • Burgers or sandwiches
  • BBQ dishes
  • Fresh bread or garlic bread

It’s the perfect side dish that complements a wide range of meals.

Storage & Reheating

To store the best pasta salad:

  • Keep in an airtight container in the refrigerator for up to 4 days
  • Stir before serving to redistribute dressing
  • Add extra dressing if it becomes dry
  • Do not freeze (texture may change)

Common Mistakes to Avoid

Avoid these mistakes when making the best pasta salad:

  • Overcooking the pasta
  • Not seasoning enough
  • Skipping the chilling step
  • Using too much or too little dressing

FAQs

1. Can I make pasta salad ahead of time?

Yes! It tastes even better after chilling for a few hours.

2. What pasta works best?

Short pasta like rotini, penne, or bowtie works best.

3. Can I make it vegan?

Absolutely—just skip the cheese or use a plant-based alternative.

4. How do I keep it from drying out?

Add a bit more dressing before serving.

Final Thoughts

This recipe truly lives up to its name as the best pasta salad—fresh, flavorful, and incredibly easy to make. It’s a dish that brings people together, whether at a casual picnic or a festive gathering.

With its vibrant ingredients and endless customization options, this pasta salad is sure to become a staple in your kitchen. Try it once, and you’ll find yourself making it again and again!

Raspberry Almond Thumbprints—A Holiday Cookie Classic

Few treats capture the magic of the season quite like raspberry almond thumbprints—a holiday cookie classic. These buttery, melt-in-your-mouth cookies filled with vibrant raspberry jam and infused with delicate almond flavor are a staple on holiday cookie trays across the country. Their beautiful appearance and irresistible taste make them perfect for gifting, entertaining, or simply enjoying with a warm drink by the fire.

What makes these cookies truly special is their simplicity—easy to prepare, yet elegant enough to impress anyone who takes a bite.

Why You’ll Love Raspberry Almond Thumbprints

There are so many reasons why raspberry almond thumbprints—a holiday cookie classic deserves a spot in your baking rotation:

  • Soft, buttery texture that melts in your mouth
  • Sweet and slightly tart raspberry filling
  • Subtle almond flavor that enhances every bite
  • Beautiful presentation for holidays and gifts
  • Easy, beginner-friendly recipe

These cookies strike the perfect balance between flavor, texture, and visual appeal.

Ingredients

To make raspberry almond thumbprints—a holiday cookie classic, you’ll need:

For the Cookies:

  • 1 cup unsalted butter (softened)
  • ⅔ cup sugar
  • 1 teaspoon almond extract
  • 2 cups all-purpose flour
  • ½ teaspoon salt

For the Filling:

  • ½ cup raspberry jam

Optional Topping:

  • Powdered sugar for dusting

Ingredient Notes

The beauty of raspberry almond thumbprints—a holiday cookie classic lies in its simple ingredients. High-quality butter creates a rich, tender base, while almond extract adds a signature flavor that pairs perfectly with raspberry jam.

Choose a thick, high-quality raspberry jam to prevent spreading during baking. If you prefer less sweetness, opt for a jam with natural fruit flavor and minimal added sugar.

Step-by-Step Instructions

1. Prepare the Dough

Preheat oven to 350°F (175°C). Cream butter and sugar until light and fluffy, then mix in almond extract.

2. Add Dry Ingredients

Gradually add flour and salt, mixing until a soft dough forms.

3. Shape the Cookies

Roll dough into small balls and place on a lined baking sheet.

4. Create Thumbprints

Press your thumb gently into the center of each cookie.

5. Add Filling

Fill each indentation with raspberry jam.

6. Bake

Bake for 12–15 minutes until edges are lightly golden.

Tips for Perfect Results

To make the best raspberry almond thumbprints—a holiday cookie classic, follow these tips:

  • Use room-temperature butter for smooth mixing
  • Don’t overwork the dough to keep cookies tender
  • Chill dough if it becomes too soft
  • Use a small spoon for even jam filling
  • Avoid overfilling to prevent overflow

Variations to Try

Apricot Almond Thumbprints

Swap raspberry jam for apricot preserves.

Chocolate Drizzle Version

Drizzle melted chocolate over baked cookies.

Nut-Coated Cookies

Roll dough balls in chopped almonds before baking.

Lemon Raspberry Twist

Add lemon zest to the dough for a citrus kick.

What to Serve With It

Pair your raspberry almond thumbprints—a holiday cookie classic with:

  • Hot coffee or espresso
  • Tea (especially black or herbal blends)
  • Hot chocolate
  • A holiday dessert platter

These pairings complement the cookies’ buttery richness and fruity sweetness.

Storage & Reheating

To keep your raspberry almond thumbprints—a holiday cookie classic fresh:

  • Store in an airtight container for up to 5 days
  • Keep at room temperature
  • Refrigerate for longer storage if needed
  • Freeze for up to 2 months

Common Mistakes to Avoid

Avoid these pitfalls when making raspberry almond thumbprints—a holiday cookie classic:

  • Using runny jam that spreads too much
  • Overbaking, which dries out cookies
  • Not spacing cookies properly
  • Skipping the indentation step

FAQs

1. Can I make these cookies ahead of time?

Yes! They store well and can be made days in advance.

2. Can I use different jam flavors?

Absolutely—strawberry, apricot, or blueberry all work well.

3. Why did my cookies spread too much?

The dough may have been too warm—try chilling it.

4. Can I freeze the dough?

Yes, you can freeze shaped dough balls and bake later.

Final Thoughts

These raspberry almond thumbprints—a holiday cookie classic are everything you want in a festive treat—simple, beautiful, and incredibly delicious. Their buttery texture, fruity center, and delicate almond flavor make them a standout on any dessert table.

Whether you’re baking for the holidays or just craving a comforting homemade cookie, this recipe is guaranteed to deliver. Once you try them, they’ll quickly become a tradition in your kitchen!

Homemade Star Crunch Treat: Chewy, Chocolatey & Nostalgic

If you grew up loving those classic chewy chocolate caramel snacks, this homemade Star Crunch treat is about to bring back all the nostalgia—with an even better, fresher twist. These no-bake treats combine crispy rice cereal, gooey caramel, and rich chocolate into perfectly chewy, irresistible bites.

Best of all, this recipe is incredibly easy to make at home with simple ingredients, giving you that iconic texture and flavor without any preservatives.

Why You’ll Love This Homemade Star Crunch Treat

This homemade Star Crunch treat is a favorite for both kids and adults:

  • No baking required—quick and easy
  • Chewy, crunchy, and chocolatey texture
  • Made with simple pantry ingredients
  • Perfect for lunchboxes, snacks, or dessert
  • Customizable with fun add-ins

It’s a perfect balance of nostalgia and homemade goodness.

Ingredients

To make this delicious homemade Star Crunch treat, you’ll need:

  • 3 cups crispy rice cereal
  • 1 cup semi-sweet chocolate chips
  • 1 cup caramel candies (or soft caramels)
  • 3 tablespoons butter
  • 2 tablespoons milk
  • ½ cup mini marshmallows

Ingredient Notes

The key to a perfect homemade Star Crunch treat is achieving the right balance of chewiness and crunch. Soft caramels melt smoothly and provide that signature gooey texture, while crispy rice cereal gives structure and lightness.

You can also experiment with dark chocolate for a richer flavor or add peanut butter for a nutty twist.

Step-by-Step Instructions

1. Melt the Caramel Mixture

In a saucepan, melt caramel candies, butter, and milk over low heat until smooth.

2. Add Chocolate

Stir in chocolate chips until melted and fully combined.

3. Mix in Cereal

Remove from heat and fold in crispy rice cereal and marshmallows.

4. Shape the Treats

Scoop mixture onto parchment paper and flatten into round discs.

5. Let Set

Allow to cool and set at room temperature until firm.

Tips for Perfect Results

To get the best homemade Star Crunch treat, follow these tips:

  • Melt caramel slowly to avoid burning
  • Use fresh marshmallows for better texture
  • Work quickly before the mixture sets
  • Lightly grease hands or spoon for easier shaping
  • Let treats cool completely before serving

Variations to Try

Peanut Butter Star Crunch

Add peanut butter for a rich, nutty flavor.

Dark Chocolate Version

Use dark chocolate for a deeper taste.

Coconut Crunch Treats

Mix in shredded coconut for added texture.

Mini Bites

Shape into small bite-sized pieces for easy snacking.

What to Serve With It

Pair your homemade Star Crunch treat with:

  • A glass of cold milk
  • Hot chocolate
  • Coffee or latte
  • Fresh fruit

These pairings enhance the chocolatey richness and chewy texture.

Storage & Reheating

To keep your homemade Star Crunch treat fresh:

  • Store in an airtight container for up to 5 days
  • Keep at room temperature
  • Avoid refrigeration (can harden texture)
  • Separate layers with parchment paper

Common Mistakes to Avoid

Avoid these common issues when making homemade Star Crunch treat:

  • Overheating the caramel
  • Not mixing quickly enough
  • Using stale cereal
  • Making treats too thick

FAQs

1. Can I use store-bought caramel sauce?

It’s better to use soft caramels for the right texture.

2. Can I make these ahead of time?

Yes! They store well for several days.

3. Can I freeze Star Crunch treats?

Freezing is not recommended as it affects texture.

4. How do I keep them soft and chewy?

Store properly and avoid overcooking the caramel.

Final Thoughts

This homemade Star Crunch treat is the perfect combination of chewy, crunchy, and chocolatey goodness. It’s quick to make, incredibly satisfying, and brings a nostalgic favorite right into your kitchen.

Whether you’re making them for a party, a snack, or just to satisfy a sweet craving, these treats are guaranteed to impress. Once you try them, you’ll never go back to store-bought!

The Best Chocolate Hazelnut Cookies: Rich, Nutty & Irresistibly Soft

If you’re a fan of rich chocolate desserts with a nutty twist, these the best chocolate hazelnut cookies are about to become your go-to recipe. Combining deep cocoa flavor with crunchy, toasted hazelnuts and gooey chocolate chips, these cookies strike the perfect balance between indulgent and comforting.

Perfect for holidays, gifting, or everyday baking, these cookies deliver bakery-style results with minimal effort.

Why You’ll Love The Best Chocolate Hazelnut Cookies

There are plenty of reasons why the best chocolate hazelnut cookies stand out:

  • Rich chocolate flavor with a nutty crunch
  • Soft, chewy texture with slightly crisp edges
  • Easy-to-follow recipe for beginners
  • Perfect for make-ahead baking
  • Customizable with different chocolate types

These cookies bring together everything you love about classic cookies with an elevated twist.

Ingredients

To make the best chocolate hazelnut cookies, you’ll need:

For the Cookies:

  • 1 ¾ cups all-purpose flour
  • ½ cup unsweetened cocoa powder
  • 1 teaspoon baking soda
  • ½ teaspoon salt
  • ½ cup unsalted butter (softened)
  • ¾ cup brown sugar
  • ½ cup granulated sugar
  • 2 large eggs
  • 1 teaspoon vanilla extract
  • 1 cup chocolate chips
  • ¾ cup chopped hazelnuts (toasted)

Ingredient Notes

The secret to the best chocolate hazelnut cookies lies in the quality of the chocolate and hazelnuts. Toasting the hazelnuts enhances their flavor and adds a delightful crunch.

For a richer taste, use dark chocolate chips or chunks. You can also mix in milk or semi-sweet chocolate depending on your preference.

Step-by-Step Instructions

1. Prepare Dry Ingredients

In a bowl, whisk together flour, cocoa powder, baking soda, and salt.

2. Cream Butter and Sugars

In another bowl, beat butter, brown sugar, and granulated sugar until light and fluffy.

3. Add Wet Ingredients

Mix in eggs and vanilla extract until well combined.

4. Combine and Fold

Gradually add dry ingredients, then fold in chocolate chips and hazelnuts.

5. Bake the Cookies

Scoop dough onto a lined baking sheet and bake at 350°F (175°C) for 10–12 minutes.

Tips for Perfect Results

To achieve the best chocolate hazelnut cookies, keep these tips in mind:

  • Toast hazelnuts for deeper flavor
  • Don’t overmix the dough to keep cookies tender
  • Chill dough for 20 minutes for thicker cookies
  • Use parchment paper for even baking
  • Slightly underbake for a soft center

Variations to Try

Nutella-Stuffed Cookies

Add a spoonful of chocolate hazelnut spread inside each cookie.

Double Chocolate Version

Add extra chocolate chips or chunks.

Gluten-Free Option

Use a gluten-free flour blend.

Sea Salt Topping

Sprinkle flaky sea salt on top for contrast.

What to Serve With It

Pair your the best chocolate hazelnut cookies with:

  • A glass of cold milk
  • Hot coffee or espresso
  • Vanilla ice cream
  • Fresh berries

These pairings enhance the rich chocolate and nutty flavors.

Storage & Reheating

To keep the best chocolate hazelnut cookies fresh:

  • Store in an airtight container for up to 5 days
  • Freeze baked cookies for up to 2 months
  • Reheat briefly for a warm, gooey texture
  • Freeze dough for future baking

Common Mistakes to Avoid

Avoid these mistakes when making the best chocolate hazelnut cookies:

  • Skipping the toasting step for hazelnuts
  • Overbaking, which dries out cookies
  • Using low-quality cocoa powder
  • Not measuring ingredients properly

FAQs

1. Can I use store-bought roasted hazelnuts?

Yes, just ensure they’re unsalted and fresh.

2. How do I make cookies softer?

Slightly underbake and store them properly.

3. Can I freeze the dough?

Absolutely! Freeze in portions and bake as needed.

4. What chocolate works best?

Dark or semi-sweet chocolate works best for balanced flavor.

Final Thoughts

These the best chocolate hazelnut cookies are everything a cookie lover could want—rich, soft, chocolatey, and packed with nutty goodness. They’re easy to make, incredibly satisfying, and perfect for any occasion.

Once you try this recipe, you’ll understand why it truly lives up to its name. Bake a batch, share with loved ones, and enjoy every delicious bite!

Orange Chocolate Chip Ricotta Cookies (Soft & Melt-In-Your-Mouth!)

If you’ve never tried orange chocolate chip ricotta cookies (soft & melt-in-your-mouth!), you’re in for a treat that’s both unique and unforgettable. These cookies combine the creamy richness of ricotta cheese with bright citrus notes and sweet chocolate chips, creating a texture that’s incredibly soft, tender, and almost cake-like.

Perfect for holidays, afternoon snacks, or gifting, these cookies offer a refreshing twist on traditional chocolate chip cookies while still delivering that comforting homemade feel.

Why You’ll Love These Orange Chocolate Chip Ricotta Cookies

These orange chocolate chip ricotta cookies (soft & melt-in-your-mouth!) are truly special for so many reasons:

  • Ultra-soft, pillowy texture thanks to ricotta cheese
  • Bright orange flavor that pairs beautifully with chocolate
  • Easy, beginner-friendly recipe
  • Perfect balance of sweetness and freshness
  • Great for make-ahead baking or gifting

They’re a delightful upgrade from classic cookies, offering something a little more elegant and flavorful.

Ingredients

To make these delicious orange chocolate chip ricotta cookies (soft & melt-in-your-mouth!), you’ll need:

For the Cookies:

  • 2 cups all-purpose flour
  • 1 teaspoon baking powder
  • ½ teaspoon baking soda
  • ½ teaspoon salt
  • ½ cup unsalted butter (softened)
  • 1 cup sugar
  • 1 large egg
  • 1 cup ricotta cheese
  • 1 tablespoon orange zest
  • 2 tablespoons fresh orange juice
  • 1 teaspoon vanilla extract
  • 1 cup chocolate chips

Optional Glaze:

  • 1 cup powdered sugar
  • 2 tablespoons orange juice
  • ½ teaspoon orange zest

Ingredient Notes

The secret to the soft texture of orange chocolate chip ricotta cookies (soft & melt-in-your-mouth!) is the ricotta cheese. It adds moisture and richness without making the cookies heavy.

Fresh orange zest is essential for a vibrant citrus flavor—don’t skip it! Use high-quality chocolate chips for the best contrast of flavors, and always opt for full-fat ricotta for optimal texture.

Step-by-Step Instructions

1. Prepare the Dough

Preheat oven to 350°F (175°C). In a bowl, whisk flour, baking powder, baking soda, and salt.

2. Cream Butter and Sugar

Beat butter and sugar until light and fluffy, then add egg.

3. Add Wet Ingredients

Mix in ricotta cheese, orange zest, orange juice, and vanilla extract.

4. Combine and Fold

Gradually add dry ingredients, then fold in chocolate chips.

5. Bake the Cookies

Scoop dough onto a lined baking sheet and bake for 12–14 minutes.

6. Add Glaze (Optional)

Once cooled, drizzle with orange glaze for extra flavor.

Tips for Perfect Results

To make the best orange chocolate chip ricotta cookies (soft & melt-in-your-mouth!), follow these tips:

  • Use room-temperature ingredients for smooth mixing
  • Don’t overmix the dough to keep cookies soft
  • Chill dough slightly if it feels too sticky
  • Use parchment paper for even baking
  • Let cookies cool before glazing

These small steps make a big difference in texture and flavor.

Variations to Try

Lemon Ricotta Cookies

Swap orange for lemon for a tangy twist.

White Chocolate Version

Use white chocolate chips for a sweeter flavor.

Almond Orange Cookies

Add almond extract for a nutty depth.

Gluten-Free Option

Use a gluten-free flour blend.

What to Serve With It

Pair your orange chocolate chip ricotta cookies (soft & melt-in-your-mouth!) with:

  • Hot coffee or cappuccino
  • Herbal or citrus tea
  • Fresh fruit
  • Vanilla ice cream

These pairings enhance the cookies’ bright and creamy flavors.

Storage & Reheating

To keep your orange chocolate chip ricotta cookies (soft & melt-in-your-mouth!) fresh:

  • Store in an airtight container in the refrigerator for up to 5 days
  • Bring to room temperature before serving
  • Freeze for up to 2 months
  • Avoid reheating—best enjoyed soft

Common Mistakes to Avoid

Avoid these mistakes when making orange chocolate chip ricotta cookies (soft & melt-in-your-mouth!):

  • Using low-fat ricotta (affects texture)
  • Skipping the orange zest
  • Overbaking, which dries out cookies
  • Adding glaze while cookies are warm

FAQs

1. Can I make these cookies ahead of time?

Yes! They store well and taste even better the next day.

2. Can I freeze the dough?

Absolutely. Freeze scooped dough and bake when needed.

3. Why are my cookies too soft?

That’s normal! These cookies are meant to be soft and tender.

4. Can I skip the glaze?

Yes, but the glaze adds extra citrus flavor and sweetness.

Final Thoughts

These orange chocolate chip ricotta cookies (soft & melt-in-your-mouth!) are the perfect combination of creamy, citrusy, and chocolatey goodness. They’re easy to make, incredibly soft, and bursting with flavor in every bite.

Whether you’re baking for a special occasion or just craving something sweet, this recipe is guaranteed to impress. Once you try them, they’ll quickly become a favorite in your baking rotation!

Perfect Pistachio Cake: Soft, Nutty & Irresistibly Delicious

If you’re searching for a unique dessert that’s both elegant and comforting, this perfect pistachio cake is exactly what you need. With its delicate green hue, rich nutty flavor, and incredibly soft texture, this cake feels like something straight out of a high-end bakery—yet it’s surprisingly simple to make at home.

Whether you’re baking for a celebration or just treating yourself, this cake delivers a perfect balance of flavor, texture, and visual appeal.

Why You’ll Love This Perfect Pistachio Cake

This perfect pistachio cake is more than just a dessert—it’s a crowd-pleaser for any occasion:

  • Soft and moist texture with a tender crumb
  • Rich, natural pistachio flavor
  • Beautiful color that makes it visually stunning
  • Easy-to-follow recipe for beginners
  • Versatile for different frostings and toppings

It’s the kind of cake that feels both special and approachable.

Ingredients

To make this delicious perfect pistachio cake, you’ll need:

For the Cake:

  • 1 cup shelled pistachios (unsalted)
  • 1 ½ cups all-purpose flour
  • 1 teaspoon baking powder
  • ½ teaspoon baking soda
  • ½ teaspoon salt
  • ½ cup unsalted butter (softened)
  • ¾ cup sugar
  • 3 large eggs
  • 1 teaspoon vanilla extract
  • ¾ cup milk

For the Frosting:

  • 1 cup heavy cream
  • ½ cup powdered sugar
  • ½ teaspoon vanilla extract
  • Crushed pistachios for garnish

Ingredient Notes

The secret to a truly perfect pistachio cake lies in the quality of the pistachios. Use unsalted, shelled pistachios and grind them finely to release their natural oils and flavor.

For an even more vibrant green color, you can add a small amount of natural food coloring, but it’s completely optional. Fresh dairy ingredients also make a big difference in achieving a soft and moist texture.

Step-by-Step Instructions

1. Prepare the Pistachios

Grind pistachios into a fine powder using a food processor.

2. Mix Dry Ingredients

Combine flour, baking powder, baking soda, salt, and ground pistachios.

3. Cream Butter and Sugar

Beat butter and sugar until light and fluffy, then add eggs and vanilla.

4. Combine Ingredients

Alternate adding dry ingredients and milk, mixing until smooth.

5. Bake the Cake

Pour batter into a greased pan and bake at 350°F (175°C) for 30–35 minutes.

6. Prepare Frosting & Assemble

Whip cream with powdered sugar and vanilla, then frost the cooled cake and garnish with crushed pistachios.

Tips for Perfect Results

To ensure your perfect pistachio cake turns out flawless:

  • Use room-temperature ingredients for even mixing
  • Don’t overmix the batter to keep it light
  • Grind pistachios finely for smooth texture
  • Let the cake cool completely before frosting
  • Taste the batter to adjust sweetness if needed

Variations to Try

Pistachio Rose Cake

Add a touch of rose water for a floral twist.

Chocolate Pistachio Cake

Incorporate chocolate chips or drizzle chocolate ganache.

Pistachio Cupcakes

Turn the batter into individual cupcakes for easy serving.

Lemon Pistachio Cake

Add lemon zest for a fresh citrus flavor.

What to Serve With It

Pair your perfect pistachio cake with:

  • Hot coffee or espresso
  • Green tea
  • Fresh berries
  • Vanilla ice cream

These pairings enhance the nutty richness and create a complete dessert experience.

Storage & Reheating

To store your perfect pistachio cake:

  • Keep in an airtight container in the refrigerator for up to 4 days
  • Bring to room temperature before serving
  • Freeze unfrosted cake layers for up to 2 months
  • Avoid reheating—best served fresh or slightly chilled

Common Mistakes to Avoid

Avoid these common issues when making perfect pistachio cake:

  • Using salted pistachios (affects flavor balance)
  • Overbaking, which dries out the cake
  • Not grinding pistachios finely enough
  • Frosting while the cake is still warm

FAQs

1. Can I use pistachio paste instead of whole pistachios?

Yes, pistachio paste works well and enhances flavor.

2. How do I make the cake greener?

Add a small amount of natural green food coloring if desired.

3. Can I make this cake ahead of time?

Absolutely! Bake the cake a day in advance and frost before serving.

4. Is this cake beginner-friendly?

Yes! This perfect pistachio cake is simple and easy to follow.

Final Thoughts

This perfect pistachio cake is everything you want in a dessert—soft, flavorful, visually stunning, and incredibly satisfying. It’s a recipe that feels special without being complicated, making it ideal for both everyday baking and special occasions.

Once you try it, you’ll understand why pistachio desserts are so beloved. With its rich nutty flavor and tender crumb, this cake is sure to become a favorite in your kitchen!

Iced Strawberry Cookies: Soft, Sweet & Perfectly Glazed Treats

If you’re looking for a bright, fruity dessert that feels both comforting and refreshing, these iced strawberry cookies are exactly what you need. Soft, tender cookies infused with real strawberry flavor and topped with a delicate, sweet glaze—every bite is bursting with sweetness and a hint of freshness that makes them irresistible.

Image Prompt: Soft iced strawberry cookies with glossy pink glaze and fresh strawberry slices on top, arranged on a rustic wooden table in a bright modern kitchen, natural sunlight, soft shadows, realistic food photography, shallow depth of field, 4k resolution

Perfect for spring gatherings, afternoon treats, or just satisfying a sweet craving, these cookies are as beautiful as they are delicious.

Why You’ll Love These Iced Strawberry Cookies

These iced strawberry cookies stand out for their flavor, texture, and simplicity:

  • Soft and chewy texture with a melt-in-your-mouth feel
  • Naturally fruity flavor from strawberries
  • Easy-to-make glaze that adds sweetness and shine
  • Perfect for parties, gifting, or everyday baking
  • Customizable with different flavors and toppings

They’re a delightful twist on classic sugar cookies with a fresh, seasonal vibe.

Ingredients

To make these delicious iced strawberry cookies, you’ll need:

For the Cookies:

  • 2 cups all-purpose flour
  • 1 teaspoon baking powder
  • ½ teaspoon salt
  • ½ cup unsalted butter (softened)
  • ¾ cup sugar
  • 1 large egg
  • 1 teaspoon vanilla extract
  • ½ cup finely chopped fresh strawberries

For the Icing:

  • 1 cup powdered sugar
  • 2–3 tablespoons strawberry puree or milk
  • ½ teaspoon vanilla extract

Ingredient Notes

The key to perfect iced strawberry cookies is using fresh, ripe strawberries. They provide natural sweetness and a subtle tartness that balances the sugary glaze beautifully.

Make sure to chop the strawberries finely and pat them dry to avoid excess moisture in the dough. If you want a stronger strawberry flavor, you can add a bit of strawberry extract or freeze-dried strawberry powder.

Step-by-Step Instructions

1. Prepare the Dough

Preheat oven to 350°F (175°C). Mix flour, baking powder, and salt in a bowl.

2. Cream Butter and Sugar

In another bowl, beat butter and sugar until light and fluffy. Add egg and vanilla.

3. Combine Ingredients

Gradually add dry ingredients to the wet mixture, then fold in chopped strawberries.

4. Bake the Cookies

Scoop dough onto a lined baking sheet and bake for 12–15 minutes until edges are lightly golden.

5. Make the Icing

Mix powdered sugar, strawberry puree, and vanilla until smooth.

6. Glaze the Cookies

Once cookies cool, drizzle or spread icing on top.

Tips for Perfect Results

To get the best iced strawberry cookies, follow these tips:

  • Use room-temperature butter for smooth mixing
  • Avoid overmixing the dough to keep cookies soft
  • Pat strawberries dry to prevent soggy dough
  • Let cookies cool completely before icing
  • Adjust icing thickness to your preference

These small details ensure bakery-quality results every time.

Variations to Try

Strawberry Lemon Cookies

Add lemon zest for a bright citrus twist.

Chocolate-Dipped Strawberry Cookies

Dip half of each cookie in melted chocolate.

Strawberry Cream Cookies

Add cream cheese to the dough for extra richness.

Gluten-Free Option

Use a gluten-free flour blend.

What to Serve With It

Pair your iced strawberry cookies with:

  • Iced tea or lemonade
  • Coffee or latte
  • Fresh fruit platters
  • Vanilla ice cream

These pairings enhance the cookies’ fruity sweetness and make for a complete treat.

Storage & Reheating

To keep your iced strawberry cookies fresh:

  • Store in an airtight container for up to 3 days
  • Refrigerate for longer freshness (up to 5 days)
  • Bring to room temperature before serving
  • Avoid stacking until icing is fully set

Common Mistakes to Avoid

Avoid these common issues when making iced strawberry cookies:

  • Using overly wet strawberries
  • Overbaking, which dries out cookies
  • Adding icing while cookies are warm
  • Not measuring ingredients accurately

FAQs

1. Can I use frozen strawberries?

Yes, but thaw and drain them well before using.

2. How do I make the icing thicker?

Add more powdered sugar until you reach the desired consistency.

3. Can I make these cookies ahead of time?

Absolutely! Bake and store them, then glaze before serving.

4. How do I enhance the strawberry flavor?

Use freeze-dried strawberry powder or strawberry extract.

Final Thoughts

These iced strawberry cookies are the perfect blend of soft texture, fruity flavor, and sweet glaze. They’re easy to make, visually stunning, and incredibly satisfying.

Whether you’re baking for a special occasion or just treating yourself, this recipe delivers delicious results every time. Once you try them, these cookies are sure to become a favorite in your kitchen!

Soft Strawberry Shortcake Cake: Light, Fluffy & Perfectly Sweet

There’s nothing quite as refreshing and satisfying as a soft strawberry shortcake cake. With its tender, fluffy layers, juicy strawberries, and airy whipped cream, this dessert captures everything we love about classic strawberry shortcake—just in a more elegant, sliceable form. It’s the perfect centerpiece for spring and summer gatherings, birthdays, or anytime you’re craving something light yet indulgent.

This recipe is designed to be beginner-friendly while still delivering bakery-quality results, making it a must-try for home bakers of all skill levels.

Why You’ll Love This Soft Strawberry Shortcake Cake

This soft strawberry shortcake cake is a standout dessert for so many reasons:

  • Light and fluffy texture that melts in your mouth
  • Naturally sweetened with fresh strawberries
  • Beautiful presentation perfect for celebrations
  • Easy-to-follow steps for beginners
  • Customizable with different flavors and toppings

It’s the kind of cake that feels both comforting and impressive at the same time.

Ingredients

To make this delicious soft strawberry shortcake cake, you’ll need:

For the Cake Layers:

  • 2 cups all-purpose flour
  • 1 ½ teaspoons baking powder
  • ½ teaspoon salt
  • ½ cup unsalted butter (softened)
  • 1 cup granulated sugar
  • 3 large eggs
  • 1 teaspoon vanilla extract
  • ¾ cup milk

For the Filling & Topping:

  • 2 cups fresh strawberries (sliced)
  • 2 tablespoons sugar (for macerating strawberries)
  • 2 cups heavy whipping cream
  • ¼ cup powdered sugar
  • 1 teaspoon vanilla extract

Ingredient Notes

The magic of a perfect soft strawberry shortcake cake lies in using fresh, high-quality ingredients. Ripe strawberries bring natural sweetness and juiciness, while heavy whipping cream creates that signature light and airy topping.

For best results, use full-fat dairy products and fresh eggs at room temperature. If strawberries are out of season, you can use frozen ones—just be sure to thaw and drain them well.

Step-by-Step Instructions

1. Prepare the Cake Batter

Preheat oven to 350°F (175°C). Mix flour, baking powder, and salt. In another bowl, cream butter and sugar until fluffy, then add eggs and vanilla.

2. Combine Ingredients

Gradually add dry ingredients and milk, mixing until smooth.

3. Bake the Cake

Pour batter into greased cake pans and bake for 25–30 minutes. Let cool completely.

4. Prepare Strawberries

Toss sliced strawberries with sugar and let sit to release juices.

5. Whip the Cream

Beat heavy cream, powdered sugar, and vanilla until soft peaks form.

6. Assemble the Cake

Layer cake, whipped cream, and strawberries. Repeat and finish with cream and berries on top.

Tips for Perfect Results

To make the best soft strawberry shortcake cake, keep these tips in mind:

  • Don’t overmix the batter to keep the cake light
  • Use chilled cream for easier whipping
  • Let cake layers cool completely before assembling
  • Slice strawberries evenly for better layering
  • Chill the assembled cake briefly for cleaner slices

Variations to Try

Chocolate Strawberry Shortcake

Add cocoa powder to the batter for a chocolate twist.

Lemon Strawberry Cake

Incorporate lemon zest for a bright, citrusy flavor.

Strawberry Shortcake Cupcakes

Turn this recipe into individual cupcakes.

Mixed Berry Version

Use blueberries and raspberries along with strawberries.

What to Serve With It

Pair your soft strawberry shortcake cake with:

  • Iced tea or lemonade
  • Fresh fruit salads
  • Vanilla ice cream
  • Light brunch dishes

These pairings complement the cake’s fresh and creamy flavors beautifully.

Storage & Reheating

To store your soft strawberry shortcake cake:

  • Refrigerate in an airtight container for up to 3 days
  • Keep chilled due to whipped cream topping
  • Avoid freezing fully assembled cake
  • Serve cold or slightly chilled for best taste

Common Mistakes to Avoid

Avoid these pitfalls when making soft strawberry shortcake cake:

  • Using unripe strawberries (lacks sweetness)
  • Overbaking the cake layers
  • Not cooling the cake before assembling
  • Overwhipping the cream

FAQs

1. Can I make this cake ahead of time?

Yes! Bake the cake layers in advance and assemble before serving.

2. Can I use store-bought whipped cream?

Fresh whipped cream is best, but store-bought can work if needed.

3. How do I keep the cake from getting soggy?

Assemble shortly before serving and don’t over-soak the strawberries.

4. Can I use frozen strawberries?

Yes, just thaw and drain them well to avoid excess moisture.

Final Thoughts

This soft strawberry shortcake cake is the perfect balance of light, sweet, and refreshing. It’s a dessert that feels special without being overly complicated, making it ideal for both everyday treats and celebrations.

With its fluffy layers, juicy strawberries, and creamy topping, every bite is a delight. Once you try this recipe, it’s sure to become a favorite in your baking collection!

No Bake Cinnamon Roll Cheesecakes: Creamy, Sweet & Irresistibly Easy

If you love the cozy flavor of cinnamon rolls and the creamy richness of cheesecake, these no bake cinnamon roll cheesecakes are about to become your new favorite dessert. They combine the warm spice of cinnamon sugar with a silky, no-bake cheesecake filling—all layered into a perfectly portioned treat that looks as good as it tastes.

Best of all, there’s no oven required. That means less effort, less mess, and more time to enjoy every creamy, cinnamon-filled bite.

Why You’ll Love These No Bake Cinnamon Roll Cheesecakes

These no bake cinnamon roll cheesecakes are a dream dessert for beginners and busy bakers alike:

  • No baking required—perfect for hot days
  • Rich, creamy texture with a cinnamon swirl twist
  • Easy to make ahead for parties or gatherings
  • Individual servings for convenient portion control
  • Crowd-pleasing flavor everyone loves

They’re simple enough for everyday treats but impressive enough for special occasions.

Ingredients

To make these delicious no bake cinnamon roll cheesecakes, you’ll need:

For the Crust:

  • 1 ½ cups graham cracker crumbs
  • ⅓ cup melted butter
  • 2 tablespoons brown sugar

For the Cheesecake Filling:

  • 16 oz cream cheese (softened)
  • ¾ cup powdered sugar
  • 1 teaspoon vanilla extract
  • 1 cup heavy whipping cream

For the Cinnamon Swirl:

  • ¼ cup brown sugar
  • 1 tablespoon ground cinnamon
  • 2 tablespoons melted butter

For the Topping:

  • Cream cheese frosting or whipped cream
  • Cinnamon sprinkle

Ingredient Notes

The magic of these no bake cinnamon roll cheesecakes lies in the balance of textures and flavors. Full-fat cream cheese ensures a rich, creamy filling, while heavy whipping cream adds lightness and structure without baking.

For the crust, graham crackers provide a classic base, but you can easily substitute with crushed cookies for a fun twist. The cinnamon swirl is what brings that iconic cinnamon roll flavor—don’t skip it!

Step-by-Step Instructions

1. Make the Crust

Mix graham cracker crumbs, melted butter, and brown sugar. Press into the bottom of jars or cups.

2. Prepare the Cheesecake Filling

Beat cream cheese, powdered sugar, and vanilla until smooth. In a separate bowl, whip cream until stiff peaks form, then fold into the cream cheese mixture.

3. Create the Cinnamon Swirl

Mix brown sugar, cinnamon, and melted butter until combined.

4. Assemble Layers

Add a layer of cheesecake filling, drizzle cinnamon mixture, then repeat layers.

5. Chill

Refrigerate for at least 3–4 hours until set.

Tips for Perfect Results

To get the best no bake cinnamon roll cheesecakes, follow these tips:

  • Use room-temperature cream cheese for a smooth filling
  • Whip cream to stiff peaks for proper structure
  • Chill long enough for the cheesecake to set properly
  • Layer carefully for a visually appealing dessert
  • Taste and adjust cinnamon sweetness to your liking

Variations to Try

Mini Cheesecake Bites

Use cupcake liners for easy grab-and-go treats.

Caramel Cinnamon Cheesecakes

Drizzle caramel sauce for extra indulgence.

Pumpkin Cinnamon Version

Add pumpkin puree and spices for a fall twist.

Chocolate Cinnamon Cheesecakes

Incorporate melted chocolate into the filling.

What to Serve With It

Pair your no bake cinnamon roll cheesecakes with:

  • Hot coffee or latte
  • Chai tea
  • Fresh fruit
  • Vanilla ice cream

These pairings enhance the warm cinnamon flavors and creamy texture.

Storage & Reheating

To store your no bake cinnamon roll cheesecakes:

  • Keep refrigerated for up to 4 days
  • Cover tightly to maintain freshness
  • Do not freeze (texture may change)
  • Serve chilled for best taste

Common Mistakes to Avoid

Avoid these pitfalls when making no bake cinnamon roll cheesecakes:

  • Not whipping cream enough (leads to soft filling)
  • Overmixing the filling (can make it dense)
  • Skipping chill time
  • Using low-fat cream cheese (affects texture)

FAQs

1. Can I make no bake cinnamon roll cheesecakes ahead of time?

Yes! They’re perfect for making a day in advance.

2. Can I use store-bought whipped cream?

Freshly whipped cream is best, but store-bought can work in a pinch.

3. How long do they need to chill?

At least 3–4 hours, but overnight is ideal.

4. Can I make this in one large pan?

Absolutely! Just layer everything in a dish instead of individual jars.

Final Thoughts

These no bake cinnamon roll cheesecakes are the perfect combination of ease, flavor, and elegance. With their creamy texture and warm cinnamon swirl, they deliver everything you love about cinnamon rolls and cheesecake—without turning on the oven.

Whether you’re hosting a party or simply treating yourself, this recipe is guaranteed to impress. Once you try it, it’s sure to become a staple in your dessert rotation!

Soft & Moist Maple Cake: The Ultimate Cozy Dessert You’ll Love

There’s something incredibly comforting about a soft & moist maple cake—the warm, rich aroma of maple syrup, the tender crumb, and that perfect balance of sweetness that feels both indulgent and homey. Whether you’re baking for a cozy weekend treat or a special gathering, this cake delivers a bakery-quality experience right from your own kitchen.

This recipe is designed to be approachable for beginners while still producing a beautifully soft texture and deep maple flavor that seasoned bakers will appreciate.

Why You’ll Love This Soft & Moist Maple Cake

This soft & moist maple cake is a must-try for several reasons:

  • Incredibly tender and fluffy texture
  • Rich, natural maple flavor
  • Easy to make with simple ingredients
  • Perfect for holidays, brunch, or dessert
  • Pairs beautifully with a variety of toppings

It’s the kind of cake that feels elegant yet comforting—perfect for any occasion.

Ingredients

To make this delicious soft & moist maple cake, you’ll need:

  • 2 cups all-purpose flour
  • 1 teaspoon baking powder
  • ½ teaspoon baking soda
  • ½ teaspoon salt
  • ½ cup unsalted butter (softened)
  • ¾ cup brown sugar
  • 2 large eggs
  • ¾ cup pure maple syrup
  • ½ cup milk
  • 1 teaspoon vanilla extract

Optional Maple Glaze:

  • 1 cup powdered sugar
  • 2–3 tablespoons maple syrup
  • 1 tablespoon milk

Ingredient Notes

The star of this soft & moist maple cake is, of course, the maple syrup. Always use pure maple syrup rather than artificial substitutes for the best flavor. Brown sugar enhances the depth and adds moisture, while butter creates a rich, tender crumb.

For a lighter version, you can substitute part of the butter with oil, but keep in mind that butter provides that classic bakery-style taste.

Step-by-Step Instructions

1. Preheat and Prepare

Preheat your oven to 350°F (175°C) and grease a cake pan.

2. Mix Dry Ingredients

In a bowl, whisk together flour, baking powder, baking soda, and salt.

3. Cream Butter and Sugar

In another bowl, beat butter and brown sugar until light and fluffy.

4. Add Wet Ingredients

Mix in eggs, maple syrup, milk, and vanilla extract until smooth.

5. Combine and Bake

Gradually add dry ingredients to wet ingredients. Pour batter into the pan and bake for 30–35 minutes.

6. Cool and Glaze

Let the cake cool completely before adding the maple glaze.

Tips for Perfect Results

To achieve the best soft & moist maple cake, follow these tips:

  • Use room-temperature ingredients for even mixing
  • Don’t overmix the batter—this keeps the cake tender
  • Measure flour correctly to avoid a dense texture
  • Check doneness with a toothpick
  • Let the cake cool before glazing

These simple steps ensure a perfect result every time.

Variations to Try

Maple Walnut Cake

Add chopped walnuts for a crunchy texture.

Maple Cream Cheese Frosting

Top with cream cheese frosting for extra richness.

Maple Spice Cake

Add cinnamon and nutmeg for a warm, spiced flavor.

Maple Cupcakes

Turn the batter into cupcakes for individual servings.

What to Serve With It

Pair your soft & moist maple cake with:

  • Fresh whipped cream
  • Vanilla ice cream
  • Hot coffee or tea
  • Fresh berries

These pairings enhance the cake’s rich maple flavor and create a complete dessert experience.

Storage & Reheating

To keep your soft & moist maple cake fresh:

  • Store in an airtight container at room temperature for up to 2 days
  • Refrigerate for up to 5 days
  • Freeze slices for up to 2 months
  • Warm slightly before serving for best texture

Common Mistakes to Avoid

Avoid these common issues when making soft & moist maple cake:

  • Using artificial maple syrup (affects flavor)
  • Overbaking, which dries out the cake
  • Skipping proper measurements
  • Not letting the cake cool before glazing

FAQs

1. Can I use pancake syrup instead of maple syrup?

It’s not recommended—pure maple syrup provides the best flavor.

2. How do I make the cake extra moist?

Don’t overbake and consider adding a bit of oil along with butter.

3. Can I make this cake ahead of time?

Yes! It stores well and can be made a day in advance.

4. Can I make it dairy-free?

Absolutely. Use plant-based milk and dairy-free butter alternatives.

Final Thoughts

This soft & moist maple cake is everything you want in a dessert—rich, tender, flavorful, and incredibly satisfying. It’s easy enough for beginners yet impressive enough for special occasions.

Once you try this recipe, it’s sure to become a go-to favorite in your kitchen. With its comforting maple flavor and soft texture, every slice feels like a warm, sweet hug.