Easy Honey Garlic Pork Chops Recipe (Oven Baked / Grilled Pork Chops)

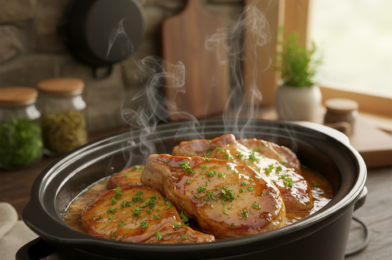
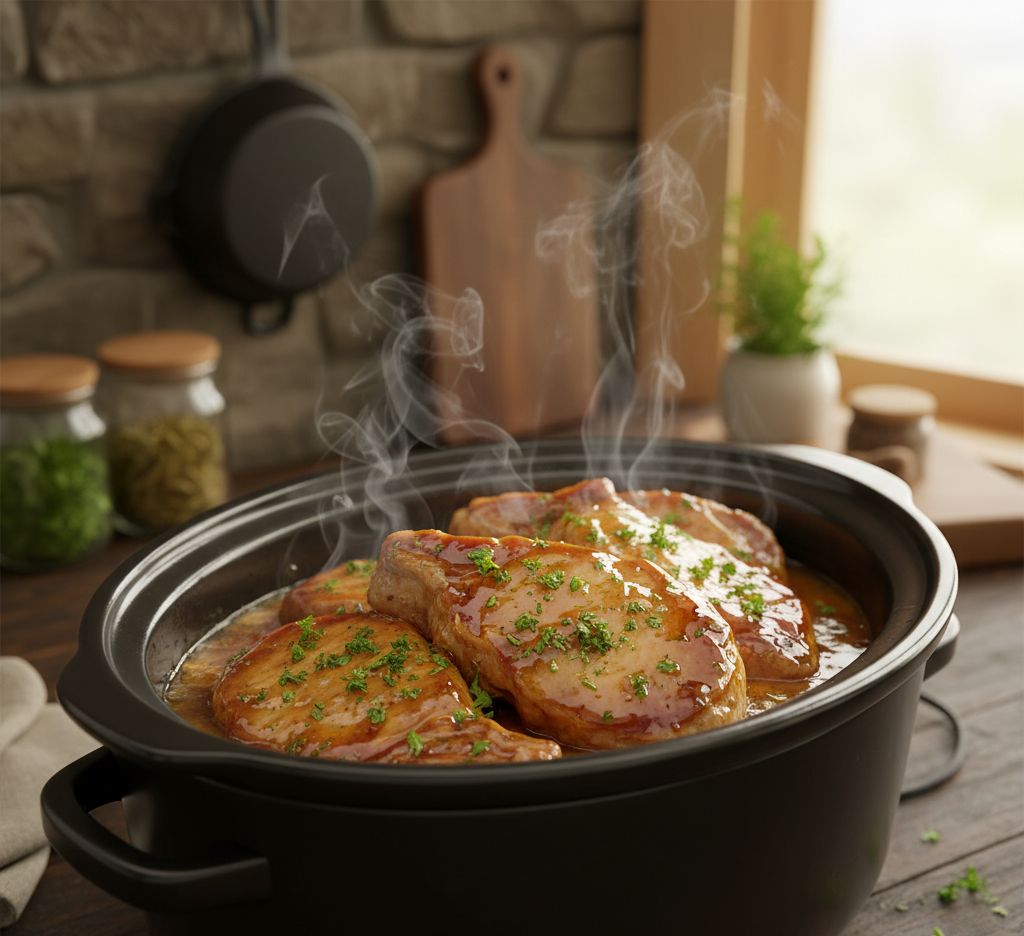
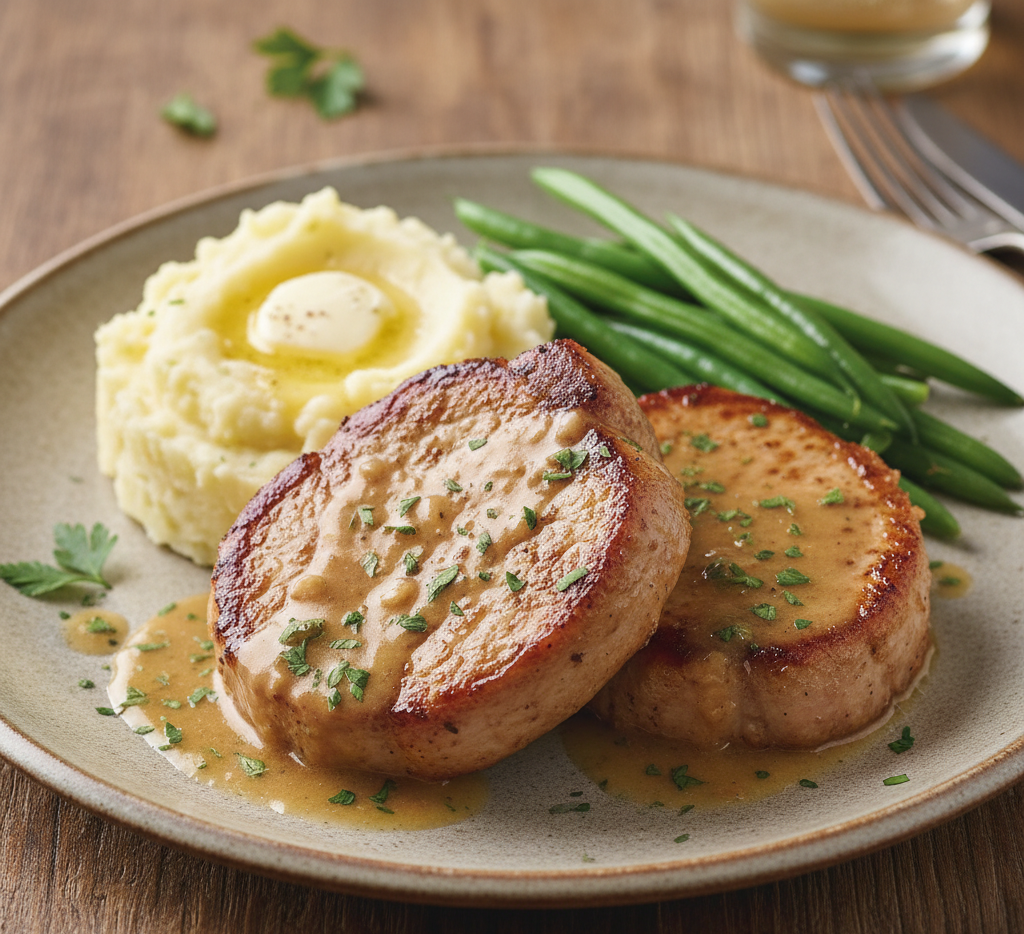
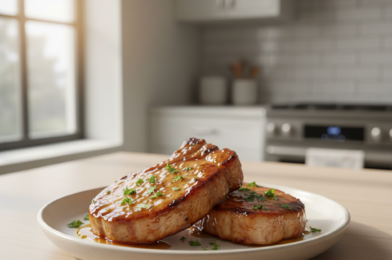
If you’re searching for a quick, flavorful dinner that feels both comforting and impressive, this Easy Honey Garlic Pork Chops Recipe is exactly what you need. Whether you choose to make oven baked pork chops or fire up the grill, this recipe delivers juicy, tender meat coated in a sticky, sweet-and-savory honey garlic glaze that’s absolutely irresistible.

Perfect for busy weeknights or weekend cookouts, these honey garlic pork chops come together with simple pantry ingredients and minimal prep time. The balance of rich garlic, sweet honey, and savory seasoning creates a bold flavor profile that works beautifully whether baked in the oven or grilled outdoors.

Why You’ll Love This Recipe

This easy honey garlic pork chops recipe is one of those meals you’ll find yourself making again and again. It’s approachable, versatile, and packed with flavor that tastes like it came from a restaurant kitchen.

One of the biggest advantages is flexibility. You can bake the pork chops in the oven for a hands-off approach or grill them for a smoky, charred finish. Either way, the results are consistently delicious.

  • Ready in under 30 minutes
  • Uses simple pantry staples
  • Works for oven baked or grilled pork chops
  • Perfect balance of sweet and savory flavors
  • Great for family dinners or entertaining
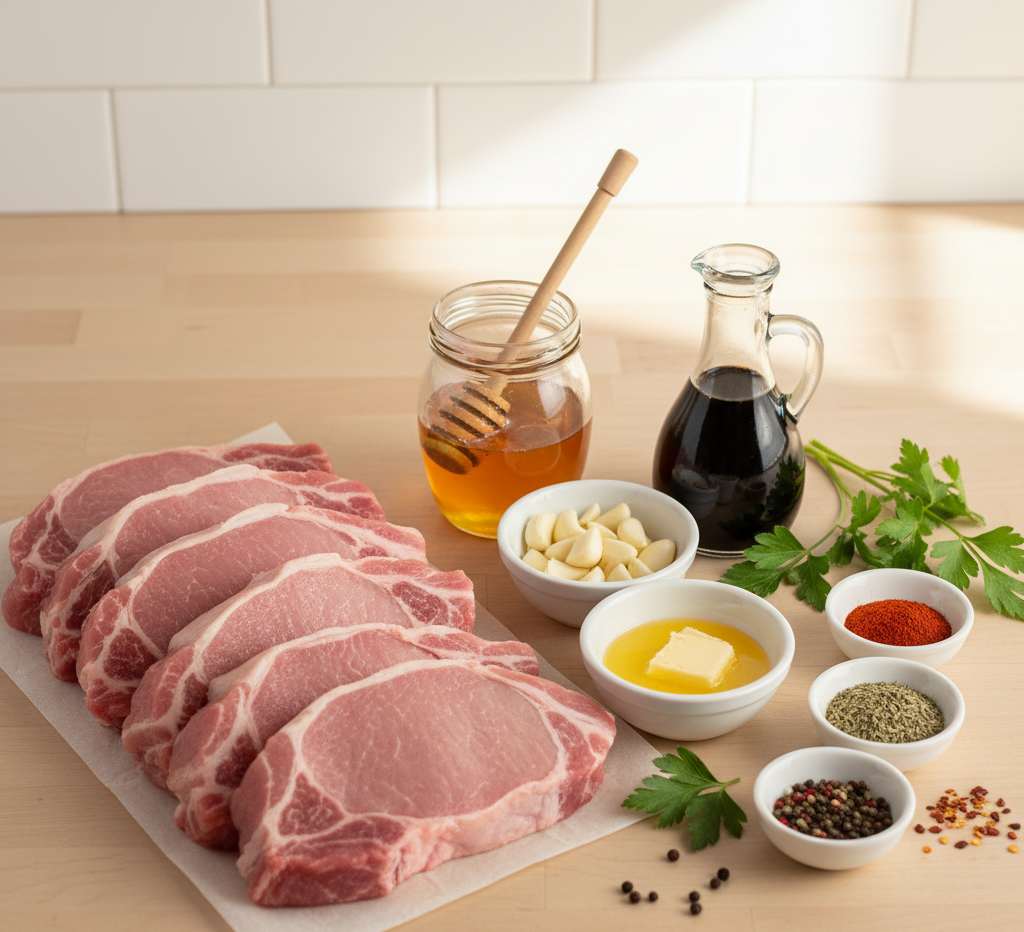
Ingredients

To make these easy honey garlic pork chops, you’ll need:

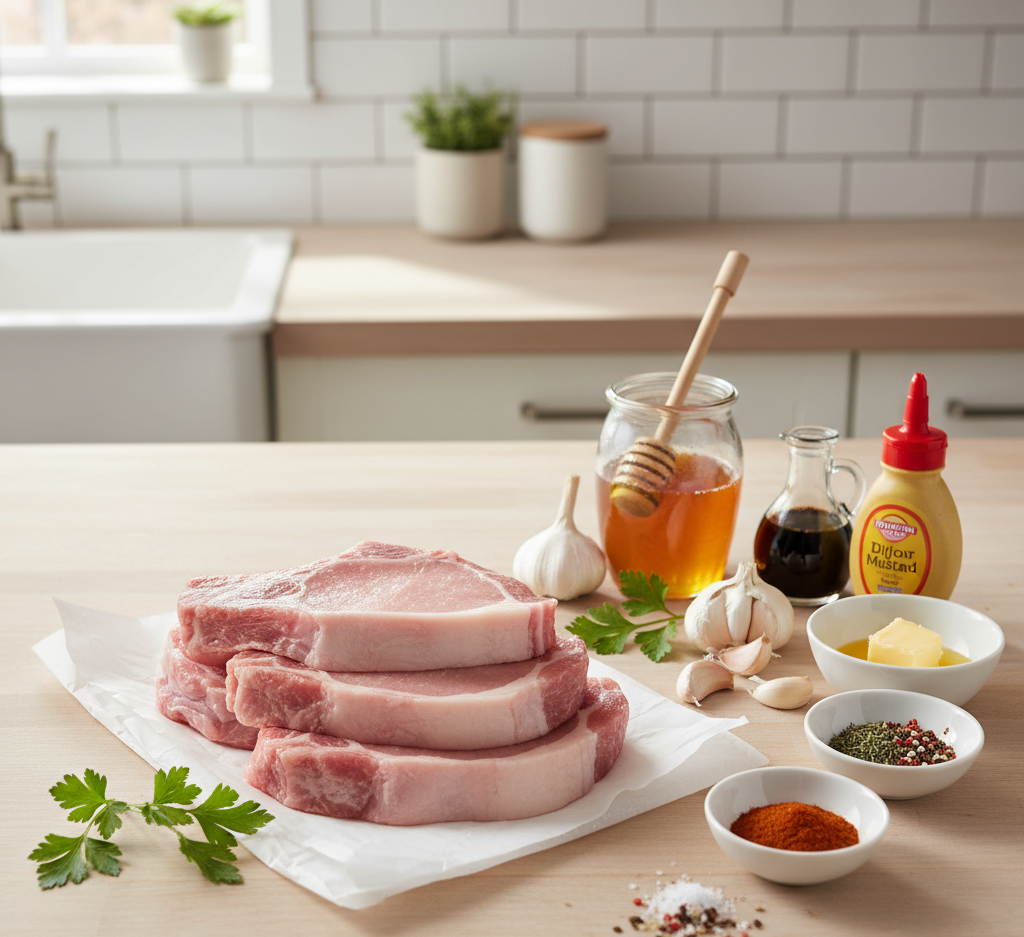
  • 4 pork chops (bone-in or boneless)
  • 1/3 cup honey
  • 4 cloves garlic, minced
  • 2 tablespoons olive oil
  • 1/4 cup soy sauce
  • 1 tablespoon Dijon mustard
  • 1 teaspoon paprika
  • 1/2 teaspoon black pepper
  • 1/2 teaspoon salt
  • Fresh parsley (optional, for garnish)

Ingredient Notes

When making the best oven baked or grilled pork chops, ingredient quality makes a difference.

Thicker pork chops (about 1 inch thick) are ideal because they stay juicy during cooking. Bone-in pork chops tend to have more flavor, while boneless chops cook a bit faster and are easier to serve.

Honey acts as both a sweetener and a glaze base, helping the pork chops caramelize beautifully. Fresh garlic is essential for that bold, aromatic flavor that defines this dish. Soy sauce adds umami depth, while Dijon mustard gives a subtle tang that balances the sweetness.

Step-by-Step Instructions

How to Make Honey Garlic Pork Chops

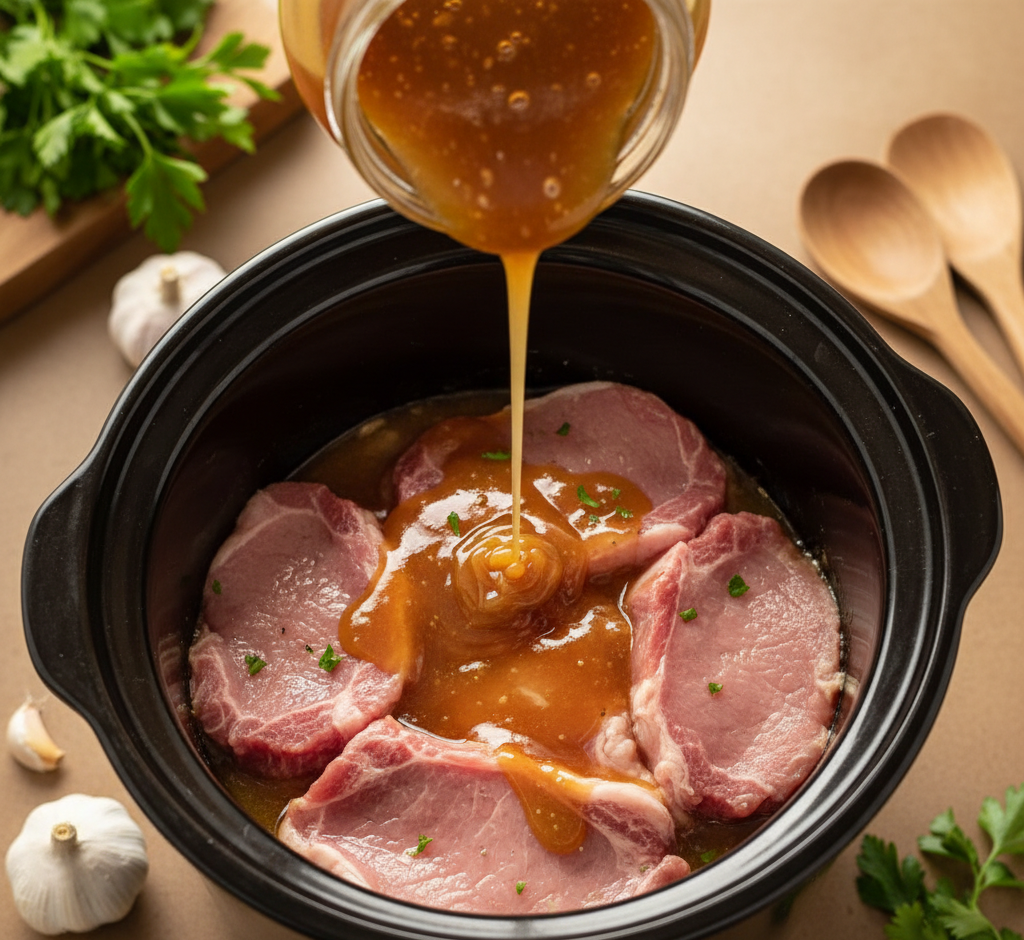
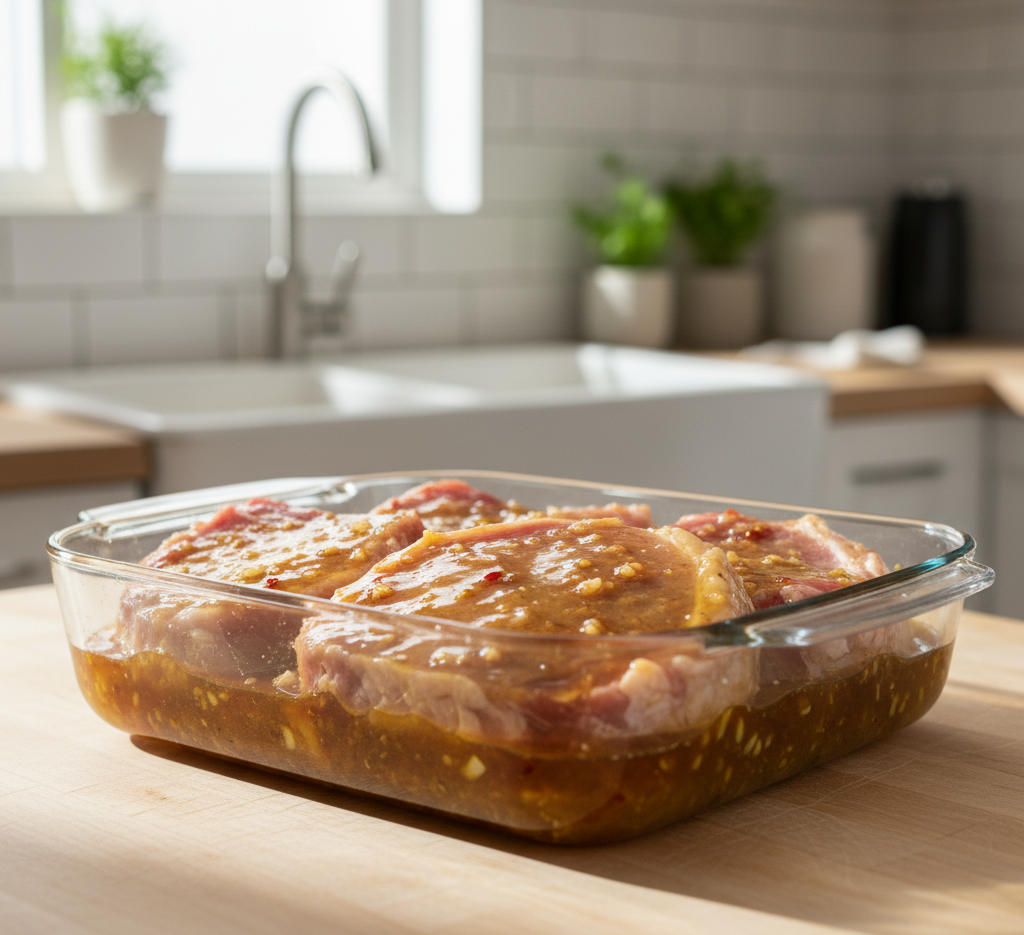
1. Prepare the Marinade

In a bowl, whisk together honey, garlic, olive oil, soy sauce, Dijon mustard, paprika, salt, and pepper until fully combined.

2. Marinate the Pork Chops

Place the pork chops in a shallow dish or zip-top bag and pour the marinade over them. Let them marinate for at least 30 minutes, or up to 4 hours for deeper flavor.
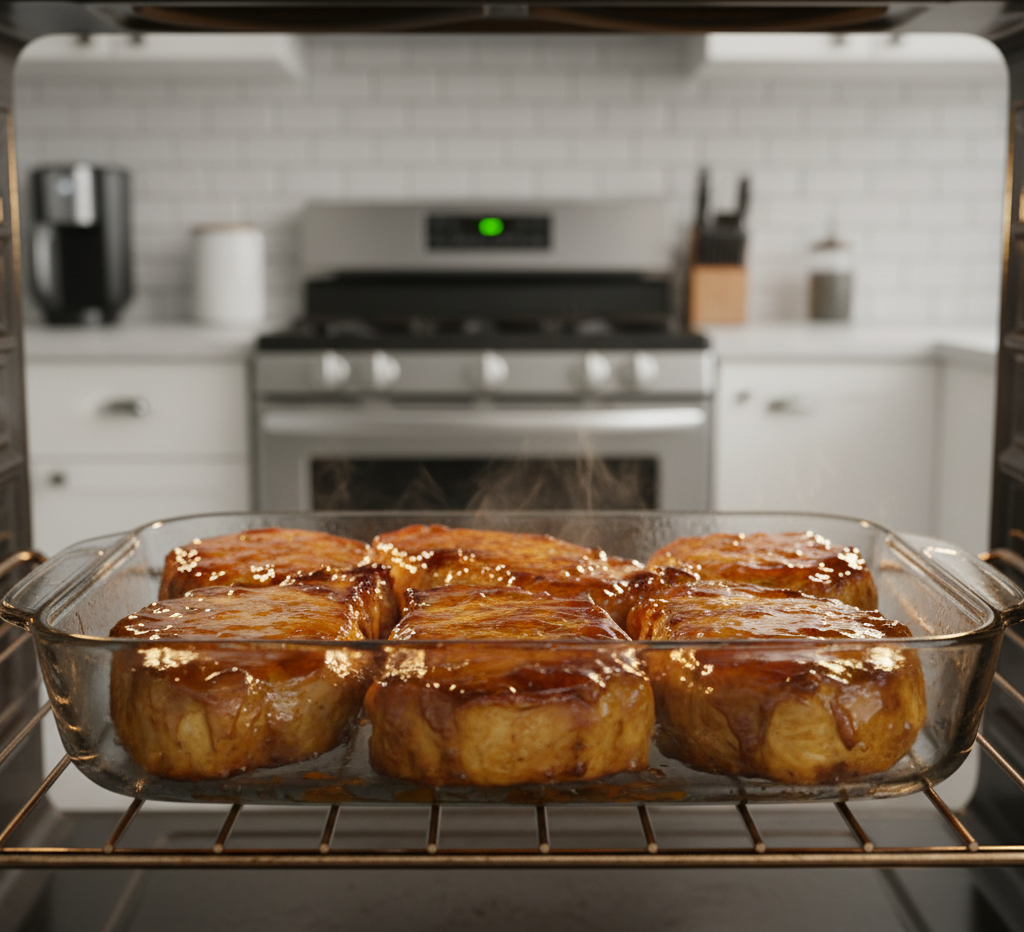
Oven Baked Method

3. Preheat and Prepare

Preheat your oven to 400°F. Place the marinated pork chops on a lined baking sheet or in a baking dish.

4. Bake

Bake for 20–25 minutes, depending on thickness, until the internal temperature reaches 145°F. Spoon extra sauce over the chops halfway through cooking.

Making perfect easy honey garlic pork chops is simple, but these expert tips will take them to the next level.

  • Don’t skip marinating: Even 30 minutes adds incredible flavor
  • Use a meat thermometer: Ensures perfectly cooked, juicy pork
  • Avoid high heat too long: Honey can burn quickly
  • Let the meat rest: Rest for 5 minutes before serving to retain juices
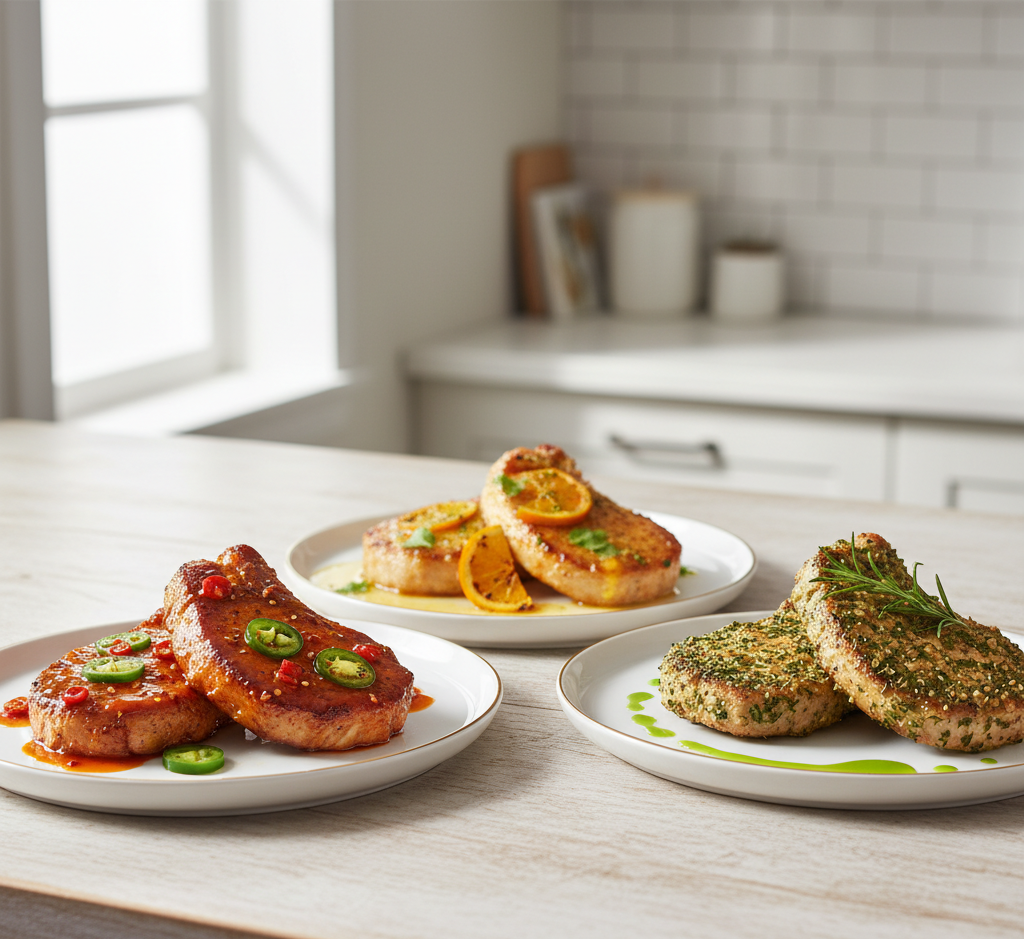
Variations

This honey garlic pork chops recipe is easy to customize based on your preferences.

For a spicy version, add chili flakes or sriracha to the marinade. If you want a citrus twist, squeeze in fresh lemon or orange juice. You can also swap honey for maple syrup for a slightly different sweetness.

For a more herb-forward version, add fresh thyme, rosemary, or oregano to the marinade.

What to Serve With It

These oven baked or grilled pork chops pair beautifully with a variety of side dishes.

  • Garlic mashed potatoes
  • Steamed rice or quinoa
  • Roasted vegetables (broccoli, carrots, asparagus)
  • Fresh green salad
  • Buttered corn on the cob

The rich glaze makes these pork chops especially delicious when paired with sides that can soak up the sauce.
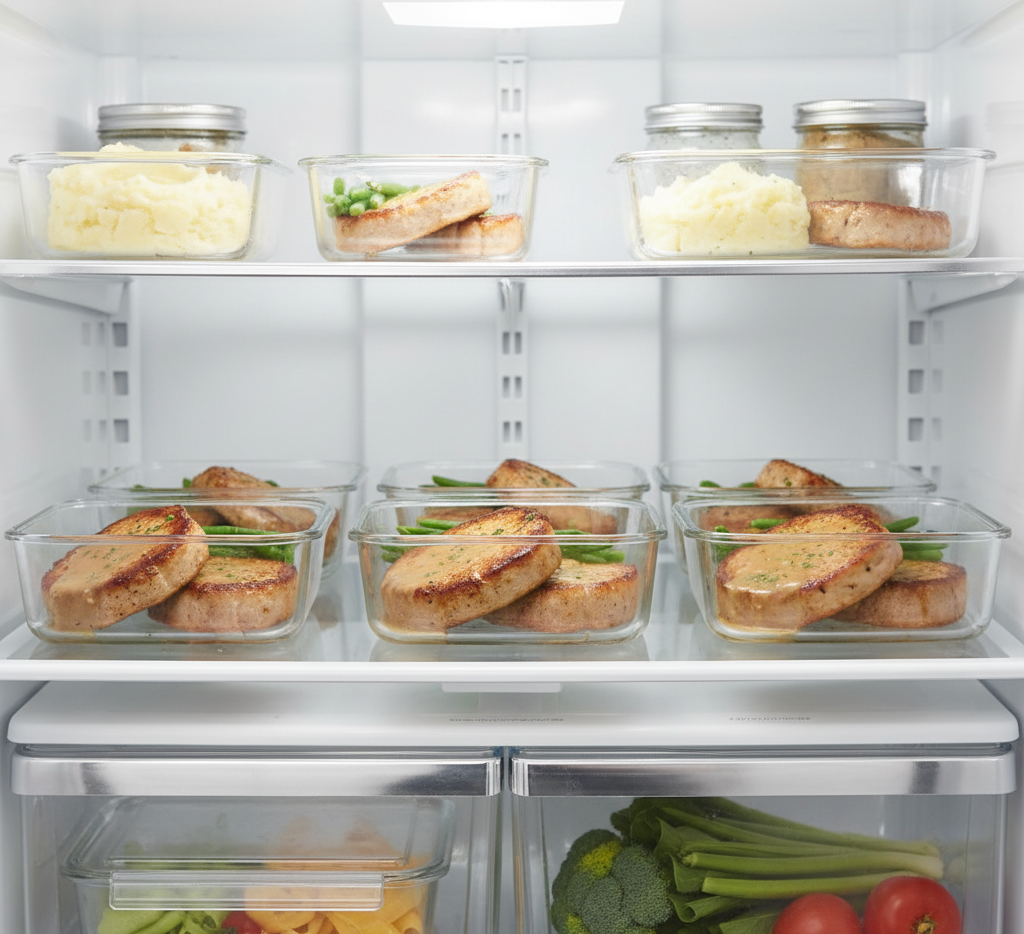
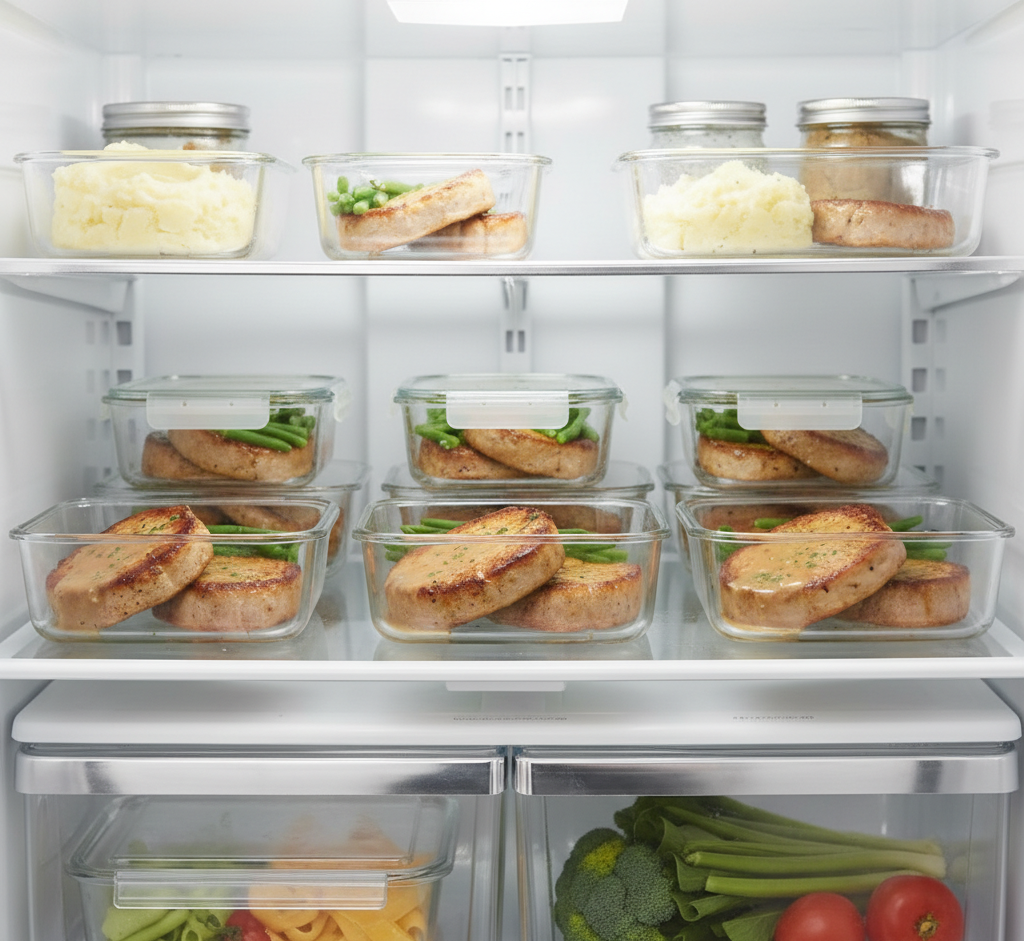
Storage & Reheating

Leftover easy honey garlic pork chops store well and make great next-day meals.

Store in an airtight container in the refrigerator for up to 4 days. To freeze, place in a freezer-safe container for up to 2 months.

Reheat gently in the microwave or on the stovetop with a splash of water or broth to keep the sauce from drying out.

Common Mistakes to Avoid

Even with a simple recipe like this, a few mistakes can affect your results.

Overcooking is the most common issue, leading to dry pork chops. Another mistake is not monitoring the glaze—because of the honey, it can burn quickly, especially on the grill.

Also, avoid skipping the resting step after cooking. This helps the juices redistribute, keeping the pork tender and juicy.

FAQs

Can I use boneless pork chops?

Yes, boneless pork chops work great and cook slightly faster than bone-in.

How long should I marinate the pork chops?

At least 30 minutes, but up to 4 hours for maximum flavor.

Can I cook these pork chops in advance?

Yes, you can cook them ahead and reheat gently when ready to serve.

How do I know when pork chops are done?

Use a meat thermometer—145°F is the safe internal temperature.

Final Thoughts

This Easy Honey Garlic Pork Chops Recipe (Oven Baked / Grilled Pork Chops) is the perfect combination of convenience and flavor. Whether you’re cooking indoors or grilling outside, you’ll end up with juicy, tender pork chops coated in a rich, caramelized glaze that’s impossible to resist.

With simple ingredients, flexible cooking methods, and bold flavor, this recipe is a must-have in your weekly rotation. Once you try it, it’s sure to become a favorite for both quick dinners and special occasions alike.

Slow Cooker Honey Garlic Butter Pork Chops

If you’re looking for a dinner that feels indulgent yet requires minimal effort, these Slow Cooker Honey Garlic Butter Pork Chops are about to become your new go-to recipe. This dish combines the rich, savory flavor of pork chops with the sweet and sticky goodness of honey, garlic, and butter—creating a mouthwatering meal that practically cooks itself.

There’s something magical about letting your slow cooker do all the heavy lifting. As the pork chops simmer gently for hours, they absorb every bit of that luscious honey garlic butter sauce, turning incredibly tender and juicy. Whether you’re feeding your family on a busy weeknight or preparing a cozy Sunday dinner, this recipe delivers comfort and flavor in every bite.

Why You’ll Love This Recipe

This slow cooker pork chop recipe checks all the boxes for a perfect home-cooked meal. It’s simple, satisfying, and packed with flavor.

  • Effortless cooking: Just set it and forget it
  • Incredibly tender pork: Falls apart with a fork
  • Sweet and savory balance: Honey and garlic create depth
  • Family-friendly: Loved by both kids and adults
  • Minimal cleanup: One pot, easy win

You’ll also love how versatile this recipe is. It pairs beautifully with a variety of side dishes, making it easy to adapt based on what you have on hand.


Ingredients

To make these slow cooker honey garlic butter pork chops, you’ll need:

  • 4 boneless or bone-in pork chops
  • 1/3 cup honey
  • 4 cloves garlic, minced
  • 1/4 cup unsalted butter, melted
  • 1/4 cup soy sauce
  • 1 teaspoon black pepper
  • 1 teaspoon paprika
  • 1/2 teaspoon salt (adjust to taste)
  • 1 tablespoon cornstarch (optional, for thickening)
  • 2 tablespoons water (optional, for slurry)
  • Fresh parsley for garnish

Ingredient Notes

Choosing the right ingredients can make a big difference in flavor and texture.

Pork chops:
Bone-in pork chops tend to stay juicier during slow cooking, but boneless works just as well if that’s what you have.

Honey:
Use a good-quality honey for the best flavor. It brings sweetness and helps create that sticky glaze.

Garlic:
Fresh garlic is key here. It adds bold, aromatic depth that powdered garlic just can’t match.

Butter:
Unsalted butter allows you to control the saltiness of the dish while adding richness.

Step-by-Step Instructions

1. Prepare the Sauce

In a medium bowl, whisk together the honey, melted butter, soy sauce, minced garlic, paprika, salt, and pepper until fully combined.

2. Arrange the Pork Chops

Place the pork chops in the bottom of your slow cooker in a single layer if possible.

3. Add the Sauce

Pour the honey garlic butter mixture evenly over the pork chops, making sure each piece is well coated.

4. Cook Low and Slow

Cover and cook on low for 5–6 hours or high for 3–4 hours, until the pork chops are tender and fully cooked.

5. Optional: Thicken the Sauce

If you prefer a thicker sauce, mix cornstarch with water and stir it into the slow cooker during the last 30 minutes of cooking.

6. Garnish and Serve

Sprinkle with freshly chopped parsley before serving for a pop of color and freshness.

Tips for Perfect Results

Getting the most out of your slow cooker honey garlic butter pork chops is easy with these tips:

  • Sear first (optional): For added flavor, quickly sear the pork chops in a skillet before adding them to the slow cooker.
  • Don’t overcook: Pork chops can become dry if cooked too long, even in a slow cooker.
  • Use a meat thermometer: Aim for an internal temperature of 145°F.
  • Layer properly: Avoid stacking pork chops too tightly to ensure even cooking.

Variations

This recipe is wonderfully adaptable depending on your taste preferences.

Spicy Honey Garlic Pork Chops
Add red pepper flakes or a dash of hot sauce for a kick.

Creamy Version
Stir in a splash of heavy cream at the end for a richer sauce.

Herb-Infused
Add thyme or rosemary for an earthy flavor twist.

Low-Sodium Option
Use low-sodium soy sauce to control salt levels without sacrificing taste.

What to Serve With It

These slow cooker honey garlic butter pork chops pair beautifully with a variety of sides:

  • Creamy mashed potatoes
  • Steamed rice or jasmine rice
  • Roasted vegetables (carrots, broccoli, Brussels sprouts)
  • Buttered noodles
  • Fresh green salad

The sauce is so good you’ll want something to soak it up—trust me on that!


Storage & Reheating

Storage:
Store leftover pork chops in an airtight container in the refrigerator for up to 3–4 days.

Freezing:
You can freeze the cooked pork chops and sauce for up to 2 months. Let them thaw overnight in the fridge before reheating.

Reheating:

  • Microwave: Heat in short intervals, stirring sauce occasionally
  • Stovetop: Reheat gently over low heat with a splash of water or broth

Common Mistakes to Avoid

Even simple recipes can go wrong without a few precautions.

  • Using too little liquid: The sauce is essential for moisture and flavor
  • Skipping seasoning: Pork benefits from well-balanced seasoning
  • Overcrowding the slow cooker: Leads to uneven cooking
  • Overcooking: Results in dry or tough meat

FAQs

Can I use frozen pork chops?

Yes, but it’s best to thaw them first for even cooking and better texture.

Can I make this recipe ahead of time?

Absolutely. You can prep the sauce and pork chops the night before and store them in the fridge until ready to cook.

What’s the best cut of pork for this recipe?

Both bone-in and boneless pork chops work well, but thicker cuts tend to stay juicier.

How do I know when the pork chops are done?

Use a meat thermometer—145°F is the safe internal temperature for pork.

Final Thoughts

These Slow Cooker Honey Garlic Butter Pork Chops are everything you want in a comforting, home-cooked meal: easy, flavorful, and incredibly satisfying. With minimal prep and maximum flavor, this recipe proves that you don’t need complicated techniques to create something truly delicious.

Whether you’re cooking for your family or just want leftovers that actually taste better the next day, this dish delivers every single time. Once you try it, don’t be surprised if it becomes a permanent part of your dinner rotation.

Sheet-Pan Sausage, Cabbage & Potatoes (Easy Weeknight Dinner)

When life gets busy, having a dependable dinner recipe can make all the difference. This Sheet-Pan Sausage, Cabbage & Potatoes (Easy Weeknight Dinner) is one of those meals you’ll find yourself returning to again and again. It’s simple, hearty, and incredibly flavorful—all while requiring minimal prep and just one pan.

The beauty of a sheet-pan dinner is how effortlessly everything comes together. With smoky sausage, tender roasted potatoes, and slightly caramelized cabbage, this dish delivers a satisfying balance of flavors and textures. Everything roasts together in the oven, allowing the savory juices from the sausage to coat the vegetables and create a deeply comforting meal.

Whether you’re feeding a hungry family, meal prepping for the week, or simply craving a cozy homemade dinner, this Sheet-Pan Sausage, Cabbage & Potatoes recipe checks all the boxes. It’s budget-friendly, customizable, and easy enough for even beginner cooks.

Why You’ll Love This Sheet-Pan Sausage, Cabbage & Potatoes

This Sheet-Pan Sausage, Cabbage & Potatoes (Easy Weeknight Dinner) recipe has quickly become a favorite for busy households. It combines classic comfort ingredients with the convenience of one-pan cooking.

Here’s why this recipe stands out:

  • One-pan dinner with easy cleanup

  • Ready in about 35–40 minutes

  • Budget-friendly ingredients

  • Perfect balance of protein and vegetables

  • Hearty, filling, and satisfying

  • Great for meal prep and leftovers

Because everything cooks together, the flavors meld beautifully. The sausage adds rich seasoning, while the cabbage and potatoes soak up all those savory juices as they roast.

Ingredients for Sheet-Pan Sausage, Cabbage & Potatoes

The ingredients for this Sheet-Pan Sausage, Cabbage & Potatoes recipe are simple and easy to find at any grocery store.

Main Ingredients

  • 14–16 oz smoked sausage (kielbasa or andouille), sliced

  • 1 small head green cabbage, cut into wedges

  • 4 medium potatoes, chopped

  • 1 medium onion, sliced

  • 3 tablespoons olive oil

  • 1 teaspoon garlic powder

  • 1 teaspoon smoked paprika

  • ½ teaspoon black pepper

  • ½ teaspoon salt (optional depending on sausage)

  • 1 teaspoon dried thyme

Optional garnishes:

  • Fresh parsley

  • Dijon mustard for serving

  • Crushed red pepper flakes

Ingredient Notes

A few ingredient choices can make your Sheet-Pan Sausage, Cabbage & Potatoes (Easy Weeknight Dinner) even more delicious.

Sausage Options

Smoked sausage adds the most flavor, but several varieties work well:

  • Kielbasa (classic choice)

  • Andouille sausage (spicier option)

  • Chicken sausage (lighter version)

  • Turkey sausage

Best Potatoes to Use

Yukon Gold or red potatoes roast beautifully because they develop crispy edges while remaining soft inside.

Fresh Cabbage

Green cabbage becomes slightly sweet and caramelized in the oven, making it the perfect complement to savory sausage.

Step-by-Step Instructions

This Sheet-Pan Sausage, Cabbage & Potatoes recipe comes together quickly with simple steps.

Step 1: Preheat the Oven

Preheat your oven to 425°F (220°C) and line a large sheet pan with parchment paper or foil.

Step 2: Prepare the Vegetables

In a large bowl, combine:

  • Potatoes

  • Cabbage wedges

  • Sliced onion

Drizzle with olive oil and sprinkle with garlic powder, smoked paprika, thyme, salt, and pepper. Toss until evenly coated.

Step 3: Add the Sausage

Spread the seasoned vegetables across the sheet pan. Add the sliced sausage pieces evenly across the pan so everything roasts together.

Step 4: Roast the Sheet Pan Dinner

Bake for 30–35 minutes, stirring halfway through to ensure even roasting. The potatoes should be tender and golden, and the cabbage edges slightly caramelized.


Step 5: Garnish and Serve

Remove the sheet pan from the oven and sprinkle with chopped fresh parsley if desired. Serve immediately while everything is hot and flavorful.

Tips for Perfect Results

To make sure your Sheet-Pan Sausage, Cabbage & Potatoes (Easy Weeknight Dinner) turns out perfectly, keep these tips in mind:

  • Cut potatoes evenly for consistent cooking.

  • Use a large sheet pan to avoid overcrowding.

  • Flip halfway through roasting for even browning.

  • Use high heat for caramelized vegetables.

These small steps help create a beautifully roasted and flavorful dish.

Delicious Variations

One of the best things about Sheet-Pan Sausage, Cabbage & Potatoes is how easy it is to customize.

Garlic Butter Version

Add melted butter and fresh minced garlic before roasting.

Spicy Sausage Version

Use spicy andouille sausage and add red pepper flakes.

Mediterranean Style

Add cherry tomatoes, oregano, and feta cheese after roasting.

Extra Vegetable Version

Add vegetables like:

  • Bell peppers

  • Brussels sprouts

  • Zucchini

What to Serve With Sheet-Pan Sausage, Cabbage & Potatoes

While this Sheet-Pan Sausage, Cabbage & Potatoes (Easy Weeknight Dinner) is a complete meal, a few sides can make it even better.

Serving ideas include:

  • Crusty artisan bread

  • Simple green salad

  • Garlic yogurt sauce

  • Mustard dipping sauce

  • Pickles or sauerkraut

These additions bring extra flavor and balance to the meal.

Storage & Reheating

This Sheet-Pan Sausage, Cabbage & Potatoes recipe is excellent for leftovers and meal prep.

Refrigerator

  • Store in an airtight container for 3–4 days.

Freezer

  • Freeze for up to 2 months in freezer-safe containers.

Reheating

  • Reheat in the oven at 350°F for 10–12 minutes or microwave until warmed through.

The roasted flavors often become even richer the next day.

Common Mistakes to Avoid

Avoid these common mistakes when making Sheet-Pan Sausage, Cabbage & Potatoes:

  • Overcrowding the sheet pan

  • Cutting potatoes too large

  • Not stirring halfway through cooking

  • Using low oven temperature

Roasting at high heat is key to getting that golden, caramelized finish.

Frequently Asked Questions

Can I make this recipe with chicken sausage?

Yes! Chicken sausage works great and makes this Sheet-Pan Sausage, Cabbage & Potatoes slightly lighter.

Do I need to boil the potatoes first?

No. When cut into small chunks, the potatoes roast perfectly in the oven.

Can I add other vegetables?

Absolutely. Bell peppers, carrots, or Brussels sprouts are great additions.

How do I keep cabbage from burning?

Make sure the cabbage pieces are coated with olive oil and placed cut-side down on the pan.

Can I make this recipe ahead of time?

Yes! You can chop all ingredients earlier in the day and store them in the refrigerator until ready to cook.


Final Thoughts

This Sheet-Pan Sausage, Cabbage & Potatoes (Easy Weeknight Dinner) is proof that simple ingredients can create incredibly satisfying meals. With smoky sausage, crispy roasted potatoes, and caramelized cabbage, every bite delivers comforting flavor and hearty texture.

Even better, everything cooks together on one pan, making this recipe perfect for busy weeknights when you want a homemade meal without the stress. It’s quick, customizable, and incredibly delicious.

Once you try this Sheet-Pan Sausage, Cabbage & Potatoes recipe, it’s likely to become a regular part of your dinner rotation.

Easy Corned Beef and Cabbage Sheet Pan (One-Pan Comfort Dinner)

If you love classic comfort food but want something simpler and easier to prepare, this Easy Corned Beef and Cabbage Sheet Pan recipe is the perfect solution. Instead of simmering everything in a pot for hours, this method roasts everything together in the oven on one pan, creating incredible flavor while keeping cleanup minimal.

Traditionally, corned beef and cabbage is slow-cooked in a large pot, especially around St. Patrick’s Day. While that method works beautifully, roasting the ingredients on a sheet pan gives the vegetables a delicious caramelized flavor and creates a slightly crispy texture that many people actually prefer. The corned beef becomes tender, juicy, and infused with roasted herbs and spices.

This Easy Corned Beef and Cabbage Sheet Pan meal is ideal for busy weeknights, cozy Sunday dinners, or holiday gatherings. With just a handful of ingredients and simple preparation, you’ll have a hearty, satisfying dinner that tastes like it took all day to make.

Why You’ll Love This Easy Corned Beef and Cabbage Sheet Pan

This Easy Corned Beef and Cabbage Sheet Pan recipe combines the comforting flavors of a traditional meal with the convenience of modern cooking.

Here’s why this recipe is worth trying:

  • One-pan dinner with easy cleanup

  • Roasted vegetables with caramelized flavor

  • Tender, juicy corned beef

  • Perfect for holidays or family dinners

  • Simple ingredients and minimal prep

  • Great for leftovers and meal prep

Because everything cooks together on the same sheet pan, the flavors blend beautifully while saving you time in the kitchen.

Ingredients for Corned Beef and Cabbage Sheet Pan

One of the best things about this Easy Corned Beef and Cabbage Sheet Pan dinner is that it uses simple, hearty ingredients.

Main Ingredients

  • 2–3 lb corned beef brisket with spice packet

  • 1 small head green cabbage, cut into wedges

  • 4 medium potatoes, cut into chunks

  • 3 large carrots, sliced

  • 1 medium onion, cut into wedges

  • 3 tablespoons olive oil

  • 1 teaspoon garlic powder

  • 1 teaspoon black pepper

  • 1 teaspoon dried thyme

  • Salt (optional, depending on corned beef seasoning)

Optional additions:

  • Whole garlic cloves

  • Dijon mustard for serving

  • Fresh parsley for garnish

Ingredient Notes

Choosing the right ingredients can make your Easy Corned Beef and Cabbage Sheet Pan even better.

Corned Beef Brisket

Look for a brisket that includes the seasoning packet. This packet contains spices like mustard seeds, coriander, and bay leaves that enhance the traditional flavor.

Best Potatoes to Use

Yukon Gold or red potatoes work best because they hold their shape and develop a crispy exterior when roasted.

Fresh Cabbage

Green cabbage is classic for this recipe. When roasted, cabbage becomes slightly sweet and beautifully caramelized.

Step-by-Step Instructions

This Easy Corned Beef and Cabbage Sheet Pan recipe comes together quickly with simple steps.

Step 1: Preheat the Oven

Preheat your oven to 400°F (200°C) and line a large sheet pan with parchment paper or foil.

Step 2: Prepare the Vegetables

In a large bowl, combine:

  • Potatoes

  • Carrots

  • Onion

  • Cabbage wedges

Drizzle with olive oil and season with garlic powder, pepper, and thyme. Toss until everything is evenly coated.

Step 3: Arrange on the Sheet Pan

Spread the vegetables evenly across the sheet pan, leaving space in the center for the corned beef.

Place the corned beef brisket in the middle and sprinkle the spice packet over the meat.

Step 4: Roast the Sheet Pan Dinner

Cover loosely with foil and roast for 45 minutes. Remove the foil and continue roasting another 20–30 minutes until the vegetables are tender and the beef is fully cooked.

Step 5: Rest and Slice the Corned Beef

Remove the sheet pan from the oven and allow the corned beef to rest for 10 minutes before slicing against the grain.

Serve with the roasted vegetables.

Tips for Perfect Results

To make sure your Easy Corned Beef and Cabbage Sheet Pan turns out perfectly every time, follow these tips:

  • Slice the beef against the grain for the most tender texture.

  • Don’t overcrowd the pan so vegetables roast instead of steam.

  • Use high heat to get crispy roasted edges.

  • Rest the meat before slicing to keep it juicy.

These small techniques elevate the entire dish.


Delicious Variations

This Easy Corned Beef and Cabbage Sheet Pan recipe can easily be customized.

Garlic Herb Version

Add fresh rosemary and minced garlic to the vegetables.

Mustard Glazed Corned Beef

Brush the corned beef with Dijon mustard before roasting.

Spicy Version

Sprinkle red pepper flakes over the vegetables.

Extra Veggie Version

Add Brussels sprouts or parsnips for more flavor and variety.

What to Serve With Corned Beef and Cabbage

This hearty Easy Corned Beef and Cabbage Sheet Pan dinner pairs well with a few classic sides.

Serving ideas include:

  • Irish soda bread

  • Grainy mustard or horseradish sauce

  • Buttered dinner rolls

  • Simple green salad

  • Roasted root vegetables

These sides help complete a comforting, traditional-style meal.

Storage & Reheating

Leftovers from this Easy Corned Beef and Cabbage Sheet Pan recipe store very well.

Refrigerator

  • Store in an airtight container for 3–4 days.

Freezer

  • Corned beef can be frozen for up to 2 months.

Reheating

  • Reheat in the oven at 325°F for 10–15 minutes or microwave in short intervals.

The flavors often become even better the next day.

Common Mistakes to Avoid

To get the best results when making Easy Corned Beef and Cabbage Sheet Pan, avoid these common mistakes:

  • Cutting vegetables too small (they may burn)

  • Overcrowding the sheet pan

  • Slicing the beef with the grain instead of against it

  • Skipping the resting time

A few simple adjustments make a big difference.

Frequently Asked Questions

Is corned beef already cooked?

Most store-bought corned beef briskets are cured but still need to be fully cooked before eating.

Can I cook corned beef and cabbage on one pan?

Yes! That’s exactly what this Easy Corned Beef and Cabbage Sheet Pan recipe is designed for.

How do I know when corned beef is done?

Corned beef is done when it reaches an internal temperature of 145°F and becomes tender when sliced.

Can I use red cabbage instead?

Yes, but green cabbage is more traditional and becomes sweeter when roasted.

What cut of corned beef is best?

Flat-cut brisket is the most common and slices nicely for serving.

Final Thoughts

This Easy Corned Beef and Cabbage Sheet Pan recipe transforms a classic comfort meal into a simple, modern one-pan dinner. Roasting the ingredients together creates incredible flavor while keeping preparation and cleanup incredibly easy.

With tender slices of corned beef, caramelized cabbage, and perfectly roasted vegetables, this dish is hearty, satisfying, and perfect for both weeknight dinners and special occasions.

Once you try this oven-roasted version of Easy Corned Beef and Cabbage Sheet Pan, you may never go back to the traditional boiled method again.

Easy Apple Cinnamon Breakfast Bars (Healthy & Delicious)

If you’re looking for a wholesome, grab-and-go breakfast that tastes like a cozy fall dessert, these Easy Apple Cinnamon Breakfast Bars (Healthy & Delicious) are exactly what you need. Packed with fresh apples, hearty oats, and warm cinnamon, these bars are soft, satisfying, and naturally sweetened—making them perfect for busy mornings.

Unlike many store-bought breakfast bars that are loaded with refined sugar and preservatives, these Easy Apple Cinnamon Breakfast Bars are made with simple, nutritious ingredients you likely already have in your kitchen. They’re wholesome enough for breakfast but delicious enough to feel like a treat. Plus, they’re easy to make ahead, which makes them ideal for meal prep.

Whether you’re feeding a busy family, prepping school lunches, or just trying to eat healthier in the morning, these apple cinnamon bars deliver comfort, nutrition, and incredible flavor in every bite.

Why You’ll Love These Easy Apple Cinnamon Breakfast Bars

There are countless breakfast bar recipes online, but these Easy Apple Cinnamon Breakfast Bars stand out because they combine simple ingredients with cozy flavor and satisfying texture.

Here’s why this recipe deserves a spot in your breakfast rotation:

  • Healthy and naturally sweetened

  • Perfect for meal prep

  • Kid-friendly and lunchbox ready

  • Made with wholesome oats and fresh apples

  • Soft, chewy, and full of warm cinnamon flavor

  • Freezer-friendly for busy weeks

These breakfast bars are not only convenient but also nourishing, making them a great option for anyone trying to start the day with something balanced and delicious.

Ingredients for Apple Cinnamon Breakfast Bars

One of the best parts about these Easy Apple Cinnamon Breakfast Bars (Healthy & Delicious) is that the ingredients are simple, wholesome, and easy to find.

Main Ingredients

  • 2 cups rolled oats

  • 1 ½ cups diced apples (about 1–2 apples)

  • 1 teaspoon ground cinnamon

  • ½ teaspoon nutmeg (optional)

  • 1 teaspoon baking powder

  • 2 eggs

  • ⅓ cup maple syrup or honey

  • ½ cup unsweetened applesauce

  • 1 teaspoon vanilla extract

  • ¼ teaspoon salt

Optional mix-ins:

  • Chopped walnuts or pecans

  • Raisins or dried cranberries

  • Chia seeds or flaxseeds

These ingredients combine to create breakfast bars that are hearty, moist, and full of comforting apple cinnamon flavor.

Ingredient Notes

Understanding the ingredients helps ensure your Easy Apple Cinnamon Breakfast Bars turn out perfectly every time.

Best Apples to Use

Choose apples that hold their shape while baking. Great options include:

  • Honeycrisp

  • Fuji

  • Gala

  • Pink Lady

These varieties provide natural sweetness and a pleasant texture.

Why Applesauce Matters

Applesauce adds moisture and natural sweetness while helping reduce the need for oil or butter. It’s one of the reasons these breakfast bars are considered healthier than many traditional baked bars.

Step-by-Step Instructions

Making these Easy Apple Cinnamon Breakfast Bars (Healthy & Delicious) is straightforward and beginner-friendly.

Step 1: Preheat the Oven

Preheat your oven to 350°F (175°C) and line an 8×8 baking pan with parchment paper for easy removal.

Step 2: Mix the Dry Ingredients

In a large mixing bowl, combine:

  • Rolled oats

  • Cinnamon

  • Nutmeg

  • Baking powder

  • Salt

Stir until evenly mixed.

Step 3: Combine the Wet Ingredients

In a separate bowl, whisk together:

  • Eggs

  • Maple syrup

  • Applesauce

  • Vanilla extract

Mix until smooth and well combined.

Step 4: Combine and Add Apples

Pour the wet ingredients into the dry mixture and stir until everything is well coated. Fold in the diced apples and any optional mix-ins like nuts or raisins.

Step 5: Bake the Bars

Spread the mixture evenly into the prepared baking pan and bake for 25–30 minutes, or until the bars are set and lightly golden on top.

Let them cool completely before slicing into squares.

Tips for Perfect Apple Cinnamon Breakfast Bars

To ensure your Easy Apple Cinnamon Breakfast Bars come out perfectly every time, keep these helpful tips in mind:

  • Dice apples into small pieces for even distribution.

  • Use parchment paper for easy removal from the pan.

  • Allow the bars to cool completely before slicing.

  • Use rolled oats instead of instant oats for better texture.

These small details make a big difference in the final result.

Delicious Variations

One of the best things about Easy Apple Cinnamon Breakfast Bars (Healthy & Delicious) is how customizable they are.

Apple Walnut Bars

Add ½ cup chopped walnuts for crunch.

Apple Cranberry Bars

Mix in dried cranberries for a sweet-tart flavor.

Apple Almond Bars

Add sliced almonds and a touch of almond extract.

Apple Protein Breakfast Bars

Add a scoop of vanilla protein powder and a little extra applesauce.

What to Serve With Apple Cinnamon Breakfast Bars

These Easy Apple Cinnamon Breakfast Bars are satisfying on their own, but they also pair well with other breakfast favorites.

Serving ideas include:

  • Greek yogurt with honey

  • A fresh fruit smoothie

  • Scrambled eggs

  • Coffee or chai tea

  • Peanut butter spread on top of the bar

These combinations help turn a simple breakfast bar into a more balanced morning meal.

Storage & Reheating

These Easy Apple Cinnamon Breakfast Bars (Healthy & Delicious) are perfect for meal prep because they store very well.

Refrigerator

  • Store in an airtight container for up to 5 days.

Freezer

  • Wrap individual bars and freeze for up to 3 months.

Reheating

  • Microwave for 10–15 seconds to warm them slightly before eating.

They’re just as delicious cold, making them great for packed lunches.

Common Mistakes to Avoid

Even simple recipes can benefit from a few baking tips.

Avoid these mistakes when making Easy Apple Cinnamon Breakfast Bars:

  • Using instant oats instead of rolled oats

  • Cutting the bars before they cool

  • Adding too many mix-ins which can make bars crumbly

  • Using apples cut too large

Keeping these tips in mind helps guarantee perfectly soft breakfast bars.

Frequently Asked Questions

Are apple cinnamon breakfast bars healthy?

Yes! These Easy Apple Cinnamon Breakfast Bars (Healthy & Delicious) are made with oats, apples, and natural sweeteners, making them a nutritious breakfast option.

Can I make these bars gluten-free?

Absolutely. Simply use certified gluten-free rolled oats.

Can I make them vegan?

Yes. Replace the eggs with flax eggs (1 tablespoon flaxseed + 2.5 tablespoons water per egg).

What apples work best for baking?

Firm apples like Honeycrisp, Fuji, or Gala work best because they hold their texture while baking.

Can I add chocolate chips?

Definitely! Adding a handful of dark chocolate chips turns these bars into a slightly more indulgent treat.

Final Thoughts

These Easy Apple Cinnamon Breakfast Bars (Healthy & Delicious) are the perfect combination of wholesome ingredients and cozy flavor. With hearty oats, naturally sweet apples, and warm cinnamon, they taste like a comforting homemade treat while still being nutritious enough for breakfast.

They’re simple to prepare, easy to customize, and ideal for meal prep. Whether you enjoy them with your morning coffee, pack them for work, or serve them as an after-school snack, these apple cinnamon bars are guaranteed to become a favorite in your kitchen.

Once you try these Easy Apple Cinnamon Breakfast Bars, you’ll likely find yourself making them again and again throughout the year.

Easy 2 Ingredient Oreo Mug Cake (Ready in 5 Minutes)

When a chocolate craving strikes, you don’t always want to bake an entire cake or make a complicated dessert. That’s where this Easy 2 Ingredient Oreo Mug Cake comes to the rescue. With just a handful of cookies and a splash of milk, you can create a soft, fluffy cake in the microwave in less than five minutes.

This recipe has gone viral for a reason. The combination of crushed Oreo cookies and milk forms a surprisingly delicious batter that transforms into a moist, chocolatey mug cake when microwaved. The result tastes like a cross between a brownie and a soft chocolate cake, making it perfect for late-night cravings, quick desserts, or a fun recipe to make with kids.

Another great thing about this Easy 2 Ingredient Oreo Mug Cake is that it requires almost no baking experience. If you can crush cookies and stir milk, you can make this dessert. Whether you’re short on time or just want a single serving treat, this mug cake delivers big flavor with minimal effort.

Why You’ll Love This Easy 2 Ingredient Oreo Mug Cake

There are plenty of mug cake recipes online, but this Easy 2 Ingredient Oreo Mug Cake stands out because of its simplicity and indulgent flavor.

Here are a few reasons people love this recipe:

  • Only two ingredients required

  • Ready in under 5 minutes

  • No oven or baking skills needed

  • Perfect single serving dessert

  • Rich chocolate flavor from Oreo cookies

  • Easy to customize with toppings

Because Oreo cookies already contain sugar, cocoa, and leavening agents, they work beautifully as the base for a quick cake batter. That means fewer ingredients and less measuring while still achieving a delicious dessert.

Ingredients for Oreo Mug Cake

The beauty of this Easy 2 Ingredient Oreo Mug Cake is that the ingredient list couldn’t be simpler.

Main Ingredients

  • 4–5 Oreo cookies

  • 3–4 tablespoons milk

That’s it! These two ingredients create the entire batter.

Optional toppings include:

  • Whipped cream

  • Chocolate syrup

  • Crushed Oreos

  • Vanilla ice cream

  • Chocolate chips

    Ingredient Notes

    Even though this recipe only uses two ingredients, a few details can help ensure the best Easy 2 Ingredient Oreo Mug Cake every time.

    Oreo Cookies

    Classic Oreo cookies work perfectly, but you can also experiment with different flavors like:

    • Double Stuf Oreos

    • Golden Oreos

    • Mint Oreos

    • Birthday Cake Oreos

    Each variation creates a slightly different mug cake flavor.

    Milk Choices

    Most types of milk will work well:

    • Whole milk (creamiest texture)

    • 2% milk

    • Almond milk

    • Oat milk

    The key is adding just enough milk to create a thick cake batter consistency.

Step-by-Step Instructions

Making this Easy 2 Ingredient Oreo Mug Cake is incredibly simple and beginner-friendly.

Step 1: Crush the Oreos

Place the Oreo cookies in a microwave-safe mug and crush them using a fork or spoon until they form fine crumbs.

Step 2: Add Milk

Pour the milk into the crushed Oreos and stir thoroughly until a thick batter forms. Make sure there are no large cookie chunks remaining.

Step 3: Microwave the Mug Cake

Place the mug in the microwave and cook on high for 60–90 seconds.

The cake should rise and set in the center but remain soft and moist.

Step 4: Add Toppings

Let the cake cool for about one minute, then add your favorite toppings like whipped cream or crushed Oreos.

Tips for Perfect Results

While the recipe is simple, these tips will help you get the best Easy 2 Ingredient Oreo Mug Cake texture.

  • Use a large mug to prevent overflow while cooking.

  • Crush the cookies well so the batter becomes smooth.

  • Don’t overcook or the cake may become dry.

  • Microwave in short intervals if your microwave is very powerful.

Because microwave wattages vary, you may need to experiment with cooking times slightly.

Delicious Variations

Once you master the basic Easy 2 Ingredient Oreo Mug Cake, you can easily customize it.

Chocolate Chip Oreo Mug Cake

Add 1 tablespoon chocolate chips to the batter before microwaving.

Cookies and Cream Mug Cake

Stir in crushed white chocolate or white chocolate chips for extra sweetness.

Peanut Butter Oreo Mug Cake

Add a teaspoon of peanut butter to the center of the batter before cooking.

Ice Cream Oreo Mug Cake

Serve the warm mug cake with a scoop of vanilla ice cream for a decadent dessert.

What to Serve With Oreo Mug Cake

While the Easy 2 Ingredient Oreo Mug Cake is delicious on its own, you can elevate it with a few simple additions.

Popular serving ideas include:

  • Vanilla ice cream

  • Chocolate syrup

  • Caramel drizzle

  • Powdered sugar

  • Fresh strawberries

  • Extra crushed Oreo cookies

These toppings turn a quick mug cake into a café-style dessert in minutes.

Storage & Reheating

Because the Easy 2 Ingredient Oreo Mug Cake is a single serving dessert, it’s best enjoyed immediately after cooking.

However, if you have leftovers:

Storage

  • Cover and refrigerate for up to 24 hours.

Reheating

  • Microwave for about 10–15 seconds to warm it up.

Keep in mind that mug cakes are always softest when freshly cooked.

Common Mistakes to Avoid

Even simple recipes can go wrong if a few key details are overlooked.

Avoid these mistakes when making Easy 2 Ingredient Oreo Mug Cake:

  • Adding too much milk, which makes the batter watery

  • Not crushing the cookies enough

  • Using a mug that is too small

  • Overcooking the cake

Following the instructions closely ensures a soft, fluffy mug cake every time.

Frequently Asked Questions

Can I make this Oreo mug cake without milk?

Milk helps create the batter, but you can substitute it with almond milk, oat milk, or even coffee creamer.

Can I use more Oreos?

Yes! Using 6 Oreos instead of 4–5 will create a larger and richer mug cake.

Why didn’t my mug cake rise?

This usually happens if the cookies weren’t crushed enough or if the cake was undercooked.

Can I bake this in the oven instead of microwaving?

Yes. Bake the batter in an oven-safe ramekin at 350°F for about 10–12 minutes.

Can kids make this recipe?

Absolutely. The Easy 2 Ingredient Oreo Mug Cake is one of the easiest desserts for kids to make with supervision.

Final Thoughts

If you’re looking for the fastest possible dessert, this Easy 2 Ingredient Oreo Mug Cake is hard to beat. With just Oreo cookies and milk, you can create a soft, chocolatey cake in minutes without any complicated baking steps.

It’s perfect for busy days, sudden dessert cravings, or anyone who loves quick microwave recipes. Once you try this simple mug cake, you’ll see why it has become one of the most popular quick desserts online.

The next time you have a pack of Oreos in the pantry, skip the traditional baking and whip up this Easy 2 Ingredient Oreo Mug Cake for an effortless sweet treat.

Banana Bread Mug Cake (Easy 5-Minute Microwave Dessert)

If you love the cozy flavor of classic banana bread but don’t want to bake a whole loaf, this Banana Bread Mug Cake is about to become your new favorite quick dessert. Ready in just a few minutes, this single-serve treat delivers the warm, comforting taste of homemade banana bread with minimal effort and zero oven time.

The beauty of a Banana Bread Mug Cake lies in its simplicity. With just a few pantry staples, a ripe banana, and a microwave-safe mug, you can create a soft, fluffy cake that tastes like it came straight from a bakery. Whether you need a late-night snack, a quick breakfast treat, or a sweet pick-me-up during the day, this recipe is fast, easy, and incredibly satisfying.

Why You’ll Love This Banana Bread Mug Cake

This Banana Bread Mug Cake has become popular for good reason. It combines convenience, comfort, and flavor into one simple recipe.

Here’s why you’ll love making it:

  • Ready in 5 minutes from start to finish

  • Single serving so there’s no waste

  • Perfect use for overripe bananas

  • Soft, fluffy texture similar to classic banana bread

  • No oven required—just a microwave

  • Customizable with chocolate chips, nuts, or spices

The result is a quick dessert that tastes homemade and comforting without the time commitment of traditional baking.

Ingredients for Banana Bread Mug Cake

One of the best parts about this easy Banana Bread Mug Cake is that it uses simple ingredients you likely already have in your kitchen.

Basic Ingredients

  • 1/2 ripe banana (mashed)

  • 3 tablespoons all-purpose flour

  • 1 tablespoon brown sugar

  • 1/2 tablespoon granulated sugar

  • 1/4 teaspoon baking powder

  • Pinch of salt

  • 2 tablespoons milk

  • 1 tablespoon vegetable oil or melted butter

  • 1/4 teaspoon vanilla extract

  • Optional: 1 tablespoon chocolate chips or chopped walnuts

These ingredients combine to create a moist, flavorful microwave banana cake that tastes like a mini loaf of banana bread.

Ingredient Notes

Understanding your ingredients helps ensure the best Banana Bread Mug Cake results every time.

Use Very Ripe Bananas

The darker and spottier the banana, the sweeter and more flavorful your mug cake will be. Overripe bananas also mash more easily and blend smoothly into the batter.

Brown Sugar for Flavor

Brown sugar adds a slight caramel note that makes the cake taste more like traditional banana bread.

Oil vs. Butter

  • Butter gives a richer flavor.

  • Oil creates a softer, more moist texture.

Either works beautifully depending on your preference.

Step-by-Step Instructions

Making a Banana Bread Mug Cake is incredibly simple and beginner-friendly.

Step 1: Mash the Banana

In a microwave-safe mug, mash the ripe banana with a fork until mostly smooth.

Step 2: Add Wet Ingredients

Stir in:

  • Milk

  • Oil or melted butter

  • Vanilla extract

Mix until well combined.

Step 3: Add Dry Ingredients

Add flour, brown sugar, granulated sugar, baking powder, and salt directly into the mug. Stir gently until a smooth batter forms.

Step 4: Add Mix-Ins

Fold in optional chocolate chips or chopped nuts for extra flavor and texture.

Step 5: Microwave

Microwave on high for 60–90 seconds until the cake rises and is set in the center.

Let it cool for one minute before eating.

Tips for Perfect Results

Even though this recipe is simple, a few tips can make your Banana Bread Mug Cake even better.

  • Do not overmix the batter to avoid a dense texture.

  • Use a large mug to prevent overflow while cooking.

  • Microwave in short intervals if your microwave is very powerful.

  • Let it rest for one minute after cooking so the texture sets properly.

These small adjustments ensure a soft and fluffy mug cake every time.

Delicious Variations

Once you master the basic Banana Bread Mug Cake, you can easily customize it.

Chocolate Chip Banana Mug Cake

Add 1 tablespoon chocolate chips for a dessert-style treat.

Peanut Butter Banana Mug Cake

Swirl 1 teaspoon peanut butter into the batter before microwaving.

Cinnamon Banana Bread Mug Cake

Add 1/4 teaspoon cinnamon for a warm, bakery-style flavor.

Healthy Banana Mug Cake

Use:

  • Whole wheat flour

  • Maple syrup instead of sugar

  • Almond milk

This creates a more wholesome version of the classic recipe.

What to Serve With Banana Bread Mug Cake

This cozy mug dessert pairs beautifully with simple additions.

Serving ideas include:

  • A scoop of vanilla ice cream

  • Fresh banana slices

  • A drizzle of honey or maple syrup

  • Whipped cream

  • A sprinkle of cinnamon sugar

For breakfast, pair it with coffee or a smoothie for a quick morning treat.

Storage & Reheating

Since a Banana Bread Mug Cake is meant to be a single serving, it’s best eaten fresh.

However, if needed:

Storage

  • Cover the mug and refrigerate up to 24 hours.

Reheating

  • Microwave for 10–15 seconds before serving.

Keep in mind that the texture is always best immediately after cooking.

Common Mistakes to Avoid

Even quick microwave desserts can go wrong without a few precautions.

Avoid these common issues:

  • Overcooking which makes the cake rubbery

  • Using an underripe banana resulting in less flavor

  • Using a mug that’s too small causing overflow

  • Skipping baking powder which helps the cake rise

Following the recipe carefully ensures the perfect fluffy mug cake.

Frequently Asked Questions

Can I make Banana Bread Mug Cake without eggs?

Yes! This recipe is naturally egg-free because the mashed banana provides moisture and structure.

Can I bake this instead of microwaving?

You can bake it in an oven-safe ramekin at 350°F for about 12–15 minutes, though the microwave is faster.

Can I make this gluten-free?

Absolutely. Substitute the all-purpose flour with a 1:1 gluten-free baking flour blend.

Why is my mug cake rubbery?

A rubbery texture usually happens when the cake is overcooked. Try microwaving for shorter intervals.

Can I double the recipe?

It’s better to make two separate mug cakes instead of doubling in one mug for even cooking.

Final Thoughts

This Banana Bread Mug Cake is proof that you don’t need a full baking session to enjoy homemade comfort food. In just a few minutes, you can turn a ripe banana and a few pantry ingredients into a warm, fluffy dessert that tastes like classic banana bread.

Whether you’re craving a quick sweet snack, an easy microwave dessert, or a cozy single-serve treat, this recipe delivers delicious results every time. Once you try it, you’ll likely find yourself making this Banana Bread Mug Cake again and again whenever a banana starts getting a little too ripe on the counter.

Easy Berry Cream Cheese Stuffed Crescent Rolls – Sweet, Flaky & Irresistible

If you’re looking for a quick sweet treat that feels bakery-worthy but requires minimal effort, these Easy Berry Cream Cheese Stuffed Crescent Rolls are the perfect solution. Made with buttery crescent dough, creamy sweetened cream cheese, and juicy berries, this recipe delivers a warm, flaky dessert that’s both simple and irresistible.

The combination of tart berries and smooth cream cheese wrapped in golden crescent dough creates a delightful balance of flavors and textures. Every bite of these berry cream cheese stuffed crescent rolls offers crisp, buttery pastry on the outside and a creamy, fruity center on the inside.

Best of all, this recipe takes only about 20 minutes from start to finish, making it perfect for last-minute desserts, brunch spreads, or cozy weekend breakfasts. Whether you’re baking for family or guests, these rolls are guaranteed to disappear quickly.

Why You’ll Love These Berry Cream Cheese Stuffed Crescent Rolls

There are plenty of quick dessert recipes, but Easy Berry Cream Cheese Stuffed Crescent Rolls stand out because they’re simple, versatile, and incredibly satisfying.

Here’s why this recipe is so popular:

  • Ready in about 20 minutes

  • Requires only a few simple ingredients

  • Perfect for breakfast, brunch, or dessert

  • Flaky, creamy, and fruity in every bite

  • Easy to customize with different berries

Whether served warm from the oven or slightly cooled, these berry cream cheese stuffed crescent rolls are always a crowd favorite.

Ingredients for Easy Berry Cream Cheese Stuffed Crescent Rolls

One of the best things about Easy Berry Cream Cheese Stuffed Crescent Rolls is how simple the ingredient list is.

Main Ingredients

  • 1 can refrigerated crescent roll dough

  • 4 ounces cream cheese, softened

  • 2 tablespoons granulated sugar

  • ½ teaspoon vanilla extract

  • ½ cup mixed berries (blueberries, raspberries, or strawberries)

  • 1 tablespoon powdered sugar for garnish (optional)

Ingredient Notes

Choosing good ingredients makes your berry cream cheese stuffed crescent rolls even better.

Here are a few helpful tips:

  • Cream cheese: Use full-fat cream cheese for the creamiest filling.

  • Berries: Fresh berries work best, but frozen berries can be used if drained well.

  • Crescent dough: Store-bought crescent dough keeps the recipe quick and convenient.

  • Vanilla extract: Adds warmth and enhances the sweetness of the filling.

You can also experiment with flavor variations like lemon zest or almond extract.

Step-by-Step Instructions

Step 1: Preheat the Oven

Preheat your oven to 375°F (190°C) and line a baking sheet with parchment paper.

This ensures your Easy Berry Cream Cheese Stuffed Crescent Rolls bake evenly and don’t stick.

Step 2: Prepare the Cream Cheese Filling

In a small bowl, mix together the softened cream cheese, sugar, and vanilla extract until smooth and creamy.

This sweet filling forms the rich center of the berry cream cheese stuffed crescent rolls.

Step 3: Prepare the Crescent Dough

Unroll the crescent roll dough and separate it into individual triangles.

Lay them flat on a clean surface so they’re ready to be filled.

Step 4: Add the Filling and Berries

Place about a tablespoon of the cream cheese mixture near the wide end of each triangle. Add a few berries on top of the cream cheese.

Carefully roll each triangle toward the tip, enclosing the filling.

Step 5: Bake the Crescent Rolls

Place the rolled crescents onto the prepared baking sheet and bake for 10–12 minutes until golden brown.

Once baked, allow them to cool slightly before serving.

Tips for Perfect Berry Cream Cheese Stuffed Crescent Rolls

To make the best Easy Berry Cream Cheese Stuffed Crescent Rolls, follow these helpful tips:

  • Use softened cream cheese for a smooth filling

  • Don’t overfill the dough to prevent leaking

  • Space the rolls apart on the baking sheet

  • Bake until the pastry is golden and flaky

  • Let them cool slightly before serving

These small tips help ensure your rolls come out perfectly every time.

Delicious Variations

This berry cream cheese stuffed crescent rolls recipe can easily be customized.

Mixed Berry Crescent Rolls

Use a blend of strawberries, blueberries, and raspberries.

Lemon Berry Crescent Rolls

Add a little lemon zest to the cream cheese filling.

Chocolate Berry Rolls

Sprinkle mini chocolate chips inside with the berries.

Cinnamon Cream Cheese Rolls

Add a dash of cinnamon to the cream cheese mixture.

What to Serve With Berry Cream Cheese Crescent Rolls

These Easy Berry Cream Cheese Stuffed Crescent Rolls pair wonderfully with many breakfast and dessert options.

Try serving them with:

  • Fresh fruit salad

  • Hot coffee or cappuccino

  • Greek yogurt

  • Vanilla ice cream for dessert

  • Maple syrup drizzle

Storage & Reheating Tips

If you have leftover berry cream cheese stuffed crescent rolls, they store surprisingly well.

Refrigeration

Store in an airtight container in the refrigerator for up to 3 days.

Reheating

Warm them in the oven at 300°F for 5 minutes or microwave for about 15 seconds.

This helps restore the flaky texture of the pastry.

Common Mistakes to Avoid

Avoid these mistakes when making Easy Berry Cream Cheese Stuffed Crescent Rolls:

  • Overfilling the dough

  • Using cold cream cheese

  • Baking at too high a temperature

  • Not sealing the rolls properly

Paying attention to these details ensures the rolls stay flaky and delicious.

FAQs About Berry Cream Cheese Stuffed Crescent Rolls

Can I use frozen berries?

Yes, but thaw and drain them well before adding them to the filling.

Can I make these ahead of time?

You can assemble them ahead and bake just before serving for the best texture.

Can I use puff pastry instead of crescent dough?

Yes, puff pastry will create a flakier, more pastry-like result.

Are these rolls good for brunch?

Absolutely! Berry cream cheese stuffed crescent rolls are perfect for brunch spreads and breakfast gatherings.


Final Thoughts

These Easy Berry Cream Cheese Stuffed Crescent Rolls prove that delicious homemade pastries don’t have to be complicated. With just a few ingredients and a short baking time, you can create warm, flaky treats filled with creamy sweetness and juicy berries.

Whether you’re preparing a cozy breakfast, a brunch centerpiece, or a quick dessert, these berry cream cheese stuffed crescent rolls are guaranteed to impress with their beautiful presentation and irresistible flavor.

BLT Pasta Salad Recipe (Creamy & Crunchy)

If you love the classic flavors of a BLT sandwich, you’re going to fall in love with this BLT Pasta Salad Recipe (Creamy & Crunchy). It takes everything people adore about the traditional bacon, lettuce, and tomato sandwich and transforms it into a refreshing pasta salad that’s perfect for gatherings, meal prep, or easy weeknight dinners.

This BLT pasta salad recipe combines crispy bacon, juicy tomatoes, tender pasta, and crisp lettuce tossed in a creamy dressing. The result is a dish that’s rich, satisfying, and full of contrasting textures. Every bite delivers smoky bacon, fresh vegetables, and creamy pasta goodness.

Whether you’re preparing a summer barbecue menu, a picnic spread, or simply craving a comforting yet fresh pasta salad, this creamy BLT pasta salad is guaranteed to become a favorite.

Why You’ll Love This BLT Pasta Salad Recipe

There are plenty of pasta salad recipes, but this BLT pasta salad recipe stands out because of its incredible flavor and satisfying crunch.

Here are a few reasons people love it:

  • Combines classic BLT sandwich flavors

  • Perfect balance of creamy and crunchy

  • Ideal for BBQs, picnics, and potlucks

  • Easy to prepare ahead of time

  • Family-friendly and crowd-pleasing

Because it’s so simple to customize, this creamy BLT pasta salad can easily become your go-to side dish for gatherings.

Ingredients for BLT Pasta Salad

This BLT Pasta Salad Recipe (Creamy & Crunchy) uses everyday ingredients that work together to create bold flavor.

Main Ingredients

  • 12 ounces rotini or bowtie pasta

  • 8 slices bacon, cooked and crumbled

  • 1 ½ cups cherry tomatoes, halved

  • 2 cups chopped romaine or iceberg lettuce

  • ¼ cup red onion, finely diced

  • ¼ cup shredded cheddar cheese (optional)

Creamy Dressing

  • ¾ cup mayonnaise

  • 2 tablespoons sour cream

  • 1 tablespoon lemon juice

  • 1 teaspoon Dijon mustard

  • Salt and black pepper to taste

Ingredient Notes

Choosing the right ingredients can elevate your BLT pasta salad recipe from good to amazing.

  • Pasta: Short pasta shapes like rotini or bowtie hold the dressing well.

  • Bacon: Thick-cut bacon provides the best flavor and crunch.

  • Lettuce: Romaine stays crisp longer than softer lettuces.

  • Tomatoes: Cherry or grape tomatoes add natural sweetness.

For even more flavor, try adding a sprinkle of freshly cracked black pepper or chopped chives.

Step-by-Step Instructions

Step 1: Cook the Pasta

Bring a large pot of salted water to a boil and cook the pasta according to package instructions until al dente. Drain and rinse briefly with cool water to stop cooking.

Allow the pasta to cool before assembling the BLT pasta salad.

Step 2: Cook the Bacon

Cook bacon in a skillet over medium heat until crispy. Transfer to a paper towel-lined plate and crumble once cooled.

Crispy bacon is the heart of this BLT pasta salad recipe, providing smoky flavor and crunchy texture.

Step 3: Prepare the Vegetables

Slice the cherry tomatoes, dice the red onion, and chop the lettuce. Place them in a large mixing bowl along with the cooled pasta.

Step 4: Make the Creamy Dressing

In a small bowl, whisk together:

  • Mayonnaise

  • Sour cream

  • Lemon juice

  • Dijon mustard

  • Salt and pepper

This creamy dressing gives the BLT pasta salad recipe its signature richness.

Step 5: Assemble the Salad

Add the crumbled bacon and dressing to the pasta mixture. Toss gently until everything is evenly coated.

Add the chopped lettuce last to maintain its crisp texture.

Tips for Perfect BLT Pasta Salad

To make the best BLT pasta salad recipe, follow these simple tips:

  • Cook pasta just until al dente

  • Let pasta cool before adding dressing

  • Use freshly cooked crispy bacon

  • Add lettuce just before serving

  • Chill the salad briefly to enhance flavor

These techniques help ensure your creamy BLT pasta salad stays flavorful and perfectly textured.

Delicious Variations

One of the best things about this BLT pasta salad recipe is how easy it is to customize.

Avocado BLT Pasta Salad

Add diced avocado for extra creaminess.

Ranch BLT Pasta Salad

Replace the dressing with ranch dressing.

Chicken BLT Pasta Salad

Add grilled chicken for a protein-packed meal.

Spicy BLT Pasta Salad

Add chopped jalapeños or a dash of hot sauce.

What to Serve With BLT Pasta Salad

This creamy BLT pasta salad pairs well with many classic dishes.

Try serving it with:

  • Grilled burgers

  • BBQ chicken

  • Pulled pork sandwiches

  • Grilled vegetables

  • Corn on the cob

Storage Tips

This BLT pasta salad recipe stores well if prepared correctly.

Refrigeration

Store in an airtight container in the refrigerator for up to 3 days.

Refreshing the Salad

If the salad becomes dry, stir in a spoonful of mayonnaise or sour cream before serving.

For the best texture, add fresh lettuce right before serving.

Common Mistakes to Avoid

Avoid these mistakes when making BLT pasta salad:

  • Overcooking the pasta

  • Using soggy bacon

  • Adding lettuce too early

  • Using too much dressing

Paying attention to these details will keep your salad fresh and balanced.

FAQs About BLT Pasta Salad

Can I make BLT pasta salad ahead of time?

Yes. Prepare the pasta and dressing ahead, but add the lettuce just before serving.

What pasta works best for BLT pasta salad?

Rotini, bowtie, or penne pasta hold the dressing well.

Can I make this pasta salad lighter?

Yes, substitute Greek yogurt for some of the mayonnaise.

Is BLT pasta salad good for meal prep?

Absolutely. Just store the lettuce separately and mix it in before serving.

Final Thoughts

This BLT Pasta Salad Recipe (Creamy & Crunchy) is a fun and flavorful twist on the beloved BLT sandwich. With crispy bacon, juicy tomatoes, fresh lettuce, and creamy pasta, it’s a dish that’s both comforting and refreshing.

Perfect for picnics, cookouts, potlucks, or everyday meals, this BLT pasta salad recipe is easy to make and guaranteed to please a crowd. Once you try it, it may quickly become one of your favorite go-to pasta salads.

Green Bean and Feta Salad – Fresh, Zesty & Easy Mediterranean Side

If you’re searching for a light, vibrant dish that’s both simple and full of flavor, this Green Bean and Feta Salad is a must-try. It combines crisp-tender green beans, creamy feta cheese, and a bright lemon vinaigrette that brings everything together beautifully.

This green bean and feta salad is inspired by Mediterranean flavors, where fresh vegetables, olive oil, and tangy cheeses are staples of everyday cooking. The result is a salad that feels refreshing yet satisfying, making it perfect for everything from casual weeknight dinners to elegant holiday meals.

One of the best things about this recipe is its versatility. It works wonderfully as a side dish for grilled meats, roasted chicken, seafood, or even as a light lunch when paired with crusty bread. Plus, the ingredients are simple and the preparation is quick, making it ideal for busy cooks.

Why You’ll Love This Green Bean and Feta Salad

There are countless vegetable side dishes out there, but this green bean and feta salad stands out thanks to its perfect balance of flavors and textures.

Here’s why this salad deserves a place on your table:

  • Quick and easy to prepare

  • Packed with fresh Mediterranean flavors

  • Crisp, creamy, and tangy in every bite

  • Perfect for summer meals and holiday spreads

  • Naturally gluten-free and nutritious

Because the ingredients are so fresh and simple, this green bean and feta salad highlights how delicious vegetables can be when prepared the right way.

Ingredients for Green Bean and Feta Salad

This Green Bean and Feta Salad uses fresh ingredients that create a simple yet elegant dish.

Main Ingredients

  • 1 pound fresh green beans, trimmed

  • ½ cup crumbled feta cheese

  • 1 cup cherry tomatoes, halved

  • ¼ small red onion, thinly sliced

  • 2 tablespoons chopped fresh parsley

Lemon Vinaigrette

  • 3 tablespoons extra virgin olive oil

  • 1 tablespoon fresh lemon juice

  • 1 teaspoon Dijon mustard

  • 1 small garlic clove, minced

  • Salt and black pepper to taste

Ingredient Notes

The beauty of this green bean and feta salad lies in its simplicity, so choosing good ingredients really matters.

Here are a few helpful tips:

  • Green beans: Fresh, crisp beans provide the best flavor and texture.

  • Feta cheese: Use block feta and crumble it yourself for better taste.

  • Olive oil: High-quality extra virgin olive oil enhances the dressing.

  • Fresh herbs: Parsley or dill adds brightness and color.

You can also include ingredients like toasted almonds or olives to deepen the Mediterranean character of the salad.

Step-by-Step Instructions

Step 1: Blanch the Green Beans

Bring a large pot of salted water to a boil. Add the green beans and cook for about 3–4 minutes until they are bright green and crisp-tender.

Immediately transfer them to an ice bath to stop the cooking process.

Step 2: Prepare the Vegetables

While the beans cool, slice the red onion, halve the cherry tomatoes, and chop the parsley.

Place everything into a large mixing bowl.

Step 3: Make the Lemon Vinaigrette

In a small bowl, whisk together olive oil, lemon juice, Dijon mustard, minced garlic, salt, and pepper.

This bright vinaigrette adds a refreshing flavor that perfectly complements the green bean and feta salad.

Step 4: Assemble the Salad

Add the cooled green beans to the bowl with the vegetables. Pour the dressing over the salad and gently toss to coat.

Finish by sprinkling the crumbled feta cheese and fresh herbs on top.

Tips for Perfect Green Bean and Feta Salad

To make the best green bean and feta salad, keep these tips in mind:

  • Don’t overcook the green beans

  • Use an ice bath to keep beans bright and crisp

  • Add feta cheese just before serving

  • Taste the dressing and adjust lemon or salt as needed

  • Let the salad rest for 10 minutes before serving

These simple techniques help ensure the salad stays vibrant and flavorful.

Delicious Variations

This green bean and feta salad can easily be customized to suit your taste.

Mediterranean Green Bean Salad

Add olives and roasted red peppers.

Nutty Green Bean Salad

Sprinkle toasted almonds or pine nuts on top.

Protein-Packed Version

Add grilled chicken or chickpeas.

Herb-Lovers Salad

Mix in fresh basil, dill, or mint for extra freshness.

What to Serve With Green Bean and Feta Salad

This green bean and feta salad pairs beautifully with many main dishes.

Great serving ideas include:

  • Grilled chicken

  • Roasted salmon

  • Steak or lamb

  • Mediterranean-style rice

  • Crusty artisan bread

Storage Tips

This green bean and feta salad stores well and can even taste better after resting.

Refrigeration

Store in an airtight container in the refrigerator for up to 3 days.

Make Ahead Tip

Prepare the beans and dressing ahead of time but add the feta cheese right before serving.

Common Mistakes to Avoid

Even simple salads can be improved by avoiding these mistakes:

  • Overcooking the green beans

  • Using low-quality feta cheese

  • Skipping the ice bath

  • Adding too much dressing

Following the recipe carefully ensures the best flavor and texture.

FAQs About Green Bean and Feta Salad

Can I make green bean and feta salad ahead of time?

Yes! You can prepare it several hours ahead and store it in the refrigerator.

Can I use frozen green beans?

Fresh beans are best, but frozen beans can work if cooked carefully.

Is green bean and feta salad healthy?

Yes, it’s packed with fiber, vitamins, and healthy fats from olive oil.

Can I serve this salad warm?

Absolutely. It tastes great warm, room temperature, or chilled.

Final Thoughts

This Green Bean and Feta Salad proves that simple ingredients can create something truly special. With crisp green beans, creamy feta, and a bright lemon dressing, it’s a dish that feels both refreshing and satisfying.

Whether you’re serving it at a family dinner, summer barbecue, or holiday gathering, this green bean and feta salad brings vibrant flavor and color to the table. Once you try it, it may quickly become one of your favorite go-to side dishes.