Heavenly Red Velvet Cinnamon Rolls: Indulgent Treats You’ll Love

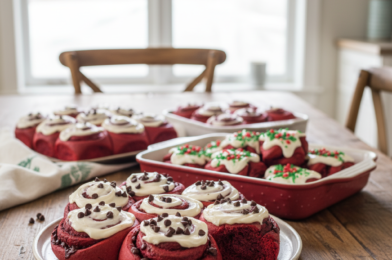
There’s something truly magical about warm, freshly baked cinnamon rolls—but when you add a red velvet twist, they become absolutely unforgettable. These Heavenly Red Velvet Cinnamon Rolls are soft, fluffy, and filled with rich cocoa flavor, finished with a luscious cream cheese frosting that melts into every swirl.

Perfect for holidays, weekend brunch, or special occasions, these rolls combine the iconic flavor of red velvet cake with the comforting, gooey goodness of classic cinnamon rolls. If you’ve been looking for a show-stopping baked treat that tastes just as amazing as it looks, this recipe delivers in every way.

Why You’ll Love This Recipe

These Heavenly Red Velvet Cinnamon Rolls are more than just beautiful—they’re incredibly delicious and satisfying.

  • Soft, pillowy texture with rich flavor
  • Perfect balance of cocoa and cinnamon
  • Cream cheese frosting that melts into every bite
  • Ideal for special occasions or holidays
  • Make-ahead friendly for convenience

They’re guaranteed to impress anyone lucky enough to try them.
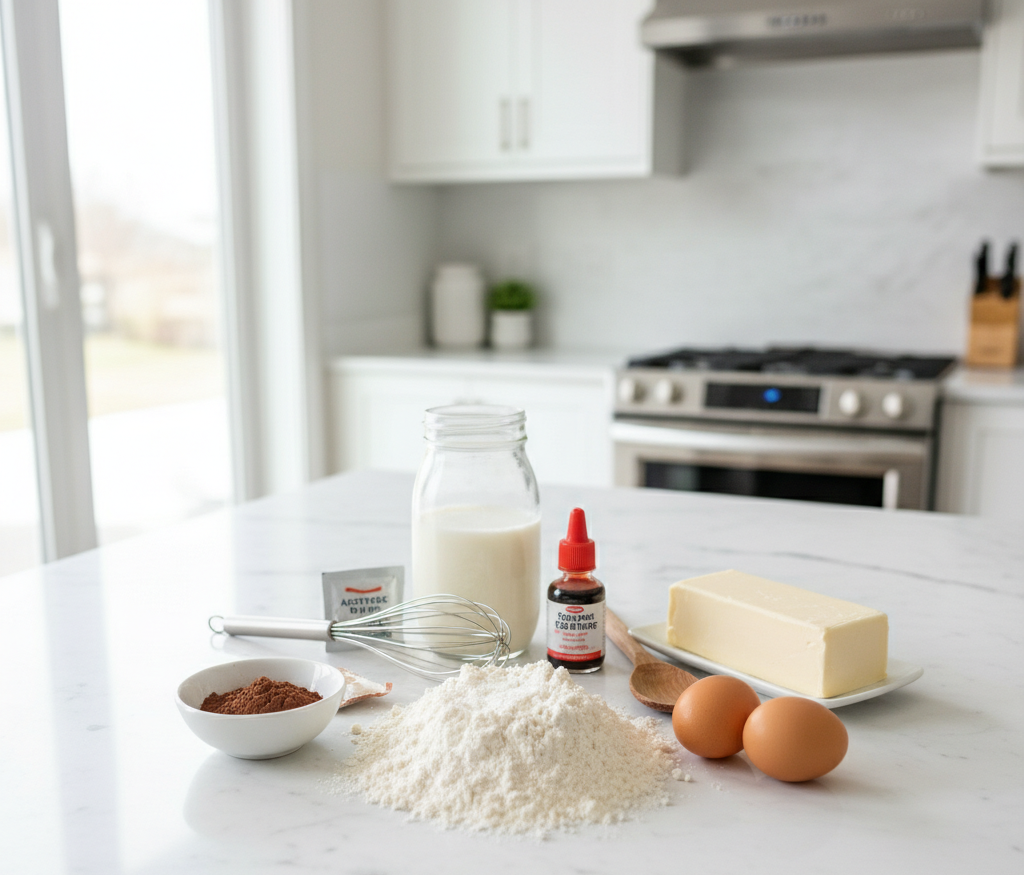
  • Ingredients

To make these irresistible Heavenly Red Velvet Cinnamon Rolls, you’ll need:

Dough:

  • 3 1/2 cups all-purpose flour
  • 1/4 cup granulated sugar
  • 1 packet active dry yeast
  • 1/2 cup warm milk
  • 1/4 cup unsalted butter (melted)
  • 1 large egg
  • 2 tablespoons cocoa powder
  • 1 teaspoon red food coloring
  • 1/2 teaspoon salt

Filling:

  • 1/2 cup brown sugar
  • 2 teaspoons cinnamon
  • 1/4 cup butter (softened)

Cream Cheese Frosting:

  • 8 oz cream cheese (softened)
  • 1/4 cup butter (softened)
  • 1 cup powdered sugar
  • 1 teaspoon vanilla extract

Ingredient Notes

Understanding your ingredients helps you create the best Heavenly Red Velvet Cinnamon Rolls every time.

  • Cocoa powder: Adds subtle chocolate flavor without overpowering
  • Red food coloring: Gives the signature red velvet look
  • Yeast: Make sure it’s fresh for proper rising
  • Cream cheese: Use full-fat for the richest frosting
  • Butter: Adds softness and flavor throughout


Step-by-Step Instructions

1. Activate the Yeast

In a bowl, combine warm milk and yeast. Let it sit for 5–10 minutes until foamy.

2. Make the Dough

Mix in sugar, melted butter, egg, cocoa powder, food coloring, and salt. Gradually add flour and knead until a soft dough forms.

3. Let It Rise

Place the dough in a greased bowl, cover, and let it rise for about 1–1.5 hours, or until doubled in size.

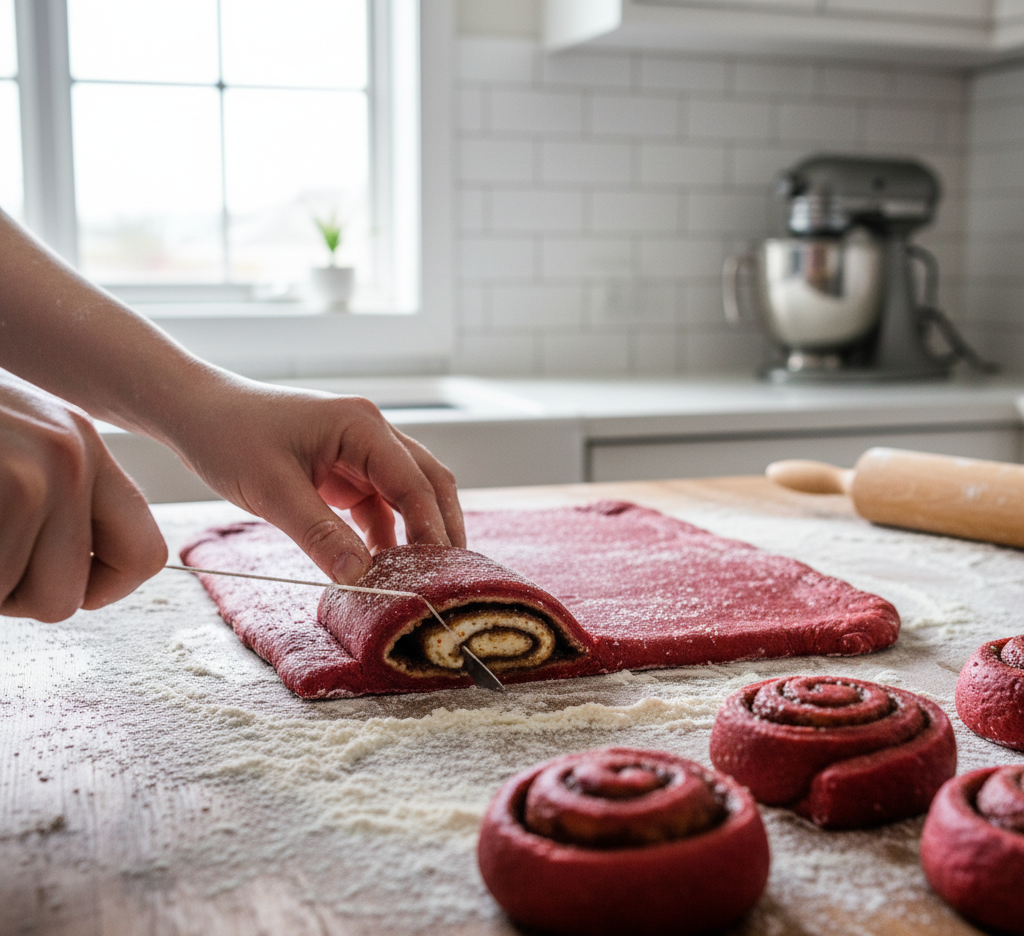
4. Prepare the Filling

Mix brown sugar and cinnamon. Roll out the dough into a rectangle and spread softened butter over it, then sprinkle the sugar mixture evenly.

5. Roll and Slice

Roll the dough tightly into a log and slice into even rolls.

6. Second Rise

Place rolls in a greased baking dish, cover, and let rise again for 30–45 minutes.

7. Bake

Bake at 350°F (175°C) for 20–25 minutes until cooked through.
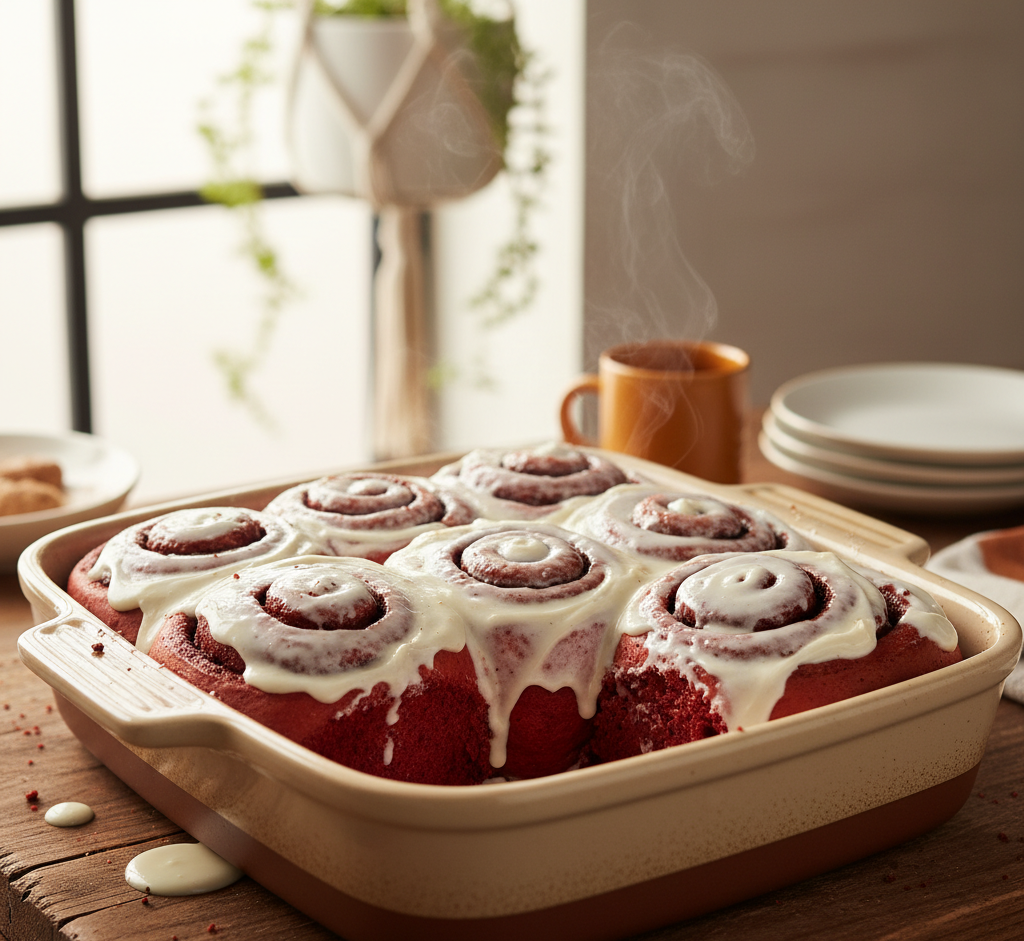
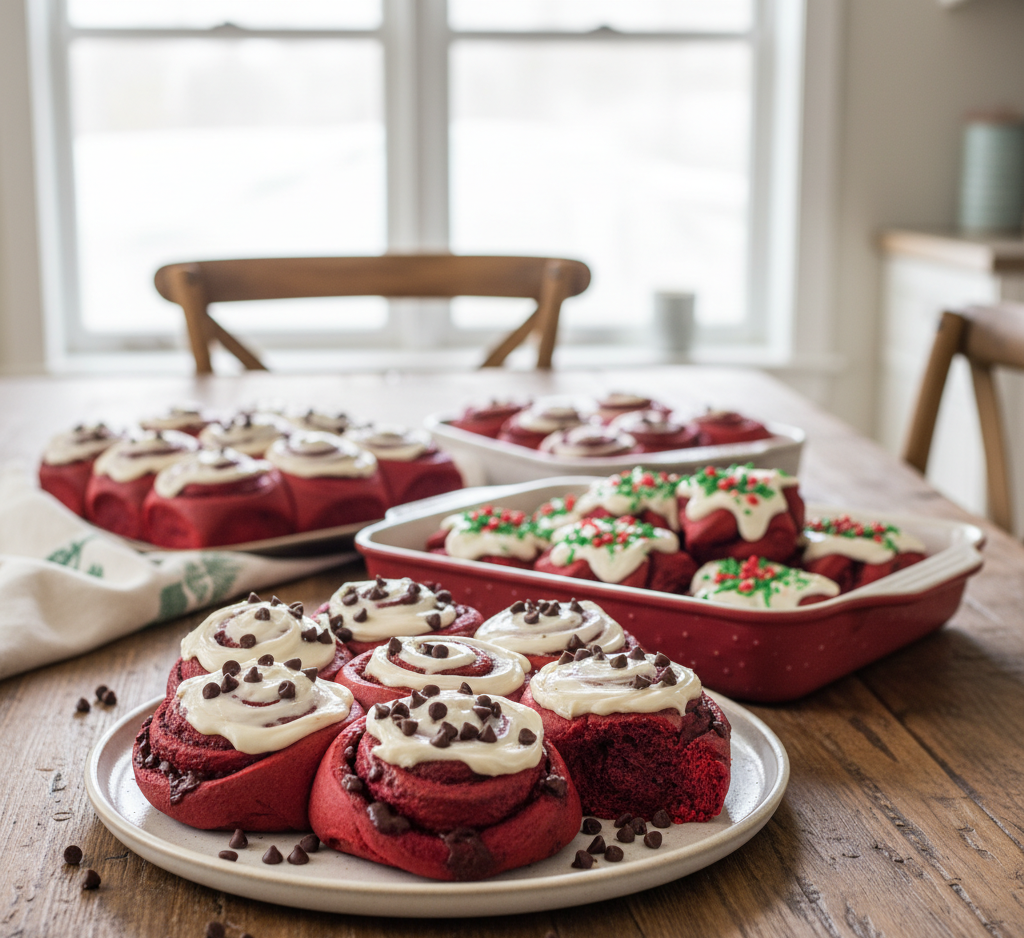
8. Frost and Serve

Spread cream cheese frosting over warm rolls and serve immediately.

Tips for Perfect Results

Making perfect Heavenly Red Velvet Cinnamon Rolls is all about technique and patience.

  • Don’t overheat the milk—it can kill the yeast
  • Knead until smooth and elastic for soft rolls
  • Allow enough rising time for fluffy texture
  • Frost while warm so it melts beautifully

Taking your time ensures bakery-quality results at home.

Variations

These Heavenly Red Velvet Cinnamon Rolls are easy to customize for different tastes.

Add Chocolate Chips

  • Sprinkle mini chocolate chips into the filling

Make It Extra Creamy

  • Add a cream cheese layer inside the rolls

Holiday Twist

  • Shape into heart or wreath designs

Less Sweet Option

  • Reduce sugar in the frosting slightly

What to Serve With It

These indulgent rolls pair perfectly with:

  • Freshly brewed coffee or espresso
  • A glass of cold milk
  • Fresh fruit for balance
  • Scrambled eggs or breakfast sides

They work beautifully as a centerpiece for brunch spreads.

Storage & Reheating

Keep your Heavenly Red Velvet Cinnamon Rolls fresh with these tips:

  • Room temperature: Store for up to 2 days
  • Refrigerator: Up to 5 days in an airtight container
  • Freezer: Freeze unfrosted rolls for up to 2 months
  • Reheat: Warm in microwave for 15–20 seconds

Proper storage keeps them soft and delicious.

Common Mistakes to Avoid

Avoid these pitfalls when making Heavenly Red Velvet Cinnamon Rolls:

  • Using expired yeast
  • Adding too much flour (leads to dense rolls)
  • Skipping the second rise
  • Overbaking (dries them out)

Attention to detail makes all the difference.

FAQs

Can I make these ahead of time?

Yes! Prepare the rolls and refrigerate overnight before baking.

Do I have to use food coloring?

No, but it gives the signature red velvet look.

Can I use instant yeast?

Yes, just skip the activation step and mix directly.

How do I keep them soft?

Store properly and avoid overbaking.

Final Thoughts

These Heavenly Red Velvet Cinnamon Rolls are the ultimate indulgent treat—soft, rich, and topped with irresistible cream cheese frosting. They bring together the best of two beloved desserts into one unforgettable experience.

Whether you’re baking for a holiday, a special brunch, or simply to treat yourself, this recipe is guaranteed to impress. Once you take that first bite, you’ll understand why these rolls are truly heavenly—and why they deserve a permanent spot in your baking rotation.

Easy Loaded Fries Recipe – Ready in 20 Minutes!

When it comes to quick comfort food that always hits the spot, nothing beats a plate of easy loaded fries. Crispy golden fries piled high with gooey melted cheese, savory toppings, and flavorful sauces—what’s not to love? Whether you’re hosting a game day party, looking for a fun appetizer, or just craving something indulgent, this recipe delivers big flavor in just 20 minutes.

The best part? You don’t need fancy ingredients or complicated steps. This easy loaded fries recipe is all about simplicity, speed, and satisfaction. It’s the kind of dish that brings people together, and once you make it, you’ll find yourself coming back to it again and again.


Why You’ll Love This Recipe

These easy loaded fries are more than just a snack—they’re a full-on flavor experience.

  • Ready in 20 minutes—perfect for busy days
  • Crispy, cheesy, and savory in every bite
  • Highly customizable with your favorite toppings
  • Perfect for sharing at parties or gatherings
  • Minimal prep and cleanup

Whether you’re cooking for yourself or feeding a crowd, this recipe is guaranteed to impress.


Ingredients

Here’s what you’ll need to make the ultimate easy loaded fries recipe:

  • 1 bag frozen French fries (or homemade fries)
  • 1 cup shredded cheddar cheese
  • 1/2 cup cooked bacon bits
  • 1/4 cup sour cream
  • 2 tablespoons green onions (chopped)
  • 1/4 cup nacho cheese sauce (optional)
  • Salt and pepper to taste

Ingredient Notes

The secret to amazing easy loaded fries lies in using quality ingredients and balancing textures.

  • Fries: Use thick-cut or crinkle fries for better crispiness
  • Cheese: Freshly shredded cheddar melts more smoothly
  • Bacon: Adds a smoky, salty crunch
  • Sour cream: Brings a cool, creamy contrast
  • Green onions: Add freshness and color

Step-by-Step Instructions

1. Bake the Fries

Preheat your oven according to package instructions and bake the fries until golden and crispy.

2. Add the Cheese

Remove fries from the oven and immediately sprinkle shredded cheese evenly over the top.

3. Melt the Cheese

Return the fries to the oven for 3–5 minutes, or until the cheese is fully melted and bubbly.

4. Add Toppings

Remove from the oven and top with bacon bits, sour cream, green onions, and optional nacho cheese sauce.

5. Serve Immediately

Serve hot and enjoy your delicious easy loaded fries while they’re fresh and crispy.

Tips for Perfect Results

To get the best out of your easy loaded fries recipe, follow these helpful tips:

  • Don’t overcrowd the pan—this helps fries crisp up evenly
  • Bake instead of microwave for better texture
  • Add toppings right before serving to keep fries crispy
  • Layer toppings evenly so every bite is flavorful

Small details like these make a big difference in the final result.

Variations

One of the best things about easy loaded fries is how customizable they are.

Classic Cheeseburger Fries

  • Add ground beef, pickles, and a drizzle of ketchup and mustard

Spicy Loaded Fries

  • Add jalapeños and hot sauce

BBQ Chicken Fries

  • Top with shredded BBQ chicken and red onions

Vegetarian Option

  • Skip bacon and add sautéed mushrooms and peppers

What to Serve With It

These easy loaded fries pair perfectly with:

  • Burgers or sliders
  • Fried chicken or wings
  • Fresh salads for balance
  • Cold drinks like soda or iced tea

They can be a side dish or the star of the show depending on how you serve them.

Storage & Reheating

While easy loaded fries are best enjoyed fresh, here’s how to handle leftovers:

  • Refrigerate: Store in an airtight container for up to 2 days
  • Reheat: Use an oven or air fryer to restore crispiness
  • Avoid microwaving—it makes fries soggy

For best results, always try to make just enough to enjoy immediately.

Common Mistakes to Avoid

Keep your easy loaded fries recipe flawless by avoiding these common mistakes:

  • Not cooking fries long enough (they need to be crispy)
  • Adding toppings too early (can make fries soggy)
  • Using low-quality cheese
  • Overloading with toppings (balance is key)

A little attention goes a long way in making this dish perfect.

FAQs

Can I use fresh potatoes instead of frozen fries?

Yes! Just cut, soak, and bake or fry them until crispy before adding toppings.

What cheese works best?

Cheddar is classic, but mozzarella, Monterey Jack, or a blend also work well.

Can I make these in an air fryer?

Absolutely! Air fry the fries for extra crispiness, then add toppings.

How do I keep fries crispy after adding toppings?

Add toppings just before serving and avoid overly wet ingredients.

Final Thoughts

This easy loaded fries recipe proves that delicious comfort food doesn’t have to be complicated. In just 20 minutes, you can create a dish that’s crispy, cheesy, and completely satisfying.

Whether you’re making them for a party, a family snack, or just treating yourself, these easy loaded fries are always a hit. Once you try them, you’ll understand why they’re such a beloved classic—and why this quick version deserves a permanent spot in your recipe collection.

Garlic Butter Shrimp Pasta: A Quick and Irresistible Dinner Favorite

If you’re searching for a fast, flavorful dinner that feels a little fancy without the extra effort, this garlic butter shrimp pasta is exactly what you need. It combines tender, juicy shrimp with a rich garlic butter sauce and perfectly cooked pasta, creating a dish that tastes like it came straight from a restaurant kitchen.

This recipe is ideal for busy weeknights, date nights at home, or anytime you want a comforting meal that doesn’t take hours to prepare. With simple ingredients and a straightforward method, even beginner cooks can master this dish with confidence.

Why You’ll Love This Recipe

This garlic butter shrimp pasta stands out for so many reasons, and once you try it, you’ll see why it’s a staple in so many kitchens.

  • Quick and easy—ready in about 30 minutes
  • Rich and buttery flavor with a hint of garlic
  • Light yet satisfying—perfect balance of protein and carbs
  • Minimal ingredients but maximum flavor
  • Customizable with your favorite add-ins

It’s the kind of meal that feels indulgent but is surprisingly simple to make.

Ingredients

To make this delicious garlic butter shrimp pasta, you’ll need:

  • 12 oz spaghetti or linguine
  • 1 lb large shrimp (peeled and deveined)
  • 4 tablespoons unsalted butter
  • 4 cloves garlic (minced)
  • 1/4 teaspoon red pepper flakes
  • 1/2 cup chicken broth
  • 1/4 cup freshly grated Parmesan cheese
  • Juice of 1 lemon
  • Salt and black pepper to taste
  • 2 tablespoons fresh parsley (chopped)

Ingredient Notes

The beauty of this garlic butter shrimp pasta lies in the quality of its simple ingredients.

  • Shrimp: Use fresh or frozen (thawed) shrimp for best results
  • Butter: Adds richness and depth—don’t substitute with margarine
  • Garlic: Fresh garlic is key for bold flavor
  • Lemon juice: Brightens and balances the dish
  • Parmesan: Adds a savory, slightly nutty finish

Step-by-Step Instructions

1. Cook the Pasta

Bring a large pot of salted water to a boil and cook the pasta according to package instructions. Reserve 1/2 cup of pasta water before draining.

2. Sauté the Shrimp

Season shrimp with salt and pepper. In a large skillet, melt 2 tablespoons of butter over medium-high heat. Cook shrimp for 2–3 minutes per side until pink and opaque. Remove and set aside.

3. Make the Garlic Butter Sauce

In the same skillet, melt the remaining butter. Add garlic and red pepper flakes, cooking until fragrant (about 1 minute).

4. Add Liquid and Flavor

Pour in chicken broth and lemon juice. Let it simmer for 2–3 minutes to slightly reduce.

5. Combine Everything

Add cooked pasta and shrimp back to the skillet. Toss to coat, adding reserved pasta water as needed.

6. Finish with Cheese and Herbs

Sprinkle in Parmesan and parsley, tossing until everything is well combined and glossy.

Tips for Perfect Results

To make your garlic butter shrimp pasta truly outstanding, keep these tips in mind:

  • Don’t overcook shrimp—they should be tender, not rubbery
  • Salt your pasta water generously for better flavor
  • Use fresh lemon juice instead of bottled
  • Add pasta water gradually to control sauce consistency

These small techniques elevate your dish from good to exceptional.

Variations

This garlic butter shrimp pasta is incredibly versatile, making it easy to adapt.

Add Vegetables

  • Spinach, cherry tomatoes, or asparagus

Make It Creamy

  • Add a splash of heavy cream for a richer sauce

Try a Different Protein

  • Substitute shrimp with chicken or scallops

Make It Spicy

  • Increase red pepper flakes or add chili paste

What to Serve With It

This dish pairs beautifully with simple sides that complement its rich flavor:

  • Garlic bread or crusty baguette
  • Fresh green salad with vinaigrette
  • Roasted vegetables
  • A glass of white wine like Pinot Grigio

These additions round out the meal without overpowering the pasta.

Storage & Reheating

Leftover garlic butter shrimp pasta can still taste great with proper storage.

  • Refrigerate: Store in an airtight container for up to 2 days
  • Reheat: Warm gently on the stove with a splash of broth or water
  • Avoid overcooking during reheating to keep shrimp tender

For best flavor, enjoy it fresh whenever possible.

Common Mistakes to Avoid

Here are a few pitfalls to watch out for when making garlic butter shrimp pasta:

  • Overcooking the shrimp
  • Burning the garlic (it turns bitter quickly)
  • Skipping the pasta water (important for sauce texture)
  • Using pre-grated cheese (doesn’t melt as smoothly)

Avoiding these ensures a perfectly balanced and delicious dish.

FAQs

Can I use frozen shrimp?

Yes, just thaw them completely and pat dry before cooking.

What pasta works best?

Spaghetti and linguine are ideal, but fettuccine or penne also work well.

Can I make this dairy-free?

You can substitute butter with olive oil and skip the cheese.

How do I know when shrimp are done?

They turn pink and opaque and curl slightly—usually within a few minutes.

Final Thoughts

This garlic butter shrimp pasta is the perfect example of how simple ingredients can create something truly special. It’s quick, flavorful, and elegant enough to serve on any occasion.

Whether you’re cooking for your family or treating yourself to a cozy homemade dinner, this recipe delivers every time. Once you make it, don’t be surprised if it becomes a regular in your weekly meal rotation—it’s just that good.

Buffalo Chicken Cheese Bake: A Flavorful Delight You’ll Love

If you love bold, spicy comfort food, this Buffalo Chicken Cheese Bake is about to become your go-to recipe. It combines everything people adore about buffalo chicken—tangy heat, juicy chicken, and creamy richness—into one bubbling, cheesy casserole that’s impossible to resist.

Perfect for game days, family dinners, or potlucks, this dish delivers big flavor with minimal effort. Even better, it’s incredibly versatile, allowing you to customize the spice level and ingredients to suit your taste. Whether you’re feeding a crowd or meal-prepping for the week, this bake checks all the boxes.

Why You’ll Love This Recipe

This Buffalo Chicken Cheese Bake stands out because it’s both comforting and exciting at the same time.

  • Bold buffalo flavor with the perfect spicy kick
  • Super creamy and cheesy texture
  • Quick and easy prep with simple ingredients
  • Great for meal prep or gatherings
  • Customizable heat level for all preferences

It’s the kind of recipe that disappears quickly from the table—and people will definitely ask for seconds.

Ingredients

Here’s everything you’ll need to make this irresistible dish:

  • 3 cups cooked, shredded chicken
  • 1/2 cup buffalo sauce
  • 1/2 cup ranch dressing (or blue cheese dressing)
  • 8 oz cream cheese (softened)
  • 1 1/2 cups shredded cheddar cheese
  • 1/2 cup shredded mozzarella cheese
  • 1/2 teaspoon garlic powder
  • 1/2 teaspoon onion powder
  • Salt and pepper to taste
  • 2 green onions (chopped, for garnish)

Ingredient Notes

The magic of this Buffalo Chicken Cheese Bake comes from balancing creamy and spicy elements perfectly.

  • Chicken: Rotisserie chicken works great for convenience and flavor
  • Buffalo sauce: Choose your favorite brand and adjust for spice level
  • Cream cheese: Creates that rich, creamy base
  • Cheddar + mozzarella: The perfect combo for flavor and meltability
  • Ranch or blue cheese dressing: Adds tangy balance to the heat

Step-by-Step Instructions

1. Preheat and Prep

Preheat your oven to 375°F (190°C) and lightly grease a baking dish.

2. Mix the Base

In a large bowl, combine shredded chicken, buffalo sauce, ranch dressing, and softened cream cheese. Mix until well incorporated.

3. Add Seasonings and Cheese

Stir in garlic powder, onion powder, and half of the shredded cheeses. Season with salt and pepper to taste.

4. Assemble the Bake

Transfer the mixture to your prepared baking dish and spread evenly. Top with the remaining cheese.

5. Bake to Perfection

Bake uncovered for 20–25 minutes, or until hot and bubbly with a golden cheesy top.

6. Garnish and Serve

Remove from the oven and sprinkle with chopped green onions before serving.

Tips for Perfect Results

To make the best Buffalo Chicken Cheese Bake, keep these tips in mind:

  • Use softened cream cheese for easier mixing
  • Don’t overbake—you want it creamy, not dry
  • Taste before baking to adjust spice and seasoning
  • Shred your own cheese for better melting

These small details make a big difference in texture and flavor.

Variations

One of the best things about Buffalo Chicken Cheese Bake is how adaptable it is.

Make It Low-Carb

  • Serve as-is or over cauliflower rice

Add Pasta or Rice

  • Turn it into a heartier casserole by mixing in cooked pasta or rice

Spice It Up

  • Add jalapeños or extra hot sauce

Make It Lighter

  • Use reduced-fat cream cheese and dressing

What to Serve With It

This rich and creamy Buffalo Chicken Cheese Bake pairs beautifully with lighter sides:

  • Celery and carrot sticks
  • Crisp green salad with vinaigrette
  • Garlic bread or dinner rolls
  • Roasted vegetables

These sides help balance the bold, spicy flavors of the dish.

Storage & Reheating

This dish stores well, making it perfect for leftovers.

  • Refrigerator: Store in an airtight container for up to 4 days
  • Freezer: Freeze for up to 2 months
  • Reheating: Warm in the oven at 350°F or microwave in short intervals

Add a splash of milk or dressing when reheating to keep it creamy.

Common Mistakes to Avoid

Avoid these common pitfalls when making Buffalo Chicken Cheese Bake:

  • Using cold cream cheese (leads to lumps)
  • Overbaking (dries out the dish)
  • Not balancing spice with creamy elements
  • Skipping seasoning adjustments

Being mindful of these ensures a perfect bake every time.

FAQs

Can I make Buffalo Chicken Cheese Bake ahead of time?

Yes! Assemble it ahead, cover, and refrigerate. Bake when ready to serve.

Can I use canned chicken?

You can, but freshly cooked or rotisserie chicken gives better flavor and texture.

How spicy is this dish?

It depends on your buffalo sauce—adjust to your preferred heat level.

Can I make it without ranch dressing?

Absolutely! Substitute with blue cheese dressing or even a bit of sour cream.

Final Thoughts

This Buffalo Chicken Cheese Bake is everything you want in a comfort food dish—bold, creamy, cheesy, and incredibly satisfying. It’s easy enough for weeknight dinners but delicious enough to serve at parties or gatherings.

Once you try it, you’ll understand why it’s such a favorite. With its rich flavor and simple preparation, this recipe is sure to earn a permanent spot in your meal rotation.

Savor Creamy Cowboy Butter Chicken Pasta in 40 Minutes

If you’re craving a bold, comforting dinner that comes together fast, this creamy cowboy butter chicken pasta is about to steal the spotlight. Packed with juicy chicken, a rich buttery sauce, and a kick of garlic, herbs, and spice, this dish brings serious flavor to your table in just 40 minutes.

Inspired by the viral cowboy butter trend, this pasta recipe transforms those zesty, savory flavors into a creamy, satisfying meal that’s perfect for busy weeknights or cozy weekends. It’s hearty, indulgent, and surprisingly easy to make—even if you’re not a seasoned cook.

Why You’ll Love This Recipe

This creamy cowboy butter chicken pasta hits all the right notes for a crowd-pleasing meal.

  • Ready in 40 minutes from start to finish
  • Rich, creamy, and flavorful with a buttery garlic kick
  • Family-friendly comfort food with a gourmet feel
  • One-pan sauce keeps cleanup simple
  • Customizable spice level to suit your taste

Every bite is loaded with bold flavors that feel indulgent yet balanced, making it a go-to recipe for pasta lovers.

Ingredients

Here’s what you’ll need to make this irresistible dish:

  • 2 boneless, skinless chicken breasts (cubed)
  • 12 oz pasta (penne or fettuccine work great)
  • 3 tablespoons butter
  • 4 cloves garlic (minced)
  • 1 cup heavy cream
  • 1/2 cup grated Parmesan cheese
  • 1 tablespoon Dijon mustard
  • 1 teaspoon smoked paprika
  • 1/2 teaspoon red pepper flakes (adjust to taste)
  • Juice of 1/2 lemon
  • Salt and black pepper to taste
  • 2 tablespoons fresh parsley (chopped)

Ingredient Notes

The secret to a truly unforgettable creamy cowboy butter chicken pasta lies in the balance of bold and creamy ingredients.

  • Butter: The foundation of the cowboy butter flavor—don’t skimp here
  • Garlic: Fresh garlic adds depth and aroma
  • Lemon juice: Brightens the rich sauce and balances flavors
  • Parmesan cheese: Adds a salty, nutty finish to the cream sauce
  • Smoked paprika: Gives a subtle smoky warmth

Step-by-Step Instructions

1. Cook the Pasta

Bring a large pot of salted water to a boil and cook your pasta according to package instructions. Reserve 1/2 cup of pasta water, then drain and set aside.

2. Sear the Chicken

Season the chicken with salt, pepper, and smoked paprika. In a large skillet, melt 1 tablespoon of butter over medium-high heat. Add the chicken and cook until golden brown and fully cooked, about 5–7 minutes. Remove and set aside.

3. Make the Cowboy Butter Sauce

In the same skillet, melt the remaining butter. Add minced garlic and cook until fragrant, about 1 minute. Stir in Dijon mustard, red pepper flakes, and lemon juice.

4. Add Cream and Cheese

Pour in the heavy cream and bring to a gentle simmer. Stir in Parmesan cheese until melted and smooth.

5. Combine Everything

Add the cooked pasta and chicken back into the skillet. Toss everything together, adding reserved pasta water as needed to loosen the sauce.

6. Garnish and Serve

Sprinkle with fresh parsley and extra Parmesan before serving.

Tips for Perfect Results

To make your creamy cowboy butter chicken pasta absolutely perfect, keep these tips in mind:

  • Don’t overcook the chicken—keep it juicy and tender
  • Use freshly grated Parmesan for the smoothest sauce
  • Adjust spice level by adding more or less red pepper flakes
  • Save pasta water—it helps create a silky sauce

Small adjustments can elevate your dish from good to restaurant-quality.

Variations

One of the best things about creamy cowboy butter chicken pasta is how easy it is to customize.

Make It Spicier

  • Add cayenne pepper or hot sauce

Swap the Protein

  • Use shrimp, steak, or even sausage

Add Veggies

  • Spinach, mushrooms, or sun-dried tomatoes work beautifully

Lighten It Up

  • Substitute half-and-half for heavy cream

What to Serve With It

This rich and creamy pasta pairs perfectly with lighter sides:

  • Garlic bread or crusty baguette
  • Simple green salad with vinaigrette
  • Roasted vegetables like asparagus or broccoli
  • A crisp white wine like Sauvignon Blanc

These sides balance the richness of the dish and round out your meal beautifully.

Storage & Reheating

Leftovers of creamy cowboy butter chicken pasta are just as delicious the next day.

  • Refrigerate: Store in an airtight container for up to 3 days
  • Reheat: Warm gently on the stove with a splash of cream or milk
  • Avoid microwaving too long to prevent drying out

Proper storage keeps the sauce creamy and the chicken tender.

Common Mistakes to Avoid

Even simple recipes can have pitfalls. Avoid these when making creamy cowboy butter chicken pasta:

  • Overheating the cream (can cause separation)
  • Using pre-shredded cheese (doesn’t melt as well)
  • Skipping the lemon juice (you’ll miss the balance)
  • Not seasoning enough—taste as you go

Being mindful of these ensures consistent, delicious results.

FAQs

What is cowboy butter?

Cowboy butter is a flavorful butter sauce made with garlic, herbs, lemon, and spices—perfect for meats and pasta.

Can I make this ahead of time?

Yes, but it’s best fresh. Reheat gently with added liquid to maintain creaminess.

What pasta works best?

Penne, fettuccine, or rigatoni all hold the sauce well.

Can I make it dairy-free?

You can substitute plant-based butter, cream, and cheese, though flavor will vary slightly.

Final Thoughts

This creamy cowboy butter chicken pasta is the perfect blend of bold flavor and comforting texture—all ready in just 40 minutes. It’s a dish that feels indulgent yet approachable, making it ideal for both weeknight dinners and special occasions.

Once you try it, you’ll see why it’s quickly becoming a favorite in kitchens everywhere. Rich, creamy, and packed with personality, this pasta recipe is one you’ll come back to again and again.

Chocolate Peanut Butter Banana Bread

If you’re looking for the ultimate comfort bake that blends indulgence with nostalgia, this chocolate peanut butter banana bread is about to become your new favorite recipe. It’s the perfect mashup of three beloved flavors: rich chocolate, creamy peanut butter, and naturally sweet bananas. The result? A moist, tender loaf that feels like dessert but is perfectly acceptable for breakfast.

Whether you’re trying to use up overripe bananas or simply craving something cozy and homemade, this recipe delivers every time. It’s easy enough for beginners yet impressive enough to share with guests. Plus, your kitchen will smell absolutely incredible while it bakes.

Why You’ll Love This Recipe

This chocolate peanut butter banana bread isn’t just another quick bread—it’s a flavor-packed experience that hits all the right notes.

  • Ultra moist texture thanks to ripe bananas
  • Rich chocolate flavor balanced with nutty peanut butter
  • Easy one-bowl preparation for minimal cleanup
  • Perfect for any time of day—breakfast, snack, or dessert
  • Freezer-friendly so you can enjoy it later

Every bite feels indulgent without being overly heavy, making it a crowd-pleaser for both kids and adults.

Ingredients

Here’s everything you’ll need to make this irresistible loaf:

  • 3 ripe bananas (mashed)
  • 1/2 cup creamy peanut butter
  • 1/2 cup unsalted butter (melted)
  • 3/4 cup brown sugar
  • 2 large eggs
  • 1 teaspoon vanilla extract
  • 1 1/2 cups all-purpose flour
  • 1/2 cup unsweetened cocoa powder
  • 1 teaspoon baking soda
  • 1/2 teaspoon salt
  • 1/2 cup chocolate chips

Ingredient Notes

The magic of this chocolate peanut butter banana bread comes from using high-quality ingredients and understanding their roles.

  • Bananas: The riper, the better. Look for dark brown spots—these add natural sweetness and moisture.
  • Peanut butter: Creamy works best, but natural peanut butter can be used if well stirred.
  • Cocoa powder: Use unsweetened cocoa for deep chocolate flavor.
  • Chocolate chips: Semi-sweet or dark chocolate chips balance the sweetness perfectly.

Step-by-Step Instructions

1. Prep Your Oven and Pan

Preheat your oven to 350°F (175°C) and grease a standard loaf pan or line it with parchment paper.

2. Mix Wet Ingredients

In a large bowl, mash the bananas until smooth. Add melted butter, peanut butter, brown sugar, eggs, and vanilla extract. Mix until fully combined and creamy.

3. Combine Dry Ingredients

In a separate bowl, whisk together flour, cocoa powder, baking soda, and salt.

4. Bring It All Together

Gradually add the dry ingredients into the wet mixture. Stir gently until just combined—don’t overmix.

5. Add Chocolate Chips

Fold in the chocolate chips evenly throughout the batter.

6. Bake

Pour the batter into your prepared loaf pan and bake for 55–65 minutes, or until a toothpick inserted in the center comes out mostly clean.

7. Cool and Serve

Let the bread cool in the pan for 10 minutes, then transfer to a wire rack to cool completely before slicing.

Tips for Perfect Results

Getting bakery-quality chocolate peanut butter banana bread at home is all about small details:

  • Don’t overmix the batter—this keeps the bread tender
  • Use room temperature eggs for better blending
  • Check doneness early to avoid overbaking
  • Let it cool completely before slicing for clean cuts

A little patience goes a long way in achieving that perfect moist crumb.

Variations

This recipe is incredibly versatile, so feel free to customize:

Add Some Crunch

  • Chopped walnuts or pecans for texture

Make It Healthier

  • Substitute half the flour with whole wheat flour
  • Use maple syrup instead of brown sugar

Go Extra Indulgent

  • Swirl extra peanut butter on top before baking
  • Add chunks of dark chocolate instead of chips

What to Serve With It

This chocolate peanut butter banana bread pairs beautifully with:

  • A hot cup of coffee or latte
  • A glass of cold milk
  • Fresh berries on the side
  • A drizzle of warm peanut butter or chocolate sauce

It’s also amazing lightly toasted with a bit of butter melting into each slice.

Storage & Reheating

To keep your banana bread fresh and delicious:

  • Room temperature: Store in an airtight container for up to 3 days
  • Refrigerator: Keeps for up to 1 week
  • Freezer: Wrap slices individually and freeze for up to 3 months

To reheat, simply microwave a slice for 15–20 seconds or warm it in the oven.

Common Mistakes to Avoid

Even simple recipes can go wrong—here’s what to watch out for:

  • Using underripe bananas (less flavor and sweetness)
  • Overbaking, which dries out the bread
  • Skipping the salt (it enhances the chocolate flavor)
  • Overmixing the batter

Avoiding these mistakes ensures a perfectly moist and flavorful loaf every time.

FAQs

Can I use natural peanut butter?

Yes, but make sure it’s well stirred. Natural peanut butter can separate and affect texture.

Can I make this gluten-free?

Absolutely! Use a 1:1 gluten-free flour blend for best results.

How do I know when banana bread is done?

Insert a toothpick into the center—if it comes out with a few moist crumbs, it’s ready.

Can I reduce the sugar?

Yes, you can slightly reduce it or substitute with natural sweeteners like honey or maple syrup.

Final Thoughts

This chocolate peanut butter banana bread is everything you want in a homemade treat—rich, moist, flavorful, and incredibly satisfying. It’s the kind of recipe you’ll come back to again and again, whether you’re baking for your family or just treating yourself.

Once you try it, don’t be surprised if it becomes a permanent staple in your kitchen. It’s easy, reliable, and absolutely delicious—exactly what great baking should be.

Crispy Beer Battered Fish and Chips (Pub-Style Recipe)

There’s nothing quite like biting into perfectly crispy beer battered fish and chips—that golden, crunchy coating giving way to tender, flaky fish inside. It’s the kind of comfort food you’d expect at your favorite pub, but the good news is you can recreate that same magic right in your own kitchen.

This pub-style recipe brings together light, airy beer batter with perfectly fried fish and classic thick-cut fries. Whether you’re planning a casual family dinner, game day meal, or just craving something indulgent, this recipe delivers authentic flavor and texture every single time.

Why You’ll Love This Recipe

This crispy beer battered fish and chips recipe is everything you want in a homemade version of this classic dish. It’s crunchy, flavorful, and surprisingly easy once you know a few key techniques.

The beer batter creates a light, airy crust that crisps up beautifully without feeling heavy or greasy. Paired with perfectly cooked fries, it’s a complete meal that feels both nostalgic and satisfying.

  • Authentic pub-style flavor at home
  • Light, crispy batter باستخدام beer
  • Flaky, tender fish inside
  • Perfectly golden fries
  • Great for gatherings or comfort meals

Ingredients

To make the best crispy beer battered fish and chips, you’ll need:

For the Fish:

  • 1 1/2 lbs white fish (cod, haddock, or pollock)
  • 1 cup all-purpose flour
  • 1 cup cold beer (lager works best)
  • 1 teaspoon baking powder
  • 1/2 teaspoon paprika
  • Salt and pepper to taste
  • Oil for frying

For the Chips:

  • 4 large russet potatoes
  • Oil for frying
  • Salt to taste

Ingredient Notes

Choosing the right ingredients is key to achieving restaurant-quality crispy beer battered fish and chips.

White fish like cod or haddock is ideal because it’s mild, flaky, and holds up well during frying. The beer is just as important—it adds carbonation, which helps create that light, crispy texture in the batter. A cold lager or pale ale works best.

Russet potatoes are perfect for fries because of their high starch content, which helps them crisp up on the outside while staying fluffy inside.

Step-by-Step Instructions

1. Prepare the Potatoes

Peel and cut the potatoes into thick fries. Rinse them in cold water to remove excess starch, then pat dry thoroughly.

2. First Fry (Blanching)

Heat oil to 325°F and fry the potatoes for 3–4 minutes until soft but not browned. Remove and set aside.

3. Make the Beer Batter

In a bowl, whisk together flour, baking powder, paprika, salt, and pepper. Gradually whisk in cold beer until smooth.

4. Prepare the Fish

Pat the fish dry and lightly coat it in flour. This helps the batter stick better.

5. Fry the Fish

Heat oil to 350°F. Dip the fish into the batter, then carefully place it into the hot oil. Fry for 4–6 minutes until golden brown and crispy.

6. Second Fry for Chips

Increase oil temperature to 375°F and fry the potatoes again until golden and crispy.

7. Drain and Serve

Remove fish and chips from oil and place on paper towels. Season with salt immediately and serve hot with lemon wedges.

Tips for Perfect Results

To master crispy beer battered fish and chips, keep these expert tips in mind:

  • Keep the batter cold: Cold batter creates a crispier coating
  • Dry the fish היט: Moisture prevents proper crisping
  • Use a thermometer: Maintain consistent oil temperature
  • Don’t overcrowd the fryer: Fry in batches for best results

Variations

This crispy beer battered fish and chips recipe is easy to customize.

You can swap beer for sparkling water if you prefer a non-alcoholic version. For a spicier twist, add cayenne pepper or hot sauce to the batter. You can also experiment with different fish varieties or even shrimp.

For a healthier option, try baking the fries or using an air fryer, though the texture will differ slightly from traditional frying.

What to Serve With It

Classic beer battered fish and chips are best served with simple, traditional sides.

  • Tartar sauce
  • Malt vinegar
  • Coleslaw
  • Pickles
  • Lemon wedges

These accompaniments enhance the flavor without overpowering the crispy fish.

Storage & Reheating

While crispy beer battered fish and chips are best enjoyed fresh, leftovers can still be saved.

Store in an airtight container in the refrigerator for up to 2 days. Reheat in the oven at 375°F to restore crispiness. Avoid microwaving, as it can make the batter soggy.

Common Mistakes to Avoid

Even simple frying recipes can go wrong without proper technique.

Avoid using warm batter, as it won’t crisp properly. Don’t skip drying the fish, and make sure your oil is hot enough before frying. Also, resist the urge to flip the fish too early—let it develop that golden crust first.

FAQs

What’s the best fish for beer battered fish and chips?

Cod and haddock are the most popular choices due to their mild flavor and flaky texture.

Can I make this without beer?

Yes, you can substitute sparkling water or club soda for similar results.

Why isn’t my batter crispy?

This usually happens if the batter isn’t cold or the oil temperature is too low.

Can I bake instead of fry?

You can, but the texture won’t be as crispy as traditional frying.

Final Thoughts

This Crispy Beer Battered Fish and Chips (Pub-Style Recipe) brings all the charm of your favorite pub straight into your kitchen. With its crunchy golden coating, tender fish, and perfectly crisp fries, it’s a dish that never goes out of style.

Once you master this recipe, you’ll find yourself coming back to it whenever you want a comforting, crowd-pleasing meal. Serve it hot, add your favorite sides, and enjoy a true classic done right.

Creamy Spinach Broccoli Cheese Casserole

If you’re looking for a cozy, crowd-pleasing dish that brings both comfort and nutrition to the table, this Creamy Spinach Broccoli Cheese Casserole is exactly what you need. Packed with tender broccoli, vibrant spinach, and a rich, cheesy sauce, this casserole delivers the perfect balance of flavor and texture in every bite.

Whether you’re planning a holiday spread, a weeknight dinner, or a potluck dish, this casserole fits right in. It’s hearty enough to stand on its own as a vegetarian main and versatile enough to serve as a side alongside your favorite proteins. Best of all, it’s incredibly easy to make with simple ingredients you likely already have in your kitchen.

Why You’ll Love This Recipe

This creamy spinach broccoli cheese casserole is one of those recipes that quickly becomes a family favorite. It combines wholesome vegetables with indulgent cheese, making it both satisfying and comforting.

The creamy texture pairs beautifully with the slight crunch of broccoli, while the spinach adds a subtle earthiness that balances the richness of the cheese sauce. It’s a dish that feels indulgent but still sneaks in plenty of greens.

  • Rich, creamy, and cheesy
  • Packed with nutritious vegetables
  • Easy to prepare ahead of time
  • Perfect for holidays or weeknight dinners
  • Kid-friendly and crowd-pleasing

Ingredients

To make this delicious creamy spinach broccoli cheese casserole, you’ll need:

  • 3 cups broccoli florets (fresh or frozen)
  • 2 cups fresh spinach (or frozen, thawed and drained)
  • 2 cups shredded cheddar cheese
  • 1/2 cup cream cheese, softened
  • 1/2 cup sour cream
  • 1/4 cup milk
  • 1/2 teaspoon garlic powder
  • 1/2 teaspoon onion powder
  • Salt and pepper to taste
  • 1/2 cup breadcrumbs (optional topping)
  • 2 tablespoons butter (for topping)

Ingredient Notes

The magic of this creamy spinach broccoli cheese casserole lies in how simple ingredients come together to create something extraordinary.

Fresh broccoli gives the best texture, but frozen works just as well if you’re short on time—just be sure to thaw and drain it היט. Spinach should also be well-drained to prevent excess moisture from making the casserole watery.

Cheddar cheese is the star here, offering bold flavor and a beautiful melt. For extra depth, you can mix in mozzarella or Parmesan. Cream cheese and sour cream create that ultra-creamy base that makes this casserole so irresistible.

Step-by-Step Instructions

1. Preheat and Prepare

Preheat your oven to 375°F and lightly grease a baking dish.

2. Cook the Vegetables

Steam or blanch the broccoli until just tender. If using fresh spinach, sauté it briefly until wilted. Drain any excess liquid.

3. Make the Creamy Sauce

In a large bowl, mix cream cheese, sour cream, milk, garlic powder, onion powder, salt, and pepper until smooth.

4. Combine Ingredients

Add the broccoli, spinach, and shredded cheese to the sauce, stirring until everything is evenly coated.

5. Assemble the Casserole

Transfer the mixture into the prepared baking dish and spread it evenly.

6. Add Topping

If using breadcrumbs, mix them with melted butter and sprinkle over the top for a crispy finish.

7. Bake

Bake for 25–30 minutes, or until bubbly and golden on top.

Tips for Perfect Results

To make the best creamy spinach broccoli cheese casserole, keep these tips in mind:

  • Drain vegetables היט: Excess moisture can make the casserole watery
  • Use freshly shredded cheese: Melts better than pre-shredded
  • Don’t overcook broccoli: Keep it slightly firm for the best texture
  • Let it rest before serving: Helps the casserole set

What to Serve With It

This creamy spinach broccoli cheese casserole pairs beautifully with a variety of main dishes.

  • Roasted chicken
  • Grilled steak
  • Baked salmon
  • Holiday turkey
  • Simple green salad

It’s also filling enough to enjoy on its own as a vegetarian main dish.

Storage & Reheating

Leftovers of this creamy spinach broccoli cheese casserole store wonderfully.

Keep it in an airtight container in the refrigerator for up to 4 days. To reheat, place in the oven at 350°F until warmed through, or microwave individual portions.

You can also freeze the casserole before or after baking for up to 2 months—just thaw overnight in the fridge before reheating.

Common Mistakes to Avoid

Even simple casseroles can go wrong without a few precautions.

One common mistake is not draining the vegetables properly, which can lead to a watery dish. Another is overbaking, which can dry out the creamy texture.

Also, avoid using too little seasoning—cheese-based dishes need proper seasoning to bring out their full flavor.

FAQs

Can I use frozen broccoli and spinach?

Yes, just make sure to thaw and drain them thoroughly before using.

Can I make this casserole ahead of time?

Absolutely! Assemble it ahead and refrigerate until ready to bake.

Can I make it without breadcrumbs?

Yes, the topping is optional. You can substitute with extra cheese if preferred.

How do I keep the casserole from being watery?

Drain all vegetables היט and avoid overcooking them before baking.

Final Thoughts

This Creamy Spinach Broccoli Cheese Casserole is the ultimate comfort food that brings together rich, cheesy goodness and wholesome vegetables in one satisfying dish. It’s easy to prepare, endlessly customizable, and perfect for everything from weeknight dinners to holiday gatherings.

Once you try this recipe, it’s sure to earn a permanent spot in your rotation. Whether you serve it as a side or enjoy it as a main, it’s a warm, delicious reminder that simple ingredients can create something truly special.

Indulge in Decadence with This Chocolate Turtle Cake Recipe

If you’re ready to truly treat yourself (and anyone lucky enough to share), this Chocolate Turtle Cake Recipe is the definition of indulgence. Rich chocolate cake, gooey caramel, crunchy pecans, and luscious chocolate drizzle come together in a dessert that feels like it belongs in a high-end bakery—but is surprisingly easy to make at home.

This cake is inspired by classic turtle candies, known for their irresistible combination of chocolate, caramel, and nuts. Each bite of this cake delivers that same magic, only amplified into a moist, layered dessert that’s perfect for celebrations, holidays, or whenever you’re craving something unforgettable.

Why You’ll Love This Chocolate Turtle Cake Recipe

There are plenty of chocolate cakes out there, but this chocolate turtle cake recipe stands in a league of its own. It’s not just about chocolate—it’s about layers of texture and flavor that create a truly memorable dessert experience.

The moist chocolate cake pairs beautifully with the buttery caramel and crunchy pecans, while the chocolate topping ties everything together. It’s rich without being overwhelming and impressive without being complicated.

  • Ultra-moist chocolate cake base
  • Gooey caramel layers throughout
  • Crunchy pecans for texture
  • Perfect for birthdays, holidays, or gatherings
  • Easy enough for home bakers

Ingredients

To make this indulgent chocolate turtle cake recipe, gather the following:

  • 1 box chocolate cake mix (or homemade equivalent)
  • Ingredients listed on the cake mix (eggs, oil, water)
  • 1 cup caramel sauce (store-bought or homemade)
  • 1 can sweetened condensed milk
  • 1 cup semi-sweet chocolate chips
  • 1 cup chopped pecans
  • 1/2 cup butter
  • 1/4 cup heavy cream

Ingredient Notes

The beauty of this chocolate turtle cake recipe is how flexible it is while still delivering incredible results.

Using a boxed cake mix saves time and ensures a consistent texture, but you can absolutely use your favorite homemade chocolate cake recipe if you prefer. The caramel sauce is the heart of the “turtle” flavor—choose a high-quality brand or make your own for an extra special touch.

Pecans add that signature crunch, but if you’re not a fan, walnuts can be a great substitute. And don’t skip the sweetened condensed milk—it helps create that gooey, almost fudgy layer inside the cake.

Step-by-Step Instructions

1. Prepare the Cake Batter

Preheat your oven to 350°F and prepare a 9×13-inch baking dish. Mix the chocolate cake batter according to package instructions.

2. Bake the First Layer

Pour half of the batter into the prepared pan and bake for about 15 minutes, just until partially set.

3. Add the Caramel Layer

Remove the cake from the oven and pour the sweetened condensed milk and caramel sauce evenly over the partially baked cake.

4. Add Toppings

Sprinkle chopped pecans and chocolate chips over the caramel layer.

5. Finish Baking

Pour the remaining cake batter over the top and return to the oven. Bake for an additional 20–25 minutes, or until fully cooked.

6. Prepare the Chocolate Drizzle

In a small saucepan, melt butter, chocolate chips, and heavy cream until smooth.

7. Drizzle and Serve

Drizzle the warm chocolate sauce over the cooled cake before serving.

Tips for Perfect Results

To make the best chocolate turtle cake recipe, keep these helpful tips in mind:

  • Don’t overbake: This cake should stay moist and slightly gooey
  • Use room temperature ingredients: Helps everything mix smoothly
  • Let it cool slightly before slicing: Allows layers to set properly
  • Toast the pecans: Enhances their flavor and crunch

Variations

This chocolate turtle cake recipe is incredibly versatile, making it easy to customize.

For a salted caramel version, sprinkle flaky sea salt over the top. If you want an extra chocolatey experience, add a layer of chocolate ganache between the cake layers. You can also experiment with different nuts or even add a hint of espresso powder to deepen the chocolate flavor.

What to Serve With It

This rich chocolate turtle cake recipe pairs beautifully with lighter accompaniments.

  • Vanilla ice cream
  • Fresh berries
  • Whipped cream
  • Hot coffee or espresso

The contrast between the rich cake and lighter sides creates a perfectly balanced dessert experience.

Storage & Reheating

Store leftover chocolate turtle cake in an airtight container in the refrigerator for up to 5 days. Because of the caramel and chocolate layers, it stays moist and delicious even after a few days.

To reheat, microwave individual slices for 10–15 seconds to bring back that gooey texture. You can also enjoy it cold for a firmer, fudge-like consistency.

Common Mistakes to Avoid

Even a forgiving recipe like this can go wrong if you’re not careful.

Avoid overbaking, which can dry out the cake and harden the caramel. Be careful not to overload the cake with too many toppings, as this can affect the structure. Also, make sure to spread the layers evenly to ensure every bite has the perfect balance of flavors.

FAQs

Can I make this chocolate turtle cake ahead of time?

Yes! It actually tastes even better the next day as the flavors meld together.

Can I use homemade caramel sauce?

Absolutely. Homemade caramel adds a richer, deeper flavor.

Can I freeze chocolate turtle cake?

Yes, wrap it tightly and freeze for up to 2 months. Thaw in the refrigerator before serving.

What makes it a “turtle” cake?

The combination of chocolate, caramel, and pecans is inspired by classic turtle candies.

Final Thoughts

This Chocolate Turtle Cake Recipe truly lives up to its name—it’s decadent, rich, and completely unforgettable. With layers of moist chocolate cake, gooey caramel, crunchy pecans, and silky chocolate drizzle, every bite is pure dessert bliss.

Whether you’re celebrating a special occasion or simply treating yourself, this cake delivers bakery-quality results with minimal effort. Once you make it, don’t be surprised if it becomes your go-to showstopper dessert for years to come.

Easy Berry Cream Cheese Stuffed Crescent Rolls

If you’re craving a quick, bakery-style treat without spending hours in the kitchen, these Easy Berry Cream Cheese Stuffed Crescent Rolls are exactly what you need. Flaky, golden crescent dough wraps around a luscious cream cheese filling and bursts of sweet, juicy berries—creating a dessert (or breakfast!) that feels both indulgent and effortless.

This recipe is perfect for busy mornings, last-minute guests, or when you just want something sweet without the hassle. Using refrigerated crescent roll dough cuts down prep time dramatically, while the creamy berry filling adds a homemade touch that tastes truly special. Whether you’re serving these at brunch or enjoying them with your morning coffee, they’re guaranteed to impress.

Why You’ll Love This Recipe

These easy berry cream cheese stuffed crescent rolls are a dream come true for anyone who loves simple yet delicious recipes. They strike the perfect balance between convenience and flavor, making them a staple you’ll return to again and again.

The combination of tangy cream cheese and sweet berries creates a rich, satisfying filling that pairs beautifully with the buttery, flaky crescent dough. Plus, they’re incredibly versatile—you can customize the filling based on what you have on hand.

  • Ready in under 30 minutes
  • Uses minimal, easy-to-find ingredients
  • Perfect for breakfast, brunch, or dessert
  • Kid-friendly and crowd-pleasing
  • Easily customizable with different fruits

Ingredients

To make these easy berry cream cheese stuffed crescent rolls, you’ll need:

  • 1 can refrigerated crescent roll dough
  • 4 oz cream cheese, softened
  • 2–3 tablespoons granulated sugar
  • 1/2 teaspoon vanilla extract
  • 1/2 cup mixed berries (strawberries, blueberries, raspberries)
  • 1 tablespoon powdered sugar (for garnish)
  • Optional: lemon zest for extra flavor

Ingredient Notes

The simplicity of these easy berry cream cheese stuffed crescent rolls means each ingredient plays an important role.

Crescent roll dough provides that signature flaky texture without the need for homemade pastry. Cream cheese should be softened to ensure a smooth, creamy filling that spreads easily. Fresh berries are ideal for the best flavor and texture, but frozen berries can work in a pinch—just be sure to thaw and drain them היט to avoid excess moisture.

Adding a touch of vanilla enhances the sweetness, while optional lemon zest brightens the entire filling with a subtle citrus note.

Step-by-Step Instructions

1. Prepare the Filling

In a medium bowl, mix the softened cream cheese, sugar, and vanilla extract until smooth and creamy.

2. Add the Berries

Gently fold in the berries, being careful not to crush them too much. You want small bursts of fruit in every bite.

3. Roll Out the Dough

Unroll the crescent dough and separate it into individual triangles along the perforated lines.

4. Fill the Crescent Rolls

Place a spoonful of the cream cheese berry mixture onto the wide end of each triangle.

5. Roll and Seal

Carefully roll each triangle from the wide end to the tip, enclosing the filling. Place them on a lined baking sheet.

6. Bake to Perfection

Bake in a preheated oven at 375°F for 10–13 minutes, or until golden brown and flaky.

7. Finish and Serve

Let them cool slightly, then dust with powdered sugar before serving.

Tips for Perfect Results

To get the best results from your easy berry cream cheese stuffed crescent rolls, keep these tips in mind:

  • Don’t overfill: Too much filling can cause leaks أثناء baking
  • Seal edges היט: Prevents the filling from escaping
  • Use parchment paper: Makes cleanup easy and prevents sticking
  • Chill slightly before baking: Helps maintain shape

These small steps can make a big difference in the final presentation and texture.

Variations

One of the best things about this recipe is how easy it is to customize.

You can switch up the berries depending on the season—try blackberries, cherries, or even diced peaches. For a richer dessert, add chocolate chips to the filling. Want a tangier flavor? Mix in a little Greek yogurt with the cream cheese.

For a more indulgent twist, drizzle the baked rolls with a simple glaze made from powdered sugar and milk.

What to Serve With It

These easy berry cream cheese stuffed crescent rolls are incredibly versatile and pair well with many dishes.

Serve them alongside:

  • Fresh fruit salad
  • Scrambled eggs or omelets
  • Coffee or tea
  • Yogurt parfaits
  • Smoothies

They work beautifully as part of a brunch spread or as a sweet snack any time of day.

Storage & Reheating

If you have leftovers (which isn’t always likely!), these easy berry cream cheese stuffed crescent rolls store well.

Keep them in an airtight container in the refrigerator for up to 3 days. To reheat, warm them in the oven at 300°F for a few minutes or microwave briefly.

For longer storage, you can freeze them after baking. Just thaw and reheat when ready to enjoy.

Common Mistakes to Avoid

Even simple recipes can have a few pitfalls.

Avoid using overly juicy berries without draining them, as excess moisture can make the rolls soggy. Don’t skip softening the cream cheese—it’s essential for a smooth filling. And be careful not to overbake, as this can dry out the pastry.

Paying attention to these details will ensure your crescent rolls come out perfect every time.

FAQs

Can I use frozen berries?

Yes, but make sure to thaw and drain them well before using.

Can I make these ahead of time?

You can assemble them ahead and refrigerate until ready to bake.

Can I use low-fat cream cheese?

Yes, though the filling may be slightly less rich and creamy.

How do I prevent the filling from leaking?

Avoid overfilling and make sure to roll the dough tightly.

Final Thoughts

These Easy Berry Cream Cheese Stuffed Crescent Rolls are proof that simple ingredients can create something truly special. With their flaky exterior, creamy filling, and bursts of sweet berries, they’re the kind of treat that feels both comforting and indulgent.

Whether you’re making them for a weekend brunch, a quick dessert, or just because you’re craving something sweet, this recipe delivers every time. Once you try them, they’re sure to become a favorite in your kitchen rotation.