Cinnamon Apple Bread — The Ultimate Cozy Delight

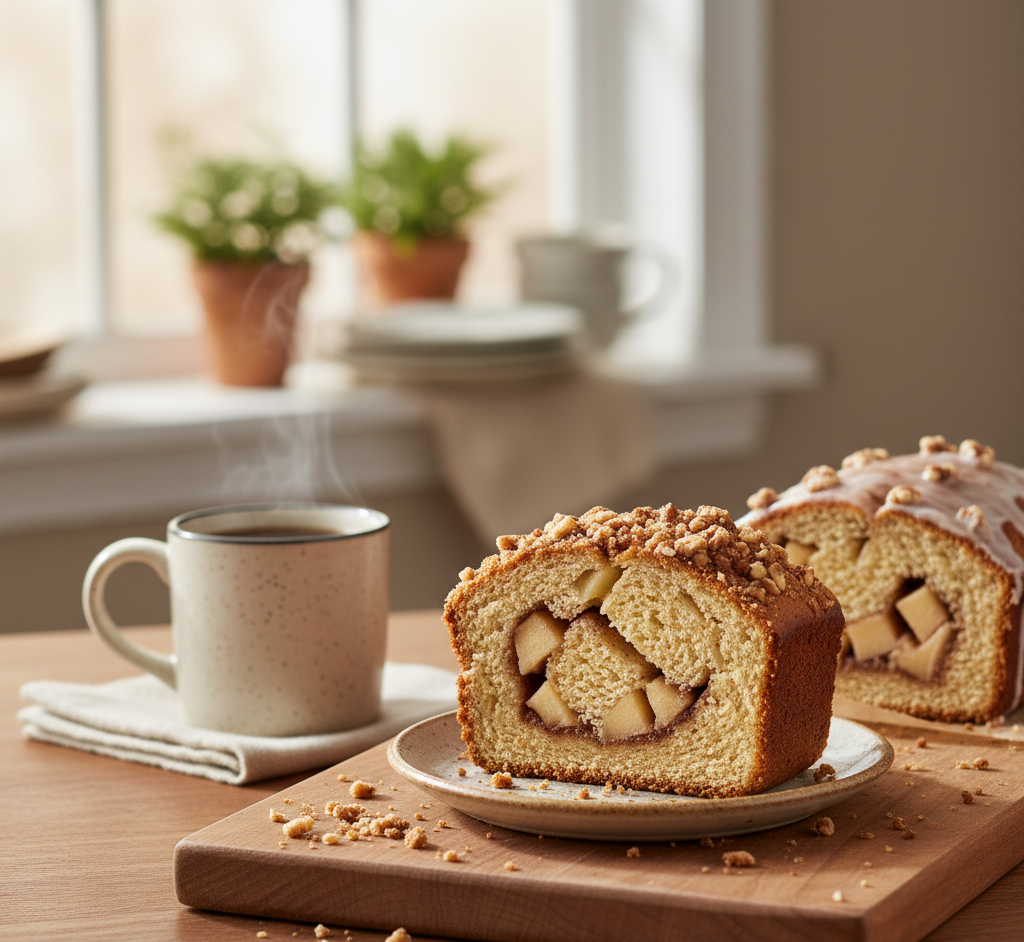
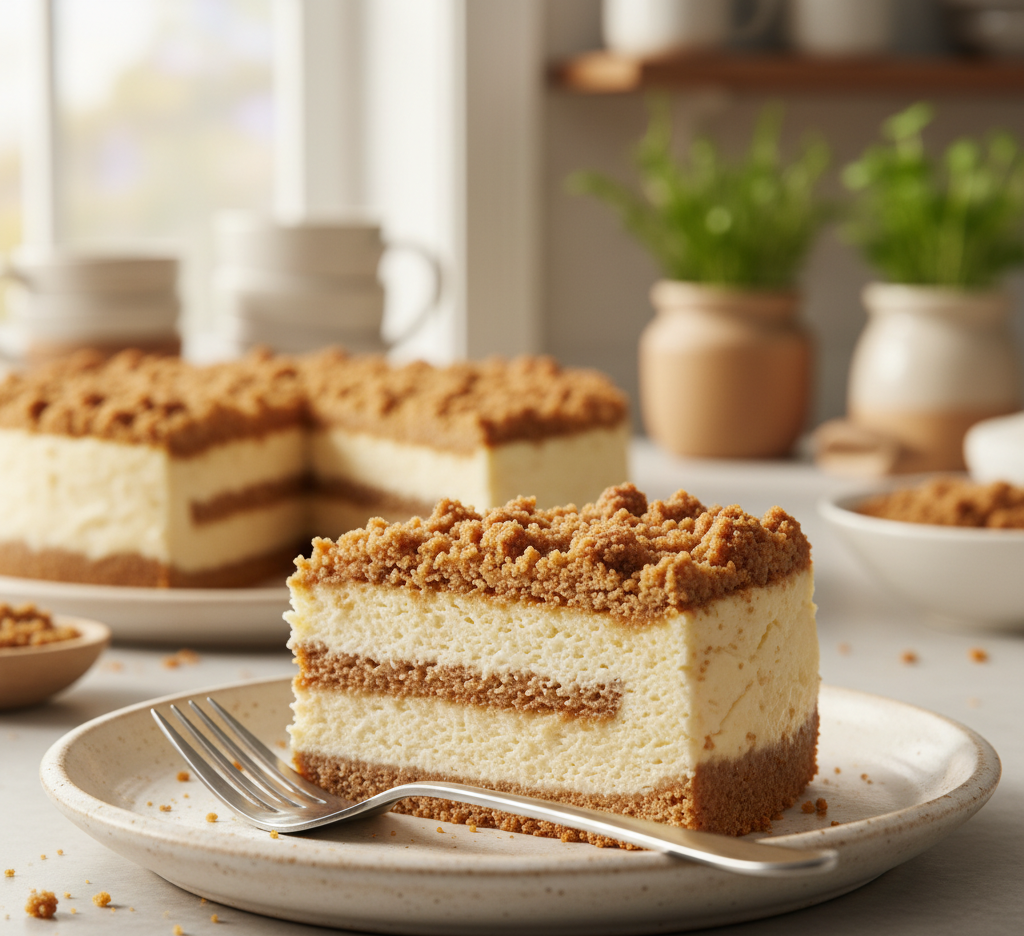
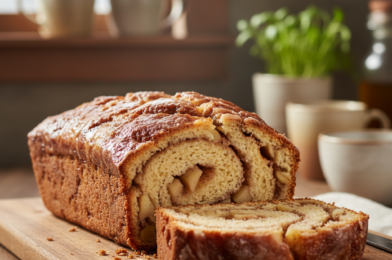
There’s something undeniably comforting about the smell of apples and cinnamon baking in the oven. This cinnamon apple bread — the ultimate cozy delight captures that warm, nostalgic feeling in every slice. With tender chunks of fresh apples, a moist crumb, and a swirl of cinnamon sugar, this bread is the definition of homemade comfort.

Whether you’re enjoying it with your morning coffee, serving it as an afternoon snack, or sharing it with friends and family, this recipe is guaranteed to bring warmth to your kitchen. It’s simple to make, incredibly flavorful, and perfect for any season—though especially magical in the fall.

Why You’ll Love This Recipe

This cinnamon apple bread — the ultimate cozy delight is a must-try for so many reasons:

  • Moist and tender texture with juicy apple pieces
  • Warm cinnamon flavor in every bite
  • Easy, no-mixer recipe perfect for beginners
  • Great for breakfast, dessert, or snacking
  • Perfect make-ahead treat for busy weeks

It’s the kind of recipe that fills your home with incredible aroma and your heart with comfort.
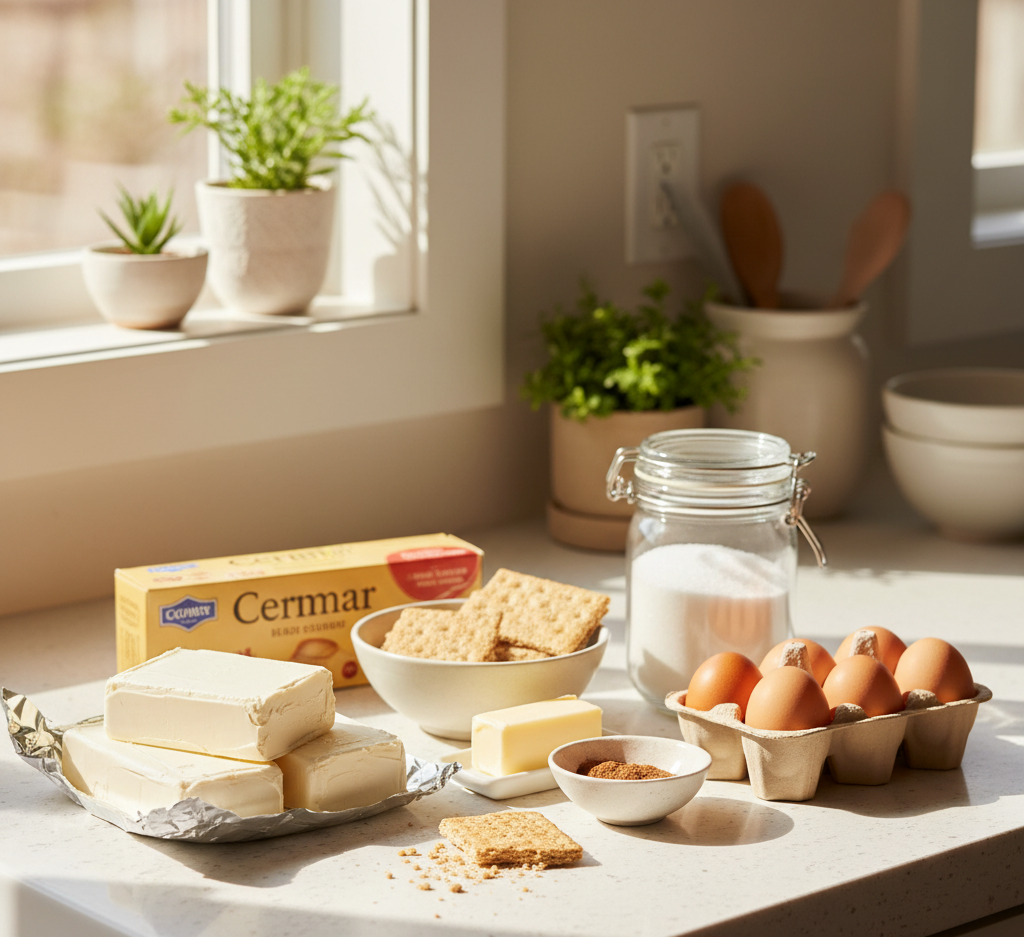
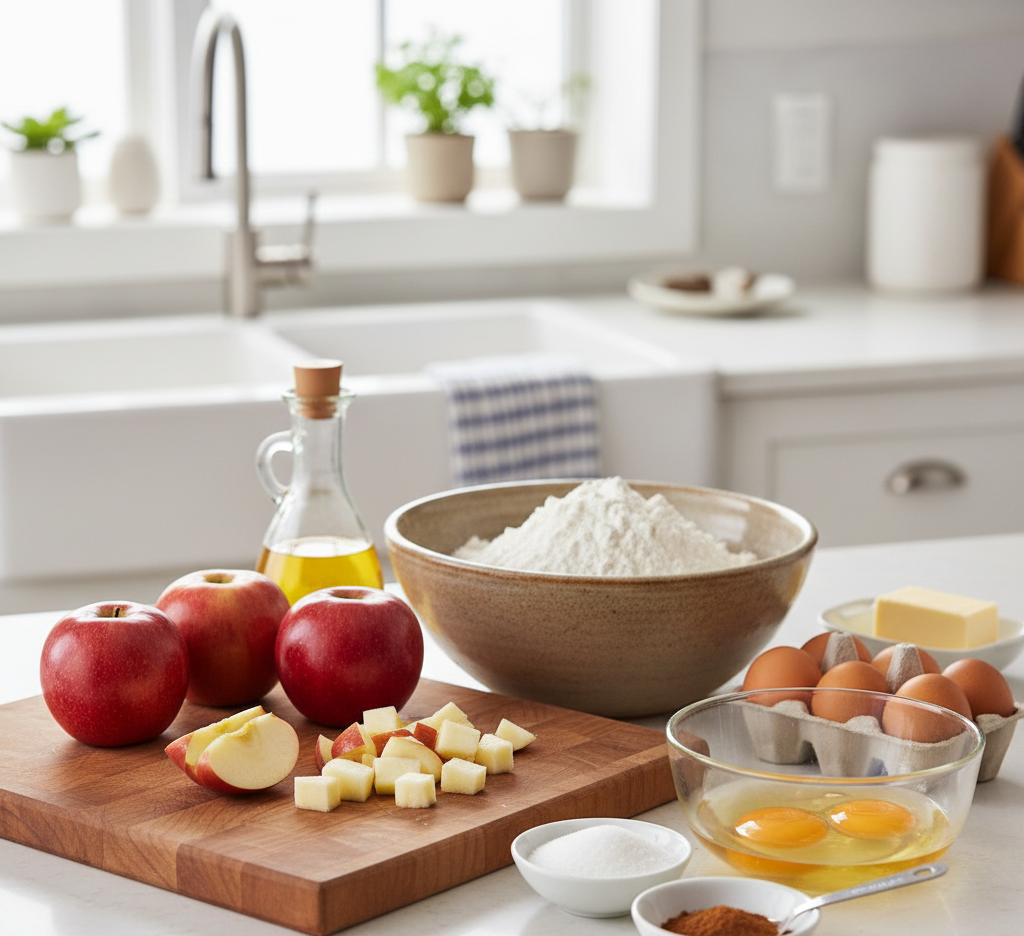
Ingredients

To make this delicious cinnamon apple bread — the ultimate cozy delight, you’ll need:

  • 2 cups all-purpose flour
  • 1 teaspoon baking soda
  • 1/2 teaspoon salt
  • 1 teaspoon ground cinnamon
  • 1/2 cup vegetable oil
  • 1 cup granulated sugar
  • 1/2 cup brown sugar
  • 2 large eggs
  • 1 teaspoon vanilla extract
  • 2 cups peeled and diced apples

Cinnamon Swirl:

  • 1/3 cup sugar
  • 1 teaspoon cinnamon

Ingredient Notes

Choosing quality ingredients will take your cinnamon apple bread — the ultimate cozy delight to the next level.

  • Apples: Use firm varieties like Honeycrisp or Granny Smith for the best texture
  • Cinnamon: Fresh cinnamon adds warmth and depth
  • Oil: Keeps the bread moist longer than butter
  • Brown sugar: Adds a subtle caramel-like sweetness

Step-by-Step Instructions

1. Preheat and Prep

Preheat your oven to 350°F (175°C) and grease a loaf pan.

2. Mix Dry Ingredients

In a bowl, whisk together flour, baking soda, salt, and cinnamon.

3. Combine Wet Ingredients

In another bowl, mix oil, granulated sugar, brown sugar, eggs, and vanilla until smooth.
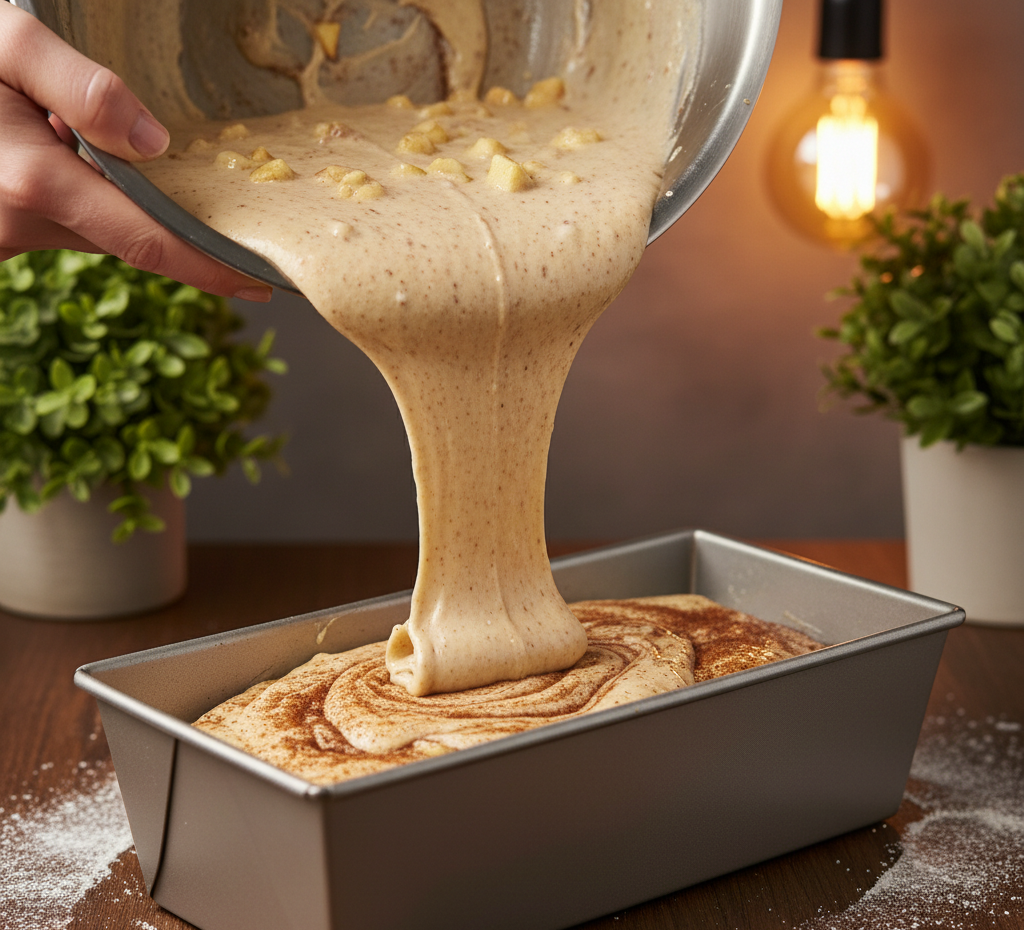
4. Combine Batter

Gradually add dry ingredients to wet ingredients, mixing until just combined. Fold in diced apples.

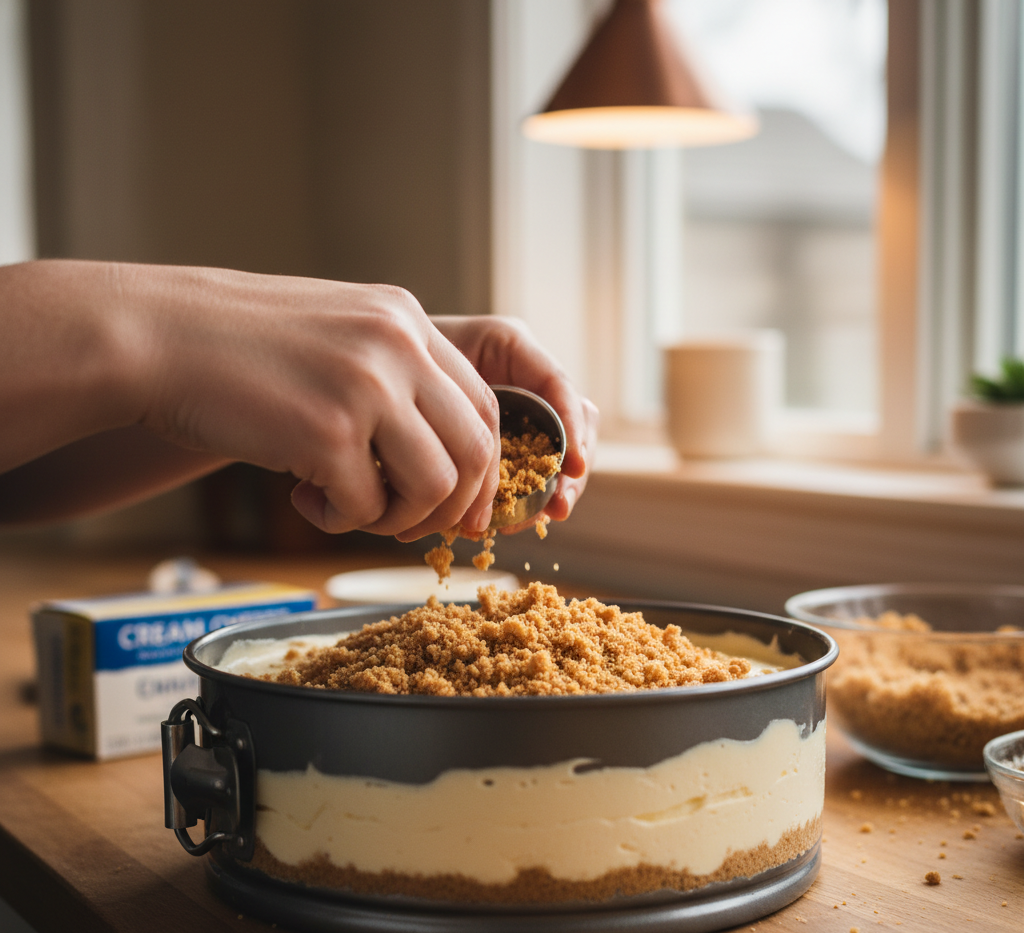
5. Add Cinnamon Swirl

Pour half the batter into the pan, sprinkle with cinnamon sugar, then add remaining batter and top with more swirl.

6. Bake

Bake for 50–60 minutes, or until a toothpick inserted comes out clean.

7. Cool and Serve

Let the bread cool before slicing for the best texture.

Tips for Perfect Results

For the best cinnamon apple bread — the ultimate cozy delight, follow these tips:

  • Don’t overmix the batter to keep it tender
  • Use fresh apples for the best flavor and texture
  • Check doneness carefully to avoid overbaking
  • Let it cool completely before slicing

These simple steps ensure a perfectly moist and flavorful loaf.
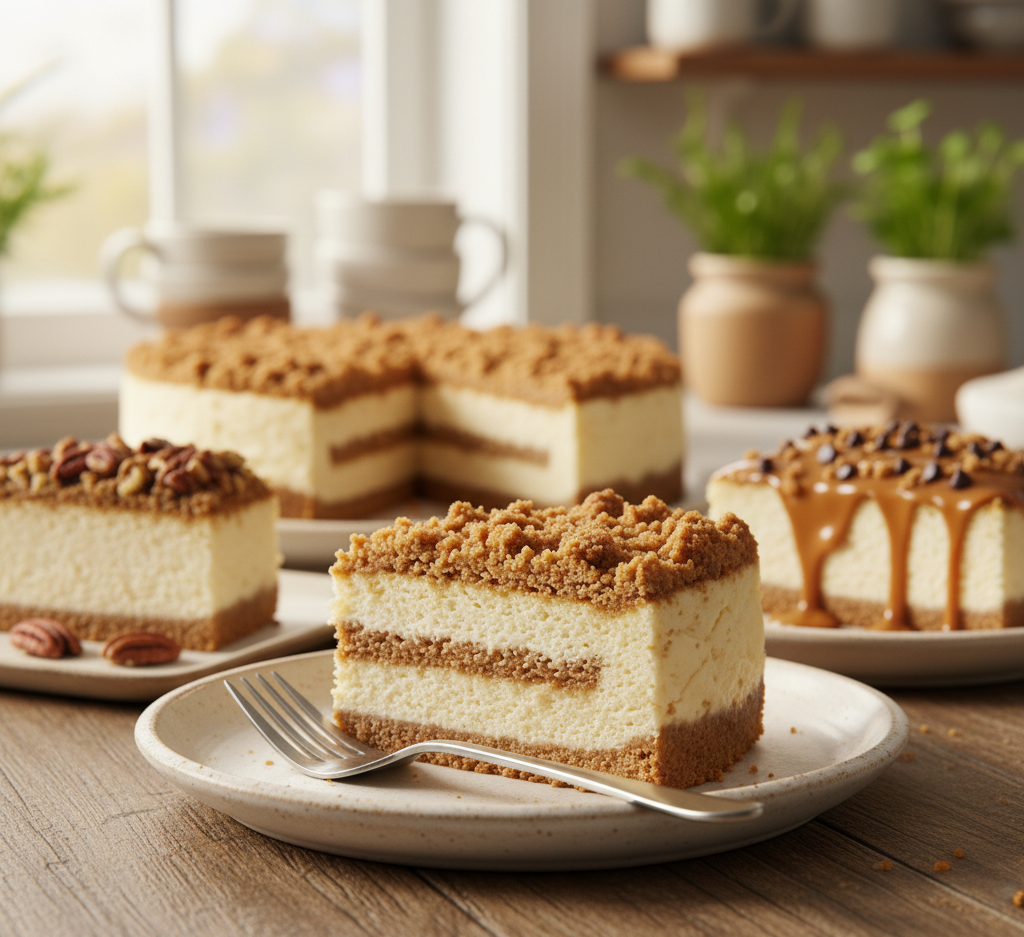
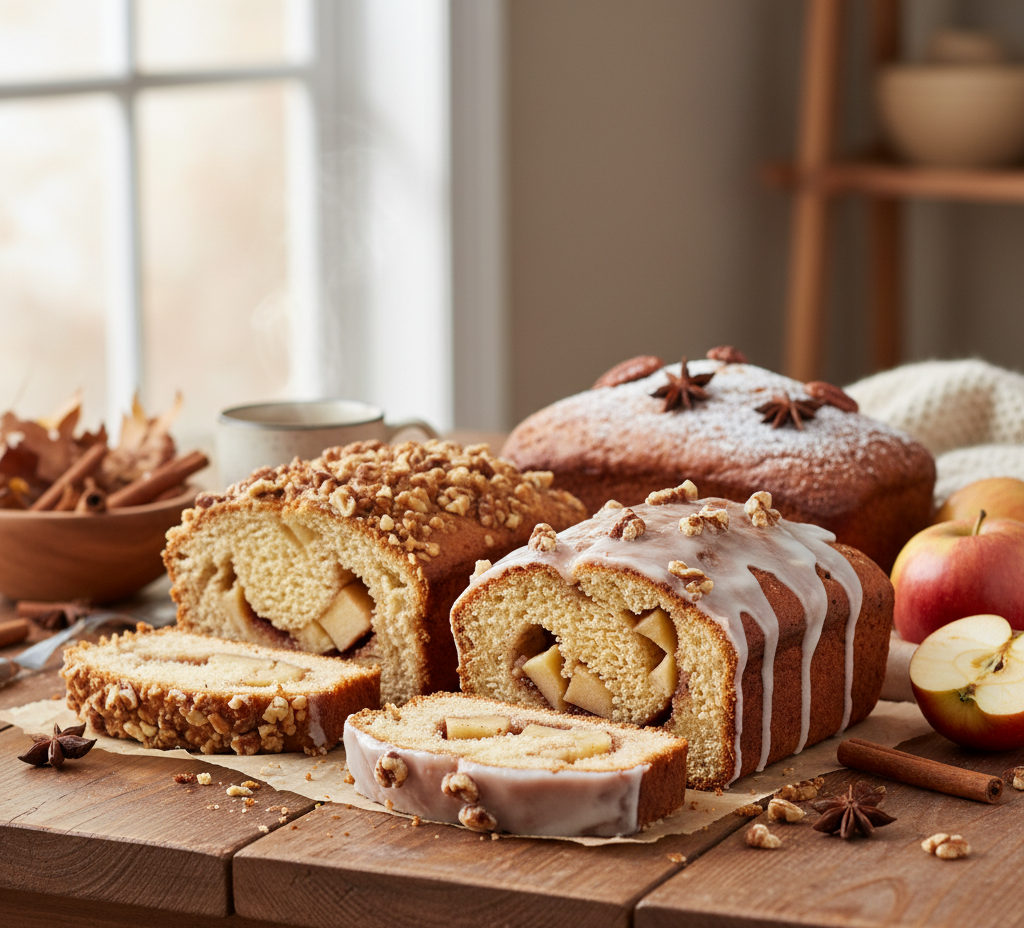
Variations

This cinnamon apple bread — the ultimate cozy delight is easy to customize:

Add Nuts

  • Mix in walnuts or pecans for crunch

Make It Healthier

  • Substitute part of the flour with whole wheat

Add Glaze

  • Drizzle with a simple powdered sugar glaze

Spice It Up

  • Add nutmeg or cloves for extra warmth

What to Serve With It

This bread pairs beautifully with:

  • Hot coffee or tea
  • A spread of butter or cream cheese
  • Fresh fruit
  • A drizzle of honey or maple syrup

It’s perfect for breakfast, brunch, or dessert.

Storage & Reheating

  • Room temperature: Store in an airtight container for up to 3 days
  • Refrigerate: Keeps for up to 5 days
  • Freeze: Wrap slices and freeze for up to 2 months
  • Reheat: Warm slices in the microwave or oven

Proper storage keeps your bread fresh and delicious.

Common Mistakes to Avoid

Avoid these common mistakes when making cinnamon apple bread — the ultimate cozy delight:

  • Overmixing the batter
  • Using overly soft apples
  • Skipping the cinnamon swirl
  • Cutting too soon before cooling

Attention to detail makes all the difference.

FAQs

What apples are best for cinnamon apple bread?

Firm apples like Granny Smith or Honeycrisp work best.

Can I make this bread ahead of time?

Yes! It actually tastes even better the next day.

Can I freeze cinnamon apple bread?

Absolutely—just wrap slices tightly and freeze.

How do I keep it moist?

Store it in an airtight container and avoid overbaking.

Final Thoughts

This cinnamon apple bread — the ultimate cozy delight is everything you want in a homemade treat—warm, moist, and bursting with comforting flavors. It’s simple enough for everyday baking yet special enough to share with loved ones.

Once you make it, you’ll find yourself coming back to this recipe again and again. Whether enjoyed with your morning coffee or as a cozy dessert, this bread truly lives up to its name.

Cheesy Bacon Ranch Wraps: The Ultimate Easy Comfort Food

If you’re searching for a quick, satisfying meal that delivers bold flavor in every bite, these cheesy bacon ranch wraps are about to become your new favorite. Packed with crispy bacon, gooey melted cheese, and creamy ranch dressing all wrapped in a soft tortilla, this recipe is the definition of comfort food made easy.

Whether you need a fast lunch, an easy dinner, or a crowd-pleasing snack, these wraps come together in minutes and taste absolutely incredible. Plus, they’re highly customizable, making them perfect for picky eaters and busy households alike.

Why You’ll Love This Recipe

There are so many reasons to fall in love with these cheesy bacon ranch wraps:

  • Quick and easy—ready in under 20 minutes
  • Loaded with flavor from bacon, cheese, and ranch
  • Perfect for meal prep or on-the-go meals
  • Kid-friendly and crowd-pleasing
  • Customizable with your favorite ingredients

They’re the kind of recipe you’ll turn to again and again when you want something delicious without the hassle.

Ingredients

Here’s everything you need to make these irresistible cheesy bacon ranch wraps:

  • 4 large flour tortillas
  • 8 slices bacon (cooked and crispy)
  • 1 1/2 cups shredded cheddar or mozzarella cheese
  • 1/2 cup ranch dressing
  • 1 cup cooked chicken (optional, shredded or diced)
  • 1/2 cup lettuce (shredded)
  • 1/2 cup tomatoes (diced)

Ingredient Notes

Choosing the right ingredients will elevate your cheesy bacon ranch wraps:

  • Bacon: Cook until crispy for the best texture
  • Cheese: Cheddar adds sharpness, mozzarella adds stretch
  • Ranch dressing: Use a high-quality brand or homemade for the best flavor
  • Tortillas: Soft, large tortillas make wrapping easier
  • Chicken: Optional but adds protein and makes it more filling

Step-by-Step Instructions

1. Cook the Bacon

Cook bacon in a skillet until crispy, then place on paper towels to drain excess grease.

2. Prepare the Filling

In a bowl, combine cooked bacon (chopped), shredded cheese, ranch dressing, and optional chicken.

3. Warm the Tortillas

Heat tortillas briefly in a skillet or microwave to make them more pliable.

4. Assemble the Wraps

Spread the filling evenly onto each tortilla. Add lettuce and tomatoes for freshness.

5. Roll the Wraps

Fold in the sides and roll tightly into a wrap.

6. Toast (Optional)

Place wraps in a skillet and toast until golden brown and the cheese melts.

7. Serve

Slice in half and serve warm.

Tips for Perfect Results

To make the best cheesy bacon ranch wraps, keep these tips in mind:

  • Don’t overfill the wraps to prevent tearing
  • Use warm tortillas for easy rolling
  • Toast the wraps for extra crunch and melted cheese
  • Balance the ingredients so no flavor overpowers the others

These tips ensure your wraps come out perfect every time.


Variations

These cheesy bacon ranch wraps are incredibly versatile:

Spicy Version

  • Add jalapeños or a drizzle of hot sauce

Low-Carb Option

  • Use lettuce wraps instead of tortillas

Veggie Version

  • Skip bacon and add grilled vegetables

BBQ Twist

  • Add BBQ sauce for a smoky flavor

What to Serve With It

These cheesy bacon ranch wraps pair perfectly with:

  • French fries or sweet potato fries
  • Fresh fruit or salad
  • Coleslaw
  • Chips and dip

They make a complete meal or a satisfying snack.

Storage & Reheating

  • Refrigerate: Store wraps in an airtight container for up to 3 days
  • Reheat: Warm in a skillet or oven for best texture
  • Avoid microwaving if you want to keep them crispy

Proper storage helps maintain flavor and texture.

Common Mistakes to Avoid

Avoid these mistakes when making cheesy bacon ranch wraps:

  • Using soggy bacon
  • Overloading with dressing
  • Not warming tortillas
  • Skipping the toasting step

These small adjustments make a big difference.

FAQs

Can I make these wraps ahead of time?

Yes, prepare and refrigerate, then toast before serving.

What’s the best cheese to use?

Cheddar, mozzarella, or a blend works best.

Can I use turkey bacon?

Absolutely! It’s a lighter alternative.

Are these wraps freezer-friendly?

They can be frozen, but texture is best when fresh.

Final Thoughts

These cheesy bacon ranch wraps are everything you want in a quick, delicious meal—crispy, creamy, cheesy, and packed with flavor. They’re incredibly easy to make and perfect for busy days when you need something satisfying fast.

Whether you stick to the classic version or experiment with fun variations, these wraps are guaranteed to become a staple in your kitchen. Once you try them, you’ll understand why they’re such a crowd favorite.

Beef and Cheese Chimichangas Recipe: Crispy, Cheesy, and Irresistible

If you’re craving a restaurant-quality meal at home, this beef and cheese chimichangas recipe is exactly what you need. These golden, crispy burritos are stuffed with flavorful seasoned beef, gooey melted cheese, and wrapped in a perfectly fried tortilla that delivers crunch in every bite.

Chimichangas are a Tex-Mex favorite known for their bold flavors and satisfying texture. The best part? You can make them easily in your own kitchen with simple ingredients and customize them to your liking. Whether you’re cooking for family dinner or a casual gathering, this recipe is guaranteed to impress.

Why You’ll Love This Recipe

This beef and cheese chimichangas recipe has everything you want in a comfort meal:

  • Crispy on the outside, cheesy inside
  • Packed with bold Tex-Mex flavors
  • Easy to make at home
  • Perfect for meal prep or leftovers
  • Customizable with your favorite toppings

It’s a satisfying dish that feels indulgent yet approachable for any home cook.

Ingredients

Here’s what you’ll need for this delicious beef and cheese chimichangas recipe:

For the Filling:

  • 1 lb ground beef
  • 1 small onion (diced)
  • 2 cloves garlic (minced)
  • 1 packet taco seasoning
  • 1/3 cup water
  • 1 cup shredded cheddar or Mexican blend cheese

For Assembly:

  • 6–8 large flour tortillas
  • Oil for frying

Optional Toppings:

  • Sour cream
  • Salsa or pico de gallo
  • Guacamole
  • Shredded lettuce
  • Chopped cilantro

Ingredient Notes

Using quality ingredients makes your beef and cheese chimichangas recipe even better:

  • Ground beef: Choose lean beef to avoid excess grease
  • Cheese: A Mexican blend melts beautifully and adds flavor
  • Tortillas: Large flour tortillas work best for wrapping
  • Seasoning: Taco seasoning adds a quick burst of flavor

Step-by-Step Instructions

1. Cook the Beef

In a skillet over medium heat, cook ground beef and diced onion until browned. Drain excess fat. Add garlic and cook briefly.

2. Add Seasoning

Stir in taco seasoning and water. Simmer for 5 minutes until thickened.

3. Prepare Filling

Remove from heat and stir in shredded cheese until melted and combined.

4. Assemble Chimichangas

Spoon the beef mixture onto the center of each tortilla. Fold in the sides and roll tightly into a burrito shape.

5. Fry Until Crispy

Heat oil in a skillet and fry chimichangas seam-side down until golden brown on all sides.

6. Drain and Serve

Place on paper towels to remove excess oil. Serve hot with your favorite toppings.

Tips for Perfect Results

For the best beef and cheese chimichangas recipe, follow these tips:

  • Don’t overfill tortillas to prevent tearing
  • Roll tightly to keep filling secure
  • Use medium heat for even frying
  • Drain on paper towels to remove excess oil

These small details ensure crispy, perfectly cooked chimichangas.


Variations

This beef and cheese chimichangas recipe is easy to customize:

Baked Version

  • Brush with oil and bake at 400°F for a lighter option

Chicken Chimichangas

  • Substitute shredded chicken for beef

Vegetarian Option

  • Use black beans, rice, and sautéed veggies

Spicy Version

  • Add jalapeños or hot sauce to the filling

What to Serve With It

Pair your beef and cheese chimichangas recipe with:

  • Mexican rice or cilantro lime rice
  • Refried beans or black beans
  • Fresh guacamole and chips
  • Corn salad or grilled corn

These sides create a complete and satisfying meal.

Storage & Reheating

  • Refrigerate: Store leftovers in an airtight container for up to 3 days
  • Freeze: Wrap individually and freeze for up to 2 months
  • Reheat: Bake at 350°F or air fry to restore crispiness

Avoid microwaving if possible to keep the exterior crispy.

Common Mistakes to Avoid

Avoid these common mistakes when making this beef and cheese chimichangas recipe:

  • Overfilling tortillas
  • Frying at too high heat (burns outside, undercooks inside)
  • Not sealing properly
  • Skipping draining step

Paying attention to these ensures perfect results.

FAQs

Can I bake instead of fry chimichangas?

Yes! Baking is a healthier option and still delivers great flavor.

What’s the best cheese to use?

Cheddar or a Mexican blend works best for melting and flavor.

Can I make them ahead of time?

Yes, assemble ahead and fry or bake just before serving.

Are chimichangas freezer-friendly?

Absolutely! Freeze before or after cooking for easy meals later.

Final Thoughts

This beef and cheese chimichangas recipe is the ultimate comfort food—crispy, cheesy, and bursting with bold flavor. It’s easy enough for weeknight dinners yet impressive enough for entertaining guests.

Once you try making chimichangas at home, you’ll love how customizable and satisfying they are. Whether you fry them to golden perfection or bake them for a lighter twist, this recipe is sure to become a favorite in your kitchen.

Irresistibly Decadent Fudge Fantasy Layer Cake Recipe

If you’re a true chocolate lover, this irresistibly decadent fudge fantasy layer cake recipe is about to become your dream dessert. Imagine moist, rich chocolate cake layers stacked high with silky fudge frosting and finished with a glossy ganache drip—every bite is pure indulgence.

This cake is perfect for celebrations, birthdays, holidays, or anytime you want to impress with a show-stopping dessert. Despite its luxurious appearance, this recipe is surprisingly approachable and delivers bakery-quality results right in your own kitchen.

Why You’ll Love This Recipe

There are so many reasons to fall in love with this irresistibly decadent fudge fantasy layer cake recipe:

  • Deep, rich chocolate flavor in every layer
  • Moist and tender cake texture
  • Creamy, smooth fudge frosting
  • Perfect for special occasions
  • Impressive yet achievable at home

It’s the kind of dessert that turns any moment into a celebration.

Ingredients

Here’s what you’ll need for this unforgettable irresistibly decadent fudge fantasy layer cake recipe:

For the Cake:

  • 2 cups all-purpose flour
  • 2 cups granulated sugar
  • 3/4 cup unsweetened cocoa powder
  • 2 teaspoons baking powder
  • 1 1/2 teaspoons baking soda
  • 1 teaspoon salt
  • 2 large eggs
  • 1 cup whole milk
  • 1/2 cup vegetable oil
  • 2 teaspoons vanilla extract
  • 1 cup hot coffee

For the Fudge Frosting:

  • 1 cup butter (softened)
  • 3 1/2 cups powdered sugar
  • 1/2 cup cocoa powder
  • 1/2 cup heavy cream
  • 1 teaspoon vanilla extract

Optional Ganache:

  • 1 cup chocolate chips
  • 1/2 cup heavy cream

Ingredient Notes

The magic of this irresistibly decadent fudge fantasy layer cake recipe lies in its high-quality ingredients.

  • Cocoa powder: Use a rich, unsweetened cocoa for deep flavor
  • Hot coffee: Enhances the chocolate taste without adding coffee flavor
  • Heavy cream: Creates a silky frosting and ganache
  • Butter: Adds richness and structure to the frosting

Step-by-Step Instructions

1. Prepare the Cake Batter

Preheat your oven to 350°F (175°C). Grease and line two or three cake pans. In a large bowl, mix dry ingredients, then add eggs, milk, oil, and vanilla. Stir until combined. Gradually add hot coffee and mix until smooth.

2. Bake the Layers

Divide batter evenly between pans and bake for 25–30 minutes, or until a toothpick inserted comes out clean. Let cool completely.

3. Make the Fudge Frosting

Beat butter until creamy. Add powdered sugar and cocoa powder gradually. Mix in cream and vanilla until smooth and fluffy.

4. Prepare the Ganache

Heat cream and pour over chocolate chips. Let sit, then stir until smooth.

5. Assemble the Cake

Place one cake layer on a serving plate. Spread frosting evenly, then repeat with remaining layers.

6. Frost and Decorate

Cover the entire cake with frosting. Drizzle ganache over the top for a dramatic finish.

Tips for Perfect Results

For the best irresistibly decadent fudge fantasy layer cake recipe, keep these tips in mind:

  • Use room temperature ingredients for smoother batter
  • Don’t overmix to keep the cake tender
  • Cool layers completely before frosting
  • Chill the cake briefly for easier decorating

These small details ensure a bakery-quality finish.

Variations

This irresistibly decadent fudge fantasy layer cake recipe is easy to customize:

Add Fillings

  • Layer with raspberry jam or caramel

Extra Chocolate

  • Add chocolate chips to the batter

Nutty Twist

  • Sprinkle chopped walnuts or pecans between layers

Flavor Boost

  • Add espresso powder for deeper chocolate flavor

What to Serve With It

This rich irresistibly decadent fudge fantasy layer cake recipe pairs beautifully with:

  • Fresh berries for contrast
  • Vanilla ice cream
  • Hot coffee or espresso
  • A glass of cold milk

These pairings balance the richness of the cake.

Storage & Reheating

  • Room temperature: Store covered for up to 2 days
  • Refrigerate: Keep for up to 5 days in an airtight container
  • Freeze: Wrap slices and freeze for up to 2 months
  • Serve: Bring to room temperature before serving for best texture

Proper storage keeps the cake moist and delicious.

Common Mistakes to Avoid

Avoid these mistakes when making this irresistibly decadent fudge fantasy layer cake recipe:

  • Overbaking (leads to dry cake)
  • Frosting warm layers (causes melting)
  • Using low-quality cocoa
  • Skipping proper measurements

Attention to detail ensures a flawless cake.

FAQs

Can I make this cake ahead of time?

Yes! Bake layers a day ahead and assemble when ready.

Can I use a different frosting?

Absolutely—cream cheese or buttercream also work well.

Why add coffee to the batter?

It enhances the chocolate flavor without tasting like coffee.

Can I make it gluten-free?

Yes, use a gluten-free flour blend as a substitute.

Final Thoughts

This irresistibly decadent fudge fantasy layer cake recipe is everything a chocolate dessert should be—rich, moist, and completely unforgettable. From its tender cake layers to its luscious fudge frosting and glossy ganache, every bite is pure indulgence.

Whether you’re celebrating a special occasion or simply treating yourself, this cake is guaranteed to impress. Once you try it, it will quickly become your go-to chocolate cake recipe for years to come.

Baked Mac and Cheese: The Ultimate Creamy and Cheesy Comfort Food

There’s nothing quite like a warm, bubbling dish of baked mac and cheese to bring comfort to your table. With its creamy cheese sauce, tender pasta, and golden, crispy topping, this classic recipe has been a staple in American kitchens for generations.

Whether you’re serving it as a main dish or a side for a holiday meal, this baked mac and cheese delivers the perfect balance of creamy and crunchy textures. It’s indulgent, satisfying, and surprisingly simple to make from scratch—no boxed mix required.

Why You’ll Love This Recipe

This baked mac and cheese stands out as a go-to comfort food for so many reasons:

  • Ultra creamy and cheesy inside with a crispy topping
  • Made from scratch with simple pantry ingredients
  • Perfect for gatherings and holiday meals
  • Customizable with different cheeses and add-ins
  • Kid-friendly and crowd-pleasing

Once you try this homemade version, it’s hard to go back to anything else.

Ingredients

Here’s everything you need for the best baked mac and cheese:

  • 12 oz elbow macaroni
  • 4 tablespoons butter
  • 1/4 cup all-purpose flour
  • 3 cups milk (whole milk preferred)
  • 2 cups shredded cheddar cheese
  • 1 cup shredded mozzarella cheese
  • 1/2 cup grated Parmesan cheese
  • 1 teaspoon mustard powder
  • Salt and pepper to taste

Topping:

  • 1 cup breadcrumbs
  • 2 tablespoons melted butter

Ingredient Notes

Understanding your ingredients will elevate your baked mac and cheese:

  • Cheddar cheese: Provides that classic sharp flavor
  • Mozzarella: Adds creaminess and stretch
  • Parmesan: Enhances depth and adds a savory kick
  • Milk: Whole milk creates a richer sauce
  • Breadcrumbs: Give that irresistible crispy topping

Step-by-Step Instructions

1. Cook the Pasta

Bring a large pot of salted water to a boil and cook the macaroni until al dente. Drain and set aside.

2. Make the Roux

In a saucepan, melt butter over medium heat. Stir in flour and cook for 1–2 minutes until lightly golden.

3. Create the Cheese Sauce

Slowly whisk in milk, stirring constantly until thickened. Add cheeses, mustard powder, salt, and pepper. Stir until smooth and creamy.

4. Combine Pasta and Sauce

Mix the cooked pasta with the cheese sauce until fully coated.

5. Assemble the Dish

Transfer to a greased baking dish. Top with breadcrumbs mixed with melted butter.

6. Bake

Bake at 375°F (190°C) for 20–25 minutes until golden and bubbly.

7. Serve

Let rest for a few minutes before serving for the best texture.

Tips for Perfect Results

To make your baked mac and cheese absolutely perfect:

  • Don’t overcook pasta—it continues cooking in the oven
  • Use freshly shredded cheese for better melting
  • Stir constantly when making the sauce to avoid lumps
  • Let it rest before serving for a thicker consistency

These simple tips ensure creamy, smooth, and flavorful results every time.

Variations

This baked mac and cheese is easy to customize:

Add Protein

  • Mix in cooked bacon, chicken, or ham

Spice It Up

  • Add jalapeños or a pinch of cayenne pepper

Gourmet Twist

  • Use Gruyère, fontina, or smoked gouda

Veggie Version

  • Add broccoli, spinach, or roasted vegetables

What to Serve With It

This rich baked mac and cheese pairs well with:

  • BBQ ribs or grilled chicken
  • Roasted vegetables
  • Fresh green salad
  • Garlic bread

It works as both a hearty side dish and a satisfying main course.

Storage & Reheating

Keep your baked mac and cheese fresh with these tips:

  • Refrigerate: Store in an airtight container for up to 4 days
  • Freeze: Freeze portions for up to 2 months
  • Reheat: Warm in the oven or microwave with a splash of milk

Adding milk helps restore creaminess when reheating.

Common Mistakes to Avoid

Avoid these common pitfalls when making baked mac and cheese:

  • Using pre-shredded cheese (doesn’t melt as smoothly)
  • Overbaking (can dry out the dish)
  • Skipping seasoning
  • Not thickening the sauce properly

Paying attention to these details ensures perfect results.

FAQs

Can I make baked mac and cheese ahead of time?

Yes! Assemble it ahead and refrigerate, then bake when ready.

What’s the best cheese combination?

Cheddar, mozzarella, and Parmesan create a perfect balance.

Can I make it gluten-free?

Yes, use gluten-free pasta and flour substitutes.

How do I keep it creamy?

Avoid overbaking and add a splash of milk when reheating.

Final Thoughts

This baked mac and cheese is the ultimate comfort food—creamy, cheesy, and topped with a golden crust that’s hard to resist. It’s a timeless recipe that works for everything from weeknight dinners to holiday feasts.

Once you make it from scratch, you’ll never go back to boxed versions. Rich, satisfying, and endlessly customizable, this dish deserves a permanent spot in your recipe collection.

Cheesy Taco Potatoes

If you’re craving comfort food with a Tex-Mex twist, cheesy taco potatoes are your new go-to dish. Imagine golden baked potatoes loaded with seasoned taco beef, smothered in gooey melted cheese, and finished with fresh toppings like salsa, sour cream, and green onions. It’s a fusion of classic baked potato comfort and bold taco flavors, all in one dish.

This recipe is perfect for busy weeknights, casual family dinners, or even game-day snacks. The combination of tender potato, seasoned meat, and creamy, melty cheese makes every bite irresistibly satisfying. Plus, it’s flexible enough to customize with your favorite toppings and heat levels.

Why You’ll Love This Recipe

There are so many reasons to try these cheesy taco potatoes:

  • Easy and quick to make with simple ingredients
  • Comfort food with a twist combining baked potato and taco flavors
  • Customizable toppings to suit your taste or dietary needs
  • Kid-friendly and family-approved
  • Perfect for meal prep—reheat leftovers easily without losing flavor

Whether you’re hosting a casual dinner or just craving a hearty snack, this dish delivers.

Ingredients

Here’s what you’ll need for the ultimate cheesy taco potatoes:

For the Potatoes:

  • 4 large russet potatoes
  • 2 tablespoons olive oil
  • Salt and pepper, to taste

For the Taco Beef:

  • 1 pound ground beef (or turkey/chicken)
  • 1 packet taco seasoning (or homemade mix)
  • 1/4 cup water

For Toppings:

  • 1 cup shredded cheddar or Mexican blend cheese
  • 1/2 cup sour cream
  • 1/2 cup salsa
  • 1/4 cup chopped green onions
  • Optional: diced tomatoes, jalapeños, black olives, avocado

Ingredient Notes

Choosing the right ingredients makes all the difference:

  • Potatoes: Russet potatoes work best for fluffy interiors that hold toppings well
  • Cheese: Cheddar, Monterey Jack, or a Mexican blend melts beautifully
  • Taco seasoning: Homemade allows you to control spice levels
  • Toppings: Fresh ingredients like green onions or avocado add texture and brightness

Step-by-Step Instructions

1. Prepare the Potatoes

Preheat oven to 400°F (200°C). Scrub potatoes, rub with olive oil, and sprinkle with salt. Bake directly on the oven rack for 45–50 minutes until tender.

2. Cook the Taco Beef

While potatoes bake, cook ground beef in a skillet over medium heat. Drain excess fat, add taco seasoning and water, simmer for 5 minutes until well combined.

3. Assemble the Potatoes

Once baked, slice the potatoes lengthwise. Use a fork to fluff the inside. Top each potato with taco beef and a generous sprinkle of shredded cheese.

4. Melt the Cheese

Return the topped potatoes to the oven for 5 minutes or until cheese is melted and bubbly.

5. Add Fresh Toppings

Remove from oven and add sour cream, salsa, green onions, and any optional toppings. Serve hot.

Tips for Perfect Results

  • Bake potatoes fully—undercooked potatoes won’t support toppings well
  • Don’t overload toppings—balance ensures flavors shine
  • Cheese melt tip: Cover with foil if cheese browns too quickly
  • Use warm beef to help cheese melt evenly

These tips ensure each cheesy taco potato is perfectly baked and flavorful.

Variations

Make these cheesy taco potatoes your own:

  • Vegetarian: Use black beans, lentils, or sautéed mushrooms instead of meat
  • Spicy kick: Add chopped jalapeños or hot sauce to the beef
  • Extra cheesy: Combine multiple cheeses like Monterey Jack and Pepper Jack
  • Loaded version: Add corn, diced bell peppers, or guacamole for more texture


What to Serve With It

Cheesy taco potatoes pair wonderfully with:

  • Fresh garden salad or coleslaw
  • Mexican rice or quinoa
  • Corn on the cob
  • A refreshing lime or citrus beverage

This makes them perfect for casual dinners or backyard gatherings.


Storage & Reheating

  • Refrigerate: Store leftover potatoes in an airtight container for up to 3 days
  • Reheat: Microwave or bake at 350°F (175°C) until warmed through
  • Avoid soggy potatoes: Reheat without adding additional moisture

Proper storage preserves texture and flavor for quick weekday meals.


Common Mistakes to Avoid

  • Using small potatoes—they can dry out or cook unevenly
  • Overcrowding the oven—potatoes need space to crisp
  • Skipping seasoning—both potatoes and beef need salt for balanced flavor
  • Not preheating oven—affects cooking time and texture

Following these pointers ensures every potato is fluffy, cheesy, and perfectly seasoned.

FAQs

Can I make these ahead of time?

Yes! Bake potatoes and cook beef ahead. Assemble and add fresh toppings just before serving.

Can I use sweet potatoes?

Absolutely! Sweet potatoes add a natural sweetness that pairs nicely with taco seasoning.

Can I freeze cheesy taco potatoes?

Yes, but best to freeze potatoes and beef separately to maintain texture.

Can I make them vegetarian?

Yes, substitute beans, lentils, or sautéed veggies for the meat.

Final Thoughts

Cheesy taco potatoes are a versatile, comforting, and flavor-packed dish that’s easy to make for any occasion. The combination of fluffy baked potatoes, seasoned taco beef, and gooey cheese topped with fresh garnishes makes every bite a delight.

Whether you’re serving them for a quick weeknight meal, a family gathering, or a game-day snack, this dish hits all the right notes of flavor and satisfaction. These potatoes are sure to become a family favorite you’ll make over and over.


Iced Espresso Coffee Smoothie Recipes

Nothing jumpstarts your morning quite like a perfectly chilled coffee beverage. If you’re craving something that’s both refreshing and energizing, these iced espresso coffee smoothie recipes are exactly what you need. Combining the rich, bold flavor of espresso with creamy ingredients and a hint of sweetness, these smoothies are a perfect pick-me-up for any time of day.

Whether you want a quick breakfast on-the-go or a cool treat to beat the summer heat, these smoothies are quick to whip up and endlessly customizable. The combination of icy texture, bold espresso, and creamy base makes them a true delight for coffee lovers.

Why You’ll Love These Recipes

There are countless reasons to try these iced espresso coffee smoothie recipes:

  • Quick and easy to make in under 10 minutes
  • Customizable to suit your taste—dairy or non-dairy options
  • Perfectly balanced flavors—bold espresso, creamy base, sweetener
  • Energizing and refreshing—ideal for mornings or afternoon pick-me-ups
  • Great for meal prep—make a batch and store for a few days

With these smoothies, you get all the flavor of your favorite coffeehouse drink without leaving home.

Ingredients

Here’s a basic set of ingredients for your iced espresso coffee smoothies:

  • 1 cup brewed espresso (cooled)
  • 1 cup milk (dairy or plant-based)
  • 1–2 tablespoons sweetener (honey, maple syrup, or agave)
  • 1 frozen banana (adds creaminess)
  • 1/2 cup ice cubes
  • Optional add-ins:
    • Cocoa powder or chocolate syrup
    • Peanut butter or almond butter
    • Protein powder
    • Vanilla extract

Ingredient Notes

Each ingredient plays an important role in creating the perfect iced espresso coffee smoothie:

  • Espresso: Provides the bold coffee flavor and caffeine kick
  • Frozen banana: Adds natural sweetness and creamy texture
  • Milk or milk alternative: Controls creaminess and can be adjusted for richness
  • Sweeteners: Adjust to taste; maple syrup adds a subtle depth
  • Optional flavor boosters: Peanut butter, cocoa, or protein powder can make it more indulgent or meal-worthy

Step-by-Step Instructions

1. Brew and Chill Espresso

Brew a strong cup of espresso and let it cool to room temperature, or use cold-brewed espresso.

2. Blend the Base

In a high-speed blender, combine cooled espresso, milk, frozen banana, and sweetener. Blend until smooth.

3. Add Ice

Add ice cubes gradually and blend again until the smoothie reaches your preferred consistency.

4. Customize

Add optional flavorings such as chocolate syrup, peanut butter, or a scoop of protein powder, blending until smooth.

5. Serve Immediately

Pour into a tall glass, garnish with whipped cream, chocolate shavings, or a sprinkle of cinnamon. Enjoy immediately for the best texture.

Tips for Perfect Results

To get your iced espresso coffee smoothie recipes just right every time:

  • Use frozen banana for a naturally creamy texture without ice cream
  • Adjust ice quantity to control thickness
  • Sweeten gradually—espresso adds slight bitterness
  • Blend on high speed to fully incorporate ingredients
  • Use cold espresso or cold brew to prevent melting ice

These tips ensure your smoothie is creamy, balanced, and perfectly chilled.

Variations

Make these iced espresso coffee smoothie recipes your own with creative twists:

Mocha Espresso Smoothie

  • Add 1 tablespoon cocoa powder or chocolate syrup for a chocolatey kick

Nutty Espresso Smoothie

  • Blend in 1 tablespoon peanut or almond butter for richness

Protein-Packed Espresso Smoothie

  • Add a scoop of vanilla or chocolate protein powder for a filling drink

Vegan-Friendly Option

  • Use almond, oat, or soy milk and maple syrup as a sweetener

What to Serve With It

These smoothies pair wonderfully with light breakfasts or snacks:

  • Fresh fruit or fruit salad
  • Granola bars or overnight oats
  • Muffins or coffee cake for a brunch setting
  • A handful of nuts for a protein boost

They’re versatile enough to be enjoyed on their own or alongside your favorite breakfast items.

Storage & Reheating

  • Refrigerate: Store smoothies in an airtight container for up to 24 hours. Shake before drinking as separation may occur.
  • Freeze: Pour into ice cube trays for mini smoothie cubes to blend later.
  • Do not heat: These smoothies are best served chilled.

Proper storage keeps the flavors fresh and prevents ice from melting too quickly.

Common Mistakes to Avoid

When making iced espresso coffee smoothie recipes, watch out for these common pitfalls:

  • Using hot espresso—it melts ice too fast and dilutes the flavor
  • Over-blending—can make the smoothie too thin
  • Forgetting the banana or frozen element—results in less creamy texture
  • Adding too much sweetener—can overpower the espresso flavor

Avoiding these mistakes ensures a perfectly balanced, creamy iced coffee smoothie.

FAQs

Can I use regular brewed coffee instead of espresso?

Yes, but espresso provides a stronger, richer flavor. You may need to adjust the coffee-to-milk ratio.

Can I make this smoothie ahead of time?

You can prepare the base (coffee + banana + milk) and store it in the fridge for up to 12 hours, but add ice just before blending.

Can I use plant-based milk?

Absolutely! Almond, oat, soy, or coconut milk all work well.

Can I add protein powder or supplements?

Yes, protein powder, collagen, or superfood powders can be blended in for added nutrition.

Final Thoughts

These iced espresso coffee smoothie recipes are the perfect way to enjoy coffee in a refreshing, creamy, and energizing form. Quick, easy, and endlessly customizable, they’re ideal for mornings, afternoon pick-me-ups, or a cool treat on hot days.

Experiment with flavors, toppings, and add-ins to create your own favorite version. Once you try these smoothies, they’ll become a go-to recipe you’ll crave again and again.

Image Prompt: A tall glass of iced espresso coffee smoothie with whipped cream and chocolate drizzle, set on a wooden kitchen counter with natural sunlight streaming in, shallow depth of field, 4k resolution.


Easy and Delicious Coffee Cake Cheesecake You’ll Crave Forever

If you’ve ever found yourself torn between a slice of classic coffee cake and a rich, creamy cheesecake, this easy and delicious coffee cake cheesecake is the ultimate solution. It combines the best of both worlds: a velvety smooth cheesecake base layered with warm cinnamon streusel and topped with a buttery crumb that’s simply irresistible.

This dessert is perfect for brunch gatherings, holiday celebrations, or anytime you want to impress your guests with something truly special. The flavors are comforting yet indulgent, and the textures—from creamy to crumbly—make every bite unforgettable.

Why You’ll Love This Recipe

This easy and delicious coffee cake cheesecake stands out for so many reasons.

  • Two desserts in one—cheesecake and coffee cake combined
  • Rich and creamy texture with a crunchy topping
  • Perfect for any occasion from brunch to dessert
  • Make-ahead friendly for stress-free entertaining
  • Beautiful presentation that looks bakery-quality

It’s the kind of dessert people will ask you to make again and again.

Ingredients

To make this incredible easy and delicious coffee cake cheesecake, you’ll need:

Crust:

  • 2 cups graham cracker crumbs
  • 1/2 cup melted butter
  • 2 tablespoons sugar

Cheesecake Filling:

  • 24 oz cream cheese (softened)
  • 3/4 cup granulated sugar
  • 3 large eggs
  • 1 teaspoon vanilla extract
  • 1/2 cup sour cream

Streusel Filling & Topping:

  • 1 cup brown sugar
  • 1 cup all-purpose flour
  • 1 tablespoon cinnamon
  • 1/2 cup cold butter (cubed)

Ingredient Notes

The quality of your ingredients makes all the difference in this easy and delicious coffee cake cheesecake.

  • Cream cheese: Use full-fat for the creamiest texture
  • Cinnamon: Fresh, high-quality cinnamon enhances flavor
  • Butter: Cold butter is key for a crumbly streusel
  • Graham crackers: Provide a sweet, slightly crunchy base

Step-by-Step Instructions

1. Prepare the Crust

Preheat your oven to 325°F (160°C). Mix graham cracker crumbs, melted butter, and sugar. Press into the bottom of a springform pan and bake for 8–10 minutes.

2. Make the Streusel

In a bowl, combine brown sugar, flour, and cinnamon. Cut in cold butter until crumbly.

3. Prepare the Cheesecake Filling

Beat cream cheese and sugar until smooth. Add eggs one at a time, then mix in vanilla and sour cream.

4. Assemble the Layers

Pour half of the cheesecake filling over the crust. Add a layer of streusel, then the remaining filling. Top with more streusel.

5. Bake

Bake for 50–60 minutes, or until the center is set but slightly jiggly.

6. Cool and Chill

Let the cheesecake cool at room temperature, then refrigerate for at least 4 hours or overnight.

7. Serve

Slice and serve chilled or slightly at room temperature.

Tips for Perfect Results

To make the best easy and delicious coffee cake cheesecake, keep these tips in mind:

  • Don’t overmix the batter to avoid cracks
  • Use room temperature ingredients for smooth blending
  • Bake in a water bath for extra creaminess
  • Cool gradually to prevent cracking

These techniques ensure a flawless, bakery-quality cheesecake.

Variations

This easy and delicious coffee cake cheesecake can be customized to suit your taste.

Add Nuts

  • Mix chopped pecans or walnuts into the streusel

Flavor Twist

  • Add a swirl of caramel or maple syrup

Chocolate Version

  • Add mini chocolate chips to the filling

Gluten-Free Option

  • Use gluten-free graham crackers and flour

What to Serve With It

This dessert pairs beautifully with:

  • Freshly brewed coffee or cappuccino
  • A drizzle of caramel sauce
  • Fresh berries for a light contrast
  • Whipped cream on the side

It’s especially perfect for brunch spreads or holiday tables.

Storage & Reheating

Keep your easy and delicious coffee cake cheesecake fresh with these tips:

  • Refrigerate: Store in an airtight container for up to 5 days
  • Freeze: Wrap slices tightly and freeze for up to 2 months
  • Serve chilled or slightly warmed depending on preference

Proper storage ensures the texture stays creamy and delicious.

Common Mistakes to Avoid

Avoid these common issues when making easy and delicious coffee cake cheesecake:

  • Overbaking (causes dryness and cracks)
  • Skipping chill time
  • Using cold ingredients
  • Not pressing the crust firmly enough

A little attention to detail goes a long way.

FAQs

Can I make this cheesecake ahead of time?

Yes! It’s actually better when made a day ahead.

Do I need a water bath?

It’s optional, but it helps prevent cracks and ensures a creamy texture.

Can I use a different crust?

Absolutely! Try a cookie crust or digestive biscuits.

How do I know when it’s done?

The center should be slightly jiggly but set around the edges.

Final Thoughts

This easy and delicious coffee cake cheesecake is the ultimate dessert mashup—rich, creamy, and layered with warm cinnamon goodness. It’s a recipe that feels both comforting and luxurious, making it perfect for any occasion.

Once you try it, you’ll understand why it’s so crave-worthy. Whether you’re serving it at a brunch, holiday gathering, or just treating yourself, this cheesecake is guaranteed to impress and satisfy every sweet tooth.

Savory Cheesy Baked Dumpling Lasagna

If you’re looking for a creative comfort food mashup that’s both easy and incredibly satisfying, this savory cheesy baked dumpling lasagna is about to become your new obsession. Imagine replacing traditional lasagna noodles with soft, pillowy dumplings layered between rich marinara sauce and gooey melted cheese—every bite is pure comfort.

This dish combines the hearty, familiar flavors of Italian lasagna with the convenience and texture of dumplings, making it perfect for busy weeknights or cozy family dinners. It’s a fun twist that feels gourmet but is surprisingly simple to make.

Why You’ll Love This Recipe

This savory cheesy baked dumpling lasagna checks all the boxes for a perfect comfort meal.

  • Unique twist on classic lasagna
  • Quick and easy preparation using frozen dumplings
  • Rich, cheesy, and hearty
  • Perfect for feeding a crowd
  • Customizable with different flavors and fillings

It’s the kind of dish that feels familiar yet exciting at the same time.

Ingredients

Here’s what you’ll need to make this delicious savory cheesy baked dumpling lasagna:

  • 1 bag frozen dumplings (potstickers or gyoza)
  • 2 cups marinara sauce
  • 1 cup ricotta cheese
  • 2 cups shredded mozzarella cheese
  • 1/2 cup grated Parmesan cheese
  • 1/2 pound ground beef or sausage (optional)
  • 1 teaspoon Italian seasoning
  • 2 cloves garlic (minced)
  • Salt and pepper to taste
  • Fresh basil or parsley for garnish

Ingredient Notes

The beauty of this savory cheesy baked dumpling lasagna is its flexibility and bold flavor.

  • Dumplings: Use chicken, pork, or veggie dumplings based on preference
  • Marinara sauce: Choose a high-quality sauce for the best flavor
  • Ricotta cheese: Adds creaminess between layers
  • Mozzarella: Creates that classic cheesy stretch
  • Protein: Ground beef or sausage adds extra heartiness

Step-by-Step Instructions

1. Preheat the Oven

Preheat your oven to 375°F (190°C) and lightly grease a baking dish.

2. Prepare the Sauce

In a skillet, cook ground beef or sausage (if using) until browned. Add garlic, marinara sauce, and Italian seasoning. Simmer for a few minutes.

3. Layer the Dish

Spread a thin layer of sauce on the bottom of the dish. Add a layer of dumplings, followed by ricotta, mozzarella, and sauce.

4. Repeat Layers

Continue layering dumplings, cheese, and sauce until all ingredients are used, finishing with a generous layer of mozzarella and Parmesan on top.

5. Bake

Cover with foil and bake for 25 minutes. Remove foil and bake an additional 10–15 minutes until bubbly and golden.

6. Rest and Serve

Let the lasagna rest for 10 minutes before slicing. Garnish with fresh herbs and serve warm.

Tips for Perfect Results

To get the most out of your savory cheesy baked dumpling lasagna, keep these tips in mind:

  • Don’t thaw dumplings beforehand—they hold their shape better frozen
  • Use enough sauce to keep the dish moist
  • Cover while baking to prevent over-browning
  • Let it rest before cutting for clean slices

These tips ensure a perfectly cooked, flavorful dish every time.


Variations

One of the best parts about savory cheesy baked dumpling lasagna is how easy it is to customize.

Vegetarian Version

  • Use veggie dumplings and add spinach or mushrooms

Spicy Twist

  • Add red pepper flakes or spicy marinara

Alfredo Style

  • Swap marinara for Alfredo sauce

Asian-Inspired Fusion

  • Use soy-based sauce and sesame oil for a unique flavor

What to Serve With It

This hearty savory cheesy baked dumpling lasagna pairs well with lighter sides:

  • Fresh green salad
  • Garlic bread
  • Roasted vegetables
  • Light vinaigrette dishes

These sides help balance the richness of the main dish.

Storage & Reheating

This dish stores beautifully, making it great for leftovers.

  • Refrigerate: Store in an airtight container for up to 4 days
  • Freeze: Freeze portions for up to 2 months
  • Reheat: Warm in the oven at 350°F or microwave individual servings

Add a bit of sauce before reheating to keep it moist.

Common Mistakes to Avoid

Avoid these common pitfalls when making savory cheesy baked dumpling lasagna:

  • Using too little sauce (can dry out the dish)
  • Overbaking (leads to tough dumplings)
  • Skipping the resting time
  • Overloading layers unevenly

Paying attention to these details makes all the difference.

FAQs

Can I use fresh dumplings instead of frozen?

Yes, but reduce the baking time slightly to avoid overcooking.

What type of dumplings work best?

Potstickers or gyoza with sturdy wrappers work best.

Can I make this ahead of time?

Absolutely! Assemble it ahead and refrigerate until ready to bake.

Is this freezer-friendly?

Yes, it freezes well—just thaw and reheat before serving.

Final Thoughts

This savory cheesy baked dumpling lasagna is the ultimate comfort food fusion—combining familiar flavors with a fun, creative twist. It’s rich, cheesy, and incredibly satisfying, making it perfect for both casual dinners and special occasions.

Once you try it, you’ll see how easy and versatile it is. Whether you stick to the classic version or experiment with variations, this dish is sure to become a favorite in your recipe rotation.

BBQ Chicken Pasta Salad: A Delightful Summer Dish!

When the weather warms up and you’re craving something fresh yet satisfying, this BBQ chicken pasta salad is exactly what you need. It combines smoky barbecue chicken, tender pasta, crisp veggies, and a creamy, tangy dressing into one irresistible dish that screams summer.

Perfect for backyard cookouts, potlucks, or easy weeknight dinners, this recipe is both hearty and refreshing. It’s one of those dishes that feels indulgent yet balanced, with bold flavors and vibrant textures in every bite. If you love BBQ and pasta salad, this fusion is going to become a staple in your kitchen.

Why You’ll Love This Recipe

This BBQ chicken pasta salad is a must-make for so many reasons:

  • Perfect summer dish for gatherings and picnics
  • Loaded with flavor from smoky BBQ sauce and creamy dressing
  • Easy to prepare ahead of time
  • Great use for leftover chicken
  • Balanced textures—creamy, crunchy, and tender

It’s the kind of dish that disappears quickly at any event.

Ingredients

To make this flavorful BBQ chicken pasta salad, you’ll need:

  • 12 oz pasta (rotini or penne)
  • 2 cups cooked chicken (grilled or shredded)
  • 1/2 cup BBQ sauce
  • 1/2 cup mayonnaise
  • 1/4 cup sour cream
  • 1 cup corn (fresh, canned, or grilled)
  • 1/2 cup cherry tomatoes (halved)
  • 1/4 cup red onion (finely chopped)
  • 1/2 cup shredded cheddar cheese
  • 2 tablespoons fresh cilantro (chopped)
  • Salt and pepper to taste

Ingredient Notes

The secret to a standout BBQ chicken pasta salad lies in using fresh, flavorful ingredients.

  • Chicken: Grilled chicken adds a smoky depth, but rotisserie works great too
  • BBQ sauce: Choose your favorite—sweet, smoky, or spicy
  • Pasta: Short pasta shapes hold the dressing best
  • Corn: Grilled corn adds extra flavor and texture
  • Cheese: Sharp cheddar gives a bold, savory bite

Step-by-Step Instructions

1. Cook the Pasta

Bring a large pot of salted water to a boil and cook the pasta according to package directions. Drain and let cool completely.

2. Prepare the Chicken

If not already cooked, grill or sauté your chicken, then chop or shred it into bite-sized pieces. Toss with BBQ sauce until well coated.

3. Make the Dressing

In a large bowl, mix mayonnaise, sour cream, and a bit more BBQ sauce for extra flavor.

4. Combine Ingredients

Add cooled pasta, BBQ chicken, corn, tomatoes, red onion, and cheese to the bowl.

5. Toss and Chill

Mix everything until evenly coated. Refrigerate for at least 30 minutes before serving.

6. Garnish and Serve

Top with fresh cilantro and an extra drizzle of BBQ sauce if desired.

Tips for Perfect Results

To make your BBQ chicken pasta salad truly shine, keep these tips in mind:

  • Cool the pasta completely before mixing to avoid a soggy texture
  • Don’t overdress—add dressing gradually
  • Use fresh ingredients for the best flavor
  • Chill before serving to let flavors meld together

These simple steps make a big difference in taste and texture.

Variations

This BBQ chicken pasta salad is easy to customize based on your preferences.

Make It Spicy

  • Add jalapeños or spicy BBQ sauce

Add More Crunch

  • Include bell peppers or celery

Lighten It Up

  • Use Greek yogurt instead of mayonnaise

Go Tex-Mex Style

  • Add black beans and avocado

What to Serve With It

This BBQ chicken pasta salad pairs perfectly with classic summer dishes:

  • Grilled burgers or hot dogs
  • BBQ ribs or pulled pork
  • Fresh fruit salad
  • Lemonade or iced tea

It’s versatile enough to be a side dish or a main course.

Storage & Reheating

Here’s how to keep your BBQ chicken pasta salad fresh:

  • Refrigerate: Store in an airtight container for up to 3 days
  • Stir before serving to redistribute dressing
  • Avoid freezing—the texture won’t hold up

Since it’s served cold, no reheating is needed—just enjoy straight from the fridge.

Common Mistakes to Avoid

Avoid these common pitfalls when making BBQ chicken pasta salad:

  • Mixing hot pasta with dressing
  • Using too much sauce (can overpower flavors)
  • Skipping seasoning adjustments
  • Not chilling long enough

Taking a little extra care ensures the best results.

FAQs

Can I make BBQ chicken pasta salad ahead of time?

Yes! It actually tastes better after chilling for a few hours.

What’s the best pasta to use?

Rotini, penne, or bowtie pasta work best for holding the dressing.

Can I use store-bought rotisserie chicken?

Absolutely—it’s a great time-saving option.

How do I keep it from drying out?

Add a little extra dressing before serving if needed.

Final Thoughts

This BBQ chicken pasta salad is the ultimate summer dish—fresh, flavorful, and incredibly easy to make. It brings together smoky BBQ flavors and creamy pasta salad in a way that feels both comforting and refreshing.

Whether you’re hosting a backyard party or preparing a simple family meal, this recipe is sure to be a hit. Once you try it, you’ll see why it’s a go-to favorite for warm-weather cooking—and why it deserves a permanent spot in your recipe collection.