Delicious Oreo Milkshake Recipe in Just 5 Minutes

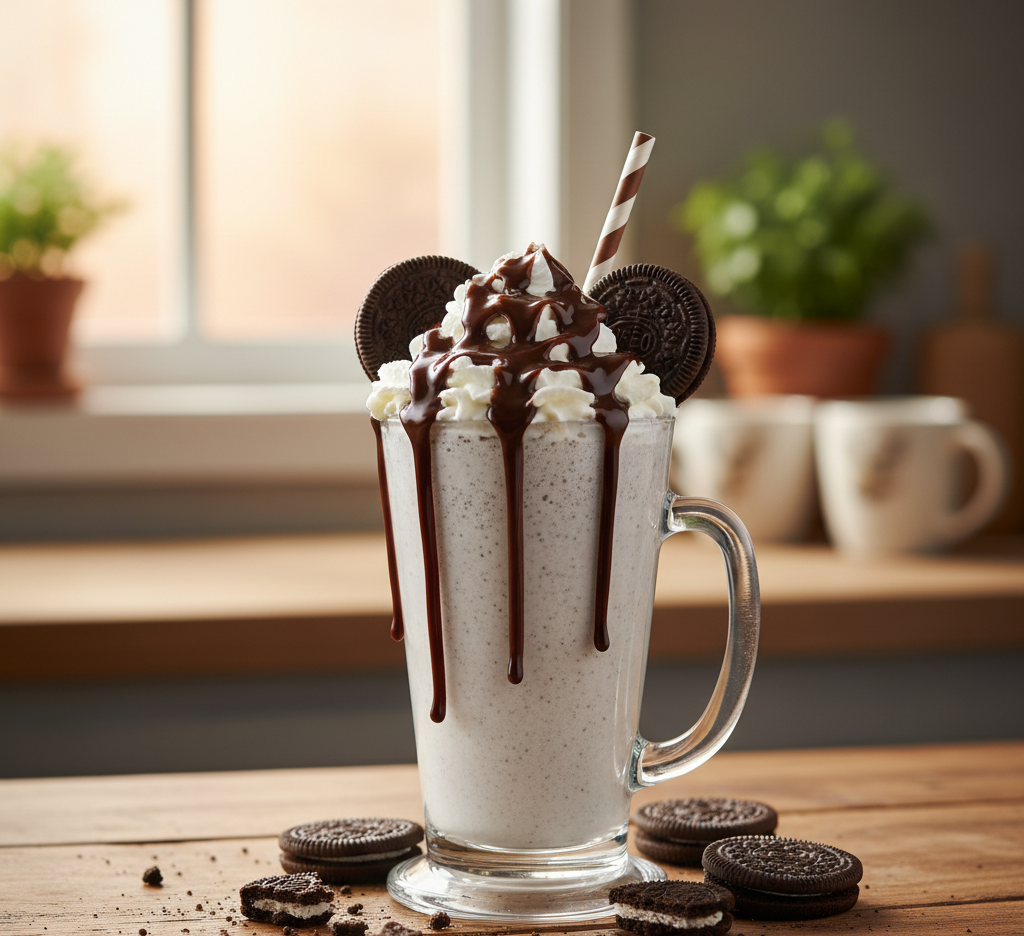
Craving something cold, creamy, and irresistibly sweet? This Delicious Oreo Milkshake Recipe in Just 10 Minutes is exactly what you need. It’s the ultimate quick dessert—thick, rich, and packed with that classic cookies-and-cream flavor we all love. Best of all, it comes together in minutes with just a handful of ingredients.

Whether you’re making an after-school treat, a late-night indulgence, or a fun dessert for guests, this Oreo milkshake recipe delivers every single time. With its smooth texture and crunchy cookie bits, it’s the kind of drink that feels both nostalgic and indulgent at the same time.

Why You’ll Love This Oreo Milkshake Recipe

This Oreo milkshake recipe is a go-to favorite for so many reasons. It’s simple, satisfying, and incredibly customizable.

Here’s why it stands out:

  • Ready in just 10 minutes or less
  • Requires only a few basic ingredients
  • Perfectly creamy and thick texture
  • Loved by kids and adults alike
  • Easy to customize with different flavors and toppings

Ingredients

To make this delicious Oreo milkshake recipe, you’ll need:
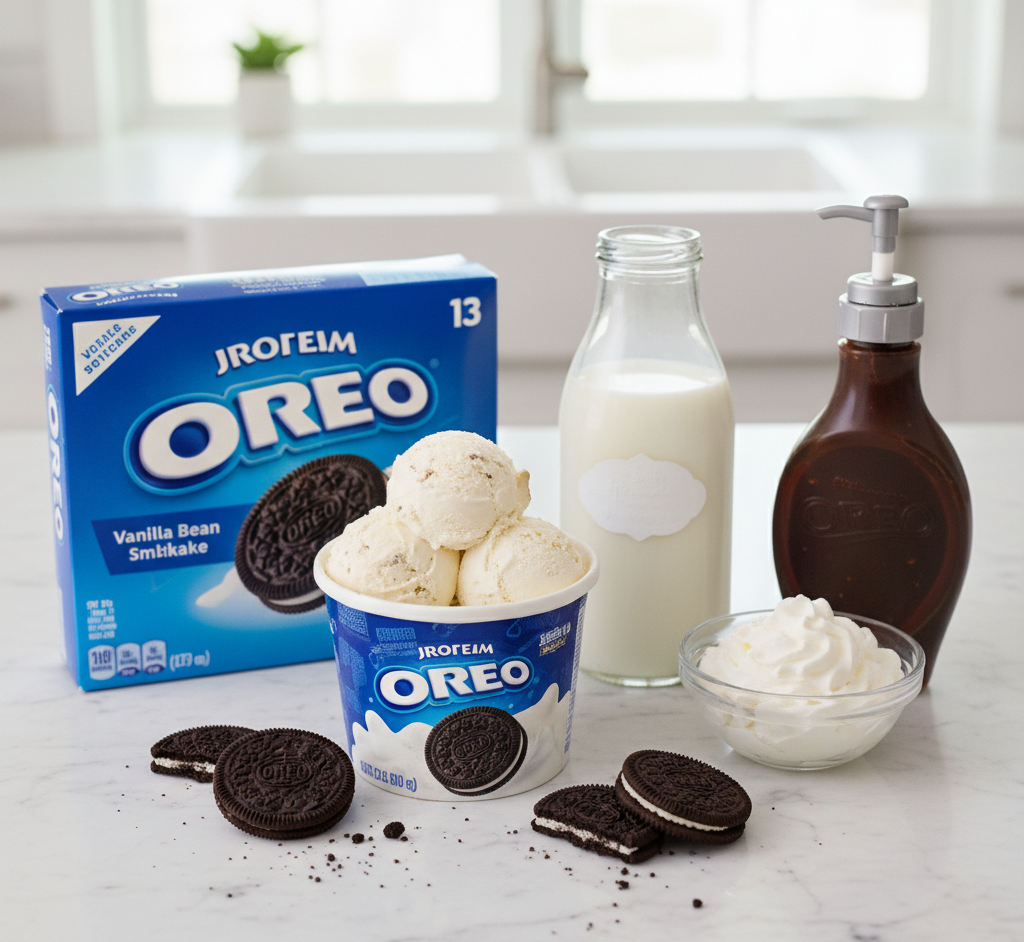
  • 6–8 Oreo cookies
  • 2 cups vanilla ice cream
  • 1 cup whole milk
  • 1/2 teaspoon vanilla extract (optional)
  • Whipped cream (for topping)
  • Chocolate syrup (optional)

Ingredient Notes

The quality of your ingredients can really elevate this Oreo milkshake recipe. Use a good-quality vanilla ice cream for the creamiest texture and richest flavor. Whole milk works best, but you can substitute with lower-fat milk or even plant-based alternatives if needed.

When it comes to Oreos, the classic version works perfectly, but feel free to experiment with flavored varieties like double-stuffed or mint for a fun twist.

Step-by-Step Instructions

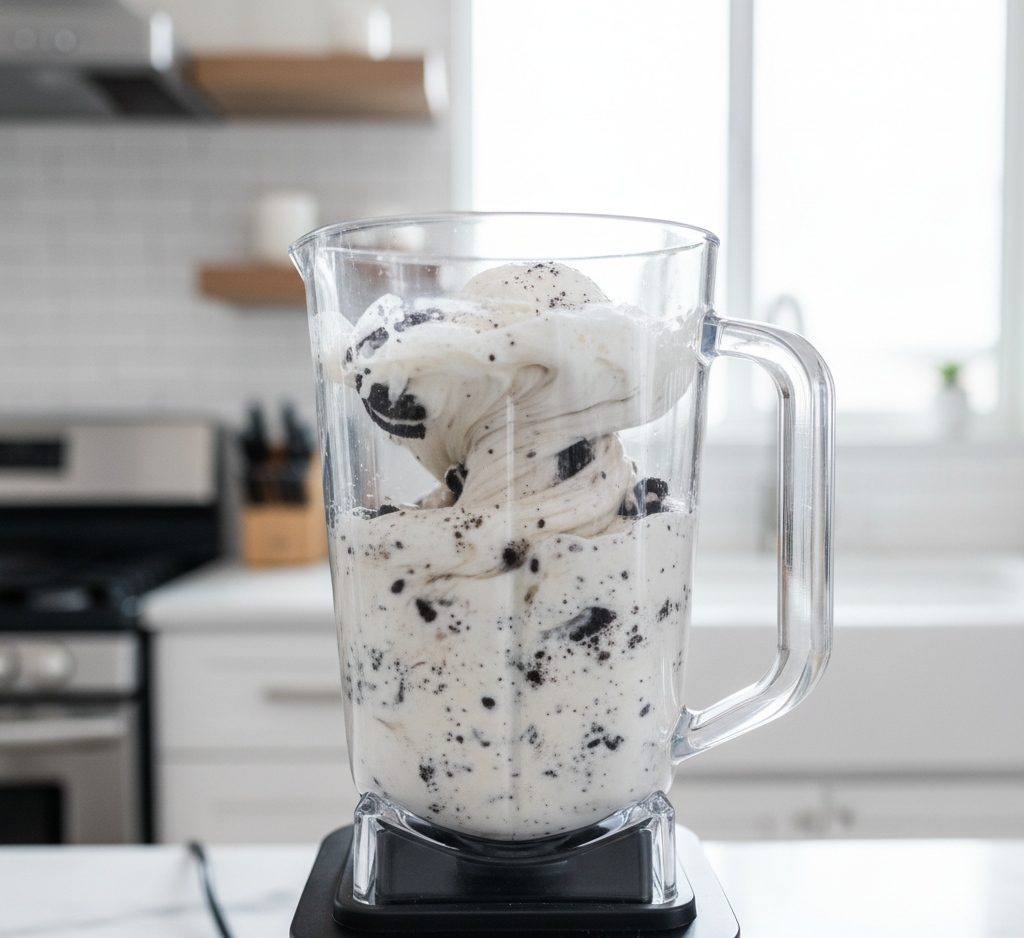
1. Add Ingredients to Blender

Place the Oreo cookies, vanilla ice cream, milk, and vanilla extract (if using) into a blender.

2. Blend Until Smooth

Blend on high speed until smooth and creamy. If you prefer a thicker shake, use less milk. For a thinner consistency, add a splash more.

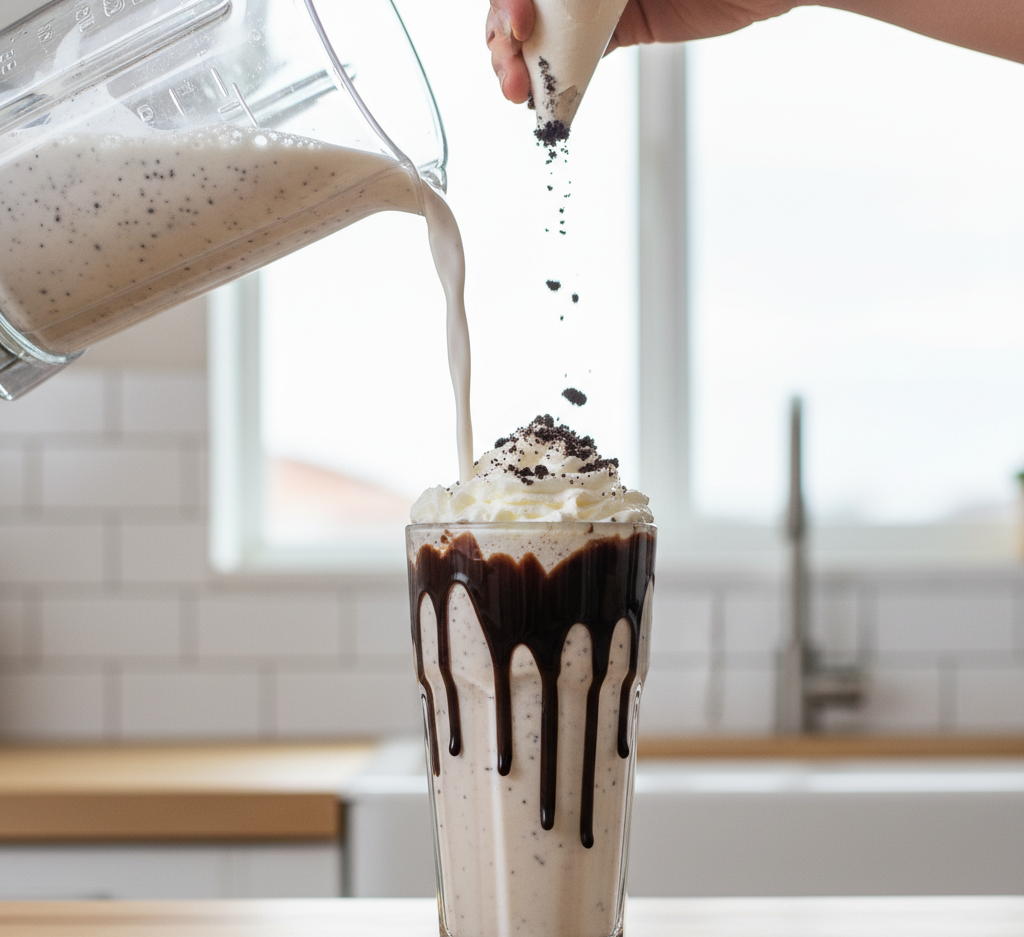
3. Prepare the Glass

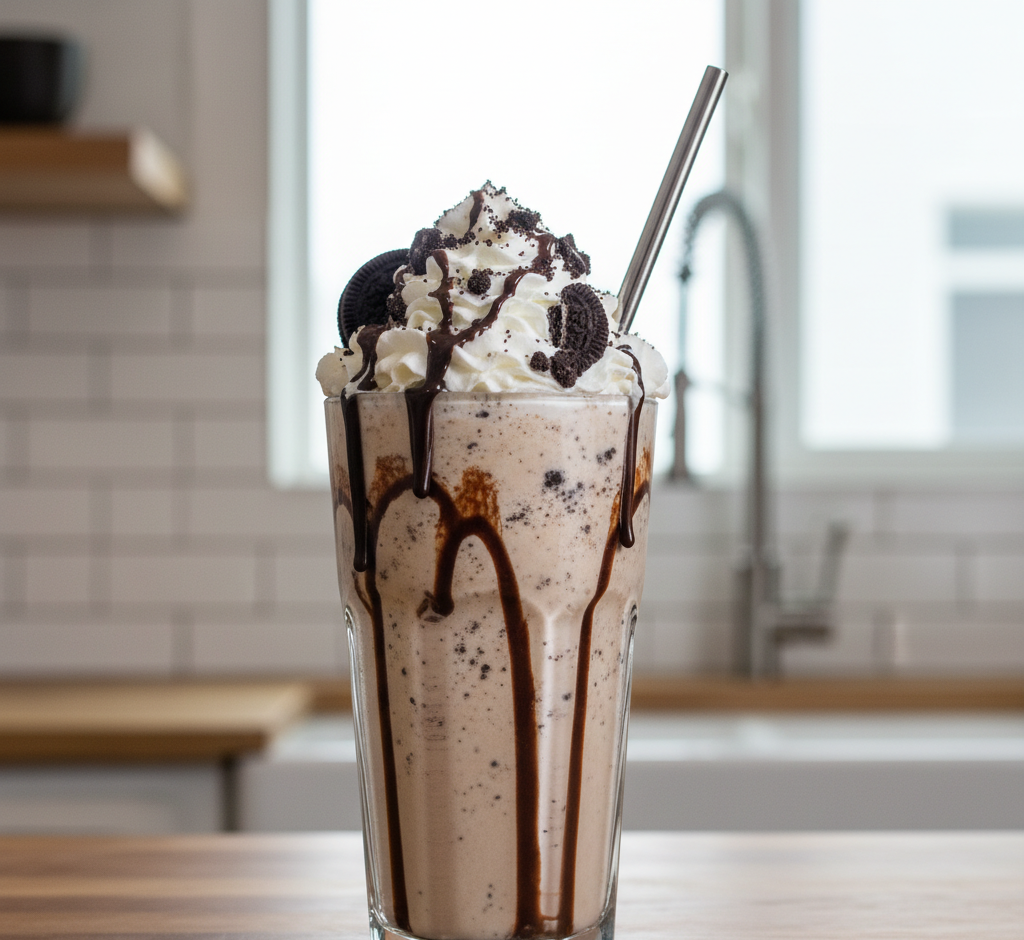
Drizzle chocolate syrup inside your serving glass for a decorative touch.

4. Pour and Garnish

Pour the milkshake into the glass, then top with whipped cream and crushed Oreo cookies.

Tips for Perfect Results

To make the best Oreo milkshake recipe, keep these tips in mind:

  • Use slightly softened ice cream for easier blending
  • Don’t over-blend if you want cookie chunks
  • Chill your glass beforehand for a frosty finish
  • Adjust milk quantity to control thickness

These small tweaks help you get that perfect milkshake consistency every time.

Variations

This Oreo milkshake recipe is incredibly versatile. Try these fun variations:

  • Chocolate Oreo Shake: Add chocolate ice cream or cocoa powder
  • Mint Oreo Shake: Use mint-flavored Oreos
  • Peanut Butter Twist: Blend in a spoonful of peanut butter
  • Protein Shake Version: Add a scoop of vanilla or chocolate protein powder

What to Serve With It

This Oreo milkshake pairs perfectly with:

  • Freshly baked cookies or brownies
  • French fries (for that sweet-salty combo)
  • Burgers for a classic diner-style meal
  • Light snacks like fruit for balance

It’s versatile enough to be a standalone dessert or part of a larger meal.

Storage & Reheating

Milkshakes are best enjoyed fresh, but here’s what you can do if needed:

  • Refrigerate: Store for up to 24 hours (may lose thickness)
  • Freeze: Freeze and re-blend before serving
  • Reblend: Add a splash of milk and blend again to restore texture

For the best experience, enjoy your Oreo milkshake immediately after making it.

Common Mistakes to Avoid

Avoid these common issues when making your Oreo milkshake recipe:

  • Using too much milk (results in a thin shake)
  • Over-blending (loses cookie texture)
  • Not chilling the glass (affects presentation and temperature)
  • Using low-quality ice cream

Attention to these details makes a noticeable difference.

FAQs

Can I make an Oreo milkshake without ice cream?

Yes! Substitute frozen milk cubes or frozen bananas for a lighter version.

How do I make it thicker?

Use less milk or add more ice cream for a thicker consistency.

Can I use dairy-free ingredients?

Absolutely! Use plant-based milk and dairy-free ice cream.

How many servings does this recipe make?

This recipe typically makes 1–2 servings, depending on portion size.

Final Thoughts

This Delicious Oreo Milkshake Recipe in Just 10 Minutes is the perfect blend of simplicity and indulgence. With its creamy texture, rich flavor, and endless customization options, it’s a dessert you’ll come back to again and again.

Whether you’re making it for yourself or sharing with friends and family, this Oreo milkshake recipe is guaranteed to satisfy your sweet tooth. Quick, easy, and absolutely delicious—it doesn’t get much better than that.

Chocolate Donut Recipe with Chili Crisp Original Topping

If you’re ready to step outside the usual dessert box, this Chocolate Donut Recipe with Chili Crisp Original Topping is about to blow your mind—in the best way possible. Imagine a soft, rich chocolate donut paired with a glossy topping that’s sweet, slightly savory, and carries a subtle heat from chili crisp. It’s the kind of flavor combination that surprises you at first bite, then instantly hooks you.

This recipe is perfect for adventurous home bakers, brunch enthusiasts, or anyone looking to elevate their donut game. The contrast between deep chocolate flavor and spicy crunch creates a bakery-style treat that feels gourmet yet is totally doable in your own kitchen.

Why You’ll Love This Chocolate Donut Recipe with Chili Crisp Original Topping

This isn’t your average donut recipe. The chocolate donut recipe with chili crisp original topping delivers a unique blend of flavors that balance sweetness, richness, and a hint of heat.

Here’s why this recipe stands out:

  • A bold sweet-and-spicy flavor combination
  • Soft, fluffy baked donuts with rich chocolate taste
  • Crunchy chili crisp topping for texture contrast
  • Perfect for brunch, dessert, or special occasions
  • A conversation-starting recipe that impresses guests

Ingredients

To make this chocolate donut recipe with chili crisp original topping, gather the following:

For the Chocolate Donuts:

  • 1 cup all-purpose flour
  • 1/3 cup cocoa powder
  • 3/4 cup granulated sugar
  • 1 teaspoon baking powder
  • 1/2 teaspoon baking soda
  • 1/2 teaspoon salt
  • 1/2 cup milk
  • 1/4 cup sour cream or yogurt
  • 1/4 cup vegetable oil
  • 1 large egg
  • 1 teaspoon vanilla extract

For the Chili Crisp Topping:

  • 1/2 cup powdered sugar
  • 2–3 tablespoons milk
  • 1 tablespoon chili crisp (adjust to taste)
  • 1 teaspoon honey or maple syrup

Ingredient Notes

The magic of this chocolate donut recipe with chili crisp original topping lies in balance. Use high-quality cocoa powder for a deep chocolate flavor—it really makes a difference. Sour cream or yogurt keeps the donuts moist and tender.

Chili crisp is the star of the topping. It brings a unique mix of heat, crunch, and umami. If you’re new to chili crisp, start with a smaller amount and adjust to your spice preference. The honey helps mellow the heat while enhancing the glaze’s shine and sweetness.

Step-by-Step Instructions

1. Preheat and Prep

Preheat your oven to 350°F and lightly grease a donut pan. This ensures your donuts release easily and bake evenly.

2. Mix Dry Ingredients

In a large bowl, whisk together flour, cocoa powder, sugar, baking powder, baking soda, and salt.

3. Combine Wet Ingredients

In another bowl, whisk milk, sour cream, oil, egg, and vanilla extract until smooth.

4. Make the Batter

Gradually combine the wet and dry ingredients, mixing until just combined. Avoid overmixing to keep the donuts tender.

5. Bake the Donuts

Spoon or pipe the batter into the donut pan, filling each cavity about 3/4 full. Bake for 10–12 minutes or until a toothpick comes out clean.

6. Prepare the Chili Crisp Topping

In a small bowl, whisk powdered sugar, milk, chili crisp, and honey until smooth and glossy.

7. Glaze the Donuts

Once the donuts have cooled slightly, dip the tops into the chili crisp glaze. Let them set for a few minutes before serving.

Tips for Perfect Results

To master this chocolate donut recipe with chili crisp original topping, keep these tips in mind:

  • Don’t overbake—this keeps the donuts soft and moist
  • Use a piping bag for neat, evenly shaped donuts
  • Let donuts cool slightly before glazing
  • Taste the glaze and adjust spice level as needed

These small adjustments can elevate your final result significantly.

Variations

This recipe is incredibly versatile and easy to customize:

  • Extra Chocolate: Add chocolate chips to the batter
  • Spicier Version: Increase chili crisp or add red pepper flakes
  • Gluten-Free: Use a 1:1 gluten-free flour blend
  • Vegan Option: Substitute egg and dairy with plant-based alternatives

What to Serve With It

These chocolate donuts pair beautifully with:

  • Freshly brewed coffee or espresso
  • Cold milk for balance
  • Vanilla ice cream for dessert
  • Fresh berries for a refreshing contrast

The sweet and spicy flavor profile makes them surprisingly versatile.

Storage & Reheating

Here’s how to store your chocolate donut recipe with chili crisp original topping:

  • Room Temperature: Store in an airtight container for up to 2 days
  • Refrigerate: Up to 5 days, though best enjoyed fresh
  • Freeze: Freeze unglazed donuts for up to 2 months
  • Reheat: Warm briefly in the microwave if desired

For best results, glaze just before serving.

Common Mistakes to Avoid

Avoid these common pitfalls:

  • Overmixing the batter (leads to dense donuts)
  • Using too much chili crisp (can overpower sweetness)
  • Glazing hot donuts (causes glaze to melt off)
  • Skipping proper measurements

Attention to detail ensures bakery-quality donuts every time.

FAQs

What is chili crisp, and is it very spicy?

Chili crisp is a flavorful oil-based condiment with crunchy bits of chili, garlic, and spices. It can be mildly to moderately spicy depending on the brand.

Can I fry these donuts instead of baking?

This recipe is designed for baked donuts, but you can adapt it with a yeast dough for frying if desired.

Can I make the glaze less spicy?

Absolutely! Reduce the chili crisp and add more honey or powdered sugar to balance the heat.

Do these donuts taste overly spicy?

Not at all—the spice is subtle and balanced by the sweetness of the chocolate and glaze.

Final Thoughts

This Chocolate Donut Recipe with Chili Crisp Original Topping is proof that bold flavor combinations can lead to something truly unforgettable. The rich chocolate base paired with a sweet and spicy glaze creates a dessert that’s exciting, modern, and completely delicious.

Whether you’re experimenting in the kitchen or looking to impress guests, this recipe delivers something unique and crave-worthy. Once you try it, you’ll see just how addictive the sweet-heat combo can be.

Crispy Beef & Cheese Quesadilla (Easy, Cheesy, and Irresistible)

There’s something undeniably satisfying about biting into a perfectly crispy beef & cheese quesadilla—that golden, crunchy tortilla giving way to melty cheese and savory, seasoned beef. It’s comfort food at its best, and the good news is you don’t need to head to a restaurant to enjoy it.

This homemade version of a crispy beef & cheese quesadilla is quick, budget-friendly, and incredibly easy to customize. Whether you’re making lunch, dinner, or a late-night snack, this recipe delivers bold flavor with minimal effort. Plus, it’s a guaranteed hit with both kids and adults alike.

Why You’ll Love This Crispy Beef & Cheese Quesadilla

This crispy beef & cheese quesadilla recipe checks all the boxes: it’s fast, flavorful, and endlessly adaptable. Once you try it, it’ll become a staple in your weekly meal rotation.

Here’s why this recipe stands out:

  • Ready in under 25 minutes
  • Uses simple pantry ingredients
  • Perfectly crispy outside with gooey melted cheese inside
  • Family-friendly and customizable
  • Great for leftovers or meal prep

Ingredients

To make the perfect crispy beef & cheese quesadilla, you’ll need:

  • 1 lb ground beef
  • 1 packet taco seasoning (or homemade blend)
  • 1/2 cup water
  • 2 cups shredded cheese (cheddar, Monterey Jack, or Mexican blend)
  • 4 large flour tortillas
  • 2 tablespoons butter or oil
  • Optional: diced onions, bell peppers, jalapeños

Ingredient Notes

The key to a truly delicious crispy beef & cheese quesadilla is using high-quality, flavorful ingredients. Ground beef with a bit of fat (like 80/20) provides the best taste and texture. Leaner beef works too, but you may want to add a touch of oil for richness.

When it comes to cheese, opt for varieties that melt well. A blend of cheddar and Monterey Jack creates that perfect gooey consistency. Pre-shredded cheese is convenient, but freshly grated cheese melts more smoothly and gives better results.

Step-by-Step Instructions

1. Cook the Beef

In a large skillet over medium heat, cook the ground beef until browned. Drain excess grease, then stir in taco seasoning and water. Simmer until the mixture thickens and becomes flavorful.

2. Assemble the Quesadilla

Lay a tortilla flat and sprinkle cheese evenly over one half. Add a layer of seasoned beef, then top with more cheese. Fold the tortilla over to create a half-moon shape.

3. Cook Until Crispy

Heat butter or oil in a skillet over medium heat. Cook the quesadilla until the tortilla is golden brown and crispy, about 2–3 minutes per side. Press gently with a spatula for even browning.

4. Slice and Serve

Remove from the skillet and let it cool slightly before slicing into wedges. Serve warm with your favorite dips.

Tips for Perfect Results

Getting the perfect crispy beef & cheese quesadilla is all about technique:

  • Use medium heat to avoid burning the tortilla
  • Don’t overfill—this makes flipping difficult
  • Press gently with a spatula for even crispiness
  • Let it rest briefly before slicing to keep fillings intact

These small details make a big difference in the final result.

Variations

One of the best things about a crispy beef & cheese quesadilla is how easy it is to customize:

  • Chicken Quesadilla: Swap beef for shredded or grilled chicken
  • Veggie Option: Use black beans, mushrooms, and peppers
  • Spicy Version: Add jalapeños or hot sauce
  • Breakfast Quesadilla: Fill with scrambled eggs, sausage, and cheese

What to Serve With It

A crispy beef & cheese quesadilla pairs perfectly with a variety of sides:

  • Fresh guacamole
  • Salsa or pico de gallo
  • Sour cream
  • Mexican rice
  • Refried beans

These sides enhance the flavor and create a complete, satisfying meal.

Storage & Reheating

If you have leftovers, here’s how to store and reheat your crispy beef & cheese quesadilla:

  • Refrigerate: Store in an airtight container for up to 3 days
  • Freeze: Wrap tightly and freeze for up to 2 months
  • Reheat: Use a skillet or oven for best crispiness (avoid microwave if possible)

Reheating in a pan helps bring back that crispy texture.

Common Mistakes to Avoid

Even simple recipes can go wrong. Avoid these common mistakes:

  • Cooking on heat that’s too high (burns tortilla before cheese melts)
  • Overstuffing the quesadilla
  • Not draining the beef properly
  • Skipping the resting time before slicing

Paying attention to these details ensures a perfect result every time.

FAQs

What’s the best cheese for a crispy beef & cheese quesadilla?

Cheddar and Monterey Jack are excellent choices because they melt smoothly and taste great.

Can I make quesadillas ahead of time?

Yes! Assemble them ahead and cook when ready, or reheat leftovers in a skillet.

How do I make them extra crispy?

Use a bit of butter or oil in the pan and cook on medium heat for even browning.

Can I use corn tortillas instead?

Yes, but they’re smaller and more delicate, so handle them carefully.

Final Thoughts

This crispy beef & cheese quesadilla is proof that simple ingredients can create something truly delicious. With its golden, crunchy exterior and cheesy, savory filling, it’s the kind of meal you’ll crave again and again.

Whether you’re making a quick lunch, an easy dinner, or a shareable snack, this crispy beef & cheese quesadilla delivers every time. Once you master this recipe, you’ll have a go-to dish that’s as versatile as it is satisfying.

15+ Pasta Recipes for Busy Weeknights (Family-Friendly Favorites)

When life gets hectic, dinner shouldn’t add more stress to your day. That’s exactly why this collection of 15+ pasta recipes for busy weeknights is a total game-changer. Pasta is one of those magical ingredients that comes together quickly, satisfies even picky eaters, and can be endlessly customized based on what you have in your kitchen.

In this guide, you’ll find a variety of family-friendly pasta recipes that are easy, comforting, and perfect for weeknight dinners. Whether you’re craving something creamy, cheesy, light, or packed with protein, these recipes will help you get a delicious meal on the table fast—without sacrificing flavor.

Why You’ll Love These Pasta Recipes for Busy Weeknights

These pasta recipes for busy weeknights are designed with real life in mind. They’re quick, flexible, and use simple ingredients you probably already have on hand.

Here’s why this list is perfect for your weekly rotation:

  • Most recipes are ready in 30 minutes or less
  • Budget-friendly and pantry-friendly ingredients
  • Kid-approved flavors the whole family will love
  • Easy to customize for dietary preferences
  • Perfect for leftovers and meal prep

Essential Ingredients for Quick Pasta Dinners

Before diving into the recipes, it helps to keep a few staple ingredients stocked. These basics will make whipping up any of these family-friendly pasta recipes even easier.

  • Dry pasta (spaghetti, penne, rotini, fettuccine)
  • Olive oil and butter
  • Garlic and onions
  • Canned tomatoes or marinara sauce
  • Heavy cream or milk
  • Parmesan and shredded cheese
  • Ground beef, chicken, or sausage
  • Fresh or frozen vegetables

15+ Pasta Recipes for Busy Weeknights

Here are some of the best pasta recipes for busy weeknights that you can rotate throughout the week:

Quick & Classic Favorites

  • Spaghetti with marinara and ground beef
  • Creamy fettuccine Alfredo
  • Garlic butter shrimp pasta
  • One-pot cheesy penne
  • Classic mac and cheese

Family-Friendly Comfort Meals

  • Baked ziti with mozzarella
  • Chicken Alfredo bake
  • Lasagna skillet (no layering required)
  • Taco pasta (a fun twist for kids)
  • Cheeseburger pasta

Light & Fresh Options

  • Lemon garlic pasta with spinach
  • Tomato basil pasta
  • Veggie primavera
  • Pesto pasta with cherry tomatoes
  • Zucchini and mushroom pasta

These options keep things lighter while still delivering big flavor.


How to Choose the Right Recipe for Your Night

Not all weeknights are the same, and that’s why having a mix of quick pasta dinner ideas is so helpful. If you’ve had a long day, go for a one-pot or 20-minute recipe. If you have a bit more time, baked pasta dishes are great for leftovers.

Think about:

  • Time available: 20-minute meals vs. baked dishes
  • Ingredients on hand: Pantry vs. fresh
  • Family preferences: Creamy, cheesy, or veggie-packed

Step-by-Step Formula for Easy Pasta Dinners

Even without a specific recipe, you can create your own pasta recipes for busy weeknights using this simple formula:

1. Cook the Pasta

Boil salted water and cook pasta until al dente.

2. Build Flavor

Sauté garlic and onions in olive oil or butter.

3. Add Protein or Veggies

Include cooked meat, beans, or vegetables.

4. Add Sauce

Use marinara, cream sauce, or even just olive oil and herbs.

5. Finish with Cheese

Top with Parmesan or shredded cheese for extra flavor.

Tips for Perfect Weeknight Pasta

To make the most of these family-friendly pasta recipes, keep these tips in mind:

  • Salt your pasta water generously for better flavor
  • Reserve a bit of pasta water to adjust sauce consistency
  • Don’t overcook pasta—it should be al dente
  • Toss pasta with sauce immediately for best results

These small techniques can elevate even the simplest dish.

Variations to Keep Things Exciting

One of the best things about these pasta recipes for busy weeknights is how easy they are to customize.

Try these ideas:

  • Swap proteins (chicken, shrimp, sausage, or plant-based)
  • Use different pasta shapes for variety
  • Add extra veggies like broccoli, peppers, or spinach
  • Spice things up with red pepper flakes or hot sauce

What to Serve With Pasta

Round out your meal with simple sides that complement your pasta dishes:

  • Garlic bread or breadsticks
  • Side salad with vinaigrette
  • Roasted vegetables
  • Soup like minestrone

These additions make your dinner feel complete without much extra effort.

Storage & Reheating Tips

These pasta recipes for busy weeknights are perfect for leftovers:

  • Refrigerate: Store in airtight containers for up to 4 days
  • Freeze: Great for baked pasta dishes (up to 2 months)
  • Reheat: Use the microwave or stovetop with a splash of water or milk

Proper storage helps maintain flavor and texture.

Common Mistakes to Avoid

Even quick recipes can go wrong if you’re not careful. Avoid these mistakes:

  • Using too little salt in pasta water
  • Overloading pasta with sauce
  • Letting pasta sit too long before serving
  • Skipping fresh herbs or cheese for finishing

Fixing these small issues makes a big difference.

FAQs

What is the fastest pasta recipe for busy weeknights?

Simple garlic butter pasta or marinara-based dishes can be ready in under 20 minutes.

Can I make these pasta recipes ahead of time?

Yes! Many recipes, especially baked ones, are perfect for meal prep.

How do I make pasta healthier?

Use whole wheat pasta, add vegetables, and choose lean proteins.

What pasta shape works best?

It depends on the sauce—long noodles for light sauces, short pasta for chunky sauces.

Final Thoughts

These 15+ pasta recipes for busy weeknights prove that delicious, home-cooked meals don’t have to be complicated or time-consuming. With a mix of comforting classics and lighter options, there’s something here for every craving and every schedule.

By keeping a few pantry staples on hand and using simple cooking techniques, you can create satisfying, family-friendly pasta recipes any night of the week. Once you start rotating these dishes into your routine, dinnertime will feel less stressful—and a whole lot more delicious.

Delicious Carrot Cake Waffles with Cream Cheese Drizzle

If you love classic carrot cake, get ready to fall head over heels for these Delicious Carrot Cake Waffles with Cream Cheese Drizzle. This recipe transforms the warm spices and cozy flavors of traditional carrot cake into a crispy-on-the-outside, fluffy-on-the-inside waffle that’s perfect for breakfast or brunch.

What really takes these carrot cake waffles with cream cheese drizzle to the next level is the rich, tangy topping. The silky cream cheese drizzle melts into the warm waffles, creating a decadent combination that feels like dessert—but is totally acceptable to eat first thing in the morning. Whether you’re hosting brunch or just treating yourself, this recipe is a guaranteed crowd-pleaser.

Why You’ll Love This Recipe

These carrot cake waffles with cream cheese drizzle are the perfect balance of indulgent and comforting. They bring together everything you love about waffles and cake into one irresistible dish.

Here’s why you’ll keep coming back to this recipe:

  • Warm spices like cinnamon and nutmeg for cozy flavor
  • Moist texture thanks to freshly grated carrots
  • Crispy edges with soft, fluffy centers
  • Decadent cream cheese drizzle for a bakery-style finish
  • Perfect for holidays, brunches, or weekend mornings

Ingredients

To make these carrot cake waffles with cream cheese drizzle, you’ll need:

For the Waffles:

  • 2 cups all-purpose flour
  • 1 tablespoon baking powder
  • 1/2 teaspoon baking soda
  • 1 teaspoon cinnamon
  • 1/2 teaspoon nutmeg
  • 1/4 teaspoon salt
  • 2 large eggs
  • 1/3 cup brown sugar
  • 1/4 cup granulated sugar
  • 1 3/4 cups milk
  • 1/3 cup vegetable oil or melted butter
  • 1 teaspoon vanilla extract
  • 1 1/2 cups finely grated carrots
  • 1/2 cup chopped walnuts or pecans (optional)

For the Cream Cheese Drizzle:

  • 4 oz cream cheese, softened
  • 1/2 cup powdered sugar
  • 2–3 tablespoons milk
  • 1/2 teaspoon vanilla extract

Ingredient Notes

The secret to amazing carrot cake waffles with cream cheese drizzle is using freshly grated carrots. Pre-shredded carrots tend to be too dry and won’t blend as smoothly into the batter. Finely grate them for the best texture.

The spice blend is also key—cinnamon and nutmeg create that classic carrot cake flavor, but you can add a pinch of ginger or cloves for extra warmth. And don’t skip the cream cheese drizzle—it adds that signature tangy sweetness that ties everything together.

Step-by-Step Instructions

1. Preheat the Waffle Iron

Start by preheating your waffle iron according to the manufacturer’s instructions. Lightly grease it to prevent sticking.

2. Mix Dry Ingredients

In a large bowl, whisk together flour, baking powder, baking soda, cinnamon, nutmeg, and salt.

3. Combine Wet Ingredients

In another bowl, whisk eggs, brown sugar, granulated sugar, milk, oil, and vanilla extract until smooth and well combined.

4. Make the Batter

Gradually add the wet ingredients to the dry ingredients, mixing until just combined. Fold in the grated carrots and nuts if using.

5. Cook the Waffles

Pour batter into the preheated waffle iron and cook until golden brown and crisp. Repeat with remaining batter.

6. Make the Cream Cheese Drizzle

In a bowl, whisk cream cheese, powdered sugar, milk, and vanilla until smooth and pourable.

7. Assemble and Serve

Drizzle the cream cheese mixture over warm waffles and serve immediately.

Tips for Perfect Results

Making perfect carrot cake waffles with cream cheese drizzle is easy with a few helpful tips:

  • Don’t overmix the batter—this keeps the waffles light and fluffy
  • Use freshly grated carrots for moisture and flavor
  • Cook waffles until crisp for the best texture contrast
  • Adjust the drizzle consistency by adding more or less milk

These simple adjustments can take your waffles from good to absolutely unforgettable.

Variations

These carrot cake waffles with cream cheese drizzle are easy to customize:

  • Raisin Lovers: Add 1/3 cup raisins for a traditional carrot cake twist
  • Healthier Option: Use whole wheat flour or reduce sugar
  • Dairy-Free: Substitute plant-based milk and cream cheese
  • Extra Indulgent: Add shredded coconut or crushed pineapple

What to Serve With It

These carrot cake waffles with cream cheese drizzle pair beautifully with:

  • Fresh fruit like berries or sliced bananas
  • Crispy bacon or breakfast sausage
  • Hot coffee or chai latte
  • Fresh orange juice

Balancing the sweetness with savory sides creates a well-rounded and satisfying meal.

Storage & Reheating

If you have leftovers, here’s how to store your carrot cake waffles with cream cheese drizzle:

  • Refrigerate: Store waffles in an airtight container for up to 3 days
  • Freeze: Freeze waffles in a single layer, then transfer to a freezer bag for up to 2 months
  • Reheat: Toast in a toaster or oven for best crispiness

Store the cream cheese drizzle separately and reheat gently before serving.

Common Mistakes to Avoid

Avoid these common pitfalls when making carrot cake waffles with cream cheese drizzle:

  • Using pre-shredded carrots (they’re too dry)
  • Overfilling the waffle iron
  • Undercooking the waffles (they should be crisp outside)
  • Making the drizzle too thick or too runny

Paying attention to these details ensures consistent, delicious results every time.

FAQs

Can I make carrot cake waffles ahead of time?

Yes! You can make and freeze them, then reheat in a toaster or oven when ready to serve.

Can I skip the cream cheese drizzle?

You can, but it’s highly recommended—it adds the signature carrot cake flavor.

What’s the best way to grate carrots?

Use a fine grater or food processor for the best texture.

Can I make these gluten-free?

Absolutely! Substitute with a 1:1 gluten-free flour blend.

Final Thoughts

These Delicious Carrot Cake Waffles with Cream Cheese Drizzle are everything you want in a breakfast treat—cozy, flavorful, and just a little indulgent. They combine the nostalgic taste of carrot cake with the satisfying texture of waffles, making them perfect for special mornings or weekend brunch.

Once you try these carrot cake waffles with cream cheese drizzle, you’ll see just how easy it is to bring bakery-style flavors into your own kitchen. Serve them warm, share them with loved ones, and enjoy every sweet, spiced bite.

Loaded Grilled Cheese Burrito (Quick Taco Bell Copycat)

If you’ve ever craved that indulgent, over-the-top burrito from Taco Bell, you’re going to love this Loaded Grilled Cheese Burrito (Quick Taco Bell Copycat). This recipe captures everything you love about the fast-food favorite—savory seasoned beef, creamy sauces, fluffy rice, and layers of melted cheese—wrapped in a warm tortilla and finished with a crispy grilled cheese exterior.

The best part? You can make this loaded grilled cheese burrito right in your own kitchen in less time than it takes to hit the drive-thru. It’s customizable, budget-friendly, and incredibly satisfying. Whether you’re cooking for yourself or feeding a hungry crowd, this recipe delivers bold flavor and comfort in every bite.

Why You’ll Love This Recipe

This loaded grilled cheese burrito is more than just a copycat—it’s an upgrade. You control the ingredients, adjust the spice level, and pile on as much filling as you like.

Here’s why this recipe stands out:

  • Ready in under 30 minutes
  • Loaded with bold, cheesy flavor
  • Perfect for meal prep or weeknight dinners
  • Easily customizable with your favorite fillings
  • Better (and often cheaper) than takeout

Ingredients

To recreate this loaded grilled cheese burrito at home, you’ll need the following:

  • 1 lb ground beef
  • 1 packet taco seasoning (or homemade)
  • 1 cup cooked white rice
  • 1/2 cup nacho cheese sauce
  • 1/2 cup sour cream
  • 1/4 cup mayonnaise
  • 1 tablespoon chipotle sauce or hot sauce
  • 1 cup shredded cheddar cheese
  • 1 cup shredded Mexican blend cheese
  • 4 large flour tortillas
  • 1/2 cup crushed tortilla chips or strips (optional for crunch)

Ingredient Notes

The magic of this loaded grilled cheese burrito comes from layering textures and flavors. Ground beef is the classic choice, but you can easily swap it for ground turkey or chicken for a lighter option. The nacho cheese sauce adds creaminess, while shredded cheese melts into every bite.

Don’t skip the chipotle or spicy sauce—it brings that signature smoky heat that makes this burrito taste just like the real deal. And those crushed tortilla chips? They add a subtle crunch that takes the texture to the next level.

Step-by-Step Instructions

1. Cook the Beef

In a skillet over medium heat, cook the ground beef until browned. Drain excess fat, then stir in taco seasoning and a splash of water. Simmer until thick and flavorful.

2. Prepare the Sauce

In a small bowl, mix sour cream, mayonnaise, and chipotle sauce until smooth. This creamy, slightly spicy sauce ties everything together.

3. Assemble the Burritos

Lay a tortilla flat and layer the ingredients:

  • Seasoned beef
  • Cooked rice
  • Nacho cheese sauce
  • Creamy chipotle sauce
  • Shredded cheese
  • Crushed tortilla chips

Fold the sides inward and roll tightly into a burrito.

4. Add the Grilled Cheese Exterior

Sprinkle shredded cheese directly onto a hot skillet, then place the burrito seam-side down on top. Let the cheese melt and crisp onto the tortilla, forming that signature grilled cheese crust.

Rotate to lightly toast the other sides.

Tips for Perfect Results

Getting that perfect loaded grilled cheese burrito is all about technique:

  • Use large tortillas to avoid overfilling
  • Don’t skip draining the beef to prevent sogginess
  • Cook on medium heat to avoid burning the cheese crust
  • Press gently while grilling for even browning

Small adjustments like these make a big difference in texture and flavor.

Variations

This loaded grilled cheese burrito is endlessly customizable. Try these variations to switch things up:

  • Chicken Burrito: Swap beef for shredded or grilled chicken
  • Vegetarian Option: Use black beans, grilled veggies, and rice
  • Spicy Kick: Add jalapeños or extra hot sauce
  • Breakfast Version: Fill with scrambled eggs, sausage, and hash browns

What to Serve With It

This loaded grilled cheese burrito is a meal on its own, but pairing it with sides makes it even better:

  • Tortilla chips and salsa
  • Guacamole
  • Mexican street corn
  • Fresh lime wedges
  • Iced tea or soda

These sides complement the richness and add balance to your meal.

Storage & Reheating

If you have leftovers, this loaded grilled cheese burrito stores surprisingly well:

  • Refrigerate: Wrap tightly and store for up to 3 days
  • Freeze: Wrap in foil and freeze for up to 2 months
  • Reheat: Warm in a skillet for best texture or microwave for convenience

Reheating in a skillet helps bring back that crispy cheese exterior.

Common Mistakes to Avoid

Avoid these pitfalls to ensure your burrito turns out perfect:

  • Overstuffing the tortilla (makes rolling difficult)
  • Skipping the cheese crust step
  • Using low heat (cheese won’t crisp properly)
  • Not sealing the burrito tightly

Attention to these details guarantees a restaurant-quality result.

FAQs

What makes this a loaded grilled cheese burrito?

It’s “loaded” because it’s packed with multiple fillings—beef, rice, sauces, and cheese—and finished with a grilled cheese crust on the outside.

Can I make this ahead of time?

Yes! Assemble the burritos ahead, then grill them fresh when ready to eat.

What’s the best cheese to use?

A mix of cheddar and Mexican blend works best for both melting and flavor.

Can I make it healthier?

Absolutely. Use lean meat, low-fat cheese, and add more veggies to lighten it up.

Final Thoughts

This Loaded Grilled Cheese Burrito (Quick Taco Bell Copycat) is everything you want in a comfort food recipe—cheesy, hearty, flavorful, and incredibly satisfying. It brings the fast-food favorite into your kitchen with fresher ingredients and even better taste.

Once you try making this loaded grilled cheese burrito at home, you may never go back to the drive-thru. It’s quick, customizable, and guaranteed to impress anyone who takes a bite.

Baked Strawberry Croissant French Toast

If you’re looking for a breakfast or brunch dish that feels luxurious yet is surprisingly easy to make, this baked strawberry croissant French toast is about to become your new favorite. Imagine buttery, flaky croissants soaked in a rich vanilla custard, layered with sweet, juicy strawberries, and baked until golden and slightly crisp on top. It’s the kind of dish that makes weekends feel special and holidays unforgettable.

This recipe is perfect for feeding a crowd or prepping ahead for a stress-free morning. Whether you’re hosting brunch or just treating your family, this baked strawberry croissant French toast delivers both comfort and elegance in every bite.

Why You’ll Love This Recipe

There are so many reasons this baked strawberry croissant French toast stands out from traditional versions. First, croissants elevate the texture—soft and custardy inside while still slightly crisp on top. Second, strawberries add a bright, fruity contrast that balances the richness perfectly.

Here’s why it’s a must-try:

  • Perfect make-ahead breakfast or brunch dish
  • Rich, custardy texture with buttery layers
  • Naturally sweet from fresh strawberries
  • Great for holidays, gatherings, or weekend treats
  • Easy to customize with different fruits or flavors

Ingredients

To make this irresistible baked strawberry croissant French toast, you’ll need simple, high-quality ingredients:

  • 6–8 large croissants (preferably day-old)
  • 2 cups fresh strawberries, sliced
  • 5 large eggs
  • 1 1/2 cups whole milk
  • 1/2 cup heavy cream
  • 1/2 cup granulated sugar
  • 2 teaspoons vanilla extract
  • 1/2 teaspoon ground cinnamon
  • Pinch of salt
  • Powdered sugar (for serving)
  • Maple syrup (optional)

Ingredient Notes

Using the right ingredients makes all the difference in this baked strawberry croissant French toast. Day-old croissants are ideal because they absorb the custard without becoming too soggy. If your croissants are fresh, let them sit out for a few hours or lightly toast them.

Fresh strawberries are best for flavor and texture, but frozen strawberries can work in a pinch—just thaw and drain them well to avoid excess moisture. Whole milk and heavy cream create a rich custard, but you can substitute with half-and-half if needed.

Step-by-Step Instructions

1. Prepare the Croissants

Cut the croissants into large chunks and place them in a greased 9×13-inch baking dish. Scatter the sliced strawberries evenly throughout.

2. Make the Custard

In a large mixing bowl, whisk together eggs, milk, heavy cream, sugar, vanilla extract, cinnamon, and salt until smooth and well combined.

3. Assemble

Pour the custard mixture evenly over the croissants and strawberries, gently pressing down so everything absorbs the liquid.

4. Chill

Cover the dish and refrigerate for at least 30 minutes, or overnight for best results.

5. Bake

Preheat your oven to 350°F. Bake uncovered for 35–45 minutes, or until the top is golden brown and the center is set.

Tips for Perfect Results

To get the best baked strawberry croissant French toast every time, keep these tips in mind:

  • Use slightly stale croissants for better absorption
  • Don’t skip the chilling step—it enhances flavor and texture
  • Cover loosely with foil if the top browns too quickly
  • Let it rest for 5–10 minutes before serving

These small details ensure your dish comes out perfectly creamy inside with a golden, slightly crisp top.

Variations

This baked strawberry croissant French toast is incredibly versatile. Try these delicious twists:

  • Berry Mix: Swap strawberries for blueberries, raspberries, or a mix
  • Chocolate Lover’s: Add chocolate chips between layers
  • Cream Cheese Filling: Add dollops of sweetened cream cheese
  • Citrus Twist: Add orange zest to the custard for brightness

Each variation brings a new flavor profile while keeping the same comforting base.

What to Serve With It

This baked strawberry croissant French toast pairs beautifully with both sweet and savory sides. Consider serving it with:

  • Crispy bacon or breakfast sausage
  • Scrambled or poached eggs
  • Fresh fruit salad
  • Yogurt parfaits
  • Freshly brewed coffee or mimosas

Balancing the richness with lighter or savory sides creates a well-rounded brunch experience.

Storage & Reheating

If you have leftovers (which is rare!), this baked strawberry croissant French toast stores well:

  • Refrigerate: Store in an airtight container for up to 3 days
  • Freeze: Wrap tightly and freeze for up to 2 months
  • Reheat: Warm in the oven at 325°F or microwave individual portions

For best texture, reheating in the oven is recommended to maintain that slight crispness on top.

Common Mistakes to Avoid

Even simple recipes can go wrong without a few precautions. Avoid these common mistakes:

  • Using overly fresh croissants (they can get mushy)
  • Skipping the resting time before baking
  • Adding too much liquid (leads to sogginess)
  • Not baking long enough (center should be set, not runny)

Paying attention to these details ensures consistent, bakery-quality results.

FAQs

Can I make baked strawberry croissant French toast ahead of time?

Yes! In fact, it’s even better when made ahead. Assemble it the night before and bake in the morning.

Can I use frozen strawberries?

Absolutely. Just thaw and drain them well to prevent excess moisture.

How do I know when it’s fully baked?

The top should be golden and the center should be set but still slightly soft—not liquidy.

Can I make this dairy-free?

Yes, substitute with plant-based milk and cream alternatives. The texture may vary slightly but will still be delicious.

Final Thoughts

This baked strawberry croissant French toast is the ultimate combination of elegance and comfort. It transforms simple ingredients into a show-stopping dish that’s perfect for brunch, holidays, or any morning you want to make special. With its buttery croissants, sweet strawberries, and rich custard, it’s a recipe that feels indulgent yet approachable.

Once you try it, you’ll find yourself coming back to this baked strawberry croissant French toast again and again—because great recipes aren’t just about flavor, they’re about creating moments worth savoring.