Bang Bang Salmon Bites Bowls

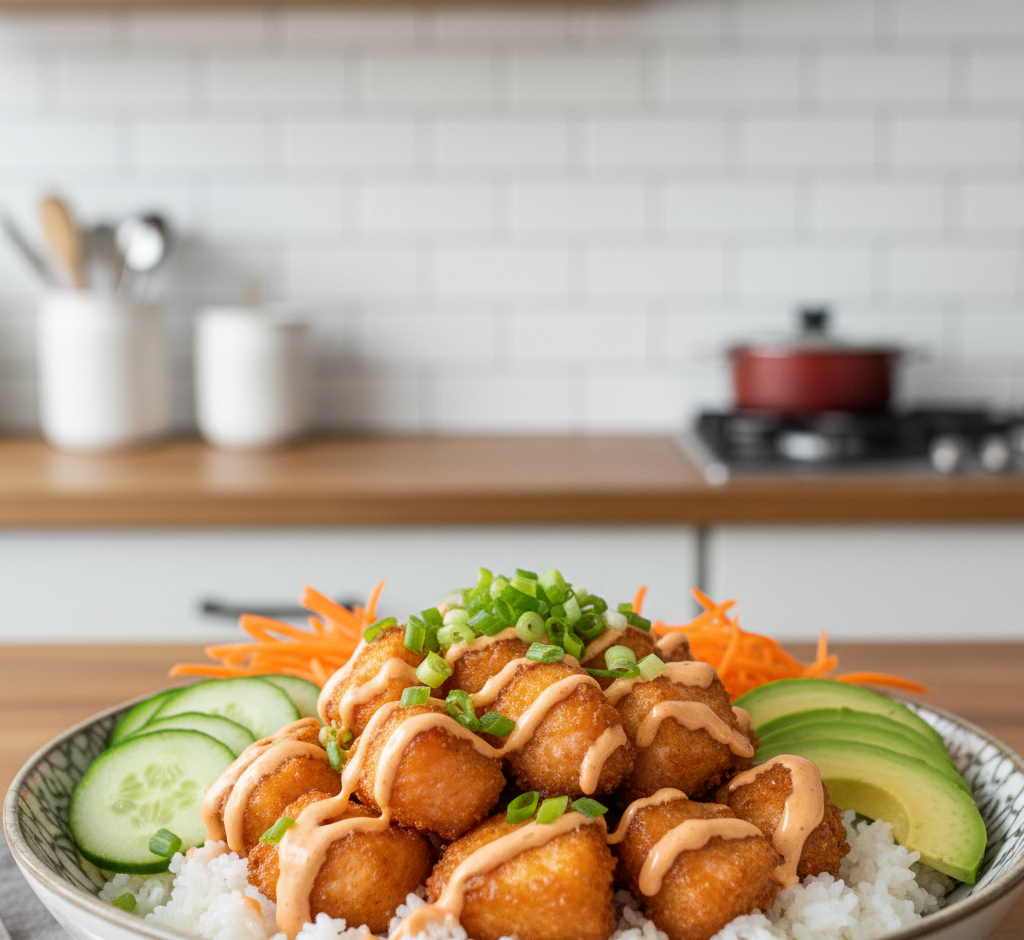
If you love bold flavors, quick dinners, and colorful bowls loaded with fresh ingredients, these Bang Bang Salmon Bites Bowls are about to become your new weeknight favorite. Crispy salmon cubes tossed in a sweet-and-spicy bang bang sauce, served over fluffy rice with crunchy veggies—this recipe checks every box for flavor, texture, and nutrition.

As a food blogger who believes healthy meals should never be boring, I’m always looking for ways to elevate simple ingredients. Salmon is already a powerhouse protein, but when you transform it into bite-sized pieces and coat it in a creamy, spicy sauce, it becomes completely irresistible. These Bang Bang Salmon Bites Bowls are perfect for busy families, meal prep lovers, or anyone craving a restaurant-style dish made right at home.

Why You’ll Love These Bang Bang Salmon Bites Bowls

There’s a reason this dish is trending in kitchens across America. These Bang Bang Salmon Bites Bowls are:

  • Ready in about 30 minutes

  • Packed with protein and healthy fats

  • Sweet, spicy, and creamy all at once

  • Easy to customize with your favorite toppings

  • Perfect for meal prep

The combination of crispy salmon and bold bang bang sauce creates layers of flavor that make every bite exciting. Plus, serving everything in a bowl makes it feel fresh and modern while keeping cleanup simple.

Ingredients for Bang Bang Salmon Bites Bowls

To make these flavorful bowls, you’ll need:

For the Salmon:

  • 1 ½ pounds fresh salmon, skin removed

  • 1 tablespoon olive oil

  • 1 teaspoon garlic powder

  • 1 teaspoon smoked paprika

  • ½ teaspoon salt

  • ½ teaspoon black pepper

  • 2 tablespoons cornstarch (for crispiness)

For the Bang Bang Sauce:

  • ½ cup mayonnaise

  • 2–3 tablespoons sweet chili sauce

  • 1–2 teaspoons sriracha (adjust to taste)

  • 1 teaspoon honey

  • 1 teaspoon rice vinegar

For the Bowls:

  • Cooked jasmine rice or brown rice

  • Sliced cucumbers

  • Shredded carrots

  • Avocado slices

  • Edamame

  • Green onions

  • Sesame seeds

These ingredients come together to create balanced, satisfying Bang Bang Salmon Bites Bowls with bold flavor and vibrant color.

Ingredient Notes for Maximum Flavor

Choose High-Quality Salmon

Fresh Atlantic or wild-caught salmon works beautifully in this recipe. Look for firm flesh and vibrant color. Pat the salmon dry before seasoning to help it crisp properly.

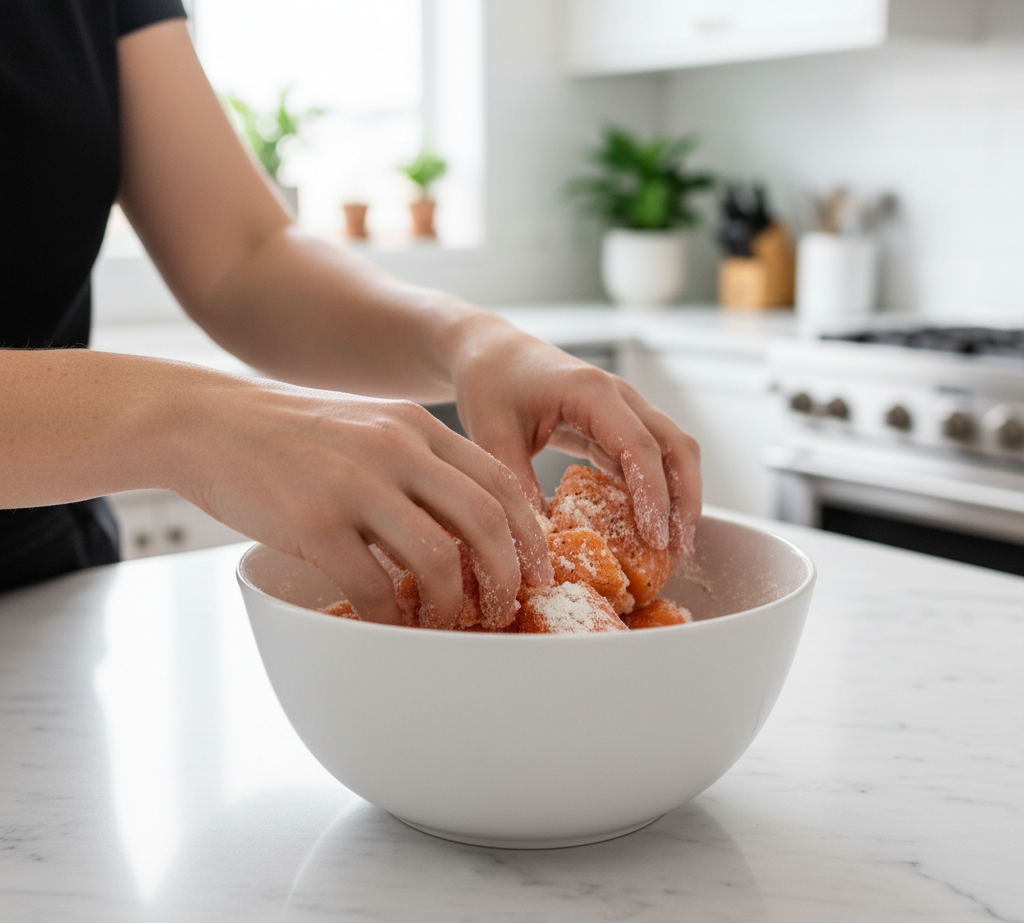
The Secret to Crispy Salmon Bites

A light coating of cornstarch helps create that irresistible golden crust. Don’t skip this step—it makes a big difference in texture.

Adjusting the Heat

Bang bang sauce is meant to have a kick, but you can easily control the spice level by adjusting the amount of sriracha.

Step-by-Step Instructions

1. Prepare the Salmon

Cut the salmon into 1-inch cubes. Pat dry thoroughly. Toss with olive oil, garlic powder, paprika, salt, pepper, and cornstarch until evenly coated.

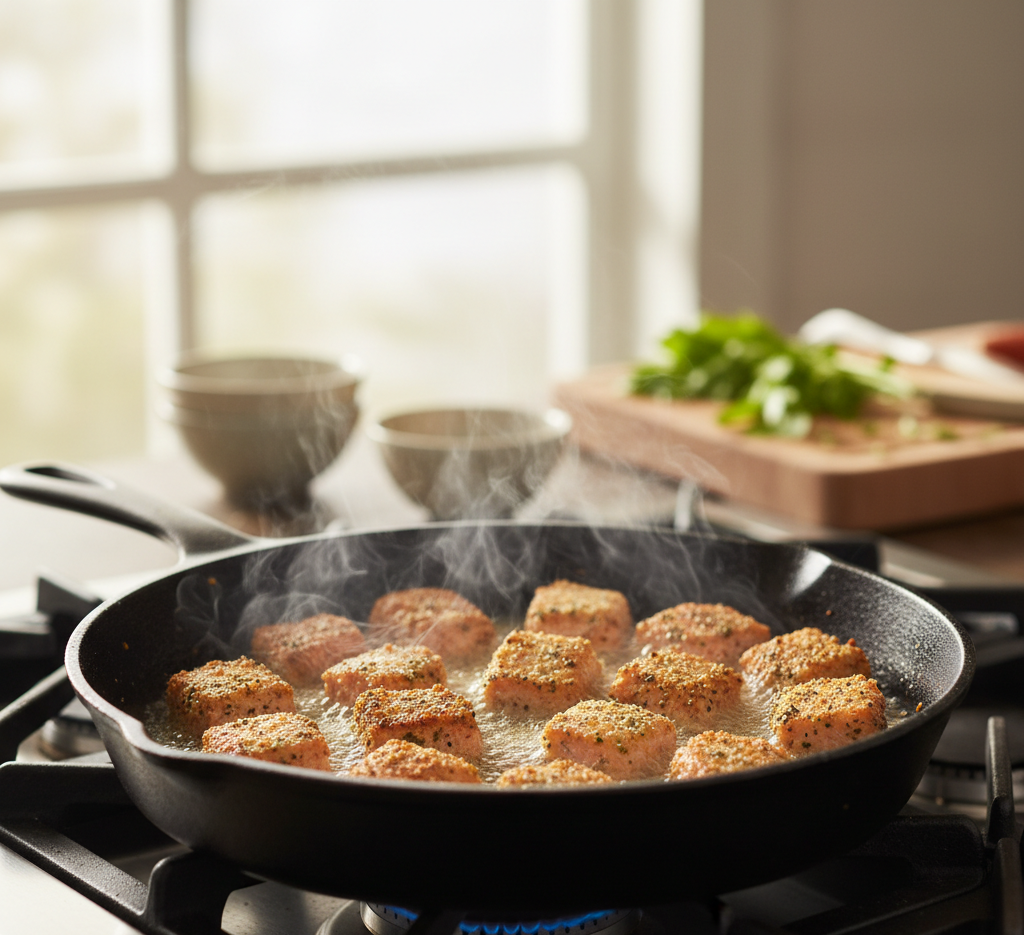
2. Cook the Salmon Bites

Heat a large skillet over medium-high heat. Add a drizzle of oil and arrange salmon pieces in a single layer. Cook for 2–3 minutes per side until golden brown and cooked through.

Alternatively, air fry at 400°F for 8–10 minutes, shaking halfway through.

3. Make the Bang Bang Sauce

In a small bowl, whisk together mayonnaise, sweet chili sauce, sriracha, honey, and rice vinegar until smooth and creamy.

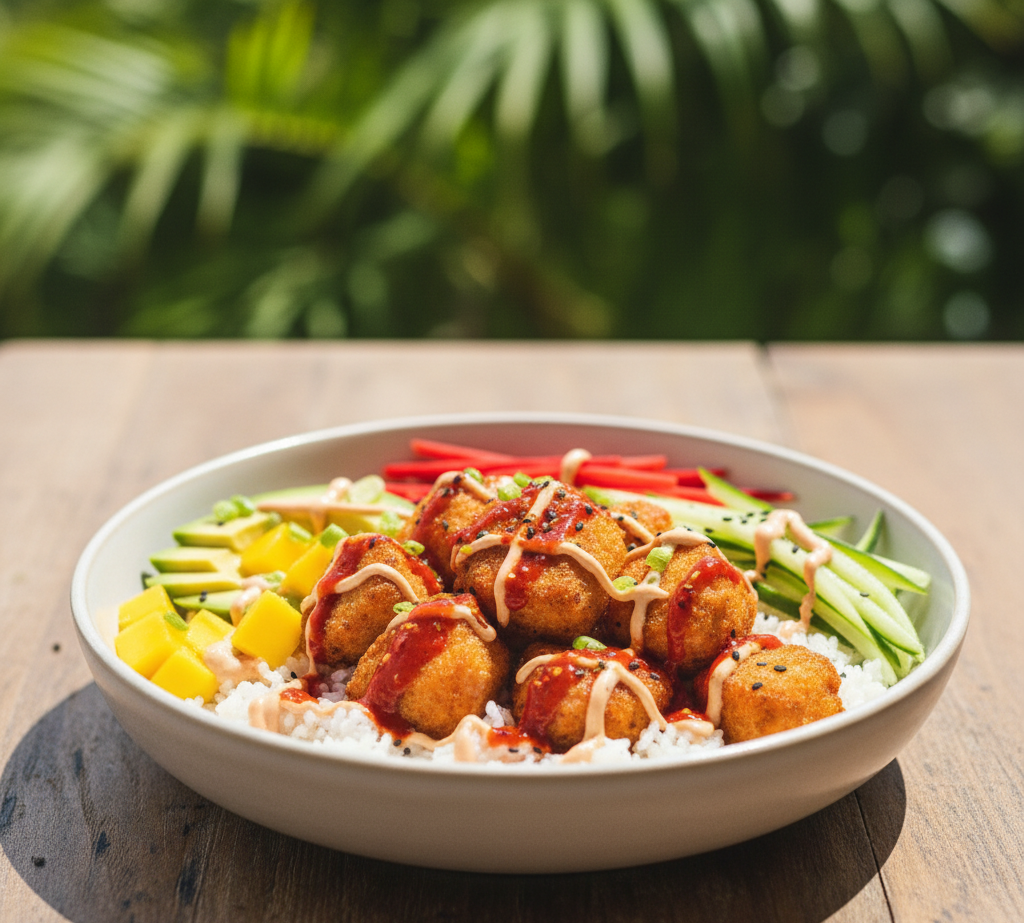
4. Assemble the Bowls

Start with a base of warm rice. Top with crispy salmon bites, fresh vegetables, and a generous drizzle of bang bang sauce. Garnish with green onions and sesame seeds.

Tips for Perfect Bang Bang Salmon Bites Bowls

  • Don’t overcrowd the pan—this ensures crisp edges.

  • Use room-temperature salmon for even cooking.

  • Add sauce just before serving to maintain texture.

  • Balance textures with crunchy and creamy toppings.

These small techniques guarantee your Bang Bang Salmon Bites Bowls turn out perfectly every time.

Delicious Variations

This recipe is incredibly versatile.

Low-Carb Version

Swap rice for cauliflower rice or mixed greens.

Spicy Lover’s Bowl

Add extra sriracha or a drizzle of chili oil.

Tropical Twist

Add fresh mango chunks or pineapple salsa.

Asian-Inspired Upgrade

Drizzle with teriyaki sauce and add pickled ginger.

What to Serve With Bang Bang Salmon Bites Bowls

While these bowls are a complete meal, you can pair them with:

  • Miso soup

  • Seaweed salad

  • Steamed dumplings

  • Iced jasmine tea

These sides complement the sweet-spicy flavors without overpowering them.

Storage & Reheating Tips

Store salmon, rice, and toppings separately in airtight containers for up to 3 days.

To reheat:

  • Warm salmon gently in a skillet or air fryer.

  • Avoid microwaving too long to prevent drying out.

  • Add fresh sauce and toppings after reheating.

These bowls are excellent for meal prep, making weekday lunches easy and delicious.

Common Mistakes to Avoid

  • Skipping the cornstarch – Results in less crispy salmon.

  • Overcooking the salmon – It should be flaky but moist.

  • Adding sauce too early – Makes salmon soggy.

  • Under-seasoning the rice – A pinch of salt enhances flavor.

Attention to these details ensures your Bang Bang Salmon Bites Bowls taste restaurant-quality.

Frequently Asked Questions

1. Can I bake the salmon instead?

Yes, bake at 400°F for 10–12 minutes until cooked through.

2. Is bang bang sauce very spicy?

It has mild heat, but you can adjust the sriracha to your preference.

3. Can I use frozen salmon?

Yes, just thaw completely and pat dry before seasoning.

4. Are these bowls healthy?

Absolutely. They’re rich in protein, omega-3 fatty acids, and fresh vegetables.

5. Can I make this dairy-free?

Yes, the recipe is naturally dairy-free as written.

Final Thoughts

These Bang Bang Salmon Bites Bowls are everything you want in a modern dinner—bold, colorful, nutritious, and incredibly satisfying. With crispy salmon, creamy spicy sauce, and fresh toppings layered over rice, every bite delivers flavor and texture in perfect harmony.

Whether you’re cooking for your family, meal prepping for the week, or simply craving something exciting and wholesome, this recipe is guaranteed to impress. Once you try these Bang Bang Salmon Bites Bowls, they’ll quickly earn a permanent spot in your dinner rotation.

Happy cooking!

Dumpling Ramen Bowl

If you’re craving something warm, comforting, and deeply satisfying, this Dumpling Ramen Bowl is about to become your new obsession. Imagine tender dumplings nestled in a rich, savory broth with slurp-worthy ramen noodles and fresh, vibrant toppings. It’s the perfect fusion of two comfort food favorites—dumplings and ramen—all in one irresistible bowl.

As a food blogger who loves creating bold, approachable recipes for busy home cooks, I can confidently say this dumpling ramen bowl hits every note. It’s cozy enough for a chilly evening, quick enough for a weeknight dinner, and impressive enough to serve guests. Best of all, it’s highly customizable, making it easy to tailor to your taste preferences or what you already have in the fridge.

Why You’ll Love This Dumpling Ramen Bowl

There are plenty of ramen recipes out there, but this dumpling ramen bowl stands out for several reasons:

  • Quick and easy – Ready in about 30 minutes

  • Deep, savory flavor from a rich homemade broth

  • Hearty and filling thanks to the dumplings

  • Customizable toppings for endless variations

  • Perfect comfort food for any season

Combining dumplings and ramen creates a complete, balanced meal in one bowl—carbs, protein, and vegetables all working together in harmony.

Ingredients for the Perfect Dumpling Ramen Bowl

Here’s what you’ll need to make this flavorful bowl:

  • 4 cups chicken or vegetable broth

  • 2 packs ramen noodles (discard seasoning packets)

  • 12–16 frozen or fresh dumplings (pork, chicken, or veggie)

  • 1 tablespoon soy sauce

  • 1 tablespoon miso paste (optional but recommended)

  • 1 teaspoon sesame oil

  • 2 cloves garlic, minced

  • 1 teaspoon freshly grated ginger

  • 1 cup baby spinach or bok choy

  • 2 soft-boiled eggs

  • Sliced green onions

  • Sesame seeds

  • Chili oil (optional)

These simple ingredients come together to create a restaurant-quality dumpling ramen bowl right in your own kitchen.

Ingredient Notes and Substitutions

Choosing the Dumplings

Frozen dumplings work beautifully in this dumpling ramen bowl, making it a convenient weeknight option. Look for high-quality potstickers or gyoza at your local grocery store. Homemade dumplings are fantastic if you have the time.

Upgrade the Broth

The broth is the heart of any ramen bowl. While boxed broth works well, enhancing it with garlic, ginger, soy sauce, and miso paste adds incredible depth and umami flavor.

Noodle Options

Traditional ramen noodles are ideal, but you can substitute:

  • Rice noodles for a gluten-free version

  • Whole wheat ramen for added fiber

  • Fresh ramen from the refrigerated section for extra texture

Step-by-Step Instructions

1. Build the Broth

In a large pot over medium heat, add a drizzle of sesame oil. Sauté garlic and ginger for about 30 seconds until fragrant. Pour in the broth, soy sauce, and miso paste. Bring to a gentle simmer and let the flavors meld for 5–7 minutes.

2. Cook the Dumplings

Add dumplings directly to the simmering broth. Cook according to package instructions, usually 4–6 minutes, until heated through and tender.

3. Add the Noodles and Greens

Add ramen noodles and cook for 2–3 minutes until just tender. Stir in spinach or bok choy during the final minute so they wilt but stay vibrant.

4. Assemble the Bowl

Divide noodles, dumplings, and broth into serving bowls. Top with halved soft-boiled eggs, green onions, sesame seeds, and chili oil if desired.

Tips for Perfect Dumpling Ramen Bowl

  • Don’t overcook the noodles—they should be tender but slightly firm.

  • Taste and adjust seasoning before serving.

  • Use fresh toppings to add brightness and texture contrast.

  • Serve immediately for best texture and flavor.

A great dumpling ramen bowl balances rich broth with fresh, crisp toppings.

Delicious Variations

One of the best parts about this dumpling ramen bowl is how versatile it is.

Spicy Dumpling Ramen Bowl

Add chili paste or sriracha to the broth for heat.

Creamy Version

Stir in a splash of coconut milk for a creamy twist.

Protein Boost

Add shredded chicken, sliced beef, or tofu cubes for extra protein.

Vegetarian Option

Use vegetable broth and veggie dumplings for a plant-based meal.

What to Serve With Dumpling Ramen Bowl

While this bowl is a complete meal, you can pair it with:

  • Asian cucumber salad

  • Steamed edamame

  • Spring rolls

  • Seaweed salad

  • Iced green tea

These sides complement the flavors without overpowering the dish.

Storage & Reheating Tips

If you anticipate leftovers, store components separately:

  • Broth and dumplings in one container

  • Noodles in another

  • Toppings separately

Reheat broth gently on the stovetop and add noodles just before serving. This prevents soggy noodles and maintains the integrity of your dumpling ramen bowl.

For best results, enjoy within 2–3 days.

Common Mistakes to Avoid

  • Overcooking dumplings – They can fall apart in the broth.

  • Using bland broth – Always season properly.

  • Letting noodles sit too long – They absorb too much liquid.

  • Skipping toppings – Garnishes add flavor and visual appeal.

Paying attention to these details ensures your ramen bowl tastes fresh and balanced.

Frequently Asked Questions

1. Can I use instant ramen packets?

Yes, just discard the seasoning packet and use the noodles only.

2. What type of dumplings work best?

Pork or chicken dumplings offer rich flavor, but veggie dumplings are excellent too.

3. Can I make this ahead of time?

You can prepare the broth in advance, but cook noodles fresh for best texture.

4. How do I make a soft-boiled egg?

Boil eggs for 6–7 minutes, then transfer to an ice bath before peeling.

5. Is this dumpling ramen bowl spicy?

Not by default. Add chili oil or hot sauce if you prefer heat.

Final Thoughts

This Dumpling Ramen Bowl delivers everything you want in a cozy meal—savory broth, tender dumplings, satisfying noodles, and vibrant toppings. It’s quick enough for a busy weeknight yet impressive enough to serve guests.

Once you master this recipe, you’ll find yourself making it again and again, experimenting with different dumplings, broths, and garnishes. It’s comfort food with personality—and every spoonful is pure satisfaction.

Grab your chopsticks and enjoy!

Banana Bread Brownies: A Sweet Twist Every Banana Lover Craves

If you’ve ever stared at overripe bananas on your counter and thought, “Not another loaf of banana bread,” then you’re in for a treat. These Banana Bread Brownies are the ultimate dessert mashup—combining the moist, comforting flavor of banana bread with the soft, chewy texture of classic brownies. It’s the sweet twist every banana lover craves.

As a longtime home baker and food blogger, I love reinventing classics in ways that feel both nostalgic and exciting. This banana bread brownies recipe delivers big banana flavor, a tender crumb, and a luscious frosting that takes them completely over the top. They’re perfect for potlucks, bake sales, family gatherings, or just a cozy weekend baking project.

Why You’ll Love These Banana Bread Brownies

There’s a reason this recipe keeps people coming back for seconds. These banana bread brownies are:

  • Ultra-moist and tender

  • Packed with real banana flavor

  • Easy to make in one bowl

  • Perfect for using overripe bananas

  • Crowd-pleasing and freezer-friendly

Unlike traditional brownies, these bars are lighter in texture but still rich and satisfying. Think of them as the softest banana snack cake crossed with a dessert bar—sweet, comforting, and completely irresistible.

Ingredients for Banana Bread Brownies

To make this banana bread brownies recipe, you’ll need simple pantry staples:

  • 1/2 cup unsalted butter, melted

  • 1 cup granulated sugar

  • 2 large eggs

  • 3 ripe bananas, mashed

  • 1 teaspoon vanilla extract

  • 1 1/2 cups all-purpose flour

  • 1 teaspoon baking soda

  • 1/2 teaspoon salt

  • 1/2 cup sour cream (or Greek yogurt)

Optional Brown Butter Frosting:

  • 1/4 cup unsalted butter

  • 2 cups powdered sugar

  • 1 1/2 tablespoons milk

  • 1/2 teaspoon vanilla extract

These ingredients create soft banana brownies with a melt-in-your-mouth texture and rich flavor.

Ingredient Notes for Best Results

Use Very Ripe Bananas

The darker and spottier your bananas, the better. Overripe bananas are sweeter, softer, and more flavorful—perfect for banana bread brownies. If your bananas aren’t ripe enough, you can bake them (in their peels) at 300°F for 15–20 minutes to soften and sweeten.

Don’t Skip the Sour Cream

Sour cream adds moisture and tenderness to the batter. It also gives these banana dessert bars a subtle richness that balances the sweetness beautifully.

Brown Butter Makes a Difference

If you choose to frost your banana bread brownies, browning the butter adds a nutty, caramel-like depth that takes the flavor to bakery-level quality.

Step-by-Step Instructions

1. Prepare the Batter

Preheat your oven to 350°F and grease a 9×13-inch baking pan.

In a large bowl, whisk together melted butter and sugar until smooth. Add eggs, mashed bananas, sour cream, and vanilla. Stir until fully combined.

2. Add Dry Ingredients

Sprinkle flour, baking soda, and salt over the wet mixture. Gently fold everything together just until combined. Avoid overmixing, which can make the brownies dense.

Pour the batter into your prepared pan and spread evenly.

3. Bake to Perfection

Bake for 22–28 minutes, or until a toothpick inserted into the center comes out clean or with just a few moist crumbs. Do not overbake—these banana bread brownies should stay soft and tender.

Let cool completely before frosting.

4. Make the Brown Butter Frosting (Optional but Recommended)

In a small saucepan, melt butter over medium heat. Continue cooking until it turns golden brown and smells nutty. Remove from heat and whisk in powdered sugar, milk, and vanilla until smooth.

Spread frosting over cooled banana brownies and let set before slicing.

Tips for Perfect Banana Bread Brownies

  • Measure flour correctly by spooning and leveling to avoid dense bars.

  • Use room-temperature eggs for smoother batter.

  • Line the pan with parchment paper for easy removal.

  • Cool completely before frosting to prevent melting.

These small steps ensure your banana bread brownies turn out bakery-perfect every time.

Delicious Variations

This banana bread brownies recipe is wonderfully adaptable.

Add Chocolate Chips

Fold 1/2 cup semi-sweet chocolate chips into the batter for extra indulgence.

Add Nuts

Chopped walnuts or pecans add crunch and classic banana bread flavor.

Make It Cinnamon-Spiced

Add 1/2 teaspoon cinnamon and a pinch of nutmeg for warm spice notes.

Cream Cheese Frosting Option

Swap the brown butter frosting for tangy cream cheese frosting if you prefer a richer topping.

What to Serve With Banana Bread Brownies

These banana dessert bars pair beautifully with:

  • A hot cup of coffee

  • Cold milk

  • Vanilla ice cream

  • Salted caramel drizzle

  • Fresh berries

They’re perfect as an afternoon snack, after-dinner dessert, or brunch treat.

Storage & Freezing Tips

Store banana bread brownies in an airtight container at room temperature for up to 3 days, or refrigerate for up to 5 days.

To freeze:

  • Wrap individual squares tightly in plastic wrap.

  • Store in freezer-safe bags for up to 3 months.

  • Thaw at room temperature before serving.

These bars maintain their moisture beautifully, making them ideal for meal prep or advance baking.

Common Mistakes to Avoid

  • Using underripe bananas – Results in bland flavor.

  • Overmixing the batter – Can make brownies tough.

  • Overbaking – Leads to dry texture.

  • Frosting while warm – Causes runny topping.

Pay attention to these details for soft, moist banana bread brownies every time.

Frequently Asked Questions

1. Are banana bread brownies the same as banana cake?

Not exactly. Banana bread brownies are denser and more bar-like than cake, with a chewy yet soft texture.

2. Can I make these gluten-free?

Yes, substitute a 1:1 gluten-free flour blend for the all-purpose flour.

3. Can I reduce the sugar?

You can slightly reduce the sugar by 1/4 cup, but keep in mind it may affect texture and moisture.

4. Do I have to frost them?

No, but frosting elevates the flavor. They’re still delicious plain or dusted with powdered sugar.

5. How do I know when they’re done baking?

A toothpick should come out clean or with a few moist crumbs—never wet batter.

Final Thoughts

These Banana Bread Brownies are proof that simple ingredients can create something truly special. Soft, moist, and packed with banana flavor, they’re the perfect solution for overripe bananas and sweet cravings alike.

Whether you keep them classic, load them with chocolate chips, or top them with luscious brown butter frosting, this banana bread brownies recipe is guaranteed to become a repeat favorite in your kitchen. Bake a batch once, and you’ll understand exactly why this sweet twist is every banana lover’s dream.

Happy baking!

Baked Parmesan Zucchini Gratin Recipe

If you’re looking for a simple, flavorful way to use up fresh zucchini, this Baked Parmesan Zucchini Gratin Recipe is about to become your new go-to side dish. With tender slices of zucchini layered in a creamy, cheesy sauce and topped with golden, bubbling Parmesan, this recipe delivers comfort food vibes while still feeling light and fresh.

As a food blogger who tests vegetable-forward recipes year-round, I can confidently say this zucchini gratin hits the perfect balance between indulgent and wholesome. It’s elegant enough for a holiday table, yet easy enough for a weeknight dinner. Whether you’re serving grilled chicken, steak, or a vegetarian main, this baked zucchini gratin complements almost any meal beautifully.

Why You’ll Love This Baked Parmesan Zucchini Gratin Recipe

There are countless zucchini recipes out there, but this one truly stands out. Here’s why:

  • Incredibly flavorful thanks to real Parmesan cheese

  • Low-carb and gluten-free friendly (with easy swaps)

  • Perfect way to use summer zucchini

  • Family-approved comfort food

  • Easy prep with simple pantry ingredients

Unlike watery zucchini casseroles, this baked Parmesan zucchini gratin is carefully layered and baked to tender perfection without becoming soggy. The result is creamy, cheesy, and lightly crisp on top.

Ingredients for the Perfect Zucchini Gratin

To make this Baked Parmesan Zucchini Gratin Recipe, you’ll need:

  • 3–4 medium zucchini, thinly sliced

  • 1 cup heavy cream

  • 1/2 cup whole milk

  • 1 cup freshly grated Parmesan cheese

  • 1/2 cup shredded mozzarella (optional but recommended)

  • 2 cloves garlic, minced

  • 1 tablespoon butter

  • 1 tablespoon olive oil

  • Salt and freshly ground black pepper

  • 1/2 teaspoon dried thyme (or Italian seasoning)

  • 1/4 cup breadcrumbs (optional for topping)

  • Fresh parsley for garnish

These ingredients combine to create a creamy zucchini bake that feels luxurious without being overly heavy.

Ingredient Notes for Best Results

Choose Firm, Fresh Zucchini

Look for zucchini that are medium-sized and firm to the touch. Overly large zucchini tend to have excess moisture and larger seeds, which can make your baked zucchini gratin watery.

Use Freshly Grated Parmesan

Pre-shredded cheese often contains anti-caking agents that prevent smooth melting. For the best flavor and texture in your Baked Parmesan Zucchini Gratin Recipe, grate Parmesan fresh from the block.

Cream vs. Half-and-Half

Heavy cream creates a rich, silky sauce. If you want to lighten things up slightly, substitute half-and-half—but avoid low-fat milk, which may cause the sauce to separate.

Step-by-Step Instructions

1. Prep the Zucchini

Preheat your oven to 375°F. Lightly grease a baking dish with butter.

Slice zucchini into 1/8-inch rounds. For extra insurance against excess moisture, lightly salt the slices and let them sit for 15–20 minutes. Pat dry with paper towels.

2. Build the Cream Sauce

In a saucepan over medium heat, add olive oil and sauté minced garlic until fragrant (about 30 seconds). Stir in cream, milk, thyme, salt, and pepper. Let simmer gently for 3–4 minutes.

Remove from heat and stir in half of the Parmesan cheese.

3. Layer the Gratin

Arrange a layer of zucchini slices in the baking dish. Spoon some cream mixture over the top. Repeat layers until all zucchini is used.

Top with remaining Parmesan, mozzarella, and breadcrumbs if using.

4. Bake to Golden Perfection

Bake uncovered for 35–40 minutes, or until the zucchini is tender and the top is golden brown and bubbling.

Let rest for 10 minutes before serving. This helps the sauce thicken and settle.

Tips for Perfect Baked Parmesan Zucchini Gratin

  • Slice evenly to ensure uniform cooking.

  • Don’t skip salting if your zucchini are extra juicy.

  • Broil for 2–3 minutes at the end for a crispier top.

  • Let it rest before serving to avoid a runny texture.

These small details elevate this zucchini gratin recipe from good to restaurant-quality.

Delicious Variations

One of the best things about this Baked Parmesan Zucchini Gratin Recipe is how adaptable it is.

Add Protein

Layer in cooked shredded chicken or crispy bacon for a heartier dish.

Make It Spicy

Add a pinch of red pepper flakes to the cream sauce.

Swap the Cheese

Try Gruyère for a nutty flavor or sharp white cheddar for boldness.

Add More Veggies

Thinly sliced yellow squash pairs beautifully with zucchini in this gratin.

hat to Serve With Zucchini Gratin

This baked zucchini gratin pairs wonderfully with:

  • Grilled steak

  • Roasted chicken

  • Baked salmon

  • Holiday turkey

  • Simple green salad

It also works beautifully as part of a vegetarian dinner spread alongside crusty bread and a hearty lentil dish.

Storage & Reheating Tips

Store leftover Baked Parmesan Zucchini Gratin in an airtight container in the refrigerator for up to 4 days.

To reheat:

  • Warm in a 350°F oven for 15–20 minutes.

  • Cover loosely with foil to prevent over-browning.

  • Avoid microwaving if possible, as it can make the zucchini watery.

You can also freeze it, though texture may soften slightly upon thawing.

Common Mistakes to Avoid

  • Skipping the moisture removal step – Leads to watery gratin.

  • Overbaking – Zucchini can turn mushy if cooked too long.

  • Using too much liquid – Stick to measured amounts.

  • Not resting before slicing – Sauce needs time to thicken.

Avoiding these common pitfalls ensures your baked zucchini casserole turns out creamy and perfectly textured every time.

Frequently Asked Questions

1. Can I make this Baked Parmesan Zucchini Gratin Recipe ahead of time?

Yes! Assemble it up to 24 hours in advance, cover, and refrigerate. Bake just before serving.

2. Is this zucchini gratin low carb?

Yes, it’s naturally low in carbohydrates. Skip breadcrumbs to make it keto-friendly.

3. How do I prevent watery zucchini gratin?

Salt the zucchini first and avoid overcrowding the dish. Proper resting time also helps.

4. Can I use frozen zucchini?

Fresh zucchini is strongly recommended. Frozen zucchini releases too much water when baked.

5. What size baking dish works best?

An 8×8-inch or similar 2-quart baking dish works perfectly for this recipe.

Final Thoughts

This Baked Parmesan Zucchini Gratin Recipe proves that simple vegetables can become show-stopping side dishes with just a little care and the right ingredients. Creamy, cheesy, and beautifully golden, this dish celebrates zucchini in the most delicious way possible.

Whether you’re cooking for your family on a busy weeknight or preparing a holiday spread, this baked zucchini gratin delivers reliable, crowd-pleasing results. Keep this recipe in your back pocket during zucchini season—you’ll find yourself making it again and again.

Happy cooking!

Crafting Crockpot French Dip Sandwiches: A Trailside Feast Guide

There’s something deeply satisfying about biting into a warm, juicy sandwich filled with tender beef and dipped into rich, savory au jus. These Crockpot French Dip Sandwiches bring comfort food to a whole new level—whether you’re feeding a hungry family at home or preparing a hearty trailside feast after a long outdoor adventure.

As a food blogger who believes slow cooking is one of the greatest kitchen hacks ever invented, I can confidently say this recipe is a game changer. The crockpot does the heavy lifting, transforming a simple beef roast into melt-in-your-mouth perfection. The result? Restaurant-quality French dip sandwiches made right in your kitchen with minimal effort and maximum flavor.

Why You’ll Love These Crockpot French Dip Sandwiches

There are countless reasons to fall in love with this recipe:

  • Effortless slow cooking – Set it and forget it.

  • Ultra-tender beef – The crockpot breaks down the meat perfectly.

  • Rich homemade au jus – Deep, savory flavor in every dip.

  • Perfect for gatherings or camping trips

  • Family-friendly and customizable

Unlike stovetop versions, crockpot French dip sandwiches develop deep flavor over hours of slow cooking. That extended cook time infuses every bite with beefy richness and aromatic herbs.

Ingredients for Crockpot French Dip Sandwiches

To make the best slow cooker French dip sandwiches, you’ll need:

  • 3–4 lb chuck roast

  • 1 large onion, thinly sliced

  • 3 cups low-sodium beef broth

  • 1 tablespoon Worcestershire sauce

  • 1 tablespoon soy sauce

  • 3–4 cloves garlic, minced

  • 1 teaspoon dried thyme

  • 1 teaspoon dried rosemary

  • Salt and black pepper to taste

  • 6–8 hoagie rolls or French rolls

  • 8 slices provolone cheese (optional but recommended)

These simple pantry ingredients come together to create bold, comforting flavor that tastes like it simmered in a gourmet kitchen all day.

Ingredient Notes for Maximum Flavor

Choosing the Right Cut of Beef

Chuck roast is ideal for Crockpot French Dip Sandwiches because it has enough marbling to become tender and juicy during slow cooking. Avoid lean cuts—they’ll dry out and won’t shred properly.

Bread Matters

Choose sturdy hoagie rolls or crusty French rolls that can hold up to dipping. Soft sandwich bread will fall apart quickly in the au jus.

Boosting the Au Jus

For deeper flavor, you can add:

  • A splash of red wine

  • A bay leaf

  • A teaspoon of beef bouillon paste

These small additions elevate your homemade au jus from good to unforgettable.

Step-by-Step Instructions

1. Prepare the Roast

Season the chuck roast generously with salt and pepper. For extra depth, sear it in a hot skillet for 2–3 minutes per side before placing it in the crockpot.

2. Build the Flavor Base

Place sliced onions and garlic at the bottom of the slow cooker. Add the roast on top. Pour in beef broth, Worcestershire sauce, soy sauce, thyme, and rosemary.

3. Slow Cook to Perfection

Cook on LOW for 8 hours or HIGH for 4–5 hours. The beef should shred effortlessly with a fork.

4. Shred and Assemble

Remove the roast and shred it. Return the meat to the crockpot to soak up the flavorful juices.

Split the rolls, add generous portions of beef, top with provolone cheese, and broil for 2–3 minutes until melted.

Tips for Perfect Crockpot French Dip Sandwiches

  • Don’t rush the cooking time. Low and slow yields the most tender beef.

  • Skim excess fat from the au jus before serving.

  • Toast the rolls lightly before adding beef to prevent sogginess.

  • Use freshly shredded cheese for smoother melting.

These small details truly elevate your slow cooker French dip sandwiches from basic to bakery-quality.

Delicious Variations

Want to customize your Crockpot French Dip Sandwiches? Try these ideas:

Spicy French Dip

Add sliced pepperoncini or red pepper flakes.

Garlic Butter Rolls

Brush rolls with garlic butter before toasting.

Mushroom Lover’s Version

Add sautéed mushrooms to the crockpot during the last hour.

Trailside Camp Version

Prepare the beef at home and store it in a sealed container. Reheat over a camp stove and assemble sandwiches fresh at your campsite.

What to Serve with Crockpot French Dip Sandwiches

Round out your meal with:

  • Crispy French fries

  • Sweet potato wedges

  • Coleslaw

  • Simple green salad

  • Roasted vegetables

  • Pickles or giardiniera

For a trailside feast, pair with kettle chips and a refreshing iced tea.

Storage & Reheating Tips

Store leftover beef and au jus separately in airtight containers in the refrigerator for up to 4 days.

To reheat:

  • Warm beef gently in a saucepan with some au jus.

  • Avoid microwaving too long—it can dry out the meat.

  • Freeze for up to 3 months for meal prep convenience.

Proper storage ensures your Crockpot French Dip Sandwiches taste just as good the next day.

Common Mistakes to Avoid

  • Using too little liquid – The beef needs enough broth to stay juicy.

  • Overcooking on high heat – Can lead to stringy texture.

  • Skipping seasoning – Proper salt levels enhance the au jus.

  • Not shredding finely enough – Smaller shreds absorb more flavor.

Attention to detail makes all the difference in slow cooker recipes.

Frequently Asked Questions

1. Can I use a different cut of beef?

Yes, rump roast or brisket can work, but chuck roast gives the most tender results for Crockpot French dip sandwiches.

2. Can I make this recipe ahead of time?

Absolutely. The flavor actually improves after sitting overnight in the au jus.

3. Is provolone required?

No, traditional French dip sandwiches sometimes skip cheese. However, melted provolone adds rich creaminess.

4. How do I thicken the au jus?

French dip au jus is traditionally thin. If desired, whisk 1 tablespoon cornstarch with water and simmer until slightly thickened.

5. Can I cook this overnight?

Yes, cooking on LOW for 8 hours overnight works perfectly—just ensure your crockpot is in good working condition.

Final Thoughts

These Crockpot French Dip Sandwiches are the definition of comfort food made simple. With minimal prep, affordable ingredients, and bold slow-cooked flavor, they’re perfect for weeknight dinners, game-day spreads, or a hearty trailside feast.

The beauty of this recipe lies in its versatility. Whether you’re serving it at your family table or warming up after an outdoor adventure, this slow cooker French dip sandwich recipe delivers every time. Tender beef, crusty bread, and rich au jus—what more could you ask for?

Once you try this method, you’ll never go back to complicated versions again. Happy cooking!